Table of Contents
Advertisement
Advertisement
Table of Contents

Related Manuals for Avid Technology Fast Track C400


Summary of Contents for Avid Technology Fast Track C400
-
Page 1: User Guide
® ™ Fast Track C400 User Guide... - Page 2 Avid. Avid, the Avid logo, Fast Track, M-Audio and Pro Tools are either trademarks or registered trademarks of Avid Technology, Inc. All other trademarks contained herein are the property of their respective owners.
-
Page 3: Table Of Contents
Connecting Instruments to the Fast Track C400 ........ - Page 4 Check the Fast Track C400 Drivers ........
-
Page 5: Chapter 1. Welcome To Fast Track C400
• Independent gain controls and level meters Fast Track C400 is a 4-input, 6-output audio in- for each analog input channel terface that connects to your computer through USB 2.0. The interface features high-quality an- •... -
Page 6: System Requirements And Compatibility
The Avid website (www.avid.com) is your best online source for information to help you get the most out of your Fast Track C400. The fol- lowing are just a few of the services and features available. Product Registration Register your purchase online at www.avid.com/support. -
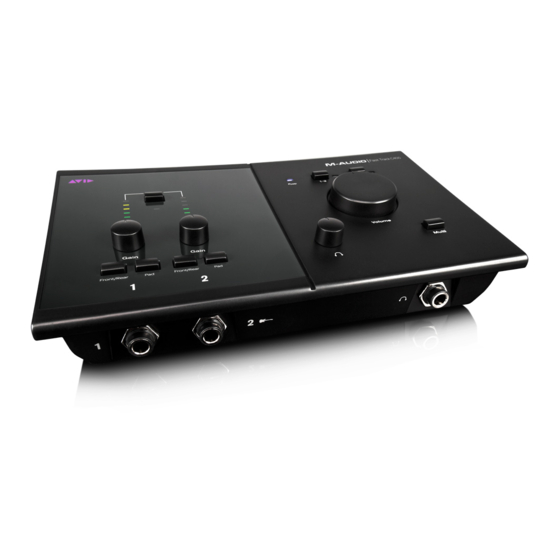
Page 7: Chapter 2. Fast Track C400 Hardware Overview
2 Fast Track C400 Hardware Overview Fast Track C400 Top Panel Features Figure 1 identifies the controls, indicators on the Fast Track C400 top panel. Power LED Output Selector Input Meters Volume Knob Gain Multi Button Input Selector Headphone Volume Figure 1. - Page 8 Phantom power is activated by the switch la- to check a mix between multiple sets of speakers beled 48V on the top panel of Fast Track C400. to ensure good “translation” of that mix on The LED, when lit, indicates that 48V phantom large and small speakers.
-
Page 9: Volume Knob
Headphone Volume This knob adjusts the output level of the head- phone output. The headphone output always mirrors line outputs 1-2. Chapter 2: Fast Track C400 Hardware Overview... -
Page 10: Fast Track C400 Back Panel Features
Fast Track C400 Back Panel Features Figure 2 identifies each port on the back panel of the Fast Track C400. Kensington Lock Connector USB Port S/PDIF Monitor Mic/Line MIDI I/O Outputs Digital I/O Inputs Figure 2. Fast Track C400 back panel... - Page 11 The input source (back panel Mic/Line, or front panel Instrument) is chosen using the corre- sponding Front/Rear Input button for each channel. Kensington®Lock Connector This connector is compatible with standard lap- top-style Kensington® security cables for theft prevention. Chapter 2: Fast Track C400 Hardware Overview...
-
Page 12: Fast Track C400 Front Panel Features
Fast Track C400 Front Panel Features Figure 3 identifies each port on the front panel of the Fast Track C400. Headphone Output Instrument Inputs Figure 3. Fast Track C400 front panel The Fast Track C400 front panel provides the Headphone Output... -
Page 13: Chapter 3. Fast Track C400 Installation
If you do not have internet access, locate the installer found To install the Fast Track C400 driver: on the Fast Track C400 disc, and proceed to the Make sure Fast Track C400 is not connected to next step. - Page 14 Click “In- stall” to continue the installation. Once the installation is complete and your computer has been restarted, connect your Fast Track C400 to an available USB port on your computer. Fast Track C400 User Guide...
-
Page 15: Chapter 4. Hardware Connections
Home stereo systems often use RCA connec- tors. You can use adaptors or a cable to con- On the front panel of the Fast Track C400 is a vert from the Line Output connectors on 1/4-inch jack to connect headphones. The vol-... -
Page 16: Connecting Audio Inputs
(the Mic and Line are on a single, combo jack): This section describes the analog inputs avail- Mic For XLR microphone cables. able on Fast Track C400. For information about Line (TRS) For 1/4-inch Tip-Ring-Sleeve cables connecting specific audio sources, see “Con- from keyboards, mixers, and other line-level necting a Microphone”... -
Page 17: Connecting A Microphone
If you are not sure about the phantom Plug your microphone cable into one of the power requirements for your microphone, refer Mic/Line inputs on the back of Fast Track C400. to your microphone’s documentation or con- tact the manufacturer. -
Page 18: Connecting Instruments To The Fast Track C400
Fast Track C400 press the Phantom Power switch (labeled 48V) on the front of the Fast Track C400. This switch Fast Track C400 provides two input types (DI sends 48V to both mic inputs. The 48V LED on... - Page 19 LEDs. The red “clip” LED (at the top of On the top panel of the Fast Track C400, begin the meters) should not illuminate as this means by turning the Gain knob fully counter-clock- your signals have overloaded the converters.
-
Page 20: Midi Connections
4 inputs and 6 out- puts simultaneously. MIDI Connections The two MIDI ports on Fast Track C400 let you Connecting Digital Devices take advantage of MIDI features within your re- cording application, including recording and To connect a S/PDIF device to Fast Track C400: editing MIDI tracks. - Page 21 Monitoring MIDI Instruments with Fast Track C400 If you have a MIDI instrument that has analog outputs, you can connect it to Fast Track C400 to monitor or record its output. To connect your MIDI instrument for monitoring in your recording software: Connect the MIDI instrument’s audio outputs...
-
Page 22: Chapter 5. The Driver Control Panel
> System Preferences), then click support CoreAudio Drivers (Mac) or ASIO Audio Fast Track C400. (You can also open the Driver Drivers (Windows). Control Panel from the Applications menu.) Several features of Fast Track C400 can be ac- –... -
Page 23: Presets
C400 Settings files, which contain all settings of but does not provide access to the stereo mixers. the Fast Track C400 Driver Control Panel. This is useful if you'd like to save various configura- tions so that you do not have to manually re- configure your system each time you work on a different type of project. -
Page 24: Additional Functions
• About Setup Setup is where you define the hardware settings of the Fast Track C400. Think of Setup as a quick way to customize Fast Track C400 behavior. For Fast Track C400 Driver Control Panel example, you can set buffer size, sample rate, (Vertical (Meters only) shown) and clock source. - Page 25 This feature gives Fast Track C400 a great deal of aging your equipment (or hearing). If you flexibility in how it can be used. For example,...
- Page 26 Fast Track C400 is synchronized. drivers, the sample rate of the interface (and your audio software) is always determined Internal If you are using Fast Track C400 by itself by this drop-down menu. Your selection in (i.e., without other digital devices or an external...
- Page 27 To find your system’s optimum buffer size set- Pre-Fader Meters ting, begin with a high setting and gradually re- When this option is selected, the meters display duce the size until you begin to hear clicks, the level of a signal before it passes the fader. pops, or other audible glitches in your audio.
- Page 28 Clicking the Flow button opens a display show- ing the signal flow from the inputs to the out- puts of Fast Track C400. This is a useful reference for understanding the path of an audio signal flowing through Fast Track C400.
-
Page 29: Monitor Mixes
The monitor mixer features high-resolution me- Monitor Mixes ters to show input channel levels (directly above each channel) and main mixer output levels (at The monitor mixer allows you to create two dif- the top right of the mixer). The pre/post fader ferent stereo mixes from 10 input sources con- metering operation can be set from the Settings sisting of any of the hardware inputs (2 analog... -
Page 30: Using The Monitor Mixer
Mic/Line and Instrument inputs are monitored, coming back from your audio application is as well as the S/PDIF input of Fast Track C400. monitored. Software Returns 1 and 2 will be the Hardware Inputs 1–2 are the analog inputs, and default stereo output from the software. - Page 31 Link The Pan knobs control the position of a chan- The Link buttons connect stereo pairs of knobs nel’s audio signal in the stereo image of the or faders (and also links the corresponding FX monitor mix (double-click the knob to return Send knobs), so that adjusting either channel pan to center).
- Page 32 These This tells you the status of the hardware; if a effects can be customized by using the following properly installed, powered-on Fast Track C400 three controls: is connected to the computer.
-
Page 33: Chapter 6. The Multi Button
Assigning the Multi button to the key command Soft button for each step is achieved by accessing the Multi Button Settings as described in the next section. Fast Track C400 Multi button Chapter 6: The Multi Button... - Page 34 Command+ S (Mac) Command+ S Command+ S (Mac) Ctrl+ S (Windows) Ctrl+ S (Windows) Go to Beginning or Return (Mac) Return “.” Return to Zero Enter (Windows) (Numeric Keypad) Play Spacebar Enter Spacebar (Numeric Keypad) Fast Track C400 User Guide...
-
Page 35: Multi Button Settings
For Mac these are: Multi Button Settings • Control • Command To configure the Multi button, access the Multi Button Settings by launching the Driver Control • Option Panel as described in “To open the Driver Con- • Shift trol Panel ” on page 18. Once the window is For Windows these are: open, click the Setup button in the upper right of the Control panel window, and click the... -
Page 36: Configuring The Multi Button (Building A Macro)
For example, you would need to select the spacebar. You can repeat steps 1 through 3 of these in- structions if you want to build a macro by using as many of the remaining 7 Step buttons as re- quired. Fast Track C400 User Guide... - Page 37 Macro Step Macro Function Start Record Stop or Stop Record Save Go to Beginning or Return to Zero Play If you have configured the Multi button as described above, make sure you disengage the track Record Enable button once you have finished recording.
-
Page 38: Chapter 7. Recording With Fast Track C400
Make sure the Input Gain knobs are turned all erly installed and connected as described in the way down (counter clockwise), on the top Chapter 3, “Fast Track C400 Installation”, and panel. Chapter 4, “Hardware Connections.” Use the Input Selector buttons to select the... - Page 39 Mic/Line input connector for chan- If you are using Input 1 on your Fast Track C400, nel 1 on the back panel of Fast Track C400, then you should select Input 1 for the track in and the right output of your keyboard to your software.
-
Page 40: Recording Instrument Tracks
MIDI connections as described in “MIDI Connections” on page 16. If you are using a USB-based MIDI controller such as an M-Audio Axiom® or Oxygen key- board from Avid, make sure you have properly installed and connected the device as described in the User Guide for that product. -
Page 41: Appendix A. Troubleshooting
Make sure the device is connected via USB at both ends, and that the computer’s USB port is providing sufficient bus power (the blue Power LED on Fast Track C400 should be illu- minated). Make sure your music software is receiving au- dio signal. -
Page 42: Check The Fast Track C400 Drivers
Audio website at www.m-audio.com/drivers. If this does not resolve the issue, check to see Mac OS X if the Fast Track C400 drivers are properly in- • Go to System Preferences > Sound, and se- stalled: lect Fast Track C400 under the Input and Windows Vista and Windows 7 Output tabs. -
Page 43: Before Updating Your System
Please check www.m-audio/support for a com- Register Your System patible driver before installing Microsoft or Ap- ple operating system updates. Register your Fast Track C400 online at: www.m-audio.com/support. Before new device drivers are released, they are tested for use with operating system versions By registering, you become eligible to receive that are available at that time. -
Page 44: Appendix B. Compliance Information
appendix b Compliance Information Proposition 65 Warning Environmental Compliance This product contains chemicals, including lead, known to the State of California to cause cancer and Disposal of Waste Equipment by Users birth defects or other reproductive harm. Wash hands in the European Union after handling. -
Page 45: Emc (Electromagnetic Compliance)
Australian Compliance EMC (Electromagnetic Compliance) N1709 Avid declares that this product complies with the following standards regulating emissions and immunity: • FCC Part 15 Class B • EN 55022 Class B Canadian Compliance • EN 55024 Class B • AS/NZS CISPR 22 Class B •... -
Page 46: Important Safety Instructions
When a cart is used, use caution when moving the cart/equipment combination to avoid injury from tip-over. 13) Unplug this equipment during lightning storms or when unused for long periods of time. Fast Track C400 User Guide... -
Page 47: Appendix C. Warranty
Avid warrants products to be free from defects in materials and workmanship, under normal use and provided that the product is owned by the original, registered user. Visit www.m-audio.com/warranty for terms and limitations applying to your specific product. Appendix C: Warranty... - Page 49 Avid Technical Support (USA) Product Information 5795 Martin Rd. Visit the Online Support Center at For company and product information, Irwindale, CA 91706 USA www.m-audio.com/support visit us on the web at www.avid.com...