Table of Contents
Advertisement
Quick Links
Advertisement
Table of Contents

Related Manuals for Avid Technology Mbox Pro


Summary of Contents for Avid Technology Mbox Pro
- Page 1 ® Mbox Pro User Guide Version 9.0...
- Page 2 Bruno, C|24, Command|8, Control|24, D-Command, D-Control, D-Fi, D-fx, D-Show, D-Verb, DAE, Digi 002, DigiBase, DigiDelivery, Digidesign, Digidesign Audio Engine, Digidesign Intelligent Noise Reduction, Digidesign TDM Bus, DigiDrive, DigiRack, DigiTest, DigiTranslator, DINR, D-Show, DV Toolkit, EditPack, Eleven, EUCON, HD Core, HD Process, Hybrid,...
-
Page 3: Table Of Contents
Connecting Instruments to the Mbox Pro ........ - Page 4 ....47 Configuring Mbox Pro for Third-Party Applications ....... . 47 Configuring the Apple Sound Preferences .
-
Page 5: Chapter 1. Welcome To Mbox Pro
S/PDIF digital audio input and out- Mbox Pro provides up to eight discrete channels put, MIDI and Word Clock I/O, and two front of input and up to eight discrete channels of... - Page 6 96 kHz, 176.4 kHz, and 192 kHz Digital I/O • Two channels of S/PDIF digital input and out- put. S/PDIF inputs are available independent of and in addition to analog inputs 1–6. S/PDIF outputs are always available in Pro Tools Mbox Pro User Guide...
-
Page 7: System Requirements And Compatibility
File > Save Choose Save from the the Pro Tools Installation Guide. File menu Mbox Pro can be also be used with a qualified Control+N Hold down the Control key Mac or Windows computer running any other and press the N key Core Audio- or ASIO-compliant software. -
Page 8: About Www.avid.com
Products and Developers Learn about Avid products; download demo software or learn about our Development Partners and their plug-ins, applications, and hardware. News and Events Get the latest news from Avid or sign up for a Pro Tools demo. Mbox Pro User Guide... -
Page 9: Chapter 2. Mbox Pro Hardware Overview
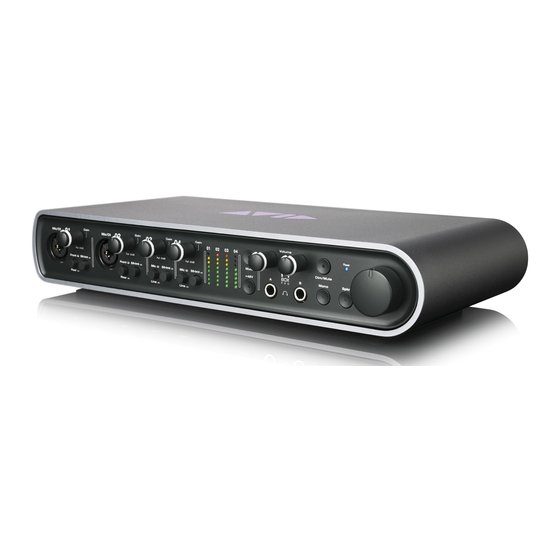
Speaker source select button LED ladders Headphone (inputs 1 - 4) outputs Front/Back Front/Back input source input source Mic/Line switch switch input source button Figure 1. Mbox Pro front panel Chapter 2: Mbox Pro Hardware Overview... - Page 10 When using phantom power, Mbox Pro’s Mic/Line Input Source Button maximum current per microphone is 10 mA. These buttons select the input source for input If you are not sure about the phantom power re- channels 3 and 4.
- Page 11 Driver Control Power Indicator LED Panel or the Mbox Pro. When engaged, the The Power LED indicates that the Mbox Pro is Mono LED lights. receiving power from its power supply. Once the light is on, audio can pass in or out of the sys- Spkr (Speaker) Button tem.
-
Page 12: Mbox Pro Back Panel Features
Mbox Pro Back Panel Features Figure 2 identifies each port on the back panel of the Mbox Pro. Aux inputs 5/6 (RCAs and 1/8-inch mini) Power input jack Insert jacks Mic inputs Line inputs Monitor outputs Power switch Foot switch... - Page 13 Power Switch These switches let you select +4 or –10 input op- This button is used to turn Mbox Pro on or off. erating levels for Line Input channels 1–2 and/or 3–4. When “out” the level is set to +4 and Word Clock, MIDI, S/PDIF when “in”...
- Page 14 Mbox Pro User Guide...
-
Page 15: Chapter 3. Installing And Connecting Mbox Pro
3 Installing and Connecting Mbox Pro To use Mbox Pro with Pro Tools or any other • Download the Mbox Pro drivers installer CoreAudio- or ASIO-compatible applications, for your computer platform from you must install the Mbox Pro hardware drivers www.avid.com. - Page 16 Mbox Pro User Guide...
-
Page 17: Chapter 4. Making Studio Connections
Headphone Volume knob on the front panel. Connecting Outputs By default, Headphone output A mirrors Moni- To hear audio from Mbox Pro, you will need to tor output channels 1–2. connect headphones or an external sound sys- tem (such as powered monitors or a home ste- You can create independent stereo mixes for reo) to Mbox Pro. -
Page 18: Connecting A Sound System
The default monitor outputs on the back of the the left channel of the stereo (often the white Mbox Pro (Monitor outputs 1 and 2) support plug) to Monitor output 1, and the right chan- 1/4-inch plugs. These connections can be bal-... -
Page 19: Audio Inputs
Mic Inputs 3–4/Line Inputs 3–4 Audio Inputs The back-panel Mic inputs 3–4 provide two ded- Mbox Pro provides six channels of analog in- icated XLR connectors for Input channels 3 and puts, and supports microphones, guitars, key- boards, and other types of instruments and de- Toggle each channel’s Front/Rear input source... -
Page 20: Connecting A Microphone
This power, called phantom power, is supplied ei- Mic Cables and Connectors ther by a battery in the microphone, or through an audio interface (such as Mbox Pro) that can Use a microphone with an XLR connector to supply power through the microphone cable. - Page 21 Using a Mic with an XLR Connector (Input Channels 1–2) To use a microphone with an XLR connector: Plug your microphone cable into one of the two Mic/DI inputs on the front of Mbox Pro (in 48V (Phantom Power) this example, input 2). Phantom Power switch...
- Page 22 (Input Channels 3–4) To use a microphone with an XLR connector: Plug your microphone cable into one of the two Mic inputs (XLR) on the back of Mbox Pro 48V (Phantom Power) (In this example, Input 3). Phantom Power switch On the front of the Mbox Pro, turn the master volume knob to the desired level.
-
Page 23: Connecting Instruments To The Mbox Pro
Connecting Instruments to the Mbox Pro To use a guitar with Mbox Pro: On the front of the Mbox Pro, plug your guitar Mbox Pro provides three input types (DI, Line, or bass cable into one of the Mic/DI inputs. -
Page 24: Connecting Keyboards And Mixers
Line Input channels on the back of the Plug your DJ mixer, DVD player, or similar Mbox Pro. If your source is stereo (such as a ste- outputs into the Aux Input 5/6 inputs (L and R). reo keyboard or the stereo output from a mixer),... -
Page 25: Connecting Inserts
Mbox Pro. Using RCA (coaxial) cables, connect the Mbox Pro S/PDIF In to the S/PDIF output of the Connect the dual TS connectors (the “Y” end device. of the cable) to the external processor as follows: •... - Page 26 192 kHz. Mbox. In the Control Panel, choose Setup. S/PDIF inputs on Mbox Pro can sync to an external Word clock. See “Word Clock” on Select S/PDIF from the Clock Source pop-up page 23 for configuration information.
-
Page 27: Midi Connections
Word clock-capable devices in your studio. Using Word Clock with Pro Tools Pro Tools with Mbox Pro can act as Word clock master, or as a slave to Word clock supplied by an external device. When using third-party applications, you can configure the Clock Source for Mbox Pro using the Control Panel. -
Page 28: Using A Footswitch
Select Record Punch In/Out or Playback the Pro Tools Clock source. Start/Stop. Click OK. To configure Pro Tools with Mbox Pro as a Word clock slave: Make sure all Word clock and audio connec- tions are correct as described earlier in this sec- tion. -
Page 29: Chapter 5. Using The Driver Control Panel
Several features of Mbox Pro can be accessed di- On Windows, choose Start > Control Panel > rectly from the Mbox Pro front panel, such as in- Mbox Pro. put gain, phantom power, and output levels. But there are many additional parameters that To open the Driver Control Panel from Pro Tools: cannot be accessed from the front panel. -
Page 30: Setup
Setup. For example, you can set buffer size, • Standalone Settings sample rate, and clock source. You can also de- fine how Mbox Pro functions when it’s con- nected to a computer or when it’s in standalone mode (not connected to a computer). - Page 31 “External clock not de- which Mbox Pro is synchronized. tected, Audio Streaming is Disabled.”). Internal If you are using Mbox Pro by itself (for example, without other digital devices or an ex- ternal clock), select the Internal option for the in-...
- Page 32 Press and Hold duration for all soft buttons on and software running smoothly by processing the front of the Mbox Pro. Choose between 250 audio in groups of samples rather than one sam- msec, 500 msec, 750 msec, and 1 sec.
- Page 33 FX Sends Mode Hosted Operation If there is a FireWire connec- tion to the computer when the Mbox Pro is first Pre-Fader FX Sends powered on, then it boots into hosted mode. When Pre-Fader FX Sends is selected, the full au-...
- Page 34 S/PDIF, or word Mode clock. The Mbox Pro can be in the following three The clock source can be switched from the front types of sub-standalone modes: panel when in standalone, using the Multi but- ton.
- Page 35 Surround Monitor Configuration You can choose which Monitor output pairs are You can configure stereo and surround monitor- controlled by Mbox Pro’s Master Volume knob. ing and output settings in Output Setup. For example, if you enable Master Volume for all...
- Page 36 Monitor Outputs (1–2, 3–4, 5–6) Master Vol. This option lets you choose which output pairs Name are controlled by Mbox Pro’s Master Volume You can name your stereo Monitor output pairs knob. by clicking in the box. The name appears in the If you enable this option for the all three Moni- Output Pair tabs in the Stereo Mix section.
-
Page 37: Flow
Mbox Pro hardware, and the puts of Mbox Pro. This is a useful reference for package version of the Mbox Pro driver installer. understanding the path of an audio signal flow- ing through Mbox Pro. -
Page 38: Stereo Mix Section
The stereo mix is set up like a standard mixing Stereo Mix Section console. There are 16 input channels (eight hardware inputs from Mbox Pro, and eight soft- These 16-input, 2-output mixes allow you to cre- ware returns from your recording application). - Page 39 The Software Returns section is where the audio Mic/Line, Instrument, and S/PDIF inputs of coming back from Pro Tools (or other audio ap- Mbox Pro are monitored. Hardware Inputs 1–6 plication) is monitored. are the analog inputs, and Hardware Inputs 7–8 Software Returns 1 and 2 are the default ste- are the S/PDIF inputs.
- Page 40 Output Pairs Stereo Mixes A stereo mix lets you set up a custom stereo mix, For each Mbox Pro Monitor output pair (Moni- setting the desired level for each hardware input tor outputs 1–2, 3–4, 5–6, S/PDIF Left and Right,...
- Page 41 • Control room output pairs must have ste- Clicking on a Channel Label gives you a cursor, reo mixes as their source. This is enforced allowing you to type in your own custom chan- automatically by the software. nel name (such as “guitar,” “vocals,” etc.). •...
- Page 42 FX Returns Master These knobs control how much of the Effect au- The Master section lets you control the main dio output will be mixed in with the monitor mixer output. This output can be routed to any signal Master L/R outputs. Unlike sends, hardware output.
-
Page 43: Status Indicators
Master Meters Lets you have a visual representa- This tells you the status of the hardware; if a tion of the audio signal being fed to the associ- properly installed, powered-on Mbox Pro is con- ated hardware output pair. nected to the computer. -
Page 44: Presets
Presets Layouts The Preset view lets you load and save Mbox Pro The Layout drop-down menu lets you choose Settings files. This is useful if you'd like to save what information you would like the Driver various configurations of the Control Panel so... - Page 45 Mbox Pro Driver Control Panel, Vertical shown The Vertical layout provides access to all con- trols and meters in a vertical window. The Verti- Mbox Pro Driver Control Panel, Vertical (Meters Only) shown cal layout was designed for compact operation,...
- Page 46 Mbox User Guide...
-
Page 47: Chapter 6. Using The Multi Button
Using the Multi Button The Multi button on the front panel of the Using the Multi Button Mbox Pro can be assigned to easily execute sev- eral functions in Pro Tools including (but not In the Hardware Setup dialog, Pro Tools lets you... -
Page 48: Press And Release Options
To use the Multi Button Function pane and Press and Release Options configure its parameters (example): Launch Pro Tools. When you click on the Press and Release list, a pop-up menu provides access to the following Choose Track > New and create 1 Mono audio options: track. -
Page 49: Press And Hold Options
Undo Each time the button is pressed and re- Add Last Track Adds the last track type that you leased, it undoes that last operation you per- created in the session. Say you have created two formed in Pro Tools. (Same as the Undo com- Audio tracks in a session. -
Page 50: Hold Duration Options
Hold Duration Options When you click on the Hold Duration list, a drop-down menu provides access to the follow- ing options: Hold Duration There are four choices of Hold Du- ration (250 msec, 500 msec, 750 msec, and 1 sec), which is the amount of time you choose to hold the Multi button down in Press and Hold mode. -
Page 51: Appendix A. Using Coreaudio- And Asio-Compliant Applications
Using CoreAudio– and ASIO–Compliant Applications The Mbox Pro hardware drivers allow you to use Configuring the Apple Sound CoreAudio (Mac) or ASIO (Windows) compliant Preferences applications with your Mbox Pro. (Mac Only–Required for Using Qualified Pro For driver installation instructions, see Tools Interface with Apple iTunes or QuickTime Chapter 3, “Installing and Connecting... - Page 52 Mbox Pro User Guide...
-
Page 53: Appendix B. Compliance Information
appendix b Compliance Information Proposition 65 Warning Environmental Compliance This product contains chemicals, including lead, known to the State of California to cause cancer and Disposal of Waste Equipment by Users birth defects or other reproductive harm. Wash hands in the European Union after handling. -
Page 54: Emc (Electromagnetic Compliance)
• Consult the dealer or an experienced radio/TV technician for help. Any modifications to the unit, unless expressly approved by Avid, could void the user's authority to operate the equipment. Mbox Pro User Guide... -
Page 55: Important Safety Instructions
The main power switch is located on the back panel of the Mbox Pro. It should remain accessible after installation. 10) Protect power cords from being walked on or pinched particularly at plugs, convenience receptacles, and the point 18) The equipment shall be used at a maximum ambient where they exit from the equipment. - Page 56 Mbox Pro User Guide...
-
Page 57: Index
28 configuring in the Driver Control Panel 32, 13 Headphone outputs 7 High-pass filter 28 Clock source 27 compatibility 3 connecting Mbox Pro 11 Indicators LED ladders 6 Power Indicator LED 7 DI Input Inserts connecting instruments 19... - Page 58 Power Switch 9 S/PDIF connecting 21, 9 using 22 sample rate 27 system requirements 3 volume Headphone A and B Volume knobs 7 Master Volume knob 7 Word clock connector 9 overview 23 using with Pro Tools 23 Mbox Pro User Guide...
- Page 59 Avid Technical Support (USA) Product Information 2001 Junipero Serra Boulevard Visit the Online Support Center at For company and product information, Daly City, CA 94014-3886 USA www.avid.com/support visit us on the web at www.avid.com...
Need help?
Do you have a question about the Mbox Pro and is the answer not in the manual?
Questions and answers