Oce im2330 / im2830 Operator's Manual
Basic functions
Hide thumbs
Also See for im2330 / im2830:
- Printing manual (386 pages) ,
- User manual (194 pages) ,
- Scanning manual (136 pages)
Table of Contents
Advertisement
Quick Links
Download this manual
See also:
User Manual
Advertisement
Table of Contents

Related Manuals for Oce im2330 / im2830


Summary of Contents for Oce im2330 / im2830
- Page 1 Océ Operator’s Manual for Basic Functions im2330 / im2830 For Océ and Imagistics Models...
- Page 3 NERGY TAR ® (MFD) The United States Environmental Protection Agency (EPA) has introduced a voluntary program, the NERGY TAR program, to encourage the widespread and voluntary use of energy-efficient technologies that enhance the workplace, improve product performance and prevent pollution. As an NERGY TAR Partner, the Océ...
-
Page 5: Table Of Contents
TABLE OF CONTENTS NOTICE TO USERS..........................5 Océ Supplies ............................7 PREFACE ..............................9 FEATURES OF THE im2330/im2830 ....................10 GENERAL PRECAUTIONS........................11 When Installing or Moving ........................11 • When Using the Multifunctional Digital Systems ................14 • During Maintenance or Inspection .....................16 • When Handling Supplies ........................17 DISCLAIMER NOTICE ..........................18 1. - Page 6 TABLE OF CONTENTS (Cont.) • Sort/Group Copying ........................87 • Rotate Sort Mode...........................88 • Staple Sorting ..........................89 • Magazine Sort & Saddle Stitch Mode (Booklet Mode)..............91 • Hole Punch Mode (Optional) ......................94 4. DUPLEX COPYING .........................95 • For Making 1-sided, 2-sided and Book-type Copies..............95 5.
- Page 7 2. PRINT JOB LIST..........................189 3. PROOF PRINT JOB ........................192 4. PRIVATE PRINT JOB ........................194 5. WHEN USING THE DEPARTMENT CODES ................196 6. CONFIRMING THE STATUS OF FAX/INTERNET FAX JOB ............198 7. CONFIRMING THE STATUS OF SCAN ..................199 8. LOG LIST............................200 9.
-
Page 9: Notice To Users
NOTICE TO USERS FCC NOTICE This equipment has been tested and found to comply with the limits for a Class A digital device, pursuant to Part 15 of the FCC Rules. These limits are designed to provide reasonable protection against harmful interference when the equipment is operated in a commercial environment. - Page 10 NOTICE TO USERS (Cont.) 1: Identification Label 2: Certification Label 3: Explanatory Label 4: Warning Label...
-
Page 11: Océ Supplies
Océ Supplies im2330/im2830 Toner Cartridges. It is recommended that genuine Océ supplies and parts be used to obtain optimum results. - Page 12 Océ Supplies (Cont.) Supplies/Parts - Dependability Genuine Océ supplies are subjected to the strictest of inspections so that every supply you receive will perform at optimal levels. - High Productivity Genuine Océ supplies are created to meet the demands of our competitive world and provide high-speed reliable trouble-free copies when you need them.
-
Page 13: Preface
PREFACE Thank you for purchasing an Océ im2330/im2830. This Operator’s Manual describes the following: - How to use the Multifunctional Digital Systems. - How to inspect and carry out maintenance on the Multifunctional Digital Systems. - How to remedy mechanical and copying problems. Before using the Multifunctional Digital Systems, thoroughly read and understand this Operator’s Manual. -
Page 14: Features Of The Im2330/Im2830
FEATURES OF THE im2330/im2830 The im2330/im2830 is a Multifunctional Digital Systems that is capable of using each function via networks. The im2330/im2830 also has various optional paper handling devices to meet the needs of your office. The im2330/im2830 offers the following convenient features, functions and options. - The copying speed is 23 copies (LT) per minute for im2330, 28 copies (LT) per minute for the im2830. -
Page 15: General Precautions
GENERAL PRECAUTIONS When Installing or Moving Warning - This multifunctional digital systems requires 115 V AC, 12 A 50/60 Hz electric power. DO NOT use a power supply with a voltage other than that specified. Avoid multiple connections in the same outlet. This could cause a fire or give you an electric shock. If you are considering increasing the number of outlets, contact an electrician. - Page 16 GENERAL PRECAUTIONS (Cont.) Caution - DO NOT tilt the multifunctional digital systems more than 10 degrees when moving it. If it falls, this could result in personal injury. - Avoid placing the multifunctional digital systems in a place unsuitable for its weight and also make sure the surface is level.
- Page 17 Other Points - Make sure that there is enough space around the system to facilitate changing of parts and maintenance. If there is insufficient space, some operations, such as bypass feeding, will become difficult and the multifunctional digital systems could even break down. To insure optimal operation, allow clearances of at least 31.5”...
-
Page 18: When Using The Multifunctional Digital Systems
GENERAL PRECAUTIONS (Cont.) When Using the Multifunctional Digital Systems Warning - DO NOT place metallic objects or containers with water (flower vases, coffee cups, etc.) on or near the multifunctional digital systems. And keep paper clips and staples away from the air vent. This could cause a fire or give you an electric shock. - Page 19 - DO NOT touch the metal portion of the guide board in the automatic duplexer as it could burn you. 1, 3, 4: Warning for high temperature areas (Fuser unit) 2, *2: Warning for high temperature areas (Ventilation holes) (*2 When automatic duplexer (optional) is installed) Warning for high temperature areas (Dram) Other Points - Be very careful to treat the touch panel gently and never hit it.
-
Page 20: During Maintenance Or Inspection
GENERAL PRECAUTIONS (Cont.) During Maintenance or Inspection Warning - NEVER attempt to repair, disassemble or modify the multifunctional digital systems by yourself. You could cause a fire or get an electric shock. ALWAYS contact your Service representative for maintenance or repair of the internal parts of the multifunctional digital systems. -
Page 21: When Handling Supplies
When Handling Supplies Caution - NEVER attempt to incinerate toner cartridges. This could cause an explosion. DO NOT dispose of used toner cartridges. Your service technician will collect them. "2.REPLACE TONER CARTRIDGE SYMBOL" Page 260... -
Page 22: Disclaimer Notice
DISCLAIMER NOTICE The following notice sets out the exclusions and limitations of liability of Océ North America, Corporate Printing Division (including its employees, agents and sub-contractors) to any purchaser or user (‘User’) of the im2330/im2830, including its accessories, options and bundled software (‘Product’). 1 The exclusion and limitations of liability referred to in this notice shall be effective to the fullest extent permissible at law. -
Page 23: Before Using Equipment
1. BEFORE USING EQUIPMENT 1. DESCRIPTION OF EACH COMPONENT ................20 Main Components ........................20 Optional Equipment ......................21 Control Panel ........................23 Adjustment of the Angle of the Control Panel ..............25 Touch Panel .........................27 2. TURNING ON THE POWER SWITCH ................31 Turning on/off the Power ......................31 Controlling the Use of the Copier with Department Codes ..........33 3. -
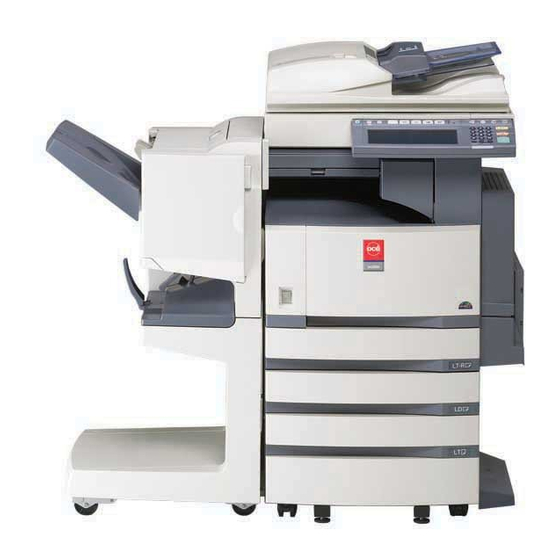
Page 24: Description Of Each Component
1. DESCRIPTION OF EACH COMPONENT Main Components 1. Front cover Original scale 2. Drawer Inner tray 3. Drawer (im2330/im2830) 10. Control panel 11. Touch panel 4. Operator’s Manual Pocket (back side) 12. Touch panel contrast adjustment volume 5. Power switch 13. -
Page 25: Optional Equipment
Optional Equipment 1 : Original cover Holds an original. 2 : Reversing automatic document feeder Automatically feeds a placed stack of originals one by one to have them copied. 3 : Offset tray Enables copied and printed sets to be collated or stacked in groups with each set being offset. 4 : Job separator Enables Faxes, copies and prints to be output onto separate paper trays. - Page 26 1.DESCRIPTION OF EACH COMPONENT (Cont.) 7 : Additional drawer module Enables one drawer to be added to the paper feed pedestal. The 2nd drawer is standard on the im2330/im2830. 8 : Slot cover This cover is used when the 2nd drawer is not installed. (Not available for the im2830/im2330) 9 : Saddle-stitch finisher Enables the saddle stitching in addition to the sort/group mode and stapling.
-
Page 27: Control Panel
Control Panel When operating the equipment and specifying the various settings through the equipment itself, use the buttons on the control panel. 10 11 1 : [HELP] button When pressing this button, appropriate operation procedures are displayed. 2 : [USER FUNCTIONS] button Press this button to set the paper size of the drawer, the drawer for special use, or to set/register the settings including such as the change of the default setting of the copy, scan and Fax functions. - Page 28 1.DESCRIPTION OF EACH COMPONENT (Cont.) 9 : PRINT DATA/MEMORY RX/FAX communication If these lamps light, they show the status of receiving data, receiving original(s) standing by to be printed and currently used telephone line (1 or 2). 10: [INTERRUPT] button Use this button to interrupt the copying job in process and to perform another copying job.
-
Page 29: Adjustment Of The Angle Of The Control Panel
Adjustment of the Angle of the Control Panel When Adjusting the Angle of the Control Panel The angle of the control panel is adjustable at any angle from 5 to 45 degrees from the horizontal position. * When changing the angle of the control panel, be careful not to let your hands be caught in the gap between the equipment and the control panel. - Page 30 1.DESCRIPTION OF EACH COMPONENT (Cont.) Slightly shift the stopper to the right, and then pull it out. Fit the latches of the stopper in the hole of the position (2) and insert them turning the stopper itself. Shift the stopper to the left until it clicks. - The angle of the control panel is fixed at 7 degrees.
-
Page 31: Touch Panel
Touch Panel When the power is turned on, and ‘READY’ is displayed, the basic screen of the copy function is shown on the touch panel. On the screen, currently set functions, selected functions and the copier status are shown via messages and illustrations. - Page 32 1.DESCRIPTION OF EACH COMPONENT (Cont.) - [SETTINGS] (setting functions confirmation) button This button allows you to confirm the functions that have been set. (An example is shown below.) - The icons displayed on the screen are as follows (some icons may not appear on the screen): 1.BEFORE USING EQUIPMENT...
-
Page 33: Clearing The Functions Selected
Clearing the Functions Selected If you press any button that is half-tone shaded, the function selected is cleared. Also, if the copier is left inactive for a while, the automatic function clear works and the setting will be cleared. - Automatic Function Clear Even if you do not press the [FUNCTION CLEAR] button, within the specified period of time (default setting: 45 seconds) after outputting is finished or after the last button is pressed in a procedure, the automatic function clear mode will work to clear all settings, and the basic screen of the copy function will... -
Page 34: Setting Letters
1.DESCRIPTION OF EACH COMPONENT (Cont.) Setting Letters The following screen is provided for entering letters. * To enter numbers, use the digital keys on the control panel. The following buttons are used to enter letters. - [CapsLock] Press this button to switch capital letters and small letters. - [B Space] Press this button to delete the letter before the cursor. -
Page 35: Turning On The Power Switch
2. TURNING ON THE POWER SWITCH Turning on/off the Power Turning on the Power Switch Open the switch cover, and then turn ON the power switch. - “Wait Warming Up” appears on the Basic screen on the touch panel. About 25 seconds later, the equipment will be ready. - Page 36 2.TURNING ON THE POWER SWITCH (Cont.) Press the [USER] button to enter the user setting menu, and then press the [SHUTDOWN] button. “Processing job will be deleted. Are you sure you want to shutdown?” appears on the screen. Press the [YES] button. - To cancel the shutdown operation, press the [NO] button.
-
Page 37: Controlling The Use Of The Copier With Department Codes
Controlling the Use of the Copier with Department Codes With the use of the department codes, you can restrict users as well as manage copy volumes made by individual groups or departments of your company. See the [User Functions Guide]. When the department management function is in use, the screen shown on the right appears immediately after the... -
Page 38: Switching To The Energy-Saving Mode
3. SWITCHING TO THE ENERGY-SAVING MODE Switching to the energy-saving mode is available only when one of the following options is installed. - Fax board - Printer kit - Printer kit and scanner upgrade kit - Printer/scanner kit If you are not going to use the equipment for a while, press the [ENERGY SAVER] button on the control panel for a few seconds to enter the energy saving mode. -
Page 39: Data Overwrite Kit (Optional)
4. DATA OVERWRITE KIT (OPTIONAL) If an optional data overwrite kit is installed, the data temporary stored in the hard disk of this equipment during copying, printing, scanning, etc. can be automatically erased after the job is completed. Data to be erased The temporary stored data during copying, printing, scanning or Fax, Internet Fax or Network Fax transmission. -
Page 40: Setting Copy Paper
5. SETTING COPY PAPER Acceptable Copy Paper Types and Sizes Maximum sheet Feeder Paper Type Paper Size capacity Drawers Plain Paper (Standard Size) 550 sheets (20 lb. Bond) (The (17-20 lb. Bond) LT format: optional LD, LG, LT, LT-R, ST-R, COMP (10 ”... - Page 41 *3.Use Thick 2 mode for Sticker Labels. * “Maximum capacity” refers to the number of sheets when the paper recommended by Océ is set. * Paper between 24 lb. Bond and 110 lb. Index can be copied if the thick mode is used. * The values shown in the parenthesis are rounded off below a decimal point.
-
Page 42: Recommended Paper/Handling And Storing Paper
5.SETTING COPY PAPER (Cont.) Recommended Paper/Handling and Storing Paper The recommended paper To make copies with a fine image, the following sheets are recommended. If you use copy paper other than the recommended types, ask your service technician. Paper Type Océ... -
Page 43: Changing The Paper Size Of The Drawer/Setting The Drawer For Special Uses
Changing the Paper Size of the Drawer/Setting the Drawer for Special Uses The paper size of the drawers can be changed. The drawers can also be set for cover sheet, insertion, thick paper 1, Fax and special sheets. Changing the Paper Size of the Drawer Pull out the drawer carefully until it comes to a stop. -
Page 44: Side Guide
5.SETTING COPY PAPER (Cont.) While pushing the side guide in the direction of the arrow, set the side guide to the desired paper size (indicated on the bottom inner surface of the drawer). - Adjust the side guides with both hands. If the side guide’s shape on the front side of the drawer and its operation differ from those in this Operator’s Manual depending on the production timing, perform the following in reference to the... -
Page 45: The Control Panel
Make sure that a gap of approx. 0.02” (less than 0.04” in total) is left between the paper and the side guide. If there is no gap, this could 0.5mm cause paper misfeeding. ( 0.02'' ) Push the drawer straight into the copier until it comes to a stop. - Page 46 5.SETTING COPY PAPER (Cont.) Press the [DRAWER] button. Press the drawer button corresponding to the one in which the paper size has been changed, and then press the button indicating the new paper size. Setting the Drawer for Special Uses You can set the drawer for various uses (cover sheet, sheet insertion, thick paper, Fax paper, special sheets).
- Page 47 Press the [USER FUNCTIONS] button on the control panel. Press the [USER] button to enter the user menu and then press the [GENERAL] button. Press the [DRAWER] button.
- Page 48 5.SETTING COPY PAPER (Cont.) Press the drawer button corresponding to the one in which the paper size has been changed, and then press the button indicating the new paper type. - If you want to select the [COVER] or [INSERT] button, make sure that paper with the same size as that for the COVER or INSERT is set in the other drawer including the optional large capacity feeder.
-
Page 49: Clearing The Drawer For Special Uses
- 2 drawers can be set for the sheet insertion. - After having set INSERT 1, press the drawer button corresponding to the one in which the paper for INSERT 2 has been set, and press the [INSERT] button. Clearing the Drawer for Special Uses Press the drawer button corresponding to the one which is set for the special use, then press the corresponding button... - Page 50 5.SETTING COPY PAPER (Cont.) Setting Paper to the Large Capacity Feeder (Optional) Pull out the large capacity feeder carefully until it comes to a stop. Set paper aligned in tray (A) and tray (B). - Place the paper face up. - Maximum number of sheets that can be set.
-
Page 51: How To Make Copies
2. HOW TO MAKE COPIES 1. GENERAL COPYING PROCEDURES ................48 2. SETTING ORIGINALS ......................51 Acceptable Original Types and Sizes/Maximum Number of Sheets that can be Stored..51 When Placing an Original on the Glass ................52 When Using the Reversing Automatic Document Feeder (optional)........54 3. -
Page 52: General Copying Procedures
1. GENERAL COPYING PROCEDURES After placing or confirming paper in the drawers, place the originals. When the [START] button is pressed with any settings unchanged, copies are made in the initial (default) settings. You can make copies as desired by setting different copy modes. Initial (default) Settings The copy modes that are automatically set when the power is turned on, when the energy-saving mode is cleared or when the [FUNCTION CLEAR] button is pressed on the control panel are called the initial... - Page 53 Place the original(s). - "Acceptable Original Types and Sizes/Maximum Number of Sheets that can be Stored" Page 51 - "When Placing an Original on the Glass" Page 52 - "When Using the Reversing Automatic Document Feeder (optional)" Page 54 When the reversing automatic document feeder (optional) is installed and the single feed mode is selected, place the original(s) after the copy mode is set.
-
Page 54: Start Button
1.GENERAL COPYING PROCEDURES (Cont.) Place the next original, and press the [START] button. - Set the first page of your originals first. - You can also press the [YES] button to perform the same operation. - Repeat this step for the subsequent originals. Once the final original has been scanned, press the [FINISHED] button. -
Page 55: Setting Originals
2. SETTING ORIGINALS Acceptable Original Types and Sizes/Maximum Number of Sheets that can be Stored Acceptable Original Types and Sizes Setting place Types of originals Maximum size Sizes capable of automatic detection Glass Sheets Width:11.69” (Standard size) 3-dimensional objects Length:17.01” LT format: LD, LG, LT, LT-R, ST-R Books A/B format:... -
Page 56: When Placing An Original On The Glass
2.SETTING ORIGINALS (Cont.) When Placing an Original on the Glass Sheet Originals Raise the original cover or the reversing automatic document feeder (optional), and place the original face down on the glass. ( A ) - Raise it 60 degrees or more for detecting the original. - A: Original Align the original against the left rear corner of the glass. -
Page 57: Book-Type Originals
Book-type Originals Raise the original cover or the reversing automatic document feeder (optional), and place the original in the direction shown in the illustration. - When using the Book-type Originals to 2-Sided Copies ("5. Book- type Originals to 2-Sided Copies" Page 99) or the Dual-Page ("4.DUAL-PAGE"... -
Page 58: When Using The Reversing Automatic Document Feeder (Optional)
2.SETTING ORIGINALS (Cont.) When Using the Reversing Automatic Document Feeder (optional) Precautions for Using the Reversing Automatic Document Feeder Do not use the following type 1 to 7 of originals as they may misfeed or become damaged: 1 : Badly wrinkled or folded originals; in particular, originals whose leading edge is curled may fail to be correctly fed. -
Page 59: In The Continuous Feed Mode
In the Continuous Feed Mode * See "Continuous Feed Mode" Page 138 * To set originals with the different size, see "Setting the [MIXED ORIGINAL SIZE]" Page 78 After aligning the edges of originals, place the originals face up and align the slides to their width. -
Page 60: Inside The Single-Feed Mode
2.SETTING ORIGINALS (Cont.) Inside the Single-feed Mode See "Single-feed Mode" Page 139 Align the slides to the desired original size. Insert the original with its face up and straight along the slides, it will be pulled in automatically. - When the original starts being pulled in, let go of it. 2.HOW TO MAKE COPIES... -
Page 61: Auto Job Start (Job Preset)
3. AUTO JOB START (JOB PRESET) While multi-copying is in progress, you can reserve the copy. Setting Auto Job Start Place the original(s). Select the copy mode. Be sure that the job starts in the previous copy mode if you do not select the copy mode. -
Page 62: Confirming And Canceling Auto Job Start
3.AUTO JOB START (JOB PRESET) (Cont.) Confirming and Canceling Auto Job Start - Confirming auto job start and canceling the job waiting to be copied. Press the [JOB STATUS] button on the control panel to display the job list for confirming and canceling the data. -
Page 63: Interrupt Copying
4. INTERRUPT COPYING While multi-copying is in progress, you can interrupt and make copies from different originals. * The following modes cannot be used with interrupt copying: - Cover sheet copying - Sheet insertion copying - Scan to e-filing/Save as file Press the [INTERRUPT] button. -
Page 64: Stopping The Copy Operation
5. STOPPING THE COPY OPERATION If you want to stop the operation during scanning or multi-copying, the [STOP] button is used. Press the [STOP] button on the operational panel during the scanning or multi-copying. When the menu on the right is displayed, press the [MEMORY CLEAR] button. -
Page 65: Bypass Copying
6. BYPASS COPYING Bypass Copying When you want to make copies on thick paper, OHP film, tracing paper, sticker labels or other special sheet, use the sheet bypass. (Only Thick 1 paper can be set in the drawer "Setting the Drawer for Special Uses" Page 42) If the desired size of paper (standard size) is not set in the drawers, or if you want to make copies on non- standard size paper, make bypass copies. -
Page 66: Bypass Copying On Standard Size Paper
6.BYPASS COPYING (Cont.) Bypass Copying on Standard Size Paper Place paper on the bypass tray, and then align the guides with the size of the paper. - When adjusting the width of the side guide, while holding down the knob of the side guide, slide the side guide. - “Ready for bypass feeding”... - Page 67 When the standard size paper other than LD, LG, LT and ST-R is set, press the [OTHER SIZE] button. - See "Setting the [OTHER SIZE] button" Page 77. Press the paper size button corresponding to the paper that has been set.
- Page 68 6.BYPASS COPYING (Cont.) Select the media type corresponding to the paper that has been set, and then press the [ENTER] button. If you select the media type not corresponding to the paper that has been set, it may cause a problem such as a paper jam, significant image deterioration, etc.
-
Page 69: Bypass Copying On Non-Standard-Size Paper
Bypass Copying on Non-Standard-Size Paper Non-standard paper falls within the following ranges: A (Length): 3.9”-11.7”, B (Width): 5.8”-17” Follow steps 1 to 2 on "Bypass Copying" Page 61. Press the [NON STANDARD] button. Key in each dimension (length and width), or recall the data stored in MEMORY, and then press the [ENTER] button. - Page 70 6.BYPASS COPYING (Cont.) - Press the [MEMORY 1] (or [MEMORY 2], [MEMORY 3], [MEMORY 4]) button, the paper size memorized in the MEMORY 1 appears. The non-standard size frequently used can be stored in the memory. Press the [MEMORY 1] (or [MEMORY 2], [MEMORY 3], [MEMORY 4]) button which you want to store, key in the size of length and width and press the [MEMORY] button.
-
Page 71: Storing A Non-Standard Size In Memory
Storing a Non-Standard Size in MEMORY It is convenient to store a frequently used non-standard-size paper in memory. Follow steps 1 to 2 on "Bypass Copying" Page 61. Press the [NON STANDARD] button. Press the desired Memory Number button. - When the paper size is '0 mm', the selected Memory Number button is vacant. -
Page 72: Before Copying On An Envelope
6.BYPASS COPYING (Cont.) Before copying on an envelope The acceptable envelope sizes are as follows. - CHO-3 (120 mm x 235 mm), YOU-4 (105 mm x 235 mm), COM10 (4 ” x 9 ”), Monarch (3 ” x 7 ”), DL (110 mm x 220 mm) The recommended envelope COM10... -
Page 73: Copying On An Envelope
Copying on an Envelope To copy on an envelope, perform the following procedure. * The copied envelope exits into the inner tray regardless of the finisher (option). Pick up about 5 envelopes, fan the envelopes well and align the edges. Place the envelopes on a flat clean surface and press them with your hands in the direction of the arrow to expel any... - Page 74 6.BYPASS COPYING (Cont.) Place the original on the original glass. Press the [OTHER SIZE] button. Press the envelope size button corresponding to the envelope placed on the bypass tray. Press the [MEDIA TYPE] button. 2.HOW TO MAKE COPIES...
-
Page 75: Media Type
Press the [ENVELOPE] button to set the media type. When setting the envelope size in step 6 and media type in step 8, make sure that they correspond to the specifications of the envelope used. If not, it may cause a paper jam or soil the copied paper or the inside of the equipment. - Page 76 2.HOW TO MAKE COPIES...
-
Page 77: Setting Of Basic Copy Modes
3. SETTING OF BASIC COPY MODES 1. PAPER SELECTION......................74 Automatic Paper Selection (APS) ..................74 Manual Paper Selection .......................76 Setting the [OTHER SIZE] button ..................77 Setting the [MIXED ORIGINAL SIZE] ..................78 2. REDUCTION AND ENLARGEMENT COPYING ..............80 3. SELECTING FINISHING MODES ..................84 Finishing Modes and Finishers (Optional) ................84 Sort/Group Copying ......................87 Rotate Sort Mode ......................... -
Page 78: Setting Of Basic Copy Modes
1. PAPER SELECTION Automatic Paper Selection (APS) When you place regular-sized originals on the glass or in the reversing automatic document feeder (optional), the size of the originals is automatically detected, which helps the copier select paper that is the same size as the originals. - Page 79 When the selected drawer size and the original size are the same, the copier rotates the original data by 90 and makes a copy which is the same size as the original --- even if those directions differ (e.g.an LT-size original is set while the same size paper is set in R direction).
-
Page 80: Manual Paper Selection
1.PAPER SELECTION (Cont.) Manual Paper Selection Automatic Paper Selection cannot be used for highly transparent originals such as OHP films and tracing paper, wholly dark originals or originals with dark borders, or irregular sized originals such as newspapers and magazines. For these types of originals, use manual paper selection. * When the desired size of paper is not set in any of the drawers, you can change the paper size of the drawer ("Changing the Paper Size of the Drawer/Setting the Drawer for Special Uses"... -
Page 81: Setting The [Other Size] Button
Setting the [OTHER SIZE] button When the original or the paper size is specified and you want to use the paper size not displayed on the menu (except for non-standard size), press the [OTHER SIZE] button to select the size. This function allows the [OTHER] button to recognize the size you use. -
Page 82: Setting The [Mixed Original Size]
1.PAPER SELECTION (Cont.) Setting the [MIXED ORIGINAL SIZE] When placing different size originals on the reversing automatic document feeder, copy can be made by setting the [MIXED ORIGINAL SIZE]. Available combination of original size - LD, LG, LT, LT-R, COMP, 8.5" SQ * The copied image may be dislocated depending on the combination of the original size. - Page 83 Select either the Automatic Paper Selection ("Automatic Paper Selection (APS)" Page 74) or Automatic Magnification Selection mode ("Automatic Magnification Selection (AMS)" Page 80) - To make duplex copying, select the automatic magnification mode. - You cannot enlarge the copy size from LT (horizontal) to LD (vertical), LG (Vertical).
-
Page 84: Reduction And Enlargement Copying
2. REDUCTION AND ENLARGEMENT COPYING When placing originals on the original glass, you can copy them at the reducing and enlarging rate of 25 to 400%. For the reversing automatic document feeder (optional), you can make copy at the reducing and enlarging rate of 25 to 200%. -
Page 85: Specifying Both Original Size And Copy Size
Press the [AMS] button. - "Setting the [OTHER SIZE] button" Page 77 Place the original(s). - "2.SETTING ORIGINALS" Page 51 - The built-in sensors automatically detect the size of the original(s) and compute the reproduction ratio with the specified paper size respectively. - Page 86 2.REDUCTION AND ENLARGEMENT COPYING (Cont.) Press the [ORIGINAL SIZE] button that represents the size of the original. - Using the original size and copy size, the correct reproduction ratio is computed and displayed on the screen. - "Setting the [OTHER SIZE] button" Page 77 Select other copy modes as required.
- Page 87 Press the [UP] (or [DOWN]) button to set the desired reproduction ratio. - Each time you press either button, the reproduction ratio changes by 1%. Holding down the button changes it continuously. - You can select the reproduction ratio by pressing the [400%], [200%], [100%], [50%] or [25%] button directly.
-
Page 88: Selecting Finishing Modes
3. SELECTING FINISHING MODES Finishing Modes and Finishers (Optional) The functions available differ depending on whether a finisher is installed and which type of finisher (9284, 9256, IM2300030 and IM2300040) it is. * The touch panel used in this chapter appears when the optional saddle-stitch finisher (optional) with hole punch unit (optional) is installed in your copier. - Page 89 6: Saddle stitch tray * When LD, A3 and B4 paper are to be printed, pull out the sub-tray in advance. If the sub-tray is not used, the outputted paper falls out and becomes inconsistent. When the finisher trays reach their maximum loading capacity ("2.SPECIFICATIONS OF OPTIONS" Page 303), “Remove paper from the finisher”...
- Page 90 3.SELECTING FINISHING MODES (Cont.) Names of each Inner Finisher (Optional) 1: Trays 2: Paper stopper When the finisher trays reach their maximum loading capacity ("2.SPECIFICATIONS OF OPTIONS" Page 303), “Remove paper from the finisher” appears. Remove the copied paper from the trays and the copier automatically resumes making copies. 3.SETTING OF BASIC COPY MODES...
-
Page 91: Sort/Group Copying
Sort/Group Copying To make multiple copies, you can select the sort mode or group mode as necessary. - Example of making 5 sets of copies from 5-page originals 1: Sort copying 2: Group copying Place paper in the drawer(s). - "5.SETTING COPY PAPER" Page 36 Place the original(s). -
Page 92: Rotate Sort Mode
3.SELECTING FINISHING MODES (Cont.) Rotate Sort Mode In this copying mode, as sets of copies are output to the internal tray, the sets are alternated -lengthwise and crosswise- on top of each other. (Optional drawer or Stack Feeder Bypass is required.) LT/LT-R, A4/ A4-R, B5/B5-R paper is available in this mode. -
Page 93: Staple Sorting
Staple Sorting When the finisher (optional) is installed, you can perform automatic stapling for every set. 3 staple positions can be selected when installing the saddle-stitch finisher (optional). * The paper weight should be in the range of 17-20 lb. for the saddle-stitch finisher (optional) and 17-20 lb. Bond for the single-staple finisher (optional). - Page 94 3.SELECTING FINISHING MODES (Cont.) Press the [FRONT STAPLE-1] (or [DOUBLE STAPLE], [REAR STAPLE]) button. - Only the [FRONT STAPLE-1] button is available when installing the single-staple finisher (optional). Select other copy modes as required. Press the [START] button. If the paper quantity exceeds the maximum number of sheets that can be stapled, the finisher automatically enters the sort mode.
-
Page 95: Magazine Sort & Saddle Stitch Mode (Booklet Mode)
Magazine Sort & Saddle Stitch Mode (Booklet Mode) When the Magazine Sort mode is selected, 1-sided originals can be copied and bound like magazines or booklets. When the saddle-stitch finisher (optional) is installed, you can select the saddle stitch mode that will automatically fold and staple the center of the document. -
Page 96: Set The Paper Size
3.SELECTING FINISHING MODES (Cont.) Set the paper size. - For drawer feeding "Manual Paper Selection" Page 76, step 3 - For bypass feeding "Bypass Copying on Standard Size Paper" Page 62, step 4 Place the original(s). - "2.SETTING ORIGINALS" Page 51 - When placing originals in the reversing automatic document feeder (optional), set them by referring to the order of previous pages in the illustrations. -
Page 97: Available Conditions For Saddle Stitch
Available Conditions for Saddle Stitch - A cover of “80 lb. Cover”-“110 lb. Index” can be added. In this case, the cover is included in the maximum capacity for saddle stitch. - When paper of different weights is loaded, the maximum number of sheets that can be stapled is that of the paper with the highest weight. -
Page 98: Hole Punch Mode (Optional)
3.SELECTING FINISHING MODES (Cont.) Hole Punch Mode (Optional) When the optional hole punch unit is attached to the finisher (Optional), you can hole punch your copies. * The paper weight should be in the range of 17 lb. to 53 lb. Special paper such as OHP files or labels is excluded. -
Page 99: Duplex Copying
4. DUPLEX COPYING For Making 1-sided, 2-sided and Book-type Copies This function allows you to set the type of originals (1-sided, 2-sided or book-type) and the desired type of copying (1-sided or 2-sided). Duplex copying is available for the plain paper (17-20 lb. Bond) and thick 1 paper (21-28 lb. - Page 100 4.DUPLEX COPYING (Cont.) 1. 1-Sided Originals to 1-Sided Copies (default setting) Place paper in the drawer(s). - "5.SETTING COPY PAPER" Page 36 Place the original(s). - "2.SETTING ORIGINALS" Page 51 Confirm that the [1 1 SIMPLEX] mode is selected in the basic menu. - If the “1-SIDED 1-SIDED”...
- Page 101 On the basic menu, press the highlighted button on the right. Press the [1 2 DUPLEX] button. Select other copy modes as required. Press the [START] button. - When placing an original on the glass, follow step 5 to 6 on page "Copying Procedure"...
- Page 102 4.DUPLEX COPYING (Cont.) Press the [2 2 DUPLEX] button. Select other copy modes as required. Press the [START] button. - When placing an original on the glass, follow step 5 to 6 on page "Copying Procedure" Page 48 continuously. 4. 2-Sided Originals to 1-Sided Copies Image Direction can be used if the orientation of the output is alternating between pages when using landscape originals.
- Page 103 5. Book-type Originals to 2-Sided Copies * Acceptable paper size for this function is LT only. Place paper in the drawer(s). - "5.SETTING COPY PAPER" Page 36 - When using this mode in bypass copying ("Bypass Copying" Page 61), be sure to specify the paper size. On the basic menu, press the highlighted button on the right.
- Page 104 4.DUPLEX COPYING (Cont.) Select LT copy size. If you need a binding space, select the book margin mode from the Image Shift function ("Creating a Bookbinding Margin" Page 109). Select other copy modes as required. Place the first page(s) on the glass, and then press the [START] button.
-
Page 105: Original Mode
5. ORIGINAL MODE By selecting an original mode according to the type of your originals, you can make copies with the suitable image. Place paper in the drawer(s). - "5.SETTING COPY PAPER" Page 36 Place the original(s). - "2.SETTING ORIGINALS" Page 51 On the basic menu, press the highlighted button on the right. -
Page 106: Copy Density Adjustment
6. COPY DENSITY ADJUSTMENT There are 2 types of image density adjustments: automatic mode and manual mode. In the automatic mode, the density of each original is detected automatically and the optimum image density is selected. In the manual mode, you can select the desired level of image density. Adjust the density with this mode depending on the original condition. -
Page 107: Image Editing And Image Adjustment
4. IMAGE EDITING AND IMAGE ADJUSTMENT 1. BACKGROUND ADJUSTMENT ..................104 2. SHARPNESS ADJUSTMENT....................105... -
Page 108: Background Adjustment
1. BACKGROUND ADJUSTMENT This function allows you to adjust the density of the original’s background or to avoid copying the back side of originals. Place paper in the drawer(s). - "5.SETTING COPY PAPER" Page 36 Place the original(s). - "2.SETTING ORIGINALS" Page 51 Press the [IMAGE] button to enter the image menu, and then press the... -
Page 109: Sharpness Adjustment
2. SHARPNESS ADJUSTMENT This function allows you to emphasize the letters and edges of images. Place paper in the drawer(s). - "5.SETTING COPY PAPER" Page 36 Place the original(s). - "2.SETTING ORIGINALS" Page 51 Press the [IMAGE] button to enter the image menu, and then press the [SHARPNESS] button. - Page 110 4.IMAGE EDITING AND IMAGE ADJUSTMENT...
-
Page 111: Using The Editing Functions
5. USING THE EDITING FUNCTIONS 1. IMAGE SHIFT ........................108 2. EDGE ERASE........................111 3. BOOK CENTER ERASE....................112 4. DUAL-PAGE........................113 5. 2 IN 1/4 IN 1 ........................115 6. MAGAZINE SORT (FROM THE EDITING MENU) ............117 7. IMAGE EDITING ........................ 119 Trimming/Masking...................... -
Page 112: Using The Editing Functions
1. IMAGE SHIFT A margin for binding is created by shifting the original image to either the right or left side. You can also create binding margins in the center (inner margin) when using Book-Type Originals to 2-sided copies (see "5. -
Page 113: Creating A Bookbinding Margin
Adjust the width of binding margin, and then press the [ENTER] button. - The default width of the margin is 7 mm (0.276”). - To adjust the width, press the [0 mm] or [30 mm] button to select the desired number, and then press the [ENTER] button. - In duplex copying, margins on the back are created on the other side of those in the front. - Page 114 1.IMAGE SHIFT (Cont.) Adjust the width of the margin, and then press the [ENTER] button. - The default width of the margin is 7 mm (0.276”) (Book binding margin is 14 mm (0.551”)). - To adjust the width, press the [2 mm] or [30 mm] button to select the desired number, and then press the [ENTER] button.
-
Page 115: Edge Erase
2. EDGE ERASE If your original has a dirty or torn edge, it may be reproduced as a black stain on the copy. In that case, use Edge Erase Copying. A white border is created along the edges of the copy, eliminating those black stains. * This function is available in only case of the standard-size original. -
Page 116: Book Center Erase
3. BOOK CENTER ERASE This feature allows you to erase the shadow in the center of a book original. 1: Before 2: After the book center has been erased Place paper in the drawer(s). - "5.SETTING COPY PAPER" Page 36 - When using this mode in bypass copying ("Bypass Copying"... -
Page 117: Dual-Page
4. DUAL-PAGE Utilizing this feature allows the facing pages of a book or magazine to be copied page by page onto 2 separate sheets of paper or duplex-copied on one sheet. There is no need to move the original on the glass. You can also place a pair of LT (A4 or B5) sized originals side by side and copy them on separate sheets of paper. -
Page 118: Copy Size
4.DUAL-PAGE (Cont.) Press the [BASIC] button to enter the basic menu, and then select LT (A4, B5) copy size. Select other copy modes as required. Place the first page(s) to be copied on the glass, and then press the [START] button. - If you do not copy your originals from the first page, the copies will not be arranged in the same order as the original. - Page 119 5. 2 IN 1/4 IN 1 This feature allows multiple originals to be reduced and copied onto a single sheet of paper. There are 2 modes: 2 IN 1 copying, where 2 originals are copied onto a single sheet, and 4 IN 1 copying, where 4 originals are copied onto a single sheet.
-
Page 120: In 1/4 In 1
5.2 IN 1/4 IN 1 (Cont.) Place paper in the drawer(s). - "5.SETTING COPY PAPER" Page 36 - When using this mode in bypass copying ("Bypass Copying" Page 61), be sure to specify the paper size. To make copies onto paper which is not the same size as originals, press the [ZOOM...] button to display the screen on the right, and then press the desired paper size and the [AMS] button. -
Page 121: Magazine Sort (From The Editing Menu)
6. MAGAZINE SORT (FROM THE EDITING MENU) The magazine sort mode allows 1-sided originals to be copied and sorted so that they can be folded and bound along a center line like typical magazines or booklets. - Example of copying a 12-page document - If used in combination with the optional finisher (optional) equipped with saddle stitch, copies can be automatically folded in half and stapled along their center line. - Page 122 6.MAGAZINE SORT (FROM THE EDITING MENU) (Cont.) Press the [EDIT] button to enter the edit menu, and then press the [MAGAZINE SORT] button. Adjust the binding margin, and then press the [ENTER] button. - The default width of the margin is 2 mm (0.08”). - To adjust the width, press the [2 mm] or [30 mm] button to select the desired number, then press the [ENTER] button.
-
Page 123: Image Editing
7. IMAGE EDITING Trimming/Masking You can select an area on an original and copy it with the area trimmed (only the inside of the area copied) or masked (only the outside of the area copied). 4 rectangular areas can be specified on an original. * Image editing is only available with standard sized originals. - Page 124 7.IMAGE EDITING (Cont.) Place an original on the glass to specify the area. - Set the original face up with the bottom toward you, fit its top left corner against the top left corner of the glass, and align it with the original scale.
-
Page 125: Mirror Image
Mirror Image Copies are made with images completely reversed (right and left). Place paper in the drawer(s). - "5.SETTING COPY PAPER" Page 36 - When using this mode in bypass copying ("Bypass Copying" Page 61), be sure to specify the paper size. Place the original(s). -
Page 126: Negative/Positive Reversal
7.IMAGE EDITING (Cont.) Negative/Positive Reversal This function allows you to reverse the black areas on the original as white areas, or vice versa. Place paper in the drawer(s). - "5.SETTING COPY PAPER" Page 36 - When using this mode in bypass copying ("Bypass Copying" Page 61), be sure to specify the paper size. -
Page 127: X-Y Zoom
8. X-Y ZOOM You can make copies with different reproduction ratios set for the X (horizontal) and Y (vertical) directions in the range of 25 to 400% respectively. In the following cases, set the reproduction ratio in the range of 25 to 200%. - When placing the original(s) on the reversing automatic document feeder (optional). -
Page 128: Cover Copying
9. COVER COPYING A top cover and/or back cover (special sheets, e.g, colored paper) can be added to each set of copies. 1: Adding a blank cover 2: Adding a copied cover 3: Adding a blank cover and a blank back cover 4: Adding a copied cover and blank back cover When using the cover feature, make sure all paper sources have the same orientation and size. - Page 129 Place the cover sheet in the drawer for cover sheet or on the bypass tray. - When placing it in the drawer for the cover sheet, it is necessary to set the paper type (cover sheet), size and weight. Setting the drawer for special use.
- Page 130 9.COVER COPYING (Cont.) Press the [BASIC] button to enter the basic menu, and then select the paper source of the same size and direction as the cover sheet paper. - Setting the drawer for cover sheet. "Changing the Paper Size of the Drawer/Setting the Drawer for Special Uses"...
-
Page 131: Sheet Insertion Mode
10. SHEET INSERTION MODE Special sheets of paper (such as colored paper) are inserted into a set of copies at the specified pages. There are 2 types of sheet insertion modes: 1 : Inserting blank sheets before the specified pages 2 : Inserting copied sheets at the specified pages To make sheet copies, you have to set 2 or 3 drawers (the large capacity feeder can also be used) to the same paper size and orientation (1 or 2 for special insertion sheets and the other for normal sheets of copy... - Page 132 10.SHEET INSERTION MODE (Cont.) Press the [EDIT] button to enter the edit menu, and then press the [SHEET INSERTION] button. Press [COPIED] or [BLANK] button. - To insert copied sheet at the specified page: [COPIED] - To insert blank sheet before the specified paper: [BLANK] Key in the desired page number (no more than 3 digits) for insertion and press the [SET] button.
-
Page 133: Time & Date Stamp
11. TIME & DATE STAMP The time and date of the scanning can be added to the copies. 1: Printed at the bottom of the portrait copy 2: Printed at the top of the landscape copy MM.DD.YYYY 14:54 MM.DD.YYYY 14:54 Place paper in the drawer(s). -
Page 134: Page Numbering
12. PAGE NUMBERING This feature allows numbers to be added at specified positions on copies. 1: Page number printed at the bottom center on the portrait copy. 2: Page number printed at the top right on the landscape copy. Place paper in the drawer(s). - "5.SETTING COPY PAPER"... - Page 135 Key in the starting page number. - If the start page number is ''1'', just press the [ENTER] button. Select other copy modes as required. Press the [START] button.
-
Page 136: Job Build
13. JOB BUILD This feature allows you to scan up to 1000 pages of originals with the optimum original mode and image adjustment respectively, and then copy and store them as a single job. * Automatic paper selection, Book to 2, Image editing, X-Y zoom, Cover copying, Magazine Sort, 2IN1/ 4IN1 and Sheet insertion mode cannot be selected. - Page 137 Press the [ENTER] button on the screen to set JOB BUILD. On the Basic screen, set the copy mode, e-filing/file function, and finishing mode you want to use for the 1st job. - Press the [SETTINGS] button to confirm the settings. - To change the settings, press the [FC] button, and then start the procedure again from step 1.
- Page 138 13.JOB BUILD (Cont.) On the Basic screen, set the settings for the 2nd job. - The settings for the 2nd job or later can be changed with regard to the following functions. Reproduction ratio, automatic magnification selection, original size, other size Scanning mode Image adjustment mode Edge erase, dual-page...
-
Page 139: Direction Of Copy Images In "1 To 2" And "2 To 1
14. DIRECTION OF COPY IMAGES IN “1 TO 2” AND “2 TO 1” When a lengthwise LD, LG, LT-R, A3, A5 or B4 original is copied under the mode of 1-Sided Originals to 2- Sided Copies, 2-Sided Originals to 1-Sided Copies, this function allows you to adjust the direction for 'open to left' opening. -
Page 140: Direction Of Copy Images In "1 To 2" And "2 To 1
14.DIRECTION OF COPY IMAGES IN “1 TO 2” AND “2 TO 1” (Cont.) Press the [ENTER] button. Select other copy modes as required Press the [START] button. 5.USING THE EDITING FUNCTIONS... -
Page 141: Direction Of Duplex Copy Images In "2 To 2
15. DIRECTION OF DUPLEX COPY IMAGES IN “2 TO 2” When copying under the mode of 2-Sided Originals to 2-Sided-Copies, this function allows you to rotate the backside of the original to be copied by 180. It is useful when 'open to left' (Book) originals need to be copied in 'open to top' (Tablet), and the opposite condition is available. -
Page 142: Continuous/Single Original Feeding
16. CONTINUOUS/SINGLE ORIGINAL FEEDING When using the optional reversing automatic document feeder, you can select the continuous feed mode (default setting) so that multiple (or single) originals are continuously fed in one by one, or the single feed mode where an original is automatically pulled in when you insert it and starts being copied. * When setting the different size of originals "Setting the [MIXED ORIGINAL SIZE]"... -
Page 143: Single-Feed Mode
Single-feed Mode Place paper in the drawer(s). - "5.SETTING COPY PAPER" Page 36 Press the [EDIT] button to enter the edit menu, and then press the [ADF] button. - If the desired function buttons are not displayed, press the [NEXT] button or [Prev] button to change the menu. - Page 144 5.USING THE EDITING FUNCTIONS...
-
Page 145: Storing Originals
6. STORING ORIGINALS 1. STORE TO e-FILING ......................142 2. COPY & FILE ........................145... -
Page 146: Store To E-Filing
1. STORE TO e-FILING In this function, the copied original data can be stored in the e-Filing. During copying, you can print it at the same time, as required. After storing the original data, you can print it at any time. To store the original data, you can specify the public box or one of user boxes. - Page 147 Press the [BOX/FOLDER] button. - The box list is displayed. Select the box in which you want to store the data, and then press the [ENTER] button. - Select either the “Public box” or the “User box”. - See the procedure of “e-FILING” for setting a new user box. "2.SETTING UP BOX"...
- Page 148 1.STORE TO e-FILING (Cont.) Press the [ENTER] button. When “PRINT THIS DOCUMENT?” appears, press the [YES] button to store and print the document. - If you want to store the document without printing, press the [NO] button. Press the [START] button. - Storing the original starts.
-
Page 149: Copy & File
2. COPY & FILE In this COPY & FILE function, the copied original data can be sent and stored to the Share folder of the hard disk in the equipment or the specified PC. You can access the data stored in the Share folder directly from the client PC via network. - Page 150 2.COPY & FILE (Cont.) Press the [FILE NAME] button to enter the file name of the stored data. - The letter entry menu is displayed. A file name can contain up to 45 letters. Select the desired location. - [MFP LOCAL]: Select when the originals should be stored in the hard disk in the main equipment.
- Page 151 “NEXT ORIGINAL?” appears. If you have the other originals to be stored, press the [YES] button. If not, press the [FINISHED] button. - This screen is displayed when the scanning is performed from the original glass. It is not displayed from the reversing automatic document feeder (optional).
- Page 152 6.STORING ORIGINALS...
-
Page 153: Scanning The Images
7. SCANNING THE IMAGES 1. SCAN SETTING IN THE TOUCH PANEL .................150 2. SCAN TO e-FILING ......................152 3. SCAN TO FILE........................156 4. SCAN TO E-MAIL ......................160... -
Page 154: Scan Setting In The Touch Panel
1. SCAN SETTING IN THE TOUCH PANEL If the scanning function is used, originals set on the reversing automatic document feeder (optional) or on the original glass can easily be scanned as image data. The scanned image data can be sent or stored to the destinations of “SCAN TO e-FILING”, “SCAN TO FILE”... - Page 155 Set the scanning conditions using the buttons on the touch panel and the digital keys. - Press the [Next] or [Prev] button to switch the screen and make necessary settings. After having completed all the settings, press the [ENTER] button. Press the [SCAN!] button.
-
Page 156: Scan To E-Filing
2. SCAN TO e-FILING In this function, the scanned original data can be stored in the e-Filing. You can scan up to 200 sheets of LT size per 1 job. During scanning, you can perform the SCAN TO FILE or the SCAN TO E-MAIL simultaneously, as required. - Page 157 Press the [SCAN TO E-FILING] button. Press the [BOX/FOLDER] button. - The box list is displayed. Select the box in which you want to store the data and press the [ENTER] button. - Select either the “Public box” or the “User box”. - See the procedure of “e-FILING”...
- Page 158 2.SCAN TO e-FILING (Cont.) Press the [DOCUMENT NAME] button to enter the name of the scanned data. - The letter entry menu (see "Setting Letters" Page 30) is displayed. A document name can contain up to 64 letters. - Press the [ENTER] button on the letter entry menu. Press the [EDIT] button to set the original type and size, and the scanning conditions.
- Page 159 Press the [SCAN!] button. If the “SCAN TO FILE” or the “SCAN TO E-MAIL” button is pressed to make the setting before pressing the [SCAN!] button, the specified 2 jobs can be performed simultaneously. “To continue, place document on glass. And press Scan!”...
-
Page 160: Scan To File
3. SCAN TO FILE In this SCAN TO FILE function, the scanned original data can be sent and stored to the Share folder of the hard disk in the equipment or the specified PC. You can scan up to 1000 sheets of LT size per 1 job. You can access the data stored in the Share folder directly from the client PC via network. - Page 161 Press the [FILE NAME] button to enter the file name of the scanned data. - The letter entry menu is displayed. A file name can contain up to 45 letters. - After entering the letters, be sure to press the [ENTER] button. Select the desired location.
- Page 162 3.SCAN TO FILE (Cont.) - Press the [Next] or [Prev] button to switch the screen and make necessary settings. Press the [ENTER] button. Press the [SCAN!] button. If the [SCAN TO E-FILING] or the [SCAN TO E-MAIL] button is pressed to make the setting before pressing the [SCAN!] button, the specified 2 jobs can be performed simultaneously.
- Page 163 - You can change the original size, type and scanning conditions by pressing the [EDIT] button for the next scanning. - If you want to cancel the storage of the scanned data, press the [JOB CANCEL] button.
-
Page 164: Scan To E-Mail
4. SCAN TO E-MAIL In this function, the scanned data can be sent to the specified E-mail address as an attached file. After finishing the setting for the E-mail transmission, the settings for SCAN TO E-FILING or SCAN TO FILE can be made and the data can be scanned simultaneously. - Page 165 Key in the “USER NAME” and “PASSWORD” on the User Authentication menu, and then press the [ENTER] button. - If "User Authentication for Scan to Email" has not been set, skip to step 5. - When pressing the [USER NAME] and [PASSWORD] button, the letter entry menu is displayed.
- Page 166 4.SCAN TO E-MAIL (Cont.) Press the [SUBJECT] button and enter the subject of the E-mail. - A subject can contain up to 128 letters. "Setting Letters" Page 30 Press the [BODY] button and enter the text body, etc. - A body can contain up to 1,000 letters. Press the [FILE NAME] button and name the scanned data.
- Page 167 Press the [EDIT] button and set the original size and type. - After step 10 is finished, press the [NEXT] button. Set the size of the attached data. - Image data are divided into some small blocks to be sent. FRAGMENT MESSAGE SIZE (KB): NONE, 64 KB, 128 KB, 256 KB, 512 KB, 1024 KB, 2048 KB Press the [Next] or [Prev] button to switch the screen and make...
- Page 168 4.SCAN TO E-MAIL (Cont.) Press the [SCAN!] button. - If the [SCAN TO E-FILING] or the [SCAN TO FILE] button is pressed to make the setting before pressing the [SCAN!] button, the specified 2 jobs can be performed simultaneously. 7.SCANNING THE IMAGES...
-
Page 169: Internet Fax
8. INTERNET FAX 1. INTERNET FAX .........................166 2. SENDING INTERNET FAX ....................168 Setting the Transmission Conditions..................168 Specifying the Recipients ....................171 Advanced Function ......................182 3. RECEIVING INTERNET FAX ....................185... -
Page 170: Internet Fax
1. INTERNET FAX Internet Fax function provides the ability to transmit a scanned original as an E-mail, with an attached TIFF- S file. Since an Internet line is used instead of a phone line, the communication cost can be reduced. In this function, an E-mail address is specified in place of a phone number to transmit a scanned original to the Internet Fax equipment or the client computers. - Page 171 - Internet Fax to Internet Fax The equipment can send a document to another Internet Fax equipment through the Internet or Intranet. The document is sent as an E-mail. im2330/im2830 im2330/im2830 - Internet Fax to/from Client Computers The equipment can send a document as an E-mail to client computers through the Internet or Intranet. The client computers can send an E-mail to the equipment as well.
-
Page 172: Sending Internet Fax
2. SENDING INTERNET FAX Setting the Transmission Conditions Set the resolution, the image quality mode, exposure, original size, subject and body of originals. Whenever a transmission is completed, the condition will automatically return to the default setting. The following describes the setting of each item. - Resolution: Set the resolution before you scan the original to be sent. - Page 173 Press the [FAX] button on the control panel. Press the [ADDRESS] button to display the address menu, and then press the [OPTION] button.
- Page 174 2.SENDING INTERNET FAX (Cont.) After selecting each transmission condition, press the [ENTER] button. - Press the [Prev] or [Next] button to switch the menu. - The buttons shaded in the menu on the right are the default settings. 8.INTERNET FAX...
-
Page 175: Specifying The Recipients
Specifying the Recipients - Direct entry: You can enter the E-mail address directly with the letter entry menu to send the original. - Address book entry: You can specify the other party that has been registered into the address book. - Group entry: Originals are sent to the recipients that have been already specified as a group at a time. -
Page 176: Address Book Entry
2.SENDING INTERNET FAX (Cont.) Address Book Entry - It is necessary to previously register the address book. See the [User Functions Guide] for registering the address book. Press the [FAX] button on the control panel. Place the original(s). - "2.SETTING ORIGINALS" Page 51 Press the [OPTION] button and set the transmission conditions. -
Page 177: Group Entry
Group Entry - It is necessary to previously enter the recipients into the group. See the [User Functions Guide] for creating groups. Press the [FAX] button on the control panel. Place the original(s). - "2.SETTING ORIGINALS" Page 51 Press the [OPTION] button and set the transmission conditions. - Page 178 2.SENDING INTERNET FAX (Cont.) Press the recipient group you want to send to. To check the specified group member, press the [CONTENTS] button. - You can search for the recipient by ID number or group. - Searching by ID Number "Searching by ID Number" Page 175 Searching by Group "Searching by Address"...
- Page 179 Searching by ID Number When selecting the recipient entered in the address and the group, you can immediately search them by the ID number on the screen. Press the [FAX] button on the control panel. Place the original(s). - "2.SETTING ORIGINALS" Page 51 Press the [OPTION] button and set the transmission conditions.
-
Page 180: Searching By Address
2.SENDING INTERNET FAX (Cont.) Press the [E-MAIL] button of destination. - 1 screen can show 8 destinations. To view the destinations not displayed on the screen, press the [Prev] or [Next] button to scroll through the screens. - To continue searching by the ID number, press the [KNOWN ID] button. - Page 181 Press the button of item that you want to search. Enter the letter or the number, and then press the [ENTER] button. - Entering Letters "Setting Letters" Page 30 Press the [SEARCH] button. Press the [E-MAIL] button of destination, and then press the [ENTER] button. - 1 screen can show 8 destinations.
-
Page 182: Searching Address Using Ldap Server
2.SENDING INTERNET FAX (Cont.) Searching Address Using LDAP Server Without using the address book in this equipment, you can select the recipients registered in the address book of the LDAP (Lightweight Directory Access Protocol) server via network. In this case, it is required to register the directory search name using Printer Utility via network beforehand. -
Page 183: Multi-Address Transmission
Press the directory search name that you want to search, and then press the [ENTER] button. Search the recipient, and then send it. - Perform steps 6 to 10 in "Searching by Address" Page 176. * Searching using the LDAP server is available for Fax number and E-mail. -
Page 184: Confirming The Destinations
2.SENDING INTERNET FAX (Cont.) Specify the recipient. - To continuously enter E-mail address after having specified them by means of entering directly, press the [MULTI] button, and then enter the next address. You do not need to press the [MULTI] button for the address book or the group entry. - Page 185 Select the destination that you want to delete, and then press the [DELETE] button.
-
Page 186: Advanced Function
2.SENDING INTERNET FAX (Cont.) Advanced Function The following advanced function can be used. - 2-sided original TX: 2-sided originals can be sent using the reversing automatic document feeder. - Priority TX: You can send originals prior to the reserved transmissions. Sending 2-sided Originals You can scan and send 2-sided originals using the reversing automatic document feeder (optional). -
Page 187: Priority Transmission
Press the [ADVANCED] button to display the advanced menu, and then press the [2-SIDED SCAN] button. Select the original type either the [BOOK] or [TABLET] button, and then press the [ENTER] button. Specify the recipient. - "Specifying the Recipients" Page 171 Press the [START] button. - Page 188 2.SENDING INTERNET FAX (Cont.) Press the [ADVANCED] button to display the advanced menu, and then press the [PRIORITY RESERVE] button. Press the [ENTER] button. Specify the recipient. - "Specifying the Recipients" Page 171 Press the [START] button. 8.INTERNET FAX...
-
Page 189: Receiving Internet Fax
3. RECEIVING INTERNET FAX Receiving Modes The methods to receive an Internet Fax vary according to the type of protocols used for receiving an E-mail. When POP3* is selected for the Receive Mode: - The equipment accesses the E-mail server at specified intervals to check whether any E-mail has been delivered. -
Page 190: Receiving From Smtp Server
3.RECEIVING INTERNET FAX (Cont.) Receiving from POP3 Server To automatically receive the Internet Fax from the E-mail server, set up the “POP3 Time”. Checking whether any E-mail has been delivered at specified intervals will be performed automatically. (Default setting: every 5 minutes) For setting the “POP3 Time”, see the [Network Administrator's Guide]. -
Page 191: Job Status
9. JOB STATUS 1. JOB STATUS ........................188 2. PRINT JOB LIST........................189 3. PROOF PRINT JOB ......................192 4. PRIVATE PRINT JOB ......................194 5. WHEN USING THE DEPARTMENT CODES ..............196 6. CONFIRMING THE STATUS OF FAX/INTERNET FAX JOB ..........198 7. CONFIRMING THE STATUS OF SCAN ................199 8. -
Page 192: Job Status
1. JOB STATUS [JOB STATUS] enables: - To show the list of printing, Internet Fax and scanning jobs in the waiting status - To show the print, transmission, reception, and scan logs - To perform the execution, pause, deletion and movement of the waiting jobs. - To print the send and receive logs 4 jobs are listed on each screen (page). -
Page 193: Print Job List
2. PRINT JOB LIST Print Job displays the status of copy jobs and print jobs transmitted between the equipment and network controller, and perform the deletion, pause, movement and print of the jobs. Press the [Next] button to display the 5th job or later, and press the [Prev] button to display the previous page. - Page 194 2.PRINT JOB LIST (Cont.) “Delete OK?” appears. Press the [DELETE] button to delete the job. Pause/Resume Press the user name on the list you want to interrupt. Press the [PAUSE] button. To resume the job, press the [RELEASE] button. 9.JOB STATUS...
- Page 195 Moving a Print Job Press the user name on the list you want to move. Press the [MOVE] button. Specify the position of the order. - (Ex.) Press the 1st user name to move the target job to the 2nd.
-
Page 196: Proof Print Job
3. PROOF PRINT JOB This function performs the proof print when the [PROOF] button is previously specified with the application. The print job specified for proof print is listed. 1 set is printed as a proof print before the specified number of sets are printed. -
Page 197: Deleting A Job
After confirming the printed paper of the proof print, press the [EDIT] button and key in the desired number to change the number of sets. And then press the [RELEASE] button to continue the normal print job. Deleting a Job Press the [PROOF] button. -
Page 198: Private Print Job
4. PRIVATE PRINT JOB Private print enables to print the desired documents by entering the password which has been set on the application. * For the Private print, see the [Print Guide]. Private Print Press the [PRIVATE] button to display the private print job list. - Page 199 Deleting a Private Print Press the [PRIVATE] button to display the private print job list. Press the user name on the list you want to delete. Press the [DELETE] button. “Delete OK?” appears. Press the [DELETE] button to delete the job.
-
Page 200: When Using The Department Codes
5. WHEN USING THE DEPARTMENT CODES Jobs sent to the equipment without a Department Code or not a registered Department Code will appear in the Invalid Queue of Job status. To Restore the Invalid Code (print error) to the Normal Print Press the [INVALID] button to display the list. - Page 201 Deleting a Job from the List Press the [INVALID] button to display the list. Press the user name on the list you want to delete. Press the [DELETE] button. “Delete OK?” appears. Press the [DELETE] button to delete the job.
-
Page 202: Confirming The Status Of Fax/Internet Fax Job
6. CONFIRMING THE STATUS OF FAX/INTERNET FAX JOB Fax (optional)/Internet Fax (optional) JOB displays its status and allows the deletion or releasing of a job. 4 jobs are listed on each screen (page). The jobs for 250 pages (1,000 jobs) are available to display. Press the [Next] button to display the 5th job or later, and press the [Prev] button to display the previous page. -
Page 203: Confirming The Status Of Scan
7. CONFIRMING THE STATUS OF SCAN SCAN JOB (optional) displays its status and enables to delete the job. 4 jobs are listed on each screen. The jobs for 250 pages (1,000 jobs) are available to display. Press the [Next] button to display the 5th job or later, and press the [Prev] button to display the previous page. -
Page 204: Log List
8. LOG LIST LOG allows you to list the jobs that have finished being copied, printed, sent/received Fax, sent/received Internet Fax, sent/received E-mail and scanned to confirm the results. You can also register the Fax number and E-mail address from the send/receive Fax, sent/received Internet Fax and scan (*1) log to the address book. - Page 205 Send/Receive Log When pressing the [SEND] button on the log menu, the sending status of Fax (optional) or Internet Fax (optional) is displayed. When pressing the [RECEIVE] button on the log menu, the receiving status of Fax (optional), Internet Fax (optional) or E-mail (optional) is displayed.
-
Page 206: Scan Log
8.LOG LIST (Cont.) Scan Log When pressing the [SCAN] button on the log menu, the scanning status of the following items is displayed. - Storing status in e-Filing by copying - Storing status in Share folder (SAVE AS FILE) by copying (optional) - Storing status in e-Filing or Share folder (SCAN TO FILE) by scanning (optional) - Sending status of E-mail (SCAN TO E-MAIL) by scanning (optional) - Items of list... -
Page 207: Address Registration From Log Lists
9. ADDRESS REGISTRATION FROM LOG LISTS You can register the recipient (or sender) in the address book from the SEND /RECEIVE LOG list or the SCAN LOG list by selecting the recipient (or sender) and pressing the [ENTRY] button. * For the address book, see the [User Functions Guide]. Press the [LOG] button and then press the [SEND] (or [RECEIVE] or [SCAN]) button. - Page 208 9.ADDRESS REGISTRATION FROM LOG LISTS (Cont.) Press the [ENTRY] button. ADDRESS ENTRY screen is displayed. Press each button on the touch panel to enter following contact information - [FIRST NAME] - Enter the first name of the contact. This name will appear in the address book list on the touch panel.
-
Page 209: Printing Send/Receive Log List Of Fax
10. PRINTING SEND/RECEIVE LOG LIST OF FAX Up to 120 logs (3 pages) and 1 selected SEND (or RECEIVE) LOG are available to print in the SEND/ RECEIVE LOG list of Fax. * Either 40 logs (1 page) or 120 logs (3 pages) can be set to print the log list. See the [User Functions Guide] for details. -
Page 210: Status
11. STATUS STATUS displays the drawer's size of the equipment and highlights the active drawer during printing. When pressing the [STATUS] during stopping of the print job due to an error, the drawer's size and the active drawer can be changed in case of paper shortage and no applicable drawer. Releasing the Print Error When the drawer for the specified size paper is not prepared, the print job error occurs and the [JOB STATUS] button blinks. - Page 211 Press the paper size button you set by pressing the paper size button on the screen. Press the [START] button.
-
Page 212: Error Code
12. ERROR CODE If an error occurs while using the optional Fax, optional Internet Fax, or optional scan, the error code is displayed in the status of each log. Take an appropriate action with reference to the following. Fax/Internet Fax Error Code Cause &... - Page 213 Error Code Cause & Message Corrective Action 1C13 Message transmission error Turn the power OFF and then back ON. Perform the job in error again. 1C14 Invalid parameter When a template is used, form the template again. If the error still occurs, turn the power OFF and then back ON, and perform the job again.
- Page 214 12.ERROR CODE (Cont.) Error Code Cause & Message Corrective Action 1C61 Address Book reading failure Turn the power OFF and then back ON. Perform the job in error again. Reset the data in the Address Book and perform the job again. If the error still occurs, contact your service representative.
- Page 215 Error Code Cause & Message Corrective Action 1C6D System error Turn the power OFF and then back ON. Perform the job in error again. If the error still occurs, contact your service representative. 1C70 SMTP client OFF Ask your administrator to enable the SMTP Client and perform the job again.
- Page 216 12.ERROR CODE (Cont.) Error Code Cause & Message Corrective Action 3B20-3B22 Context-Type error Ask the sender to resend the E-mail with attached files that are the TIFF format. 3B30-3B32 Invalid character set Ask the sender to resend the E-mail in the ISO-8559-1/2 format.
- Page 217 Error Code Cause & Message Corrective Action 3E20 POP3 server communication timeout Ask your administrator that the POP3 server works properly and the LAN cable is connected to the server. 3E30 POP3 login error Ask your administrator that the POP3 user name and password is set correctly.
- Page 218 12.ERROR CODE (Cont.) Error Code Cause & Message Corrective Action 2C65, 2C66, Failed to connect to SMTP server Make sure the SMTP server is correctly 2C69 working, or the SMTP server address has been set correctly. Then retry the scan. 2C67, 2C68 Failed to send E-Mail message Turn the power OFF and then back ON.
- Page 219 Error Code Cause & Message Corrective Action 2D31, 2D33 Failed to create file Make sure that the access privilege to the storage directory is writable and the server or local disk has a sufficient space in disk capacity. Then retry the scan. 2D32 Failed to delete file Turn the power OFF and then back ON.
- Page 220 12.ERROR CODE (Cont.) Error Code Cause & Message Corrective Action 2B30 Insufficient disk space. Delete unnecessary documents in e-Filing and try again. 2B31 Failed to access Electronic Filing. Make sure that the specified e-Filing or folder exists. (If not, this error would not occur.). Delete the specified e-Filing or folder and reset them.
- Page 221 Error Code Cause & Message Corrective Action 2BC0 System fatal error. Turn the power OFF and then back ON. Retry the print. If the error still occurs, contact your service representative. 2BC1 Failed to acquire resource. Turn the power OFF and then back ON. Retry the print.
- Page 222 12.ERROR CODE (Cont.) RFC related Error Code Cause & Message Corrective Action 2500 Syntax error, command unrecognized: Check if the Terminal mail address and HOST NAME error, Destination mail Destination mail address are correct. Check if address error, Terminal mail address the mail server is operating properly.
-
Page 223: E-Filing
10. e-FILING 1. e-FILING FUNCTIONS ......................220 2. SETTING UP BOX ......................223 3. CHANGING INPUT DATA....................225 4. DELETING BOX ........................227 5. DELETING FOLDER ......................228 6. DELETING DOCUMENT ....................230 7. PRINTING STORED DOCUMENT ..................232... -
Page 224: E-Filing Functions
1. e-FILING FUNCTIONS In this e-Filing functions, the documents obtained by copying, scanning, printing, Fax receiving and Internet Fax reception can be managed in the e-Filing (hard disk) inside the equipment. Before you use the e-Filing, you need to set up it. The e-Filing consists of one public box and user boxes up to 200. You can store a number of documents in each box, and then print the stored documents later as required. - Page 225 The following figure shows the functional diagram of the e-Filing. 1 : Store the document. 2 : Add the printing settings to the stored documents as required. 3 : Print the documents. 4 : The documents can be viewed, edited, merged (Copy/Paste), and printed by the e-Filing web utility via network.
- Page 226 1.e-FILING FUNCTIONS (Cont.) The following shows the basic configuration of the e-Filing. Public box Shared document 1, Shared document 2, ... User box 001 Document 1 Document 2 Folder 1 Document 1 Document 2 The public box is a pre-set box by default in the equipment. Use it to store documents that any user may need to work with.
-
Page 227: Setting Up Box
2. SETTING UP BOX The e-Filing consists of one public box and user boxes up to 200. The public box is a pre-set box since the installation of the equipment, and no setting up is required. The user box can be set/registered by giving a box name. - Page 228 2.SETTING UP BOX (Cont.) Press the [ENTER] button. - A box is newly set. 10.e-FILING...
-
Page 229: Changing Input Data
3. CHANGING INPUT DATA The “registered box name” and “password” of the user box can be changed. * You cannot change the folder name with the equipment. Change it with a client PC using the e-Filing web utility via network, if required. See the [e-Filing Guide] for details. Press the [e-FILING] button on the control panel. - Page 230 3.CHANGING INPUT DATA (Cont.) Press the [ENTER] button. - The box settings are updated. 10.e-FILING...
-
Page 231: Deleting Box
4. DELETING BOX The unnecessary user box can be deleted. In this case, all the documents in a user box are also deleted. * The public box cannot be deleted. * You cannot delete the folder in a user box with the equipment. Delete it with a client PC using the e-Filing web utility via network, if required. -
Page 232: Deleting Folder
5. DELETING FOLDER An unnecessary folder can be deleted. In this case, all the documents in the folder are also deleted. Press the [e-FILING] button on the control panel. Select the box in which the folder you want to delete is stored, and then press the [ENTER] button. - Page 233 “Are you sure you want to delete this folder?” appears. Press the [YES] button to delete the folder. - The selected folder is deleted.
-
Page 234: Deleting Document
6. DELETING DOCUMENT The document stored in the user box and folder can be deleted. Press the [e-FILING] button on the control panel. Select the box in which the document you want to delete is stored, and then press the [ENTER] button. Key in the “Password”... - Page 235 To delete the document in the box, select the document you want to delete, and then press the [DELETE] button.To delete the document in the folder, select the folder in which the document you want to delete is stored, and then press the [OPEN FOLDER] button.
-
Page 236: Printing Stored Document
7. PRINTING STORED DOCUMENT Documents stored in the box or the folder can be printed. State of finishing can be selected. And to confirm the printing content, test printing can also be performed. Print the whole Document All the pages of the document will be printed. If printing multiple copies is desired, see "Printing the Stored Document with Added/Changed Settings"... - Page 237 Press the [PRINT] button. - Printing of the whole document starts. When you want to stop the print of the stored document during the operation, select the job you want to stop from the PRINT JOB screen or SCAN JOB screen and then press the [DELETE] button. For details, see the JOB STATUS.
- Page 238 7.PRINTING STORED DOCUMENT (Cont.) Press the [PRINT] button. - Printing the set page starts. When you want to stop the print of the stored document during the operation, select the job you want to stop from the PRINT JOB screen or SCAN JOB screen and then press the [DELETE] button. For details, see the JOB STATUS.
- Page 239 Press the [SETTINGS] button. Set printing as required. - See the previous page for details. As for the settings of 3 to 8, press the button, select the desired button in the menu and press the [ENTER] button. Press the [PRINT] button. - Printing starts.
- Page 240 10.e-FILING...
-
Page 241: Template
11. TEMPLATE 1. TEMPLATE ........................238 2. RECALLING TEMPLATE ....................239 3. REGISTERING TEMPLATE....................242 4. CHANGING INPUT DATA....................248 5. DELETING TEMPLATE .....................253... -
Page 242: Template
1. TEMPLATE A combination of functions frequently used can be registered as a template and recalled as required * You can register the setting combination of copy functions, scan functions or Fax functions as a template and retrieve it. The combinations are registered in either “PUBLIC TEMPLATE GROUP” or “USER GROUP (Up to 200 groups are available.)”... -
Page 243: Recalling Template
2. RECALLING TEMPLATE All you have to do is to press the [START] button (the [SCAN] button on the touch panel for scanning) after recalling the required template. The operation of the registered setting functions is automatically started by pressing the template button with the icon if “ENABLE”... - Page 244 2.RECALLING TEMPLATE (Cont.) Select the desired template. - When the template button with the icon is pressed, the operation of the registered setting functions is automatically started. Confirm that “Updated the template setting” is displayed on the screen. Select other copy mode as required. Press the [START] button.
- Page 245 Key in the Password (5 digits) of the selected group, and then press the [ENTER] button. - If the password has not been set at the group registration, skip this procedure and go to step 6. Select the desired template. - When the template button with the icon is pressed, the operation of the registered setting functions is automatically...
-
Page 246: Registering Template
3. REGISTERING TEMPLATE To recall the template, you need to first register the setting combination as a template. The template is registered either in “PUBLIC TEMPLATE GROUP” or “USER GROUP” depending on your purpose. - PUBLIC TEMPLATE GROUP: Anyone can use the template when the setting combination of the functions frequently used throughout the company or organization have been registered in this group. - Page 247 Press the [PASSWORD] button and then key in the “Admin Password” (6 to 10 digits). - When pressing the [PASSWORD] button, the letter entry menu is displayed. Key in the password, and then press the [ENTER] button. Press the blank key in the template menu, and then press the [SAVE] button.
- Page 248 3.REGISTERING TEMPLATE (Cont.) When pressing the [PASSWORD] button on the menu of step 7, the menu is switched as shown on the right. Key in a 5-digit identical number in both “Password” and “Retype Password”, and then press the [ENTER] button. - Press the [ENTER] button after entering the password.
- Page 249 Select the “USER GROUP” of blank buttons from 001 to 200, and then press the [ENTER] button. - When selecting the unregistered “USER GROUP”, follow step 5. - When selecting the registered “USER GROUP”, key in “GROUP PASSWORD” (5 digits) on the next menu, and then skip to step 8. Enter the data for registering the new user group.
- Page 250 3.REGISTERING TEMPLATE (Cont.) Press the empty [TEMPLATE] button, and then press the [SAVE] button. Enter the data requested. - Although either the “NAME 1” or the “NAME 2” must be entered, the “USER NAME” and the “PASSWORD” are entered as required.
- Page 251 Press the [SAVE] button. - The menu returns to step 1, which is the menu seen before pressing the [TEMPLATE] button on the control panel.
-
Page 252: Changing Input Data
4. CHANGING INPUT DATA The registered name, user name, password of template/user group can be changed. Changing the Data of Template Press the [TEMPLATE] button on the control panel. Press the [REGISTRATION] button. Select the group (in which the template was registered) that you want to change, and then press the [ENTER] button. - Page 253 Select the template you want to change, and then press the [EDIT] button. Key in the “Password” (5 digits) for the selected template, and then press the [ENTER] button. - If the password has not been set at the template registration, skip to step 7.
- Page 254 4.CHANGING INPUT DATA (Cont.) When pressing the [PASSWORD] button on the menu of step 7, the menu is switched as shown on the right. Key in the changed number (5-digits identical number) in both “Password” and “Retype Password”, then press the [ENTER] button.
- Page 255 Select the “USER GROUP” you want to change, and then press the [EDIT] button. - Switch to the applicable menu using the [prev] or the [Next] button. - To display the applicable menu immediately, key in the number of the desired user group using the digital keys. Key in the “Password”...
- Page 256 4.CHANGING INPUT DATA (Cont.) Press the [ENTER] button. - The data of user group are changed. 11.TEMPLATE...
-
Page 257: Deleting Template
5. DELETING TEMPLATE Unnecessary templates can be deleted. You can also delete user groups. Deleting a Template Press the [TEMPLATE] button on the control panel. Press the [REGISTRATION] button. Select the group (in which the template was registered) that you want to delete, then press the [ENTER] button. - Page 258 5.DELETING TEMPLATE (Cont.) Select the template you want to delete, then press the [DELETE] button. Key in the “Password” (5 digits) for the selected template, and then press the [ENTER] button. - If the password has not been set at the user group registration, skip to step 7.
- Page 259 Deleting a User Group Press the [TEMPLATE] button on the control panel. Press the [REGISTRATION] button. Select the user group you want to delete, and then press the [DELETE] button. - Switch to the applicable menu using the [Prev] or the [Next] button.
- Page 260 5.DELETING TEMPLATE (Cont.) Press the [DELETE] button. - The selected user group is deleted. 11.TEMPLATE...
-
Page 261: When The Graphic Symbols Blink On The Touch Panel
12. WHEN THE GRAPHIC SYMBOLS BLINK ON THE TOUCH PANEL 1. DESCRIPTION OF THE BLINKING GRAPHIC SYMBOLS..........258 2. REPLACE TONER CARTRIDGE SYMBOL...............260 3. CLEAR PAPER SYMBOL ....................265 4. ADDING STAPLES (OPTIONAL)..................280 5. REMOVING JAMMED STAPLES (OPTIONAL)..............285 6. DISPOSING OF THE PUNCHED PAPER BITS (OPTIONAL)...........289 7. -
Page 262: Description Of The Blinking Graphic Symbols
1. DESCRIPTION OF THE BLINKING GRAPHIC SYMBOLS The graphic symbol on the touch panel shows the status of the equipment. When one of the graphic symbols blinks, take the appropriate action referring to the page shown. 1 : REPLACE TONER CARTRIDGE symbol Blinks when the toner cartridge runs out of toner. - Page 263 9 : RELAY UNIT MISFEED symbol Blinks when a paper misfeed occurs in the relay unit. "9. Paper Misfeed in the Relay Unit (optional)" Page 274 10: FINISHER/HOLE PUNCH UNIT MISFEED symbol Blinks when a paper misfeed occurs inside the finisher (optional) or hole punch unit (optional). "11.
-
Page 264: Replace Toner Cartridge Symbol
2. REPLACE TONER CARTRIDGE SYMBOL When the toner in the cartridge runs out, the REPLACE TONER CARTRIDGE symbol blinks and “Install new toner cartridge” appears. Replacing the Toner Cartridge Open the front cover. Press the green lever down. - It makes the toner cartridge move to the front. 12.WHEN THE GRAPHIC SYMBOLS BLINK ON THE TOUCH... - Page 265 Pull out the toner cartridge. Shake the new toner cartridge well to loosen the toner inside. Pull out the seal in the direction of the arrow. Insert the toner cartridge until it clicks.
- Page 266 2.REPLACE TONER CARTRIDGE SYMBOL (Cont.) Lower the bypass tray. Open the automatic duplexer. Open the transfer cover to take out the transfer charger cleaner from the front pocket. Wipe the transfer charger wire properly with the transfer charger cleaner. - Insert the transfer charger cleaner into the edge of the transfer separation unit.
- Page 267 Return the transfer charger cleaner to the front pocket, and then close the transfer cover. Return the automatic duplexer and the bypass tray to their original position. Close the front cover.
- Page 268 2.REPLACE TONER CARTRIDGE SYMBOL (Cont.) Additional Explanation The life of the toner cartridge (number of copies) varies depending on the following conditions. 1 Coverage of originals (printing ration of copies) 2 Size and density of originals 3 The existence of solid black when making copies (when a book is copied and the original cover is partially open.) 4 Temperature and humidity in the room when making copies.
-
Page 269: Clear Paper Symbol
3. CLEAR PAPER SYMBOL When a paper misfeed occurs in the equipment, the symbol on the touch panel blinks in the positions where the paper is misfed. In that case, remove the misfed paper using the following procedure referring to the illustration below. * See "1.DESCRIPTION OF THE BLINKING GRAPHIC SYMBOLS"... - Page 270 3.CLEAR PAPER SYMBOL (Cont.) If the misfed original still remains, rotate the green knob to the opposite direction against the step 2. Then remove it. Lift the green handle. - Remove any misfed originals. Rotate the green knob on your side in the direction of the arrow and remove any misfed originals.
- Page 271 Lower the original feeding tray, move the green knob toward the front and open the cover. Remove any misfed paper. Close the upper and lower cover.
- Page 272 3.CLEAR PAPER SYMBOL (Cont.) 2. Jam Releasing Unit Misfeed Open the bypass tray. Open the automatic duplexer. Open the transfer cover. Rotate the green knob as indicated by the arrow toward the inside and remove any misfed paper. Return the transfer cover, the automatic duplexer and the bypass tray to the original positions.
- Page 273 3. Drawer Misfeed Open the cover. Remove any misfed paper. Close the cover.
- Page 274 3.CLEAR PAPER SYMBOL (Cont.) 4. Paper Misfeed in the Large Capacity Feeder (optional) Open the cover. Remove any misfed paper. Paper Misfeed in the Paper Feed Pedestal (optional) -Open the cover as shown on the right, and remove any misfed paper.
- Page 275 5. Paper Misfeed on the Bypass Feed Unit Pull out misfed paper on the bypass tray. 6. Paper Misfeed in the Automatic Duplexer Make sure that the bypass tray is opened, and then open the automatic duplexer. - Be careful not to let your fingers be caught between the equipment and the automatic duplexer.
- Page 276 3.CLEAR PAPER SYMBOL (Cont.) 7. Paper Misfeed in the Fuser Unit Make sure that the bypass tray and the automatic duplexer are opened, and then open the transfer cover. Open the exit cover. - Press it down completely. ( 1 ) ( 2 ) Remove any misfed paper.
- Page 277 8. Paper Misfeed in the Offset Tray Unit or Job Separator Unit (Optional) Make sure that the bypass tray and the automatic duplexer are open, then open the transfer cover. DO NOT touch the fuser unit and the metal area around it. Since they are very hot, you could be burned or the shock could cause an injury to your hand in the equipment.
- Page 278 3.CLEAR PAPER SYMBOL (Cont.) Remove any misfed paper inside the offset tray unit or job separator unit. - According to the position of the misfed paper, pull it out upward or downward. - upward - downward Close the offset tray cover or job separator cover.
- Page 279 Remove any misfed paper that is inside the relay unit. Remove the misfed paper from the fuser unit side if it is easier. Close the relay unit cover. 10. Paper Misfeed in the Finisher (optional) Remove any misfed paper in the paper exit area.
- Page 280 3.CLEAR PAPER SYMBOL (Cont.) 11. Paper Misfeed in the Hole Punch Unit (optional) Pressing the release lever of the finisher, move the finisher carefully away from the copier. Rotate the green knob of the hole punch unit to locate the arrow within the shadow area in the right side of the knob.
- Page 281 12. Paper Misfeed in the Single-staple Finisher (optional) Pull the lever and move the finisher carefully away from the copier. Lift the green lever and remove any misfed paper. Remove any misfed paper in the paper exit area. Install the finisher to the equipment. Be careful not to let your fingers be caught between the equipment and the finisher (optional).
- Page 282 3.CLEAR PAPER SYMBOL (Cont.) 13. Paper Misfeed in the Saddle-stitch Finisher (optional) Pressing the release lever of the finisher, move the finisher carefully away from the copier. Open the exit cover. Remove any misfed paper. Open the front cover. 12.WHEN THE GRAPHIC SYMBOLS BLINK ON THE TOUCH PANEL...
- Page 283 Rotate the knob in the lower right clockwise. - Remove any misfed paper in the paper exit area of the saddle stitch unit. Close the exit cover and the front cover, and then return the finisher to the original position. 14.
-
Page 284: Adding Staples (Optional)
4. ADDING STAPLES (OPTIONAL) When the staple in the cartridge runs out, “Check staple cartridge” appears. Add staples to the cartridge according to the procedure below. Saddle-stitch Finisher (optional) Open the front cover of the finisher. Hold the green handle to pull out the staple unit. - Page 285 Holding the both sides of the green area of the staple cartridge, take out the cartridge. Take out the empty staple case. - Push the buttons (marked PUSH) from both sides to release the lock. - Take out the empty staple case from the staple cartridge. Push the new staple case into the staple cartridge until it clicks.
- Page 286 4.ADDING STAPLES (OPTIONAL) (Cont.) Pull out the seal holding the staples. Return the staple cartridge to the original position. Return the staple unit to the original position, and then close the front cover. 12.WHEN THE GRAPHIC SYMBOLS BLINK ON THE TOUCH PANEL...
-
Page 287: Staple Cartridge
Single-staple Finisher (optional) Pull the lever and move the finisher away carefully from the equipment. Take out the staple cartridge. Remove the empty staple case from the staple cartridge. Set the new staple case. - Push a new staple case into the staple cartridge until it clicks. - Do not remove the seal holding the staples before the staple case is set in the cartridge. - Page 288 4.ADDING STAPLES (OPTIONAL) (Cont.) Pull out the seal holding the staples straight upward. Return the staple cartridge to its original position. - Insert the cartridge until it is caught by the latch and fixed with a click sound. If “Check staple cartridge” remains, repeat the above procedure from step 1 to 6.
-
Page 289: Removing Jammed Staples (Optional)
5. REMOVING JAMMED STAPLES (OPTIONAL) If copies have not been stapled in the staple mode, “Examine stapler” appears. This shows that staples are jammed. Remove them as described below. Saddle-stitch Finisher (optional) Open the front cover of the finisher. Hold the green handle to pull out the staple unit. - Page 290 5.REMOVING JAMMED STAPLES (OPTIONAL) (Cont.) Holding the both sides of the green area of the staple cartridge, take out the cartridge. Holding the knob on which the blue seal attaches, raise the staple cover. Remove any jammed staples. Holding the handle, lower the staple cover.
- Page 291 Single-staple Finisher (optional) Pull the lever and move the finisher away carefully from the equipment. Take out the staple cartridge. Lower the staple cover while holding the knob. ( A ) - A: stapler Do not touch the stapling area. The stapler could injure you. Remove any jammed staples.
- Page 292 5.REMOVING JAMMED STAPLES (OPTIONAL) (Cont.) Return the staple cover to its original position while holding the knob. Return the staple cartridge to its original position. - Insert the cartridge until it is caught by the latch and fixed with a click sound.
-
Page 293: Disposing Of The Punched Paper Bits (Optional)
6. DISPOSING OF THE PUNCHED PAPER BITS (OPTIONAL) When paper bits punched from copies have accumulated to a certain level, “READY (HOLE PUNCH DUST BIN IS FULL)” appears. Dispose of the paper bits as described below. Pressing the release lever of the finisher, move the finisher carefully away from the copier. -
Page 294: Call Service Symbol/Periodic Maintenance Message
7. CALL SERVICE SYMBOL/PERIODIC MAINTENANCE MESSAGE Call Service Symbol Never attempt to repair, disassemble or modify the equipment by yourself. You could cause a fire or get an electric shock. Always contact your service representative for maintenance or repair of the internal parts of the copier. When the CALL SERVICE symbol blinks and “Misfeed in copier Press HELP”... -
Page 295: Maintenance
13. MAINTENANCE 1. DAILY INSPECTION ......................292 2. SIMPLE TROUBLESHOOTING..................294... -
Page 296: Daily Inspection
1. DAILY INSPECTION Items for Daily Check Power ON/OFF status We recommend that you turn the power switch ON at the startup everyday so as to use whenever needed. Also, be sure to turn the power OFF ("Turning off the Power (Shutting down)" Page 31) when you leave the office, except in the following cases: - When the off-mode (or sleep mode) is set;... -
Page 297: Cleaning The Charger
Cleaning the Charger If the inside of the charger wire become dirty, the dirt may appear on the copy. * Before start cleaning, BE SURE TO TURN OFF THE POWER, then open the front cover. To turn the power OFF, see "Turning off the Power (Shutting down)" Page 31. -
Page 298: Simple Troubleshooting
2. SIMPLE TROUBLESHOOTING Check the following items and, if the problem still occurs, call your service representative for assistance. NEVER attempt to repair, disassemble or modify the equipment by yourself. You could cause a fire or get an electric shock. ALWAYS contact your service representative for maintenance or repair of the internal parts of the equipment. -
Page 299: Image Density Is Too Low
Image Density is too Low Items to be checked Countermeasure Reference page Has the message “Install new Replace the toner cartridge. "2.REPLACE TONER CARTRIDGE toner cartridge” appeared on SYMBOL" Page 260 the screen? Is the image density or the Use the manual density buttons "Manual Copy Density Mode"... -
Page 300: Images Are Stained
2.SIMPLE TROUBLESHOOTING (Cont.) Images are Stained Items to be checked Countermeasure Reference page Is the original cover or the Close the cover or the feeder "When Placing an Original on the optional reversing automatic properly to shut out any outer Glass"... -
Page 301: Functions Cannot Be Set
Images are Partially Missing Item to be checked Countermeasure Reference page Are the original size and Select copy paper of the same "1.PAPER SELECTION" Page direction, as well as the size as the original, or set the 74. "2.REDUCTION AND reproduction ratio suitable for reproduction ratio suitable for ENLARGEMENT COPYING"... - Page 302 13.MAINTENANCE...
-
Page 303: Specifications & Options
14. SPECIFICATIONS & OPTIONS 1. im2330/im2830 SPECIFICATIONS..................300 2. SPECIFICATIONS OF OPTIONS ..................303 3. PACKING LIST........................310 4. COPYING FUNCTION COMBINATION MATRIX .............. 311 Combination Matrix 1/2 ...................... 311 Combination Matrix 2/2 ......................312... -
Page 304: Im2330/Im2830 Specifications
1. im2330/im2830 SPECIFICATIONS Model Name im2330/im2830 Type Desktop type Original Glass Fixed Printing (Copying) System Indirect electrophotographic method Developing System 2-component magnetic brush developing Fixing Method Halogen lamp (2 pieces) Photosensor Type Original Scanning System Flat surface scanning system (When the reversing automatic document feeder is installed: Fixed scanning system by feeding the original) Original Scanning Sensor Linear CCD sensor... - Page 305 Toner Density Adjustment Magnetic auto-toner system Exposure Control Automatic plus manual selection from 11 exposure step Environment Temperature: 10-30ºC, Humidity: 20-85% (No Condensation) (for normal use) Power Requirements 115 V ±10%, 12 A (50/60 Hz) Power Consumption At least 1.5 kW (including optional equipments) Dimensions 25.08”...
- Page 306 1.im2330/im2830 SPECIFICATIONS (Cont.) Continuous Copying Speed Unit: sheets/min. Paper Type Paper size Feeder im2330 im2830 Plain Paper LT, ST-R, A4, A5-R, B5 Drawer Bypass LT-R, A4-R, B5-R Drawer Bypass LG, COMP, B4, FOLIO Drawer Bypass LD, A3 Drawer Bypass Thick 1 LT, ST-R, A4, A5-R, B5 Drawer Bypass...
-
Page 307: Specifications Of Options
2. SPECIFICATIONS OF OPTIONS Reversing Automatic Document Feeder Model Name MR-3016 Copy Sides 1-side, Duplex Number of Originals (LT) 100 originals (13.3-21.3 lb.) Feeding Speed 45 originals/min. (LT, 100%) Acceptable Originals LD, LG, LT, LT-R, ST-R, COMP Paper Weight 13.3-34 lb. (1-sided original), 13.3-28 lb. (2-sided original) Power Source Power supplied from the equipment Dimensions... - Page 308 2.SPECIFICATIONS OF OPTIONS (Cont.) Paper Feed Pedestal (1 drawer type) Paper Weight 17-28 lb. Maximum Capacity 550 sheets (20 lb. Bond) Dimensions 24.5” (W) x 25.9” (D) x 12.6” (H) Weight Approx. 47.4 lb. 14.SPECIFICATIONS & OPTIONS...
- Page 309 Additional Drawer Module Model Name MY-1021 Acceptable Paper Size LD, LG, LT, LT-R, ST-R, COMP Paper Weight 16-28 lb. Maximum Capacity 550 sheets (20 lb. Bond) Dimensions 20.7” (W) x 22.4” (D) x 4.2” (H) Weight Approx. 8.38 lb. Saddle-stitch Finisher Model Name 9256 Type...
- Page 310 2.SPECIFICATIONS OF OPTIONS (Cont.) Tray Loading Capacity: (See "Available Conditions for Saddle Stitch" Page 93) (9256 with mixed paper not loaded) Mode Non-Sort Sort/Group Staples loaded Tray No. LT, LT-R, ST-R, A4, A4-R, A5-R, B5, B5-R 6.3” 6.3” 6.3” (1000) (960) (1000 sheets or 30 sets) LD, LG, COMP, A3, B4, FOLIO...
- Page 311 Single-staple Finisher Model Name 9284 Type Hanging-type Acceptable Paper Size LD, LG, LT, LT-R, ST-R, COMP, A3, A4, A4-R, B4, B5, A5-R, FOLIO Acceptable Paper Weight 13.3-55 lb. Bond Number of Copies Stapled at LT, LT-R, A4, A4-R, B5 30 sheets a time LG, B4 50 sheets...
- Page 312 2.SPECIFICATIONS OF OPTIONS (Cont.) (9284 with mixed paper loaded) Mode Non-Sort Sort/Group Staples loaded Tray No. Combination of 0.59” 1.92” different width (100) (350) paper LD and LT 0.59” 1.92” 0.59” 1.92” (80 sheets or 15 sets) (300 sheets or 15 sets) (100) (350) (100)
- Page 313 Offset Tray Model Name IM2300040 Acceptable Paper Size LD, LG, LT, LT-R, ST, ST-R Acceptable Paper Weight 13 lb. to 55 lb. (110 lb. Index type) Loading Capacity 1.54” (250 sheets) Shift Amount Approx. 1.2” Power Source Supplied from the multifunctional digital systems Dimensions 19.7”...
-
Page 314: Packing List
3. PACKING LIST Packing List Operator’s Manual Pocket Unpacking Instructions Operator’s Manual Setup Report Warranty Sheet 14.SPECIFICATIONS & OPTIONS... -
Page 315: Copying Function Combination Matrix
4. COPYING FUNCTION COMBINATION MATRIX Combination Matrix 1/2... -
Page 316: Combination Matrix 2/2
4.COPYING FUNCTION COMBINATION MATRIX (Cont.) Combination Matrix 2/2 14.SPECIFICATIONS & OPTIONS... - Page 317 INDEX Numerics basic screen ..........24 1-Sided Originals to 1-Sided Copies Before copying on an envelope ......68 (default setting) ..........96 BLINKING GRAPHIC SYMBOLS ....258 1-Sided Originals to 2-Sided Copies ....96 BOOK CENTER ERASE ......... 112 2 IN 1/4 IN 1 .............115 Bookbinding margin .........109 2-Sided Originals to 1-Sided Copies ....
- Page 318 INDEX (Cont.) Controlling the Use of the Copier Drawer for sheet insertion .........42 with Department Codes ........33 Drawer for special sheets ........42 COPY & FILE ..........145 DRAWER MISFEED ........258 COPY button ............. 23 Drawer Misfeed ..........269 COPY DENSITY ADJUSTMENT ....102 Drawers .............20 Copy paper ..........
- Page 319 GENERAL COPYING PROCEDURES ..... 48 Machine Balance ..........8 GENERAL PRECAUTIONS .......11 MAGAZINE SORT ........... 117 Group copying ........... 87 Magazine Sort ...........91 Group Entry ............. 173 MAGAZINE SORT & SADDLE STITCH button ............91 Magazine Sort & Saddle Stitch Mode Handling and storing paper .......
- Page 320 INDEX (Cont.) in the Automatic Duplexer ......271 RECEIVING INTERNET FAX ......185 in the Finisher (optional) ......275 Receiving Modes ..........185 Recommended paper/ in the Fuser Unit ........272 Handling and Storing Paper .......38 in the Hole Punch Unit (optional) ....276 REDUCTION AND ENLARGEMENT in the Large Capacity Feeder (optional) ..
- Page 321 SETTING ORIGINALS ........51 TIME & DATE STAMP ........129 Setting Paper to the Large Capacity Feeder Tip ................9 (Optional) ............46 To Restore the Invalid Code (print error) Setting Staple Sort Mode ........89 to the Normal Print ...........196 Setting the Drawer for Special Uses ... 39 Toner .............
- Page 322 X-Y ZOOM ............123...
- Page 323 Printed in China im2330/2830...
Need help?
Do you have a question about the im2330 / im2830 and is the answer not in the manual?
Questions and answers