Table of Contents
Advertisement
Quick Links
BEDIENUNGSANWEISUNG
mit Montageanweisungen
Instructions for use and installation instructions
Instructions d'utilisation et avis de montage
Gebruiksaanwijzing en montagehandleiding
Istruzioni di uso e di montaggio
Instrucciones de uso y de montaje
Instruções de uso e de montagem
Ο∆ΗΓΙΕΣ ΧΡΗΣΗΣ ΚΑΙ ΣΥΝΑΡΜΟΛΟΓΗΣΗΣ
EKE 606.4 / 805.4
225982 N81
Advertisement
Table of Contents

Subscribe to Our Youtube Channel
Related Manuals for Kuppersbusch EKE 606.4


Summary of Contents for Kuppersbusch EKE 606.4
- Page 1 Instructions for use and installation instructions Instructions d'utilisation et avis de montage Gebruiksaanwijzing en montagehandleiding Istruzioni di uso e di montaggio Instrucciones de uso y de montaje Instruções de uso e de montagem Ο∆ΗΓΙΕΣ ΧΡΗΣΗΣ ΚΑΙ ΣΥΝΑΡΜΟΛΟΓΗΣΗΣ EKE 606.4 / 805.4 225982 N81...
-
Page 2: Table Of Contents
Disposing of the packaging For your information... Please ensure the environmentally-friendly disposal of the pack- Please read this manual carefully before using your appliance. It aging that came with your appliance. Recycling the packaging contains important information on safety and on how to use and material saves on resources and cuts down on waste. -
Page 3: Safety Instructions
Safety instructions Connection and operation • If food boils over onto the sensor keys, we advise you to Safety instructions activate the OFF key. • The appliances are constructed in accordance with the • Hot pans should not cover the sensor keys, since this will relevant safety regulations. -
Page 4: Appliance Description
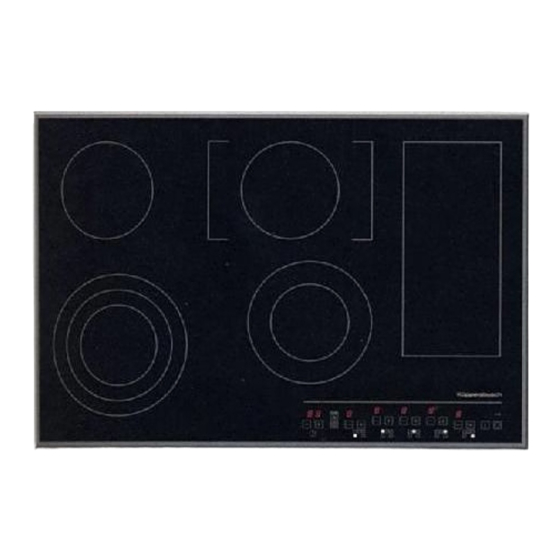
Appliance description Operating the hob with the sensor keys 1. Front left cooking zone 2. Rear left cooking zone The ceramic glass hob is operated with touch control sensor 3. Back right cooking zone (frying zone) keys. The sensor keys are operated as follows: lightly touch a symbol on the surface of the ceramic glass plate. -
Page 5: Operation
Operation Residual heat display If the operation time limit has been activated, the cooking zone Operation will switch off, a short signal will sound and an H will appear in The glass ceramic hob is equipped with an H as a resid- the display. -
Page 6: Operating The Keys
Operation Operating the keys The controls described here expect the pressing of a (selection) key to be followed by the pressing of a subsequent key. The next key will need to be pressed within 10 seconds, otherwise the selection will be deleted. The Plus/ Minus keys can be touched individually or be permanently pressed. -
Page 7: Locking
Operation Locking The lock can be used to lock key operation and cooking level settings. Only the Off key can be used to switch the hob off. Activating the lock (while cooking): 1. Press the Lock key to activate function. The control lamp above the Lock key will light up. -
Page 8: Automatic Switch-Off (Timer)
Operation Automatic switch-off (timer) The automatic switch-off device is used to automatically switch off any cook- ing zone after a stipulated period of time. Cooking times ranging from 1 minute to 99 minutes can be set. 1. Switch on the hob. 2. -
Page 9: Automatic Boost Function
Operation Automatic boost function Parboiling takes place at power level 9 with the automatic boost function. After a certain time the power level will switch down automatically to a lower simmering setting (1 to 8). When using the automatic boost function only the simmering setting with which the food is to be cooked through needs to be selected since the elec- tronic unit switches down automatically. -
Page 10: Cleaning And Care
Cleaning and Care Specific soiling Cleaning and Care Heavy soiling and stains (limescaling and shiny, mother-of- pearl-type stains) can best be removed when the hob is still • Before cleaning, switch off the hob and let it cool down. slightly warm. Use commercial cleaning agents to clean the hob. •... -
Page 11: What To Do If Trouble Occurs
What to do if trouble occurs The symbol will blink and a time-limited continuous What to do if trouble occurs signal will sound. Food which has boiled over, cookware or other items are causing the touch control sensor keys to be consistently operated. Interference with and repairs to the appliance by unqualified per- Remedy: clean the surface or remove the item. -
Page 12: Instructions For Assembly
Instructions for assembly Note Installation Instructions for assembly The KÜPPERSBUSCH hob may only be built-in in accord- Important ance to the instructions included in this manual: • If the cooking surface is located above furniture parts (side • over an intermediate shelf panels, drawers, etc.), then an intermediate shelf must be •... - Page 13 Instructions for assembly Dimensions in mm Clips • Drive the clips into the worktop cut-out at the intervals indicated. It is not necessary to adjust the height due to the horizontal stop. • Important! The horizontal drive of the clips must be flush with the worktop.
-
Page 14: Electrical Connection
Instructions for assembly Electrical connection Electrical Permanent connection by means of an oven connection connection socket. • The built-in cooking area must be connected to the mains Connection is depicted on the underside of the appliance, supply by a qualified electrician who is authorized to carry diagram suitable for the various types of mains. -
Page 15: Technical Data
Instructions for assembly Technical data Start of operation EKE 606 Once the hob has been installed and the power supply has been provided (mains connected) an automatic test of the controls will Hob dimensions be carried out and information for Customer Service will be indi- Height/ Width/ Depth .
Need help?
Do you have a question about the EKE 606.4 and is the answer not in the manual?
Questions and answers