Table of Contents
Advertisement
Advertisement
Table of Contents

Related Manuals for Grundig UMS 25


Summary of Contents for Grundig UMS 25
- Page 1 MICRO-SYSTEM UMS 25 ENGLISH...
-
Page 2: Table Of Contents
Special features of CD mode Playback of titles in a selected order – creating a music programme Tape mode General information about tape mode Playback, recording Faster tape forward/rewind Timer mode Information Cleaning the tape drive Technical data GRUNDIG customer service locations... -
Page 3: Set-Up And Safety
SET-UP AND SAFETY ______________________________________________ In order that this quality, easy-to-use stereo system continues to provide you with satisfaction and entertainment, please observe the following when setting it C D O P E N / C L O S E This stereo system is designed for the playback of audio signals. CL O CK T I M E R ME M ORY R D S MO D E... -
Page 4: Overview
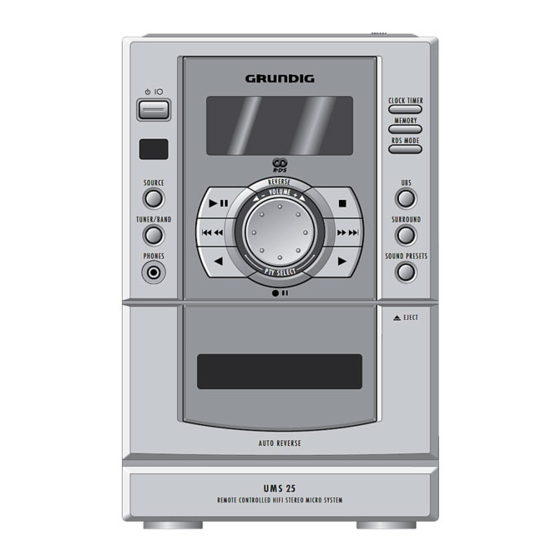
OVERVIEW _______________________________________________________________________ Operating elements of the stereo system CD com- To open press » CD OPEN/CLOSE «. partment C D O P E N / C L O S E Switches the stereo system on and off again. Receiver for remote control signals. CLOCK TIMER SOURCE Selects the programme sources »... - Page 5 OVERVIEW __________________________________________________________________________________ Selects the programme source » TAPE«; starts the cassette rewind mode. C D O P E N / C L O S E REVERSE In tuner mode: searches the channel positions according to the programme type selected. In cassette mode: chooses the tape travel CL OCK TIME R direction.
-
Page 6: The Back Of The Stereo System
OVERVIEW __________________________________________________________________________________ The back of the stereo system EXT. ANT Aerial terminals for the supplied frame EXT.ANT AM LOOP aerial. LOOP Ω FM 75 Aerial jack for the house aerial or the supplied projection aerial. OPTICAL OUT Sound signal output for copying a CD onto a digital recording device. -
Page 7: Remote Control
5 a TUNE – In tuner mode: for manual tuning of the frequency REMOTE CONTROL UMS 25 s 6 s s TUNE + band; selects frequencies step-by-step. In CD mode: for selecting a title;... - Page 8 P R E S E T R E P E AT V O L U M E T U N E R / B A N D S O U N D P R E S E T S REMOTE CONTROL UMS 25...
-
Page 9: Connection And Preparation For Use
CONNECTION AND PREPARATION FOR USE _______ Connection Connecting the aerial Ω Insert the house aerial in the aerial socket » FM 75 « of the stereo system. Note: EXT.ANT LOOP If no house aerial system is available, use the supplied auxiliary aerial. This aerial enables reasonably good reception of local FM (VHF) stations. -
Page 10: Connecting Headphones
CONNECTION AND PREPARATION FOR USE ______________________ Connecting a digital recording device Connect jack » OPTICAL OUT« on the stereo system by an OPTICAL cable to the appropriate jack on the external device (e.g., MD or CDR). OPTICAL OUT – A CD playback can be recorded by a digital recording device via this jack. VIDEO (AUDIO) Connecting headphones... -
Page 11: Preparation For Use
CONNECTION AND PREPARATION FOR USE ______________________ Preparation for use Inserting the batteries in the remote control Open the battery compartment by pressing the snap-catch, and remove the lid. When inserting the batteries (type micro, for example, AAA R 03, 2 x 1,5 V), observe the polarity marked on the base of the battery compartment. -
Page 12: Settings
SETTINGS ____________________________________________________________________________ Setting the time When the stereo is connected to the mains supply and the time has not been set, the time display flashes. Note: Perform the setting in switched-off state. Activate time-setting function by pressing » CLOCK TIMER «... -
Page 13: Settings To Radio Stations
SETTINGS ____________________________________________________________________________________ Settings for radio stations There are two options for tuning to radio stations: – Automatic search. The stations are automatically saved at unoccupied channel positions. – Automatic station search. There are 24 channel positions available for FM radio stations and 12 channel positions each for MW and LW radio stations. - Page 14 SETTINGS ____________________________________________________________________________________ Searching for and saving radio stations – with the automatic station search Note: TUNER When making this setting, no more than 5 seconds may elapse between pressing various keys. | __ | __ | __ | __ | __ | __ | __ | __ VOLUME I | __ | __ | __ | __ | __ | __ | __ | __ Switch on stereo system with...
-
Page 15: General Functions
GENERAL FUNCTIONS _________________________________________ Switching on/off Switch on stereo system with » «. WELCOME – In the display, » W E L C O M E « appears, the most recently selected programme source is automatically selected. Note: The following keys can also be used to switch on the stereo system: »... -
Page 16: Sound Settings
GENERAL FUNCTIONS ______________________________________________________________ Sound settings You can select between four different sound settings: The sound settings » POP «, » ROCK «, » JAZZ«, » CLASSIC« can be selected according to the current type of music. | __ | __ | __ | __ | __ | __ | __ | __ VOLUME I | __ | __ | __ | __ | __ | __ | __ | __ Select the sound setting with »... -
Page 17: Tuner Mode
TUNER MODE ________________________________________________________________ Selecting tuner programme source Select programme source » TUNER /BAND «, with TUNER Switch on stereo system with » « and press » SOURCE « on the stereo | __ | __ | __ | __ | __ | __ | __ | __ VOLUME I | __ | __ | __ | __ | __ | __ | __ | __ system until »... - Page 18 TUNER MODE _____________________________________________________________________________ Special features in tuner mode RDS programme service RDS channels in FM range also transmit their station names. Call up channel name, by continuing to press »RDS MODE « on the stereo PR:I2 system, until » PS« appears in the display. The station name will appear directly afterwards.
- Page 19 TUNER MODE _____________________________________________________________________________ PTY programme type code RDS provides the option of selecting FM stations according to programme type. A total of 31 programme types are defined. Call up programme type, by continuing to press »RDS MODE « on the PTYPR:I2 stereo system, until »...
-
Page 20: Cd Mode
CD MODE ___________________________________________________________________________ Basic functions of CD mode Do not attach adhesive labels to CD’s. Keep the surfaces of CD’s clean. To clean, use a lint-free cloth and always wipe from the centre of the CD outwards in a straight line. Do not use cleaning solution for traditional records or solvent or abrasive cleaner to clean CD’s. -
Page 21: Playing Back A Cd
CD MODE ____________________________________________________________________________________ Playing back a CD Press » « to start playback. 0.00 – Display: » «. | __ | __ | __ | __ | __ | __ | __ | __ Note: VOLUME I | __ | __ | __ | __ | __... -
Page 22: Special Features Of Cd Mode
CD MODE ____________________________________________________________________________________ Special features of CD mode Searching for a passage of a title »s ss 6 »5 a a a During playback, press « or « and hold down until the desired passage has been found. »s ss 6 »5 a a a When «... -
Page 23: Playback Of Titles In A Selected Order - Creating A Music Programme
CD MODE ____________________________________________________________________________________ Playback of titles in a selected order – creating a music programme This function allows you to save up to 24 titles on the inserted CD in a selected order and then play them back. The same title may be saved more than once. Selecting and saving titles and playing back title selection Insert CD in the CD compartment. - Page 24 CD MODE ____________________________________________________________________________________ Checking title selection To check the saved titles, press » MEMORY« repeatedly in stop mode. – In the display, the saved title numbers appear in a row. Extending a music programme Switch stereo system to stop with » «.
-
Page 25: Tape Mode
TAPE MODE _____________________________________________________________________ General information about tape mode Protect your tapes from humidity, dust, and extremes of heat and cold. Do not store your tapes near devices with strong magnetic fields such as television sets, stereo speakers, etc. After using a tape, put it back in its protective case. Selecting tape programme source Select programme source with »... - Page 26 TAPE MODE ________________________________________________________________________________ Playback Selecting replay mode Select playback mode with » REVERSE «. – Display » « – one side of the cassette is replayed. – Display » « – both sides of the cassette are replayed. – Display » «...
- Page 27 TAPE MODE ________________________________________________________________________________ Continuous playback of both cassette sides Note: Note the setting in the Section ”Selecting playback mode” on Page 26. Select the setting » «. Start replay with » « or » «. – The playback is continued indefinitely. End continuous playback with »...
- Page 28 TAPE MODE ________________________________________________________________________________ Recording from the tuner, a CD or an external programme source Select programme source » TAPE« with » « or » «. Insert tape without erase protection in the cassette compartment, and find desired tape position with » «...
-
Page 29: Faster Tape Forward/Rewind
TAPE MODE ________________________________________________________________________________ Manually inserting recording pauses When making a recording, you can insert 5 seconds of silence after the recorded title. Press » « on the remote control during recording. – After 5 seconds, the stereo system switches over to recording pause. Minimising hiss during recording When recording radio broadcasts, a high-pitched noise may be superimposed over the recording. -
Page 30: Timer Mode
TIMER MODE __________________________________________________________________ General information about timer mode Your stereo system has two timer modes: – The ON/OFF timer, which can be used to programme the stereo system to switch on at a preselected time and to later shut off. After activation, the volume is adjusted from extremely soft to the previously selected volume. -
Page 31: Setting The Sleep Timer
TIMER MODE ______________________________________________________________________________ To select programme source, press » MEMORY« and then select the desired TUNER programme source with » SOURCE «. | __ | __ | __ | __ | __ | __ | __ | __ Save setting with » MEMORY«. VOLUME I | __ | __ | __ | __ | __ | __ | __ | __ Switch off stereo system with »... -
Page 32: Information
INFORMATION _____________________________________________________________ Cleaning the tape drive To guarantee good recording and playback quality, clean the indicated parts (1, 2, 3) after every 50 hours of use, or monthly. Open tape compartment, moisten Q-tip with alcohol special head-cleaning fluid. Begin playback and clean the capstan (3). Switch to playback pause and clean the sound axle (2) and the magnetic heads (1). Close the tape compartment. - Page 33 INFORMATION __________________________________________________________________________ GRUNDIG CUSTOMER SERVICE LOCATIONS GRUNDIG GRUNDIG GRUNDIG GRUNDIG GRUNDIG Kundendienst Nord Kundendienst West Kundendienst Mitte Kundendienst Süd Kundendienst Ost Kolumbusstraße 14 Horbeller Straße 19 Dudenstraße 45-53 Beuthener Straße 65 Wittestraße 30e D-22113 Hamburg D-50858 Köln D-68167 Mannheim D-90471 Nürnberg...
Need help?
Do you have a question about the UMS 25 and is the answer not in the manual?
Questions and answers
how to connect and [lay external preamp to GRUNDIG ums25
To connect an external preamp to the Grundig UMS 25, follow these steps:
1. Locate the sound output jacks of the external preamp.
2. Use a cinch (RCA) cable to connect the output jacks of the preamp to the "IN R L VIDEO (AUDIO)" jacks on the Grundig UMS 25 stereo system.
3. Ensure the right (R) and left (L) channels are correctly matched.
4. Power on both devices and select the appropriate input source on the stereo system.
This setup allows the preamp’s audio signal to be played through the UMS 25 speakers.
This answer is automatically generated