Table of Contents
Advertisement
Advertisement
Table of Contents

Subscribe to Our Youtube Channel
Related Manuals for Grundig VARIXX UMS 4200


Summary of Contents for Grundig VARIXX UMS 4200
- Page 1 HIFI STEREO MICRO SYSTEM VARIXX UMS 4200 ENGLISH...
-
Page 2: Table Of Contents
CONTENTS ________________________________________________________________________ Set-up and safety Overview The HiFi system controls The HiFi display The back of the HiFi system The remote control Connection and preparation Connecting the loudspeakers Connecting headphones Connecting the mains cable Inserting batteries in the remote control Settings Setting the clock Setting the time display to 12 or 24 hour format... - Page 3 General information about tape mode Playback Fast forwarding and rewinding the tape Recording Synchro recording from a CD Timer mode Switch-on timer Sleep timer Information Cleaning the CD unit Cleaning the tape drive Technical data Rectifying minor problems GRUNDIG Service GRUNDIG Customer Service Centre...
-
Page 4: Set-Up And Safety
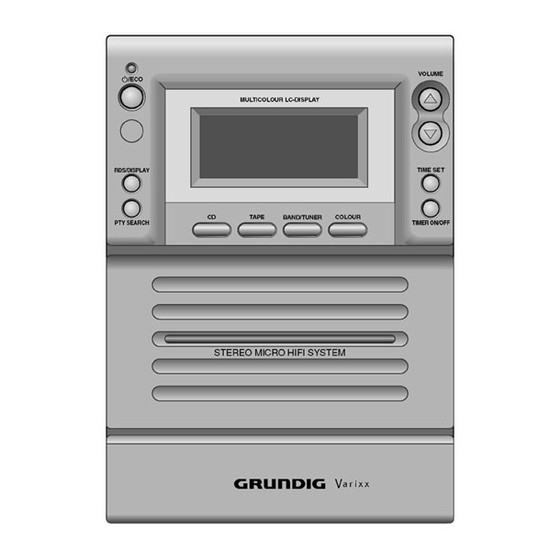
SET-UP AND SAFETY ______________________________________________ Please note the following information when setting up the system: The HiFi system is designed for the playback of audio signals. Any other use is expressly prohibited. g/ECO VOLUME MULTICOLOUR LC-DISPLAY RDS/DISPLAY TIME SET TAPE BAND/TUNER COLOUR PTY SEARCH TIMER ON/OFF... -
Page 5: Overview
OVERVIEW _______________________________________________________________________ The HiFi system controls Controls on the top PHONES Headphone jack for connecting a stereo headphone set with a jack plug (ø 3.5 mm). The loudspeakers of the HiFi system are automatically switched off. P– PRESET P+ In tuner mode: select stored radio stations;... - Page 6 OVERVIEW __________________________________________________________________________________ STOP In CD mode: ends CD playback; deletes the track memory of the CD. For setting the time; for setting the timer data. SKIP/SEARCH TUNING In tuner mode: holding down starts the station search; pressing briefly changes the frequency in small steps or starts the PTY search.
-
Page 7: Controls On The Front
OVERVIEW __________________________________________________________________________________ Controls on the front • LED (power-saving mode). Switches the HiFi system to and from /ECO stand-by mode; VOLUME g/ECO switches on from demo mode; MULTICOLOUR LC-DISPLAY pressing and holding down: switches the HiFi system to power-saving mode. Infrared receiver for remote control RDS/DISPLAY TIME SET... -
Page 8: The Hifi Display
OVERVIEW __________________________________________________________________________________ TIMER ON/OFF Switches the timer on and off. Adjusts the volume. VOLUME Displays the time; TIMER SET activates the timer setting. Buttons under the cover: Tape Open by pressing compartment STOP • RECORD Starts recording. Starts playback. PLAY Rewinds the tape to the beginning. - Page 9 OVERVIEW __________________________________________________________________________________ The total playing time of a CD is displayed. TOTAL STEREO ; > < Displays the playback time remaining on a REMAIN TIMER ON OFF TOTAL REMAIN INTRO SLEEP track or on the CD (during playback). PROGRAM RANDOM REPEAT ALL ONE 0000 : 00 The Intro function is activated.
-
Page 10: The Back Of The Hifi System
OVERVIEW __________________________________________________________________________________ The back of the HiFi system Wire antenna for FM (UKW) reception. The HiFi system has a built-in antenna for MW reception. Loudspeaker connections for the supplied SPEAKERS loudspeakers. L +/– R +/– = left channel, = right channel. Ü... -
Page 11: The Remote Control
OVERVIEW __________________________________________________________________________________ The remote control Switches the HiFi system to and from stand-by mode; switches /ECO on from demo mode; extended pressing: switches the HiFi system to power-saving mode. g/ECO EQ/UBS Press repeatedly: selects the sound settings; EQ/UBS BAND/ TUNER TAPE press once and hold down: switches the ultra-bass system on MONO/... - Page 12 OVERVIEW __________________________________________________________________________________ SLEEP Switches the sleep timer on and off. In CD mode: INTRO for a brief sample playback of each track. g/ECO EQ/UBS In tuner mode: TUNING BAND/ hold down to start the station search; 5 a s 6 TUNER TAPE press briefly to change the frequency in small steps.
-
Page 13: Connection And Preparation
CONNECTION AND PREPARATION _______ Connecting the loudspeakers Connect the loudspeaker cables to the »SPEAKER L +/– R +/–« terminals on the HiFi system. SPEAKERS Connect the cables labelled in red to the red terminal. IMPEDANCE 4Ω Connecting headphones Insert the headphone plug (ø 3.5 mm) into the »PHONES« socket on the top of the device. -
Page 14: Inserting Batteries In The Remote Control
CONNECTION AND PREPARATION _______________________________________ Inserting batteries in the remote control Open the battery compartment by pushing up the lid of the battery com- partment. When inserting the batteries (micro type, e.g. 2 x 1.5 V, AAA, LR 3, AM 3), observe the polarity marked on the base of the battery compartment. -
Page 15: Settings
SETTINGS ____________________________________________________________________________ Setting the clock If the clock has not been set, the time display flashes when the HiFi system is connected to the mains. The following settings may only be performed in stand- by mode. : 25 To set the time, press the » PROG« button and hold it down until the hour display flashes. -
Page 16: Setting And Storing Radio Stations
SETTINGS ____________________________________________________________________________________ Switching RDS time synchronisation on and off If the RDS time information is received via an RDS station, the time is set auto- matically. When RDS stations are received, the time is later continuously upda- ted, provided that an appropriate time signal is transmitted and the function is switched on. -
Page 17: Deleting Settings (Initial State)
SETTINGS ____________________________________________________________________________________ Note: To move the frequency forward in steps, briefly press »TUNING « 5 a s 6 several times. FM 87.95 – Display: the frequency in 50 or 100 kHz steps (FM) or in 9 or 10 kHz steps (MW). To activate the storage function, press »PROG«... -
Page 18: General Functions
GENERAL FUNCTIONS _________________________________________ Switching on and off Switch on the HiFi system out of stand-by mode by pressing » /ECO«. – The last input source used is automatically selected. Note: The following buttons on the device can also be used to switch on the stereo system: »TUNER /BAND«... -
Page 19: Sound Settings
GENERAL FUNCTIONS ______________________________________________________________ Muting STEREO This function enables you to ”silence” the device. Press »MUTE« on the remote control to switch the sound on or off. PROGRAM MUTING – Display: »MUTING« flashes. Sound settings You can select from among five different sound settings (» FLAT«, » POP«, STEREO »... -
Page 20: Tuner Mode
TUNER MODE ________________________________________________________________ Selecting the tuner input source Select the input source by pressing » TUNER /BAND«. STEREO – The most recently selected station is activated (Last Station Memory). – Display: frequency band and frequency or station name. ENERGY SYNC Selecting the preset position Select the frequency band (FM or MW) by pressing the »... -
Page 21: Rds Station Service
TUNER MODE _____________________________________________________________________________ RDS station service RDS (Radio Data System) is an information system which is transmitted additio- nally by most FM stations. When the HiFi system receives an RDS station, » « appears in the display. Note: It may take some time before all the RDS information is available. Searching for RDS stations STEREO Search for the desired RDS station by repeatedly pressing »... - Page 22 TUNER MODE _____________________________________________________________________________ Radiotext Some RDS stations offer ”radiotext” as additional information. Radiotext appears as ticker text in the display. As this information is transmitted character STEREO by character, it may take some time before the text is received in full. PROGRAM Call up radiotext by pressing »RDS/DISPLAY«...
-
Page 23: Cd Mode
CD MODE ___________________________________________________________________________ Basic CD mode functions The HiFi system is suitable for music CDs displaying the logo shown here or for CD-Rs with audio data. Always keep the CD compartment closed to prevent dust from collecting on the laser optics. Do not attach adhesive labels to CDs. Keep the surfaces of CDs clean. -
Page 24: Playing Back A Cd
CD MODE ____________________________________________________________________________________ Playing back a CD Start playback by pressing »PLAY/PAUSE II«. – Playback begins with the first track. – Display: the current track number and the elapsed playing time of the 0 : I2 track. Playback stops at the end of the CD. Pause playback with »... -
Page 25: Special Cd Mode Features
CD MODE ____________________________________________________________________________________ Special CD mode features Searching for a passage within a track During playback, press » SKIP SEARCH« or » SKIP SEARCH « and hold it down until you find the passage you want to hear. Playback begins as soon as you release the » SEARCH«... - Page 26 CD MODE ____________________________________________________________________________________ Repeating all tracks Start playback by pressing »PLAY/PAUSE II«. Select the Repeat function by pressing »REPEAT« once. REPEAT ALL – Display: »REPEAT ALL«. I : 36 – The CD is repeated. To quit the function, press »REPEAT« twice. –...
-
Page 27: Creating A Track Memory - Playing Back Tracks In Selected Order
CD MODE ____________________________________________________________________________________ Creating a track memory – playing back tracks in a selected order You can save up to 60 tracks on an inserted CD and save them in a selected order for playback. One track may be stored several times. Selecting and storing titles and playing back the track selection Insert CD in the CD compartment. - Page 28 CD MODE ____________________________________________________________________________________ Deleting a track memory Open the CD compartment with »OPEN/CLOSE« on the device. – Display: » PROGRAM« disappears; TOTAL OPEN while the device is stopped, press » «. STOP Checking a track memory Press »PROG« on the device repeatedly. Expanding a track memory While the device is stopped, keep pressing »PROG«...
-
Page 29: Tape Mode
TAPE MODE _____________________________________________________________________ General information about tape mode Protect your cassettes from humidity, dust, heat and cold. Do not store your cassettes near devices with strong magnetic fields, such as television sets or stereo speakers. After using a cassette, put it back in its protective case. Selecting the tape input source Select the input source by pressing »... -
Page 30: Fast Forwarding And Rewinding The Tape
TAPE MODE ________________________________________________________________________________ Playback Playing back one side of the tape Press »PLAY « to start playback. – One side of the tape is played. – Playback stops at the end of the tape. Pause playback by pressing »PAUSE II«. Press »PAUSE II«... -
Page 31: Recording
TAPE MODE ________________________________________________________________________________ Recording Erase protection Every new recording overwrites the existing recording on the tape. You can protect your own tapes against accidental erasure by breaking the safety tabs on the top of the tape. Pre-recorded commercial music tapes are already protected against accidental erasure. -
Page 32: Synchro Recording From A Cd
TAPE MODE ________________________________________________________________________________ Synchro recording from a CD This function enables you to record from a CD without having to operate the CD compartment. Place a cassette without protection tabs in the tape compartment and use »F.FWD « or » REWIND«... -
Page 33: Timer Mode
TIMER MODE __________________________________________________________________ Your HiFi system has two timer modes: – The switch-on timer, which switches the HiFi system on and off at a preset time. – The sleep timer, which switches the HiFi system off at a preset time. Switch-on timer Setting the switch-on timer Note:... -
Page 34: Sleep Timer
TIMER MODE ______________________________________________________________________________ Press »TIMER SET« and then »PROG«. – Display: » TIMER « and the most recently selected input source, e.g. »CD«. TIMER Select input source with » «. TUNING 5 a s 6 Press »PROG« to quit the settings. Switching the timer on and off STEREO TIMER... -
Page 35: Information
INFORMATION _____________________________________________________________ Cleaning the CD unit If the device is unable to scan CDs perfectly, use a standard, commercially available cleaning CD to clean the laser optics. Other cleaning methods may damage the laser optics. To clean CDs use a lint-free cloth and wipe them in a straight line from the centre of the disc out- wards. -
Page 36: Additional Information For Units Sold In The Uk
In no circumstance must any of the wires be connected to the terminal marked with the letter “E”, earth symbol “ ”, coloured green, or green & yellow. Replacement mains lead sets can be obtained from your local dealer, or by contacting Grundig Consumer Relations (01788 570088) Moulded 3-pin lead set, suitable for UK use:... -
Page 37: Rectifying Minor Problems
INFORMATION __________________________________________________________________________ Rectifying minor problems Not every kind of sound interference is caused by a defect in your HiFi system. Impairment can also be caused by leads having been accidentally pulled out, damaged CDs and worn out batteries in the remote control. If the following measures do not bring about satisfac- tory results, consult an authorised dealer. -
Page 38: Grundig Service
GRUNDIG Service GRUNDIG Deutschland Ihre regionale Kundendienst-Stelle in Deutschland erreichen Sie unter: Telefon 0180/5 23 18 52* • Telefax 0180/5 23 18 46* *gebührenpflichtig GRUNDIG BELUX N.V. GRUNDIG IRELAND LTD. GRUNDIG PORTUGUESA GRUNDIG DANMARK A/S GRUNDIG AUSTRIA Ges.m.b.H. Deltapark, Weihoek 3, Unit 3G 2 Waverley Office Park, Old Comércio de Artigos Electróni-...
Need help?
Do you have a question about the VARIXX UMS 4200 and is the answer not in the manual?
Questions and answers