Table of Contents
Advertisement
Available languages
Available languages
KIC 630 B
KIC 631 C
KIC 631 T B
KIC 631 T X
KIC 631 T C
KIC 633 T Z
KIC 633 T X
English
GB
Operating Instructions
HOB
Contents
Operating Instructions,1
Description of the appliance-Control Panel,2
Français
FR
Mode d'emploi Manutenção e cuidados
TABLE DE CUISSON
Sommaire
Mode d'emploi,1
Español
ES
Manual de instrucciones
ENCIMERA
Sumario
Manual de instrucciones,1
Descripción del aparato-Panel de control,2
Português
PT
Instruções para a utilização
Índice
Instruções para a utilização,1
Descrição do aparelho-Painel de comandos,2
Instalação, 31
Deutsch
DE
Bedienungsanleitung
Inhaltsverzeichnis
Bedienungsanleitung,1
Beschreibung des Gerätes- Bedienfeld,2
Installation, 39
Italiano
IT
Istruzioni per l'uso
Sommario
Istruzioni per l'uso,1
Descrizione dell'apparecchio- Pannello di controllo,2
Installazione, 47
Nederland
NL
Gebruiksaanwijzing
KOOKPLAAT
Inhoud
Gebruiksaanwijzing,1
Beschrijving van het apparaat-Bedieningspaneel,2
Installatie, 55
Polski
PL
Instrukcja obsługi
PŁYTA GRZEJNA
Spis treści
Instrukcja obsługi,1
Opis urządzenia-Panel sterowania,2
Opis Techniczny,70
Pусский
RS
инструкция по эксплуатации
плита
содержание
Установка, 7
Монтаж,71
Bарочная панель,73
Техническое обслуживание и уход,78
Техническое обслуживание,79
Advertisement
Table of Contents

Related Manuals for Hotpoint Ariston KIC 630 B


Summary of Contents for Hotpoint Ariston KIC 630 B
-
Page 1: Table Of Contents
KIC 630 B Deutsch KIC 631 C KIC 631 T B Bedienungsanleitung KIC 631 T X KOCHFELD KIC 631 T C Inhaltsverzeichnis KIC 633 T Z Bedienungsanleitung,1 KIC 633 T X Beschreibung des Gerätes- Bedienfeld,2 Installation, 39 Inbetriebsetzung und Gebrauch,41 Vorsichtsmaßregeln und Hinweise, 45... -
Page 2: Description De L'appareil-Tableau De Bord
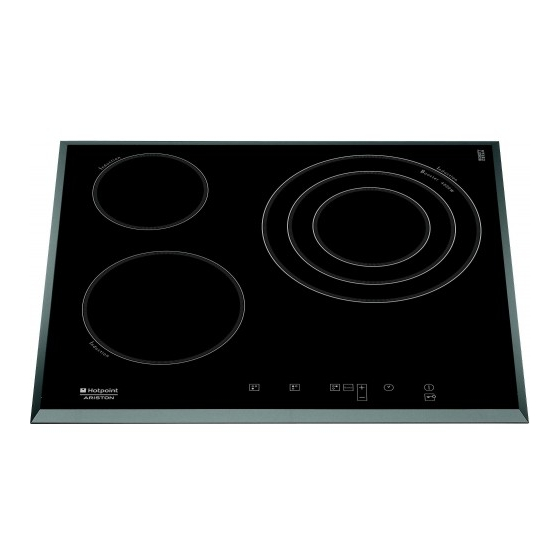
Booster Booster Booster Description de l’appareil Description of the appliance Tableau de bord Control panel Le tableau de bord qui est The control panel described in this manual is only a décrit n.a qu.une valeur d.exemple : representative example: it may not exactly match the panelon il peut ne pas correspondre au modèle acheté... - Page 3 Descripción del aparato Descrição do aparelho Panel de control Painel de comandos O painel de comandos descrito a seguir está representado para El panel de control se describe a continuación a modo de fins explicativos: pode não ser uma exacta ejemplo: puede no ser una exacta reproducción del reprodução do modelo comprado.
- Page 4 Beschreibung des Gerätes Descrizione dell’apparecchio Bedienfeld Pannello di controllo Das hier beschriebene Bedienfeld dient nur als Beispiel, es Il pannello di controllo che qui viene descritto è handelt sich nicht unbedingt um eine genaue rappresentato a fini esemplificativi: può non essere una Widergabe des von Ihnen erworbenen Modells.
- Page 5 Opis urządzenia Beschrijving van het apparaat Panel sterowania Bedieningspaneel Het bedieningspaneel dat hier wordt beschreven en Opisany tu panel sterowania jest przedstawiony jako afgebeeld geldt alleen als voorbeeld: het is mogelijk dat przykład: nie musi być dokładnie taki sam, jak panel het niet exact overeenkomt met het door u aangeschafte zainstalowany w zakupionym urządzeniu.
- Page 6 Описание изделия Панель управления Панель управления, описание которои приводится ниже, служит только в качестве примера: она может не в точности соответствовать Вашеи модели 1 Кнопка УВЕЛИЧЕНИЕ МОЩНОСТИ служит для включения варочнои зоны и регуляции мощности нагрева (см. Включение и эксплуатация). 2 Кнопка...
-
Page 7: Installation
Installation Before operating your new appliance please read this instruction booklet carefully. It contains important information concerning the safe operation, installation and maintenance of the appliance. min. 20 mm Please keep these operating instructions for future reference. Pass them on to any new owners of the COMPARTMENT appliance. -
Page 8: Electrical Connection
Fixing Separate the wires and connect them in accordance on a perfectly level The appliance must be installed with the instructions given in the following table and supporting surface. diagrams: Any deformities caused by improper fixing could affect Voltage and Electrical cable Wire connection mains frequency... -
Page 9: Start-Up And Use
Start-up and use The glue applied on the gaskets leaves traces of Switching on the hob grease on the glass. Before using the appliance, we recommend you remove these with a special non- abrasive cleaning product. During the first few hours To switch the hob on, press and hold the button for of use there may be a smell of rubber which will... - Page 10 3. Press the programming button. The indicator 2. Set the desired duration using the light corresponding to the selected zone will start buttons. flashing. 3. Confirm by pressing the button. 4. Set the cooking duration using the The timer begins counting down immediately. When buttons.
-
Page 11: Safety Devices
Overheating protection Practical advice on using the appliance If the electronic elements overheat, the hob switches off ! Use cookware made from materials which are compatible with the induction principle (ferromagnetic automatically and appears on the display, followed by material). We especially recommend pans made a flashing number. - Page 12 Practical cooking advice ª Pressure cooking Frying Pressure cooker • Grilling Boiling • ¶ Crêpes Cooking on a high flame and browning (roasts, steaks, escalopes, fish fillets, fried eggs) ¶ § Fast thickening (liquid juices) Boiling water (pasta, rice, vegetables) Milk §...
-
Page 13: Precautions And Tips
Precautions and tips This appliance has been designed and manufactured • When unplugging the appliance, always pull the in compliance with international safety standards. The plug from the mains socket; do not pull on the cable. following warnings are provided for safety reasons and •... -
Page 14: Care And Maintenance
Hobs KIC 631 C KIC 633 T Z KIC 630 B KIC 631 T B KIC 633 T X KIC 631 T X KIC 631 T C... -
Page 15: Installation,15
Installation Conserver ce mode d’emploi pour pouvoir le consulter à tout moment. En cas de vente, de cession ou de déménagement, veiller à ce qu’il suive l’appareil pour informer le nouveau propriétaire sur son fonctionnement et lui min. 20 mm fournir les conseils correspondants. - Page 16 Fixation Tension type et fréquence réseau l’encastrement de l’appareil sur un Il est impératif d’assurer • 400V - 2+N ~ 50 Hz plan d’appui parfaitement plat. • 220-240V 3 ~ 50 Hz Les déformations provoquées par une mauvaise fixation • 400V 3 - N ~ 50 Hz risquent d’altérer les caractéristiques de la table de cuisson •...
-
Page 17: Mise En Marche Et Utilisation,17
Mise en marche et utilisation La colle utilisée pour les joints laisse des traces Mise sous tension de la table de cuisson de graisse sur le verre. Nous conseillons de les éliminer avant d’utiliser l’appareil à l’aide d’un produit d’entretien non abrasif. Une odeur de caoutchouc Pour mettre la table de cuisson sous tension, appuyer peut se dégager au cours des premières heures sur la touche... - Page 18 (pendant 1 minute). 5. Valider en appuyant sur la touche , sinon la sélection se fait automatiquement au bout de 10 Verrouillage des commandes secondes. Le compte à rebours du minuteur démarre aussitôt. La fin de la cuisson programmée est indiquée Pendant le fonctionnement de la table, il est possible par un signal acoustique (durée 1 minute) et le foyer de verrouiller les commandes pour empêcher toute...
- Page 19 Interrupteur sécurité A UTILISER NE CONVIENT PAS L’appareil est équipé d’un interrupteur de sécurité qui interrompt instantanément le fonctionnement des foyers dès qu’un temps limite de fonctionnement à Cuivre un niveau de puissance donné est atteint. Pendant Fonte Aluminium, Verre, Terre, Acier émaillé...
- Page 20 Conseils utiles pour la cuisson ª Mise en pression Friture Autocuisser • Grillade Ebullition • ¶ Crêpes Saise et coloration (Rotis, Steack, Escalope, Filets de poisson, Oeufs au plat) ¶ § Réduction rapide (Sauce liquides) Eau Frémissante (Pates, Riz, Légumes) Lait §...
-
Page 21: Précautions Et Conseils
Précautions et conseils • N’effectuer aucune opération de nettoyage ou ! Cet appareil a été conçu et fabriqué conformément d’entretien sans avoir auparavant débranché la fiche aux normes internationales de sécurité. Ces consignes de la prise de courant. de sécurité sont très importantes et doivent être lues •... -
Page 22: Nettoyage Et Entretien,22
: la chaleur est produite à l’intérieur du récipient à condition que le fond de ce dernier soit en matériau ferromagnétique. Tables de cuisson KIC 631 C KIC 633 T Z KIC 630 B KIC 631 T B KIC 633 T X KIC 631 T X KIC 631 T C... -
Page 23: Instalación,23
Instalación Es importante conservar este manual para poder consultarlo en todo momento. En el caso de venta, de cesión o de mudanza, verifique que permanezca junto al aparato para informar al nuevo propietario sobre su funcionamiento y min. 20 mm sobre las advertencias correspondientes. - Page 24 Fijación Tensión tipo y frecuencia de la red sobre una superficie La instalación del aparato se debe realizar • 400V - 2+N ~ 50 Hz de apoyo perfectamente plana. • 220-240V 3 ~ 50 Hz Las deformaciones que se podrían provocar por una mala •...
-
Page 25: Puesta En Funcionamiento Y Uso,25
Puesta en funcionamiento y uso Encendido de las zonas de cocción La cola aplicada sobre las juntas deja algunas trazas de grasa en el vidrio. Antes de utilizar el aparato, se Cada zona de cocción se acciona utilizando un botón recomienda eliminarlas con un producto específico para el mantenimiento, no abrasivo. - Page 26 el botón durante algunos instantes, la luz testigo se Visualización en el caso de programación múltiple apagará y el panel de control se desbloqueará. Cuando una o varias placas han sido programadas, el display visualiza el tiempo remanente de la placa que está Apagado de la encimera más cerca del final del tiempo programado, indicando su posición con el piloto intermitente.
- Page 27 Además, para obtener las mejores prestaciones de la Nivel de potencia Límite de duración de funcionamento en horas encimera: • Utilice ollas con fondo plano y de gran espesor para asegurarse que se adhieran perfectamente a la zona calentadora • Utilice ollas de un diámetro suficiente para cubrir completamente la zona de cocción, de ese modo se garantiza el aprovechamiento de todo el calor disponible.
- Page 28 Consejos prácticos para la cocción ª Cocción a presión Freído Olla a presión • Asado Ebullición • ¶ Crêpe Cocción a fuego fuerte y dorado (Asados, Bistec, Escalopes, Filetes de pescado, Huevo frito) ¶ § Espesamiento rápido (Salsas líquidas) Agua hirviendo (Pasta, arroz, Verduras) Leche §...
-
Page 29: Precauciones Y Consejos,29
Precauciones y consejos que sean chocados accidentalmente. El aparato ha sido proyectado y fabricado en • No desconecte el aparato de la toma de corriente conformidad con las normas internacionales sobre tirando del cable sino sujetando el enchufe. seguridad. Estas advertencias se suministran por •... -
Page 30: Mantenimiento Y Cuidados,30
El calor es generado directamente dentro de la olla la cual deberá poseer necesariamente un fondo de material ferromagnético. Encimeras KIC 631 C KIC 633 T Z KIC 630 B KIC 631 T B KIC 633 T X KIC 631 T X KIC 631 T C Zonas de cocción... -
Page 31: Plano
Instalação É importante guardar este folheto para poder consultá-lo a qualquer momento. No caso de venda, cessão ou mudança, assegure-se que o mesmo permanece com o aparelho para informar o novo min. 20 mm proprietário sobre o funcionamento e sobre as respectivas advertências. - Page 32 Outros tipos de ligações • Os móveis situados ao lado, com altura superior Se o sistema eléctrico corresponder à uma dessas aquela do plano de trabalho, devem ser situados ao características: menos 600 mm do bordo do mesmo plano. Tensão tipo e frequência de rede •...
-
Page 33: Início E Utilização
Início e utilização A cola aplicada nas guarnições deixa alguns traços de graxa no vidro. Antes de utilizar o aparelho, é recomendável Acender as zonas de cozedura eliminá-la com um produto não abrasivo específico para a Cada uma as zonas de cozedura é accionada mediante um manutenção. - Page 34 sinal sonoro (que toca 1 minuto) e a zona de cozedura se Bloqueio dos comandos apagará. Quando um plano de cozedura estiver a funcionar, é possível Repita o procedimento descrito acima para cada chapa que bloquear os comandos para evitar riscos de modificações deseja programar.
- Page 35 Conselhos práticos para utilizar esta Aquecimento excessivo aparelhagem No caso de superaquecimento dos componentes electrónicos, o plano de cozedura desliga-se ! Utilize um recipiente cujo material de fabricação automaticamente e no display aparece seguido por um seja compatível com o princípio da indução (material número intermitente.
- Page 36 Conselhos práticos para a cozedura ª Cozedura à pressão Frituras Panela de pressão • Assado Ebulição • ¶ Crêpe Cozedura em fogo alto e doiramento (Assados, Bifes, Escalopes, Filés de peixe, Ovos fritos) ¶ § Adensamento rápido (molhos líquidos) Água fervente (Massas, Arroz, Verduras) Leite §...
-
Page 37: Precauções E Conselhos,37
Precauções e conselhos Este aparelho foi projectado e fabricado em • Não realize limpeza nem manutenção sem antes ter conformidade com as normas internacionais de desligado a ficha da rede eléctrica. segurança. Estas advertências são fornecidas por • Não é previsto que este aparelho seja utilizado razões de segurança e devem ser lidas com atenção. -
Page 38: Manutenção E Cuidados,38
é a zona de cozedura que se aquece: o calor é gerado directamente no interior da panela, a qual deverá possuir necessariamente um fundo em material ferromagnético. Planos de cozedura KIC 631 C KIC 633 T Z KIC 630 B KIC 631 T B KIC 633 T X KIC 631 T X KIC 631 T C Zonas de cozedura Potência (em W) -
Page 39: Kochfeld
Installation ! Bewahren Sie diese Bedienungsanleitung bitte sorgfältig auf, damit Sie sie jederzeit zu Rate ziehen können. Sorgen Sie dafür, dass sie im Falle eines Verkaufs, eines Umzugs oder einer Übergabe an einen anderen Benutzer das Gerät min. 20 mm stets begleitet, damit auch der Nachbesitzer die Möglichkeit hat, darin nachschlagen zu können. - Page 40 Befestigung • 400V - 2+N ~ 50 Hz perfekt ebenen Stütz- bzw. Das Kochfeld muss auf einer • 220-240V 3 ~ 50 Hz Auflagefläche installiert werden. • 400V 3 - N ~ 50 Hz Durch unsachgemäße Befestigung hervorgerufene • 400V - 2+2N ~ 50 Hz Verformungen könnten die Eigenschaften und Leistungen Trennen Sie die Drähte und schließen Sie sie gemäß...
-
Page 41: Inbetriebsetzung Und Gebrauch,41
Inbetriebsetzung und Gebrauch Der auf die Dichtungen aufgetragene Leim könnte Fettspuren auf dem Glas hinterlassen. Wir Durch längeres Drücken der Tasten empfehlen Ihnen, diese vor Einsatz des Gerätes mit können die Leistungswerte und die Minuten des Timers einem herkömmlichen Reinigungsmittel (eine nicht im Schnelllauf verändert werden. - Page 42 3. Drücken Sie die Programmiertaste . Die Kontrollleuchte des Minutenzählers einschaltet Kontrollleuchte der ausgewählten Zone blinkt. 2. Stellen Sie über die Tasten “-” und “+” die 4. Stellen Sie über die Tasten “-” und “+” die gewünschte Zeit ein. gewünschte Garzeit ein. 3.
- Page 43 Zum Verlassen dieses Modus verfahren Sie gemäß des Topfbodens nur bei einer angemessenen, der Kochzone entsprechenden Topfgröße. Das Blinken der obiger Angaben. Auf dem Display erscheint Anzeigeleuchte kann Folgendes signalisieren: abwechselnd die Anzeige DE und OF und das • ungeeignetes Kochgeschirr, Kochfeld schaltet sich aus: Wird das Kochfeld •...
- Page 44 Praktische Back-/Brathinweise ª Schnellgaren Fritieren Schnellkochtopf • Grillen Kochen • ¶ Crêpes Stark garen und bräunen (Braten, Koteletts, Schnitzel, Fischfilets, Spiegeleier) ¶ § Schnell eindicken (flüssige Soßen) Kochendes Wasser (Nudeln, Reis, Gemüse) Milch § Langsam eindicken (dickflüssige Soßen) ¢ Wasserbad Garen im Schnellkochtopf nach dem Dampfaustritt ¢...
-
Page 45: Vorsichtsmaßregeln Und Hinweise
Vorsichtsmaßregeln und Hinweise Das Gerät wurde entsprechend den strengsten jegliches Risiko durch unbeabsichtigtes Anstoßen internationalen Sicherheitsvorschriften entworfen auszuschließen. und gebaut. Nachstehende Hinweise werden aus • Ziehen Sie den Netzstecker nicht am Netzkabel aus der Sicherheitsgründen geliefert und sollten aufmerksam Steckdose, sondern nur am Netzstecker selbst. gelesen werden. -
Page 46: Reinigung Und Pflege
Kochplatten, heizt sich nicht die Kochzone auf: die Hitze wird direkt im Innern des Topfes entwickelt, der hierzu notwendigerweise über einen Boden aus magnetisiertem Material verfügen muss. Kochfelder KIC 631 C KIC 633 T Z KIC 630 B KIC 631 T B KIC 633 T X KIC 631 T X KIC 631 T C... -
Page 47: Piano Cottura
Installazione ! È importante conservare questo libretto per poterlo consultare in ogni momento. In caso di vendita, di cessione o di trasloco, assicurarsi che resti insieme all’apparecchio per informare il nuovo proprietario sul min. 20 mm funzionamento e sui relativi avvertimenti. ! Leggere attentamente le istruzioni: ci sono importanti informazioni sull’installazione, sull’uso e sulla sicurezza. -
Page 48: Collegamento Elettrico
Fissaggio Altri tipi di collegamento L’installazione dell’apparecchio deve essere effettuata Se l’impianto elettrico corrisponde a una delle seguenti su un piano d’appoggio perfettamente piano. caratteristiche: Le eventuali deformazioni provocate da un errato Tensione tipo e frequenza di rete fissaggio potrebbero alterare le caratteristiche e •... -
Page 49: Avvio E Utilizzo,49
Avvio e utilizzo La colla applicata sulle guarnizioni lascia alcune tracce di grasso sul vetro. Prima di utilizzare La pressione prolungata dei tasti consente l’apparecchio, si raccomanda di eliminarle con un l’avanzamento veloce dei livelli di potenza e dei minuti prodotto specifico per la manutenzione non abrasivo. - Page 50 1. Selezionare la zona di cottura tramite il tasto di 1. Premere il tasto di programamzione . finchè la selezione corrispondente. 2. Regolarne il livello di potenza. spia contaminuti non si accende 3. Premere il tasto di programamzione Lampeggia la spia corrispondente alla zona scelta. 2.
- Page 51 Per uscire da questa modalità seguire la procedura • una pentola incompatibile sopra descritta. Il display visualizza la scritta DE e • una pentola di diametro insufficiente OF e il piano si spegne. Alla successiva riaccensione • il sollevamento della pentola funzionerà...
- Page 52 Consigli pratici per la cottura ª Cottura a Pressione Frittura Pentola a Pressione • Grigliata Ebollizione • ¶ Crêpe Cottura a fuoco vivo e doratura (Arrosti, Bistecche, Scaloppine, Filetti di pesce, Uova al tegamino) ¶ § Addensamento rapido (Sughi liquidi) Acqua bollente (Pasta, Riso, Verdure) Latte §...
-
Page 53: Precauzioni E Consigli,53
Precauzioni e consigli L’apparecchio è stato progettato e costruito • Non staccare la spina dalla presa della corrente in conformità alle norme internazionali di sicurezza. Queste tirando il cavo, bensì afferrando la spina. avvertenze sono fornite per ragioni di sicurezza e devono •... -
Page 54: Manutenzione E Cura,54
è la zona di cottura che si riscalda: il calore viene generato direttamente all’interno della pentola, la quale dovrà possedere necessariamente un fondo in materiale ferromagnetico. Piani cottura KIC 631 C KIC 633 T Z KIC 630 B KIC 631 T B KIC 633 T X KIC 631 T X KIC 631 T C... -
Page 55: Installatie
Installatie Bewaar dit instructieboekje zorgvuldig voor eventuele raadpleging in de toekomst. Wanneer u het product weggeeft, verkoopt, of wanneer u verhuist, dient u dit boekje bij het apparaat te bewaren zodat waarschuwingen en min. 20 mm informatie betreffende werking voorhanden blijven. Lees de instructies aandachtig door: u vindt er belangrijke LADE informatie betreffende installatie, gebruik en veiligheid. -
Page 56: Elektrische Aansluiting
• 400V - 2+N ~ 50 Hz Bevestigen • 220-240V 3 ~ 50 Hz Het apparaat moet op een absoluut horizontaal • 400V 3 - N ~ 50 Hz oppervlak worden geïnstalleerd. Eventuele door • 400V - 2+2N ~ 50 Hz onjuiste installatie veroorzaakte vervormingen kunnen de eigenschappen en de prestaties van de kookplaat Scheid de kabels en voer de draadverbinding uit zoals... -
Page 57: Starten En Gebruik
Starten en gebruik De lijm die gebruikt is voor de afdichtingen laat wat vetvlekjes achter op het glas. Voordat u het apparaat Als u lang op de toetsen drukt kunt u de gebruikt raden wij u aan de vlekken te verwijderen stroomsterkte en de minuten van de timer snel laten met een speciaal niet-schurend schoonmaakmiddel. - Page 58 3. Druk op de programmeertoets . Het toetsen controlelampje voor het betreffende kookgedeelte begint te knipperen. 3. Bevestig door op de toets te drukken. 4. Stel de gewenste kookduur in door middel van de De timer begint gelijk met aftellen. Als de tijd verstreken is hoort u voor de duur van 1 minuut een toetsen geluidssignaal.
- Page 59 Praktische tips voor het gebruik van het Oververhitting apparaat In het geval van oververhitting van de elektronische onderdelen gaat de kookplaat automatisch uit ! Gebruik pannen die gemaakt zijn van materiaal dat geschikt is voor inductie (ferromagnetisch materiaal). en verschijnt op het display gevolgd door een Wij raden het gebruik aan van pannen van: gietijzer, knipperend nummer.
- Page 60 Praktische kooktips ª Koken met een snel Frituren kookpanSnelkookpan • Grillen Koken • ¶ Crêpes Koken op hoog vuur en bruin bakken (Braadstukken, biefstukken, kalfslappen, visfilets, gebakken eieren) ¶ § Snel indikken (vloeibare sauzen) Koken van water (pasta, rijst, groente) Melk §...
-
Page 61: Voorzorgsmaatregelen En Advies,61
Voorzorgsmaatregelen en advies Dit apparaat is ontwikkeld en gefabriceerd volgens de • Maak het apparaat niet schoon of voer geen geldende internationale veiligheidsvoorschriften. Deze onderhoud uit als de stekker nog in het stopcontact aanwijzingen zijn geschreven voor uw veiligheid en u dient zit. -
Page 62: Onderhoud En Verzorging,62
Kookplaten KIC 631 C KIC 633 T Z KIC 630 B KIC 631 T B KIC 633 T X KIC 631 T X KIC 631 T C... -
Page 63: Instalacja,63
Instalacja Należy zachować niniejszą instrukcję, aby móc z niej skorzystać w każdej chwili. W razie sprzedaży, odstąpienia lub przeniesienia urządzenia, należy się upewnić, czy instrukcja została przekazana wraz z nim, aby nowy min. 20 mm właściciel płyty grzejnej mógł się zapoznać z jej działaniem i z właściwymi ostrzeżeniami. - Page 64 Mocowanie Typowe napięcie i częstotliwość sieci Urządzenie powinno być zainstalowane na idealnie • 400V - 2+N ~ 50 Hz płaskim blacie. Ewentualne odkształcenia, • 220-240V 3 ~ 50 Hz spowodowane nieprawidłowym zamocowaniem, mogą • 400V 3 - N ~ 50 Hz •...
-
Page 65: Uruchomienie I Użytkowanie,65
Uruchomienie i użytkowanie Klej stosowany do uszczelek pozostawia na szkle tłuste Włączanie płyty grzejnej plamy. Przed przystąpieniem do eksploatacji urządzenia zaleca się usunąć te plamy przy pomocy odpowiedniego produktu nieposiadającego właściwości ściernych. Płytę grzejną włącza się trzymając wciśnięty przycisk Podczas pierwszych godzin działania urządzenia może być przez około sekundę. - Page 66 się natychmiast. Po upływie ustawionego czasu włącza się 5. Potwierdzić naciskając przycisk , lub w przeciwnym sygnał dźwiękowy (na 1 minutę). razie wybór zostanie dokonany automatycznie po upływie 10 Blokada sterowania sekund. Odliczanie wsteczne regulatora czasowego rozpoczyna się natychmiast. Po zakończeniu zaprogramowanego czasu Kiedy płyta grzejna jest w trakcie pracy, można zablokować...
- Page 67 Praktyczne porady dotyczące użytkowania Przegrzanie urządzenia W przypadku przegrzania elementów elektronicznych płyta grzejna wyłącza się automatycznie, a na wyświetlaczu ! Używane do gotowania naczynia powinny być wykonane pojawia się symbol , po którym następuje pulsująca z materiału nadającego się do stosowania na płytach cyfra.
- Page 68 Praktyczne porady dotyczące gotowania ª Gotowanie pod ciśnieniem Smażenie Garnek ciśnieniowy • Grilowanie Gotowanie • ¶ Naleśniki Gotowanie na dużym ogniu i przysmażanie (Pieczenie, Befsztyki, Zrazy, Filety rybne, Smażone jajka) ¶ § Szybkie zagęszczenie (Płynne sosy) Woda gorąca (Makarony, Ryż, Warzywa) Mleko §...
-
Page 69: Zalecenia I Środki Ostrożności,69
Zalecenia i środki ostrożności • Nie czyścić urządzenia ani nie wykonywać czynności Urządzenie zostało zaprojektowane i wyprodukowane konserwacyjnych bez uprzedniego odłączenia wtyczki zgodnie z międzynarodowymi normami od sieci elektrycznej. bezpieczeństwa. Poniższe ostrzeżenia dotyczą zasad • Nie jest przewidziane, aby urządzenie było używane bezpieczeństwa i należy je uważnie przeczytać. -
Page 70: Konserwacja I Utrzymanie,70
Ciepło wytwarzane jest bezpośrednio wewnątrz garnka, który ma koniecznie posiadać dno z materiału termomagnetycznego. Płyty grzejne KIC 631 C KIC 633 T Z KIC 630 B KIC 631 T B KIC 633 T X KIC 631 T X KIC 631 T C... -
Page 71: Монтаж
Монтаж Важно сохранить данное руководство для его последующих консультации. В случае продажи, передачи изделия или при переезде на новое место жительства необходимо проверить, чтобы руководство оставалось min. 20 mm вместе с изделием, для того чтобы его новыи владелец мог ознакомиться с правилами эксплуатации и с соответствующими... - Page 72 • 400V 3 - N ~ 50 Hz • 400В - 2+2N ~ 50 Гц Крепление Разделите провода и подсоедините проводники в Изделие должно быть установлено на идеально ровнои соответствии с таблицеи и приведенным ниже схемам: поверхности. Возможные деформации, вызванные Типовое...
- Page 73 Включение и эксплуатация Включение варочной панели На стекляннои поверхности варочнои панели могут быть видны сальные следы от клея, нанесенного на прокладки Перед началом эксплуатации изделия следует удалить Включите варочную панель, нажав кнопку примерно следы клея при помощи специального неабразивного на одну секунду. моющего...
- Page 74 5. Подтвердить настройки при помощи кнопки пока не загорится индикатор таимера или переключение происходит автоматически через 10 2. Настроите нужную продолжительность приготовления секунды. Обратный отсчет таймера начинается сразу же. По при помощи кнопок и завершении заданного приготовления раздается звуковой сигнал (в течение 1 минуты), и варочная зона 3.
- Page 75 Практические советы по эксплуатации Перегрев изделия В случае перегрева электронных комплектующих варочная панель автоматически отключается, и на ! Используите посуду из материала, подходящего для индукционного нагревания (ферромагнитныи дисплее появляется с мигающим кодом. Это сообщение материал). Рекомендуется использовать посуду из: пропадает, и варочная панель возвращается в рабочии чугуна, эмалированнои...
- Page 76 Практические советы по приготовлению блюд ª Приготовление под давлением Фритюр Скороварка • Бифштексы Варка • ¶ Блины Приготовление на среднем огне, обжаривание (Жаркое, бифштексы, эскалопы, рыбное филе, яичница) ¶ § Быстрое загустени (Жидкие соусы) Кипячение воды (для варки макарон, риса, овощей) Кипячение...
-
Page 77: Предосторожности И Рекомендации
Предосторожности и рекомендации могли случаино задеть их. ! Изделие спроектировано и изготовлено в • Не тяните за сетевои кабель для отсоединения вилки соответствии с международными нормативами по изделия из сетевои розетки, возьмитесь за вилку безопасности. Необходимо внимательно прочитать рукои. настоящие предупреждения, составленные в целях •... - Page 78 Техническое обслуживани и уход Отключение электропитания Структура из нержавеющеи стали (только в моделях с рамкои) Перед началом какои-либо операции по На поверхности из нержавеющеи стали обслуживанию или чистке отсоедините изделие от могут образоваться пятна от воды с большим сети электропитания. содержанием...
- Page 79 от традициональных конфорок нагрев производится не варочной зоной: нагревается непосредственно содержимое кастрюли, дно которой обязательно должно быть из ферромагнитного материала. Модели KIC 631 C KIC 633 T Z KIC 630 B варочных KIC 631 T B KIC 633 T X панелей...
- Page 80 11/2011 - 195065943.05 XEROX FABRIANO Изделие: Электрическая рабочая поверхность Торговая марка: Торговый знак изготовителя: KIC 630 B* KIC 631 C** KIC 631 T B** Модель: KIC 631 T X** KIC 631 T C* KIC 633 T Z* KIC 633 T X** Изготовитель:...
Need help?
Do you have a question about the KIC 630 B and is the answer not in the manual?
Questions and answers