Pioneer DEH-P9800BT Operation Manual
Multi-cd control dsp high power cd/mp3/wma/aac player with bluetooth wireless technology and fm/am tuner
Hide thumbs
Also See for DEH-P9800BT:
- Operation manual (233 pages) ,
- Installation manual (6 pages) ,
- Service manual (148 pages)
Table of Contents
Advertisement
Quick Links
Operation Manual
Mode d'emploi
Multi-CD control DSP High power CD/MP3/WMA/
AAC player with Bluetooth Wireless Technology and
FM/AM tuner
Syntoniseur FM/AM et lecteur de CD/MP3/WMA/
AAC, "Puissance élevée", avec contrôleur pour lec-
teur de CD à chargeur et DSP, avec technologie sans
fil Bluetooth
DEH-P9800BT
Advertisement
Table of Contents

Related Manuals for Pioneer DEH-P9800BT


Summary of Contents for Pioneer DEH-P9800BT
- Page 1 Multi-CD control DSP High power CD/MP3/WMA/ AAC player with Bluetooth Wireless Technology and FM/AM tuner Syntoniseur FM/AM et lecteur de CD/MP3/WMA/ AAC, “Puissance élevée”, avec contrôleur pour lec- teur de CD à chargeur et DSP, avec technologie sans fil Bluetooth DEH-P9800BT...
-
Page 2: Table Of Contents
Contents Thank you for buying this Pioneer product. Please read through these operating instructions so you will know how to operate your model properly. After you have finished reading the instructions, keep this man- ual in a safe place for future reference. - Page 3 Contents Introduction of advanced built-in CD player Deleting a registered phone 40 (MP3/WMA/AAC/WAV) operation 29 Connecting to a registered cellular Repeating play 29 phone 41 – Connecting to a registered phone Playing tracks in random order 29 Scanning folders and tracks 30 manually 41 –...
- Page 4 Contents – Displaying text information on CD TEXT Displaying system version for repair 51 discs 62 – Scrolling text information in the Bluetooth Audio Listening to songs on BT Audio (Bluetooth display 62 – Selecting tracks from the track title audio player) 52 Setting up for Bluetooth audio player 52 list 62...
- Page 5 Contents Introduction of advanced SIRIUS tuner Introduction of audio adjustments 80 operation 71 Using the position selector 81 Switching the SIRIUS display 71 Using balance adjustment 81 Switching the scroll setting 71 Using the time alignment 82 – Adjusting the time alignment 82 Storing and recalling broadcast stations 71 Selecting the SIRIUS channel select Using subwoofer output 83...
- Page 6 Contents Switching the reverse mode 92 Switching the Ever Scroll 92 Calibrating the RPMs 93 Activating the BT Audio source 93 Entering PIN code for Bluetooth wireless connection 93 Resetting the Bluetooth wireless technology module 94 Other Functions Turning the clock display on or off 95 Using the AUX source 95 –...
-
Page 7: Before You Start
Alteration or modifications carried out without appropriate authorization may invalidate the FCC ID: AJDK012 user’s right to operate the equipment. MODEL NO.: DEH-P9800BT IC: 775E-JK012 ! This transmitter must not be co-located or op- This device complies with Part 15 of FCC Rules erated in conjunction with any other antenna and RSS-Gen of IC Rules. -
Page 8: Operating Environment
! Keep this manual handy as a reference for op- After-sales service for erating procedures and precautions. Pioneer products ! Always keep the volume low enough so that you can hear sounds from outside the vehicle. Please contact the dealer or distributor from ! Protect this unit from moisture. -
Page 9: Product Registration
800-421-1404 does not convey a license nor imply any CANADA right to use this product in any commercial Pioneer Electronics of Canada, Inc. (i.e. revenue-generating) real time broad- CUSTOMER SATISFACTION DEPARTMENT casting (terrestrial, satellite, cable and/or 300 Allstate Parkway... -
Page 10: About Wma
Before You Start iPod ® compatibility About AAC When you use this unit with a Pioneer iPod AAC is short for Advanced Audio Coding and adapter (CD-IB100), you can control an iPod refers to an audio compression technology with Dock Connector. -
Page 11: About The Sat Radio Ready Mark
The SAT RADIO READY mark printed on the front panel indicates that the Satellite Radio Tuner for Pioneer (i.e., XM tuner and Sirius sa- tellite tuner which are sold separately) can be controlled by this unit. Please inquire to your... -
Page 12: Protecting Your Unit From Theft
Section Before You Start Protecting your unit from Slide and remove the front panel to- ward you. theft Take care not to grip it too tightly or to drop The front panel can be detached from the the front panel and protect it from contact head unit and stored in the provided protective with water or other fluids to prevent perma- case to prevent theft. -
Page 13: Reverse Mode
Section Before You Start Important The red lead (ACC) of this unit should be con- nected to a terminal coupled with ignition switch on/off operations. If this is not done, the vehicle battery may be drained. WARNING Reverse mode Keep the battery out of the reach of children. Should the battery be swallowed, immediately If you do not perform an operation within consult a doctor. -
Page 14: Function Button And Audio Button
Section Before You Start FUNCTION button and AUDIO button slope)—Rear HPF FREQ. (rear high pass filter cut-off frequency)—BBE (BBE)—COMP/BMX You can also select the desired mode by (Compression and BMX)—SLA (source level FUNCTION button and AUDIO button on the adjustment)—AUI sound level (auditory user remote control. -
Page 15: What's What
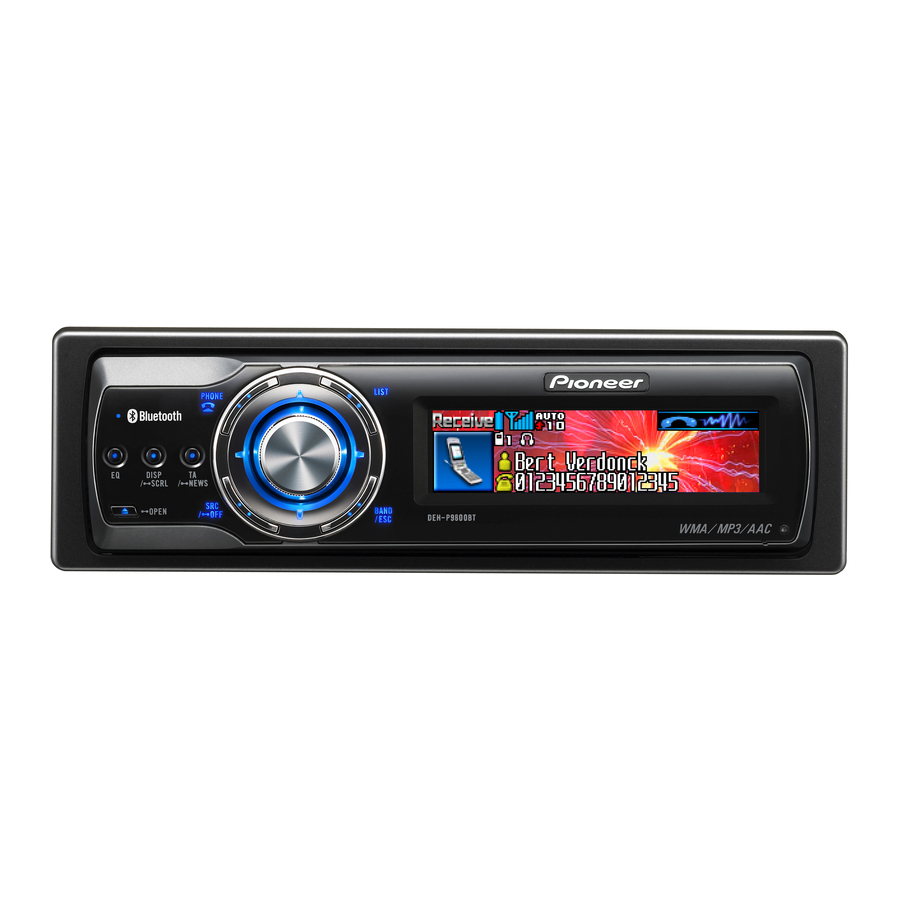
Section What’s What 1 1 1 2 2 2 3 3 3 4 4 4 5 5 5 7 7 7 b b b a a a 9 9 9 8 8 8 8 RESET button Head unit Press to reset the microprocessor. 1 EQ button Press to select various equalizer curves. - Page 16 Section What’s What j ON HOOK button c c c 9 9 9 d d d While operating the phone source, press to end a call or reject an incoming call. k ATT button m m m Press to quickly lower the volume level, by a a a about 90%.
-
Page 17: Basic Operations
! The built-in CD player plays one standard, 12- page 93). cm or 8-cm CD at a time. Do not use an adap- ! External unit refers to a Pioneer product (such ter when playing 8-cm CDs. as one available in the future) that, although... -
Page 18: Adjusting The Volume
Section Basic Operations ! There is sometimes a delay between starting up CD playback and the sound being issued. When being read, Format read is displayed. ! If you cannot insert a disc completely or if after you insert a disc the disc does not play, check that the label side of the disc is up. -
Page 19: Tuner
Section Tuner Listening to the radio To perform manual tuning, push MULTI-CONTROL left or right. The frequencies move up or down step by 1 1 1 2 2 2 2 3 3 3 3 4 4 4 4 5 5 5 5 step. -
Page 20: Introduction Of Advanced Tuner Operation
Section Tuner Introduction of advanced Storing and recalling tuner operation broadcast frequencies You can easily store up to six broadcast fre- quencies for later recall. When you find a frequency that you want to store in memory press LIST to switch to the preset channel list mode. -
Page 21: Selecting Stations From The Preset Channel List
Section Tuner Press MULTI-CONTROL to turn BSM on. Notes Searching is displayed. While Searching is ! You can also recall radio station frequencies displayed, the six strongest broadcast frequen- assigned to preset tuning numbers by push- cies will be stored under preset tuning num- ing MULTI-CONTROL up or down during the bers 1–6 in the order of their signal strength. -
Page 22: Built-In Cd Player
Section Built-in CD Player Playing a CD To skip back or forward to another track, push MULTI-CONTROL left or right. Pushing MULTI-CONTROL right skips to the 1 1 1 1 2 2 2 2 start of the next track. Pushing MULTI-CONTROL left once skips to the start of the current track. -
Page 23: Introduction Of Advanced Built-In Cd Player Operation
Section Built-in CD Player ! If you do not operate the function within about Introduction of advanced 30 seconds, the display is automatically re- built-in CD player operation turned to the playback display. Repeating play There are two repeat play ranges for the built- 1 1 1 in CD player: Disc repeat (disc repeat) and Track repeat (one-track repeat). -
Page 24: Scanning Tracks Of A Cd
Section Built-in CD Player Scanning tracks of a CD Selecting the search method Scan play lets you hear the first 10 seconds of You can switch the search method between each track on the CD. fast forward/reverse and searching every 10 tracks. -
Page 25: Using Disc Title Functions
Section Built-in CD Player # If a disc contains less than 10 tracks, pushing Push MULTI-CONTROL up or down to and holding MULTI-CONTROL left recalls the first select a letter of the alphabet. track of the disc. Also, if the remaining number of Each time MULTI-CONTROL is pushed up, al- tracks after searching every 10 tracks is less than phabet, numbers or symbols are displayed in... -
Page 26: Displaying Disc Titles
Section Built-in CD Player Displaying disc titles than 24 letters, you can scroll the text informa- tion as follows. You can display the text information of any ! When the source icon is turned off, this disc that has had a disc title entered. unit can display the first 30 letters of text in- formation. -
Page 27: Mp3/Wma/Aac/Wav Player
Section MP3/WMA/AAC/WAV Player # If no disc is loaded in the unit, you cannot se- Playing MP3/WMA/AAC/ lect Compact Disc (built-in CD player). Insert a WAV files disc in the unit. (Refer to page 17.) 1 1 1 1 2 2 2 2 3 3 3 3 4 4 4 4 Push MULTI-CONTROL up or down to... -
Page 28: Selecting A Track Directly In The Current Folder
Section MP3/WMA/AAC/WAV Player ! Playback is carried out in order of file number. Note Folders are skipped if they contain no files. (If After entering the number input mode, if you do folder 01 (ROOT) contains no files, playback not perform an operation within about eight sec- commences with folder 02.) onds, the mode is automatically canceled. -
Page 29: Introduction Of Advanced Built-In Cd Player (Mp3/Wma/Aac/Wav) Operation
Section MP3/WMA/AAC/WAV Player Introduction of advanced Repeating play built-in CD player (MP3/ For MP3/WMA/AAC/WAV playback, there are three repeat play ranges: Folder repeat (folder WMA/AAC/WAV) operation repeat), Track repeat (one-track repeat) and Disc repeat (repeat all tracks). Use MULTI-CONTROL to select Play mode in the function menu. -
Page 30: Scanning Folders And Tracks
Section MP3/WMA/AAC/WAV Player Press MULTI-CONTROL to turn random Pausing MP3/WMA/AAC/ play on. WAV playback Tracks will play in a random order within the previously selected Folder repeat or Pause lets you temporarily stop playback of the MP3/WMA/AAC/WAV. Disc repeat ranges. # To turn random play off, press Use MULTI-CONTROL to select Pause in MULTI-CONTROL again. -
Page 31: Displaying Text Information On Mp3/Wma/Aac/Wav Disc
Section MP3/WMA/AAC/WAV Player # Depending on the version of iTunes ® Select the search method Rough search. used to Refer to Selecting the search method on the write MP3 files onto a disc, comment information previous page. may not be correctly displayed. # Depending on the version of Windows Media Push and hold MULTI-CONTROL left or Player used to encode WMA files, album names... -
Page 32: Selecting Tracks From The File Name List
! Record jacket arts for folders on CD-ROM on page 92. in advance using your computer. For de- tails, please visit the following site: http://www.pioneer.co.jp/car/pclink4/index- e.html Selecting tracks from the ! Jacket arts (max. 15 images) directly be- neath the ROOT folder can be read. If... -
Page 33: Selecting Folders With Jacket Arts
Section MP3/WMA/AAC/WAV Player Selecting folders with jacket arts You can display the list of folders that are al- ready assigned jacket arts and select one to start playback. ! In the jacket art list, this unit displays up to 15 folders with jacket arts. ! For other folders with no jacket arts re- corded, this unit automatically assigns pre- set images to them. -
Page 34: Featuring Bluetooth Wireless Technology
Section Bluetooth Telephone Hands-free phoning with case, the signal level indicator does not appear. cellular phones featuring Bluetooth wireless technology 3 Automatic answering/Automatic reject- ing indicator Shows AUTO when the automatic answer- 1 1 1 2 2 2 3 3 3 4 4 4 5 5 5 5 ing function is on (for more details, refer to Setting the automatic answering on page... -
Page 35: Bluetooth Telephone
Section Bluetooth Telephone — OPP (Object Push Profile) nology, refer to Connecting a cellular phone on — HSP (Head Set Profile) page 38. — HFP (Hands Free Profile) # Your phone should now be temporarily con- ! When phone is selected as a source, volume nected;... -
Page 36: Basic Operation Of Hands-Free Phoning
Section Bluetooth Telephone Basic operation of hands- Push MULTI-CONTROL up or down to select a preset number. free phoning Preset numbers Dial preset 1–10 appear in These are the basic operations to use hands- the display. # You can also recall preset numbers free phoning via Bluetooth wireless technol- ogy. -
Page 37: Taking A Phone Call
Section Bluetooth Telephone Taking a phone call Answering a call waiting If while you are talking on the phone another Answering an incoming call call comes in, the number (or name if it is in Even when a source other than Telephone is your phone book) of the new caller appears in selected or when this unit itself is turned off, the display to signal that you have a call wait-... -
Page 38: Introduction Of Advanced Hands-Free Phoning Operation
Section Bluetooth Telephone Introduction of advanced If connected but not registered yet Disconnect phone (disconnect phone)— hands-free phoning operation Set phone (registering phone)— Delete phone (delete phone)— Phone book transfer (phone book transfer)— Number dial (call by entering number)— Refuse calls (automatic reject setting)— Auto answer (automatic answer setting)—... -
Page 39: Searching For Available Cellular Phones
To complete the connection, please check the nection from your cellular phone, the device name (Pioneer BT unit) and enter the connection may be made by HSP and sev- link code on your cellular phone. If the con- eral functions may not be available. -
Page 40: Disconnecting A Cellular Phone
Section Bluetooth Telephone # The link code is set to 0000 as default. You Push MULTI-CONTROL up or down to select a registration assignment. can change this code in the initial setting. Refer to Entering PIN code for Bluetooth wireless con- Each time MULTI-CONTROL is pushed up or nection on page 93. -
Page 41: Connecting To A Registered Cellular Phone
Section Bluetooth Telephone Push MULTI-CONTROL up or down to Push MULTI-CONTROL up or down to select a registration assignment. select a registration assignment. Each time MULTI-CONTROL is pushed up or Each time MULTI-CONTROL is pushed up or down, the registration assignment is switched down, the registration assignment is switched in the following order: in the following order:... -
Page 42: Using The Phone Book
Section Bluetooth Telephone ! With some cellular phones, it may not be Use MULTI-CONTROL to select Auto connect in the function menu. possible to transfer whole phone book at a Auto connect appears in the display. time. In this case, transfer phone book en- tries one by one from your phone by using Press MULTI-CONTROL to turn auto- your cellular phone. -
Page 43: Changing The Phone Book Display Order
Section Bluetooth Telephone Changing the Phone Book Press MULTI-CONTROL to display en- tries. display order The display shows the first three Phone Book You can choose to display the Phone Book entries starting with that letter (e.g. “Ben”, sorted alphabetically by first name or last “Brian”... -
Page 44: Editing The Name Of A Phone Book Entry
Section Bluetooth Telephone Use MULTI-CONTROL to display the de- Turn MULTI-CONTROL clockwise or tailed list of your desired Phone Book counterclockwise to switch to the name entry. input screen. Turning MULTI-CONTROL switches input See step 2 to 5 on Calling a number in the Phone Book on the previous page for how to screens in the following order: Edit genre (genre input screen)—Edit name... -
Page 45: Editing Phone Numbers
Section Bluetooth Telephone Editing phone numbers Selecting the icon of a Phone Book entry You can edit the phone numbers of Phone Book entries. You can select the icon of Phone Book entries. When you make a call or answer an incoming Press LIST to display the Phone Book. -
Page 46: Clearing A Phone Book Entry
Section Bluetooth Telephone Press MULTI-CONTROL to delete the Note Phone Book entry. You can rewrite icons of Phone Book entries. Cleared is displayed. (Refer to Rewriting the entertainment displays and The Phone Book entry is deleted. The display the icons for telephone functions on page 98.) returns to Phone Book entry list. -
Page 47: Using The Call History
Section Bluetooth Telephone Use MULTI-CONTROL to select Displaying the Call History Clear memory in the function menu. The Call History is divided into three groups: Clear memory appears in the display. Missed calls, Dialed calls, and Received calls. You can see the time and date of the call, as Push MULTI-CONTROL up or down to well as the number (and name if the number select an item. -
Page 48: Calling A Number From The Call History
Section Bluetooth Telephone Calling a number from the Call Assigning preset numbers History You can assign up to ten frequently called phone numbers to number presets Display the list and select a phone num- (Dial preset 1–10). ber. Display the phone number you want to make a Display the list and select a phone num- call. -
Page 49: Echo Canceling And Noise Reduction
Section Bluetooth Telephone Push MULTI-CONTROL up or down to Use MULTI-CONTROL to select select a number. Echo cancel in the function menu. Pushing MULTI-CONTROL up repeatedly Echo cancel appears in the display. changes numbers in 0 1 2 ... 9 + # * _ order. Pushing it down changes in _ * # + 9 ... -
Page 50: Setting The Automatic Rejecting
Section Bluetooth Telephone Setting the automatic Selecting the icon for user rejecting phone If this function is on, this unit automatically re- You can select one of icons to be displayed for jects all incoming calls. telephone source. ! This feature cannot be set for each different A different icon can be assigned for each dif- user phone. -
Page 51: Displaying Bd Address Of Your Cellular Phone
# If the assignment is empty, No data is dis- Device INFO. in the function menu. played and the operation is not possible. The device name (Pioneer BT unit) of this unit appears in the display. Push MULTI-CONTROL left to switch to the BD address. -
Page 52: Bluetooth Audio
Section Bluetooth Audio Listening to songs on BT Audio ing on your cellular phone as much as possible. If you try operating on your cellular (Bluetooth audio player) phone, the signal from your cellular phone may cause a noise on the song playback. ! When you are talking on the cellular phone 1 1 1 2 2 2... -
Page 53: Connecting A Bluetooth Audio Player
Section Bluetooth Audio Connection Press MULTI-CONTROL to open the con- Refer to Connecting a Bluetooth audio player nection. on this page on how to connect your Blue- Always waiting is displayed. This unit is now tooth audio player to this unit. on standby for connection from Bluetooth # Once connected via Bluetooth wireless tech- audio player. -
Page 54: Function Operation
Section Bluetooth Audio Function operation Notes ! If you do not operate the function within about 30 seconds, the display is automatically re- turned to the playback display. ! Depending on Bluetooth audio players con- nected to this unit, function operations may not be correctly operated. -
Page 55: Disconnecting A Bluetooth Audio Player
Use MULTI-CONTROL to select Disconnected is displayed. The Bluetooth Device INFO. in the function menu. audio player is now diconnected from this The device name (Pioneer BT unit) of this unit unit. appears in the display. Push MULTI-CONTROL down to switch to the system version of this unit. -
Page 56: Multi-Cd Player
Section Multi-CD Player Playing a CD until the disc number appears in the dis- play. 1 1 1 1 2 2 2 2 3 3 3 3 To perform fast forward or reverse, push and hold MULTI-CONTROL left or right. To skip back or forward to another track, push MULTI-CONTROL left or right. -
Page 57: 50-Disc Multi-Cd Player
Section Multi-CD Player Press DIRECT. Introduction of advanced The track of entered number will play. multi-CD player operation Note After entering the number input mode, if you do not perform an operation within about eight sec- onds, the mode is automatically canceled. 1 1 1 50-disc multi-CD player 1 Function display... -
Page 58: Repeating Play
Section Multi-CD Player ! If you do not operate the function within about Use MULTI-CONTROL to select Random mode in the function menu. 30 seconds, the display is automatically re- turned to the playback display. Random mode appears in the display. Press MULTI-CONTROL to turn random play on. -
Page 59: Pausing Cd Playback
Section Multi-CD Player Use MULTI-CONTROL to select Note ITS memory in the function menu. After track or disc scanning is finished, normal ITS memory appears in the display. playback of the tracks will begin again. Select the desired track by pushing MULTI-CONTROL left or right. -
Page 60: Erasing A Track From Your Its Playlist
Section Multi-CD Player Erasing a track from your ITS Push MULTI-CONTROL down to erase all tracks on the currently playing CD from playlist your ITS playlist. You can delete a track from your ITS playlist if All tracks on the currently playing CD are ITS play is on. -
Page 61: Displaying Disc Titles
Section Multi-CD Player % Press DISPLAY. Push MULTI-CONTROL up or down to select a letter of the alphabet. Press DISPLAY repeatedly to switch between Each time MULTI-CONTROL is pushed up, al- the following settings: phabet, numbers or symbols are displayed in : disc title—Simple display ascending order (A B C ...). -
Page 62: Displaying Text Information On Cd Text Discs
Section Multi-CD Player Displaying text information on Press LIST to switch to the disc title list mode during the playback display. CD TEXT discs # If you want to display the track title list of the % Press DISPLAY. currently playing disc, push MULTI-CONTROL Press DISPLAY repeatedly to switch between right. -
Page 63: Playing Songs On Ipod
Section Playing songs on iPod Listening to songs on your of the current song. Pushing again will skip to the previous song. iPod 1 1 1 1 2 2 2 2 Browsing for a song The operation of this unit to control an iPod is designed to be as close to the operation of the iPod as possible for easy operation and song search. -
Page 64: Searching For A Song
Section Playing songs on iPod Searching for a song Use MULTI-CONTROL to select a song from the selected playlist. Press LIST to switch to the top menu of Turn to change the song; press to play. the list search. # If no songs have been stored in playlist, STOP is displayed and playback stops. -
Page 65: Introduction Of Advanced Ipod Adapter Operation
Section Playing songs on iPod Introduction of advanced peat one song) and Repeat all (repeat all songs in the list). iPod adapter operation ! While Play mode is set to Repeat one, you cannot select the other songs. Use MULTI-CONTROL to select Play mode in the function menu. -
Page 66: Pausing A Song
Section Playing songs on iPod Pausing a song Pause lets you temporarily stop playback of a song. Use MULTI-CONTROL to select Pause in the function menu. Pause appears in the display. Press MULTI-CONTROL to turn pause Playback of the current song pauses. # To turn pause off, press MULTI-CONTROL again. -
Page 67: Xm Tuner
Section XM tuner Listening to XM Satellite Radio Press SOURCE to select the XM. Press SOURCE until you see XM displayed. 1 1 1 1 2 2 2 2 3 3 3 3 4 4 4 4 Press BAND to select a XM band. Press BAND repeatedly until the desired XM band is displayed, XM-1, XM-2 or XM-3. -
Page 68: Introduction Of Advanced Xm Tuner Operation
Section XM tuner Introduction of advanced Storing and recalling XM tuner operation broadcast stations You can easily store up to six broadcast sta- tions for later recall. When you find a station that you want to store in memory press LIST to switch to the preset channel list mode. -
Page 69: Selecting A Channel In The Channel Category
Section XM tuner % Push MULTI-CONTROL up or down to Press MULTI-CONTROL to select the de- sired channel select setting. select RADIO ID from channel category. # If you select another channel, display of the ID Press MULTI-CONTROL repeatedly to switch between the following channel select settings: code is canceled. -
Page 70: Sirius Satellite Radio Tuner
Section SIRIUS Satellite Radio tuner Listening to SIRIUS Satellite Press SOURCE to select SIRIUS. Press SOURCE until you see SIRIUS displayed. Radio Press BAND to select a SIRIUS band. Press BAND repeatedly until the desired SIR- 1 1 1 1 2 2 2 2 3 3 3 3 4 4 4 4... -
Page 71: Introduction Of Advanced Sirius Tuner Operation
Section SIRIUS Satellite Radio tuner % Press and hold DISPLAY to select the Introduction of advanced scroll setting. SIRIUS tuner operation Press and hold DISPLAY selects scroll setting in the following order: Continuous scroll setting—One-time scroll setting Storing and recalling 1 1 1 broadcast stations 1 Function display... -
Page 72: Selecting The Sirius Channel Select Mode
Section SIRIUS Satellite Radio tuner Selecting the SIRIUS Note channel select mode To select CH : 000, set the channel select setting to Channel number. About the channel select You have two methods for selecting a channel: setting, refer to Selecting the SIRIUS channel se- by number and by categoy. -
Page 73: Tv Tuner
Section TV tuner # You can cancel seek tuning by pushing Watching the television MULTI-CONTROL left or right. # If you push and hold MULTI-CONTROL left or 1 1 1 1 2 2 2 2 3 3 3 3 right, you can skip broadcasting channels. Seek tuning starts as soon as you release MULTI-CONTROL. -
Page 74: Introduction Of Advanced Tv Tuner Operation
Section TV tuner Introduction of advanced Use MULTI-CONTROL to store the se- lected station in memory. TV tuner operation Turn to change the preset number; press and hold to store. The preset number you have selected will flash and then remain lit. The selected station has been stored in memory. -
Page 75: Selecting Stations From The Preset Channel List
Section TV tuner # If you do not operate the list within about 30 seconds, the preset channel list mode is can- celed automatically. Note Storing broadcast stations with BSSM may re- place broadcast stations you have saved using P01–P12. Selecting stations from the preset channel list The preset channel list lets you see the list of... -
Page 76: Dvd Player
Section DVD Player 5 Play time indicator Playing a disc Shows the elapsed playing time of the cur- rent track. 1 1 1 1 2 2 2 2 3 3 3 3 4 4 4 4 Press SOURCE to select the DVD player/ multi-DVD player. -
Page 77: Introduction Of Advanced Dvd Player Operation
Section DVD Player Introduction of advanced Note DVD player operation When using this unit with multi-DVD player, you can switch to ITS play mode, ITS memory and Title Input. Repeating play 1 1 1 ! During PBC playback of Video CDs, this function cannot be operated. -
Page 78: Pausing Disc Playback
Section DVD Player ! During video CD or CD playback, if you per- Scanning tracks of a CD/ form track search or fast forward/reverse dur- MP3/WMA ing Track repeat, the repeat play range ! You can operate this function during CD/ changes to Disc repeat. -
Page 79: Entering Disc Titles
Section DVD Player Entering disc titles Disc title input lets you input CD titles up to 10 letters long into the DVD player. For details concerning operation, refer to Entering disc ti- tles on page 60. ! You can operate this function only when a DVD player is connected to this unit. -
Page 80: Audio Adjustments
Section Audio Adjustments Adjusting the audio easily Introduction of audio adjustments The following functions let you easily adjust your audio system to match the car interior acoustic characteristics, which vary depend- ing on the type of car. ! Recalling equalizer curves ! Using the position selector (Position) ! Adjusting equalizer curves 1 1 1... -
Page 81: Using The Position Selector
Section Audio Adjustments Fader (balance adjustment)—Position (posi- Use MULTI-CONTROL to select Position. tion selector)—TA Mode (time alignment set- Position appears in the display. ting)—Time Alignment (time alignment Push MULTI-CONTROL left, right, up or adjusting)—Loudness (loudness)—Powerful (graphic equalizer adjustment)—FREQ. (16- down to select a listening position. band graphic equalizer adjustment)—... -
Page 82: Using The Time Alignment
Section Audio Adjustments Left 25 to Right 25 is displayed as the left/ Use MULTI-CONTROL to select right speaker balance moves from left to Time Alignment. right. Time Alignment appears in the display. # Can't adjust TA. Set position FL/FR appears when neither Front Left nor Front Right is se- lected in the position selector mode (Position). -
Page 83: Using Subwoofer Output
Section Audio Adjustments 400.00cm to 0.00cm is displayed as the dis- Use MULTI-CONTROL to select tance is increased or decreased, if you have Subwoofer2. selected centimeters (cm). Subwoofer2 appears in the display. # You can adjust the distance for the other # When the subwoofer output is on, you can se- speakers in the same way. -
Page 84: Using The High Pass Filter
Section Audio Adjustments Push MULTI-CONTROL left or right to Push and hold MULTI-CONTROL down select slope. to mute the selected speaker unit (filter). Each time MULTI-CONTROL is pushed left or MUTE ON is displayed. # To cancel the muting, push MULTI-CONTROL right, slopes are selected in the following order: –18—... -
Page 85: Setting The High Pass Filter For Rear Speakers
Section Audio Adjustments Setting the high pass filter for Recalling equalizer curves rear speakers There are seven stored equalizer curves which you can easily recall at any time. Here is a list Use MULTI-CONTROL to select of the equalizer curves: Rear HPF. -
Page 86: Adjusting 16-Band Graphic Equalizer
Section Audio Adjustments Push MULTI-CONTROL left or right to Use MULTI-CONTROL to select 16-band select an equalizer curve. graphic equalizer adjustment. Each time MULTI-CONTROL is pushed left or FREQ. appears in the display. right, equalizer curves are selected in the fol- lowing order: Push MULTI-CONTROL left or right to Powerful—Natural—Vocal—Flat—Custom1... -
Page 87: Using Compression And Bmx
Section Audio Adjustments Press MULTI-CONTROL to turn BBE on. Push MULTI-CONTROL left or right to # To turn BBE off, press MULTI-CONTROL select the desired setting. Each time MULTI-CONTROL is pushed left or again. right, settings are selected in the following Push MULTI-CONTROL up or down to order: adjust the level of BBE. -
Page 88: Using Auditory User Interface
Section Audio Adjustments Push MULTI-CONTROL up or down to adjust the source volume. Each time MULTI-CONTROL is pushed up or down, source volume increases or decreases. +4 to –4 is displayed as the source volume is increased or decreased. Notes ! The AM tuner volume level can also be ad- justed with source level adjustments. -
Page 89: Initial Settings
Section Initial Settings Adjusting initial settings Selecting the display language For your convenience, this unit equips multi- ple language display. You can select the lan- guage best suited to your first language. Use MULTI-CONTROL to select Language select. 1 1 1 Language select appears in the display. -
Page 90: Setting The Clock
Section Initial Settings ! Even when the sources are off, the clock dis- Push MULTI-CONTROL up or down to set the date. play appears on the display. Pressing CLOCK Pushing MULTI-CONTROL up will increase when the sources and feature demo are off, the selected day, month or year. -
Page 91: Switching The Auxiliary Setting
Section Initial Settings Switching the auxiliary setting Push MULTI-CONTROL left or right to adjust the brightness level. Auxiliary equipments connected to this unit Each time MULTI-CONTROL is pushed left or can be activated individually. Set each AUX right, brightness level increases or decreases. source to ON when using. -
Page 92: Switching The Feature Demo
Section Initial Settings Use MULTI-CONTROL to select Mute. reverse, and then continue reversing every 10 Mute appears in the display. seconds. Press MULTI-CONTROL to select the de- Use MULTI-CONTROL to select sired setting. Reverse mode. Press MULTI-CONTROL repeatedly to switch Reverse mode appears in the display. -
Page 93: Calibrating The Rpms
Section Initial Settings Calibrating the RPMs Press MULTI-CONTROL to turn the BT Audio source on. Follow the instructions below to measure the ON appears in the display. RPM of your vehicle and records them. By # To turn the BT Audio source off, press doing this, the tachometer of this unit can MULTI-CONTROL again. -
Page 94: Resetting The Bluetooth Wireless Technology Module
Section Initial Settings When you press MULTI-CONTROL again on the same display, the PIN code you entered is stored in this unit. # Pusing MULTI-CONTROL right in the confir- mation display returns you to the PIN code input display, and you can change the PIN code. Resetting the Bluetooth wireless technology module Should you need to, you can reset the built-in... -
Page 95: Other Functions
Section Other Functions Turning the clock display AUX2 source: When connecting auxiliary equipment using an on or off IP-BUS-RCA Interconnector (sold separately) You can turn the clock display on or off. % Use an IP-BUS-RCA Interconnector such % Press CLOCK to turn the clock display as the CD-RB20/CD-RB10 (sold separetely) on or off. -
Page 96: Using Different Entertainment Displays
Section Other Functions Push MULTI-CONTROL up or down to Using different select a letter of the alphabet. entertainment displays Each time MULTI-CONTROL is pushed up, al- phabet, numbers or symbols are displayed in 1 1 1 1 2 2 2 2 ascending order (A B C ...). -
Page 97: Setting The Background Display
Section Other Functions Use MULTI-CONTROL to select Press MULTI-CONTROL to determine ENTERTAINMENT. the entertainment display and text color Turn to change the menu option; press to se- setting. lect. The choices you made on the color and the en- tertainment display are stored in memory and Turn MULTI-CONTROL to select a de- the display reverts. -
Page 98: Rewriting The Entertainment Displays And The Icons For Telephone Functions
Notes puter, and record it on CD-R. For details, please visit the following site: ! Do not insert anything other than a CD into http://www.pioneer.co.jp/car/pclink4/index- the CD loading slot. e.html ! It can take several minutes to complete this operation. -
Page 99: Additional Information
When you contact your dealer or your nearest Pioneer Service Center, be sure to record the When you contact your dealer or your nearest error message. Pioneer Service Center, be sure to record the error message. -
Page 100: Cd-R/Cd-Rw Discs
Appendix Additional Information ! Check all CDs for cracks, scratches or ment. Please record with the correct for- warping before playing. CDs that have mat. (For details, contact the manufacturer cracks, scratches or are warped may not of the application.) ! Playback of CD-R/CD-RW discs may be- play properly. -
Page 101: Mp3, Wma, Aac And Wav Files
Appendix Additional Information ! When playing discs with MP3/WMA/AAC/ MP3, WMA, AAC and WAV files WAV files and audio data (CD-DA) such as ! MP3 is short for MPEG Audio Layer 3 and CD-EXTRA and MIXED-MODE CDs, both refers to an audio compression technology types can be played only by switching standard. -
Page 102: Wma Additional Information
Appendix Additional Information ! The emphasis function is valid only when ! This unit plays back AAC files in the sam- MP3 files of 32, 44.1 and 48 kHz frequen- pling frequencies 11.025, 16, 22.05, 24, 32, cies are played back. (16, 22.05, 24, 32, 44.1 and 48 kHz. - Page 103 Appendix Additional Information mend creating discs with no more than 2 tiers. ! It is possible to play back up to 99 folders on one disc. 1 First level 2 Second level 3 Third level Notes ! This unit assigns folder numbers. The user cannot assign folder numbers.
-
Page 104: Terms
Appendix Additional Information Terms HFP is short for Hands Free Profile. This profile A2DP is used for hands-free phoning with the de- A2DP is short for Advanced Audio Distribution vices featuring Bluetooth wireless technology. Profile. This profile allows the high quality audio data of either stereo or monaural to be transmitted via Bluetooth wireless technology. - Page 105 Appendix Additional Information Linear PCM (LPCM)/Pulse code data, schedule data and so on between de- modulation vices featuring Bluetooth wireless technology. This stands for linear pulse code modulation, Packet write which is the signal recording system used for music CDs and DVDs. This is a general term for a method of writing on CD-R, etc., at the time required for a file, just as is done with files on floppy or hard...
-
Page 106: Specifications
Appendix Additional Information Specifications Signal format: Sampling frequency ..44.1 kHz General Number of quantization bits ........... 16; linear Power source ......14.4 V DC (10.8 V to 15.1 V Frequency characteristics ... 5 Hz to 20 000 Hz (±1 dB) allowable) Signal-to-noise ratio .... - Page 107 Appendix Additional Information Profile ..........GAP (Generic Access Pro- file) SDP (Service Discovery Pro- tocol) HSP (Head Set Profile) HFP (Hands Free Profile) A2DP (Advanced Audio Dis- tribution Profile) AVRCP (Audio Video Re- mote Control Profile) OPP (Object Push Profile) Note Specifications and the design are subject to pos- sible modifications without notice due to im-...
- Page 108 TEL: (03) 9586-6300 PIONEER ELECTRONICS OF CANADA, INC. 300 Allstate Parkway, Markham, Ontario L3R OP2, Canada TEL: 1-877-283-5901 PIONEER ELECTRONICS DE MEXICO, S.A. de C.V. Blvd.Manuel Avila Camacho 138 10 piso Col.Lomas de Chapultepec, Mexico, D.F. 11000 TEL: 55-9178-4270 先鋒股份有限公司...
- Page 109 DEH-P9800BT This product conforms to CEMA cord colors. Le code de couleur des câbles utilisé pour ce produit est conforme à CEMA. Printed in Thailand Imprimé en Thaïlande <CRD4099-A/N> UC <KMMZX> <06B00000>...
-
Page 110: Connecting The Units
Connecting the Units Note: • This unit is for vehicles with a 12-volt battery and • When an external power amp is being used with negative grounding. Before installing it in a recre- this system, be sure not to connect the blue/white ational vehicle, truck, or bus, check the battery lead to the amp’s power terminal. - Page 111 <ENGLISH> 14 cm (5-1/2 in.) Subwoofer output 23 cm (SUBWOOFER OUTPUT) Power amp (9 in.) Microphone input (sold separately) Rear output (REAR OUTPUT) Power amp This product Antenna jack (sold separately) 15 cm (5-7/8 in.) Front output (FRONT OUTPUT) Power amp 4 m (13 ft.
- Page 112 Installation Note: • Before making a final installation of the unit, tem- • When installing, to ensure proper heat dispersal porarily connect the wiring to confirm that the con- when using this unit, make sure you leave ample nections are correct and the system works space behind the rear panel and wrap any loose properly.
- Page 113 DIN Front/Rear-mount This unit can be properly installed either from “Front” (conventional DIN Front-mount) or “Rear” (DIN Rear-mount installation, utilizing threaded screw holes at the sides of unit chassis). For details, refer to the following illustrated installation methods. DIN Front-mount Installation with the rubber bush (Fig.
- Page 114 Removing the unit (Fig. 6) (Fig. 7) Frame To remove the frame, extend top and bottom of the frame outwards in order to unlock it. (When reattaching the frame, point the side with a groove downwards and attach it.) • It becomes easy to remove the frame if the front panel is released.
- Page 115 <ENGLISH> DIN Rear-mount Installation using the screw holes on the side of the unit 1. Remove the frame. (Fig. 8) Frame To remove the frame, extend top and bottom of the frame outwards in order to unlock it. (When reattaching the frame, point the side with a groove downwards and attach it.) •...
- Page 116 Installation Fixing the front panel If you do not operate the removing and attaching the front panel function, use the supplied fixing screw to fix the front panel to this unit. Fixing screw Fig. 11...
- Page 117 Installing the microphone Installation notes • Install the microphone in a position and orientation that will enable it to pick up the voice of the person operating the system. When installing the microphone on the sun visor 1. Install the microphone on the microphone clip. (Fig. 12) Microphone Microphone clip Fig.
- Page 118 <ENGLISH> When installing the microphone on the steering column 1. Install the microphone on the microphone clip. (Fig. 14) Fit the microphone lead into the groove. Microphone Microphone clip Fig. 14 2. Install the microphone clip on the steering column. (Fig. 15) Double-sided tape Clamps Use clamps to secure the...
- Page 121 *CD BTB100 or CD BTB200 required There are two options in pairing Bluetooth cell phones with Pioneer headunits. Most cell phones will work with either Option 1 or Option 2. We highly recommend trying both methods. If neither method works, unfortunately the cell phone will not pair with the Pioneer headunit.
Need help?
Do you have a question about the DEH-P9800BT and is the answer not in the manual?
Questions and answers