Table of Contents
Advertisement
Advertisement
Table of Contents

Related Manuals for Abbott FreeStyle Flash Blood Glucose Monitor


Summary of Contents for Abbott FreeStyle Flash Blood Glucose Monitor
- Page 1 Owner’s Booklet B l o o d G l u c o s e M o n i t o r i n g S y s t e m...
-
Page 2: Table Of Contents
Table of Contents Important Information About Your FreeStyle Flash Blood Glucose Monitoring System ...2 ™ Important Health Related Information ... 3-4 The FreeStyle Flash Meter and FreeStyle Test Strip ™ Getting Started With the FreeStyle Flash Meter ... 5-6 The FreeStyle Flash Meter and How It Works... 7-8 The FreeStyle Flash Meter Display ... - Page 3 Appendices Using your Meter’s Lights ...35 Using Alarms...36 Meter Screen Displays ... 37-42 Setting Alarms ...38 Viewing Your Meter Memory ... 43-45 Transferring Data ...45 Error Messages ... 46-49 Batteries ...50 Replacing the Batteries ...51 Troubleshooting ... 53-54 Caring for Your Meter ...55 Meter Specifications ...56 Index ...
- Page 4 The FreeStyle Flash Sample So You Can Test on a Variety of Locations Test On or Off Your Fingers Suggested Test Areas for the Hand The FreeStyle Flash System gives you the freedom to obtain a blood sample for testing your glucose level from different areas of your body.
-
Page 5: Important Information About Your Freestyle Flash Blood Glucose Monitoring System
Important Information About Your FreeStyle Flash Blood Glucose Monitoring System ™ How the FreeStyle Flash System Should Be Used • The FreeStyle Flash System is intended for use outside the body (in other words, in vitro diagnostic use only). • The FreeStyle Flash System is used for measuring blood glucose (also known as blood sugar) from samples taken from the forearm, upper arm, hand, thigh, calf as well as your fingers (refer to page 1 for more information). -
Page 6: Important Health Related Information
Important Health-Related Information • Severe dehydration and excessive water loss may cause false low results. If you believe you are suffering from severe dehydration, consult your physician immediately. • Test results below 60 mg/dL (3.3 mmol/L) mean low blood glucose (hypoglycemia). -
Page 7: Glucose Monitoring System
Important Health-Related Information • Changes in blood glucose may be observed in finger or palm (at the base of the thumb) blood samples sooner than blood samples from the forearm and other alternate sites. Vigorous rubbing of the alternate test sites before lancing helps to minimize the difference between finger or palm (at the base of the thumb) and alternate site test results. -
Page 8: The Freestyle Flash
The FreeStyle Flash Test Strip Getting Started with the FreeStyle Flash Meter Abbott Diabetes Care has developed and tested your FreeStyle Flash Meter, FreeStyle Test Strips, and FreeStyle Control Solution to provide precise and accurate results. These items are included in your FreeStyle Flash Blood Glucose Monitoring System: 1. - Page 9 FreeStyle Flash System ™...
-
Page 10: The Freestyle Flash Meter And How It Works
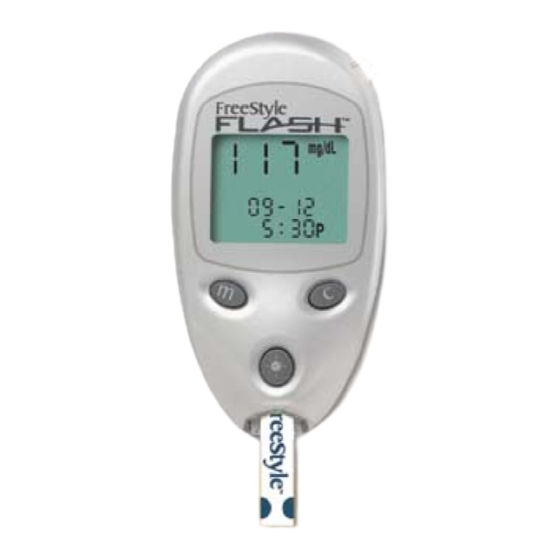
The FreeStyle Flash Data Port Allows you to transfer data from the meter’s memory to a computer or upload to a secure, protected website designed for diabetes data management. Refer to “Transferring Data” on page 45 for more information. Display Screen Displays your test results and other important information. - Page 11 c (Configure) Button The “c” button is used to: • Marks a test result as control solution. • Changes the test strip code (scrolls forward), time, alarm settings, sound options, date, unit of measurement, and reviews stored readings. • Silences an alarm. Test Strip Port Insert the Top end of a new FreeStyle Test Strip here.
-
Page 12: Meter Display
The FreeStyle Flash Check Owner’s Booklet Symbol Appears when the meter detects LO or HI blood glucose, out of temperature range results, low batteries, data cable inserted and error messages. Note: Always refer to FreeStyle Flash Owner’s Booklet when this appears. Control Solution Test Result Symbol Shows that you have marked a test result as a control solution test. - Page 13 System Check Screen This screen always appears when the meter leaves clock mode so that you can ensure the display is working properly. Test Result Area Test results appear here. A decimal point appears only when the unit of measurement is in millimoles per liter (mmol/L).
-
Page 14: The Freestyle Flash Meter Display
The FreeStyle Flash Blood Drop and Test Strip Symbols These symbols work together in an animation to tell you when the meter is ready for you to apply blood or control solution. Date Setup Symbol d-m or m-d appears in Set mode when setting the date format (for either the day-month or month-day format). - Page 15 mg/dL (U.S. Standard) or mmol/L The units of measurement used for your test result. 14-Day Average Symbol Appears with a glucose reading that equals the average value of the readings from the last 14 days (refer to page 43). Clock Symbol A clock symbol appears in the Clock mode and in the Set mode when setting the time.
-
Page 16: The Freestyle Test Strip
The FreeStyle ® Apply blood or control solution to only one edge of the test strip per test. Important: Use only one edge of the test strip per test. Do not apply blood to both edges. Test strips may be used only once. Discard used test strips. -
Page 17: The Freestyle Test Strip
Important Test Strip Information • The FreeStyle Flash (5 º to 40 º C). • Use the test strips only within the system operating temperature range. • Store the test strip package in a cool, dry place between 37 º to 86 º F (3 º... -
Page 18: The Freestyle Control Solution
The FreeStyle ® All About FreeStyle Control Solution What is FreeStyle Control Solution? It is a red liquid that contains a fixed amount of glucose and has three important uses: • To practice testing without having to use your own blood. •... - Page 19 When should I perform a control solution test? • When you question your results and want to confirm that your monitor and test strips are working properly. For information on how to obtain Control Solution, call Customer Care at 1-800-522-5226. How do I know if my control solution has expired? FreeStyle Control Solution is good for three months after opening...
- Page 20 Ensuring Accurate Control Solution Results. • Use only FreeStyle Meter. The use of other brands of control solution with the FreeStyle Flash Meter may produce inaccurate results. • Replace the cap on the control solution bottle immediately after using. • Do not use control solution past the expiration date or you may get inaccurate results.
- Page 21 How do I know if the control solution test results are accurate? • The control solution test results should fall within the range printed on the test strip vial label. Important: The control solution range is a target range for control solution only.
-
Page 22: Performing A Control Solution Test
Performing a Control Solution Test Insert only the Top end of test strip into the meter (with the dark-colored rectangle going into the meter). Bottom Grasp the bottom of the test strip with the name “FreeStyle” on the test strip facing up. - Page 23 around the display screen while the sample is being processed. Important: Do not apply control solution to both edges of test strip. If the sound prompt is on, your meter beeps twice and the result appears on the display screen in about 7 seconds. To mark the result as a control solution result, press and hold the “c”...
-
Page 24: The Freestyle Lancing Device
The FreeStyle Call Customer Care Toll Free at 1-888-522-5226 Lancing Device ® Cocking Handle Depth Settings Dial Depth Indicator Window Release Button Clear Cap (for testing sites other Grey Cap (for finger testing) than the finger) www.AbbottDiabetesCare.com... -
Page 25: Using The Lancing Device
Using the Lancing Device Remove Cap Snap off the cap on the lancing device at an angle. Insert Lancet Insert a new FreeStyle into the white lancet holder cup. (Pushing the lancet into the cup may cock the device; this is okay.) Twist Off the Rounded Top Hold the lancet firmly in place with one hand;... - Page 26 Replace Cap Replace the cap until it snaps or clicks into place. Be careful not to touch the exposed needle on the lancet. Important: Use the grey cap for finger tests. Lancing with the clear cap may be completed at the following test sites: fore- arm, upper arm, hand, thigh, and calf.
-
Page 27: Lancing On Alternate Sites
Lancing Clear Cap Lancing Your Forearm, Upper Arm, Hand, Thigh, or Calf Important: Use the clear cap for testing on your forearm, upper arm, hand, thigh, or calf. To bring fresh blood to the surface of the test site, rub the test site vigorously for a few seconds until you feel it getting warm. -
Page 28: Lancing Your Finger
Lancing (continued) Grey cap Call Customer Care Toll Free at 1-888-522-5226 Lancing Your Finger Important: Use the grey cap for finger testing. Stimulate blood flow by keeping your hand warm or by lowering your hand to waist level and by gently massaging your finger. -
Page 29: Removing The Lancet
Removing the Lancet When you have finished testing, snap off the cap from the lancing device. Hold the lancet over a sharps container or a puncture-proof container with a lid. Pinch the white clip that holds the lancet until the lancet falls out. Potential Bruising It is possible you may experience bruising at the test site. -
Page 30: Testing Your Blood Glucose
Testing Your Blood Glucose • With the FreeStyle Flash on your forearm, upper arm, hand, thigh, calf, as well as your fingers. • Testing with the FreeStyle Flash System requires a very small sample size, just 3/10th microliter of blood; about the size of a pinhead (example: ). -
Page 31: Blood Glucose Testing And Components
Blood Glucose Testing Components Test Strips Control Solution Meter Lancing Device Lancet Grey Cap (for testing on the finger) Clear Cap (for testing sites other than the finger) -
Page 32: Performing A Blood Glucose Test
Performing a Blood Glucose Test Before performing a blood glucose test, prepare the lancing device (refer to pages 22 and 23 for more information). Note: If you do not start the test within two minutes, the meter returns to clock mode. To restart your meter, take out the unused test strip and reinsert it into the meter. - Page 33 2. Code Number Note: To ensure accurate test results, make sure the code number on your meter display always matches the code number in the box out- lined in blue, located on the side of the test strip vial. b. When you see the word “COdE” and a code number on the display screen, use the “c”...
- Page 34 • press the test strip against the test site. Do not • scrape the blood onto the test strip. Do not • apply blood to the flat side of the test strip. Do not • apply blood to the test strip when the test strip Do not is out of the meter.
- Page 35 Important: • Make sure the apply sample symbols show on the display (alternating test strip and blood sample). • Use only one edge of the test strip per test. • If blood is applied to both edges, you can get an inaccurate result. •...
-
Page 36: Lo And Hi Readings
LO Readings Important: Low or high blood glucose readings can indicate a potentially serious medical condition. The FreeStyle Flash from 20 to 500 mg/dL (1.1 to 27.8 mmol/L). LO Reading If your test result is lower than 20 mg/dL (1.1 mmol/L), LO appears on the meter display screen. - Page 37 HI Readings HI Reading If your test is above 500 mg/dL (27.8 mmol/L), HI appears on the display screen. This indicates severe hyperglycemia (high blood glucose). HI Reading HI Reading with Symptoms If you feel symptoms such as fatigue, thirst, excess urination, or blurry vision, then follow your doctor’s recommendation to treat hyperglycemia.
-
Page 38: Appendices
Appendices 1. Using Your Meter’s Lights Depending on what mode your meter is in, pressing the light button ( ) lights either the display backlight or the test light. Call Customer Care Toll Free at 1-888-522-5226 Using the Display Backlight Pressing the light button powers on the display backlight in all modes except when applying a sample (for example, clock,... -
Page 39: Using Alarms
If you use either the backlight or the test light during the test mode, the backlight lights again to show you the test results after the measurement is complete. 2. Using Alarms There are four alarms that you can set. When an alarm goes off, you hear the sound for up to 15 seconds. -
Page 40: Meter Screen Displays
3. Meter Screen Displays Setting Up Your Meter • To Enter Setup Mode Start with the meter in clock mode (and no test strip inserted). Press and firmly hold the “m” (mode) button until the SET display screen appears. • To Exit at Any Time Press and hold the “m”... -
Page 41: Setting Alarms
Setting the Alarm An alarm is set if the sound level is set to low or high. This will show in set-up mode with a bell (alarm) icon displayed. An alarm is off if the alarm volume is off. This will show in set-up mode with a bell (alarm) icon with a slash/stroke through it. - Page 42 Setting the Sound There are three sound volume options to let you know when the test strip is full, when the reading is done, and when an error occurs: Off, Low, and High (default setting). 1. Press the “c” button until the desired sound 2.
- Page 43 Setting the Time 1. With the clock symbol showing and the hour Hour 2. Press the “m” button to move to minute setting. 3. With the minute blinking, press the “c” button Minute 4. Press the “m” button to move to the time format 5.
- Page 44 Setting the Date 1. With the month blinking, press the “c” button 2. Press the “m” button to move to the day setting. 3. With the day blinking, press the “c” button until Month 4. Press the “m” button to move to the year setting. 5.
- Page 45 Software Version Display This is the software version programmed in your FreeStyle Flash Meter. It is for display only, ™ and cannot be changed. The picture to the left is an example. Your meter may have a different number. Write the software version shown on your meter display on page 65.
-
Page 46: Viewing Your Meter Memory
4. Viewing Your Meter Memory Getting In and Out of Memory • To Enter Start with the meter in clock mode (and no test strip inserted). Press the “m” button and release; the first memory screen to appear is your 14-day average. •... - Page 47 Working the Memory The meter stores the last 250 test readings with time and date. You may scroll through all of the readings by pressing and holding the “c” button. The first reading you see is the most recent result. As you continue to push the “c”...
-
Page 48: Transferring Data
Special Notes Transferring Data The data port allows you to download test results from the meter’s memory to a computer or upload to a secure, protected website designed for diabetes data management. (Requires FreeStyle Data Cable, and FreeStyle data management software or other software programs that accept FreeStyle Flash data.) You will see the word “PC”... -
Page 49: Error Messages
5. Error Messages Error 1 Possible Causes • Sample is too small. • Problem with the test strip. • Problem with the meter. • Very low blood glucose What You Should Do 1. If you have symptoms such as weakness, sweating, nervousness, headache, or confusion, follow your doctor’s recommendation for treating hypoglycemia. - Page 50 Error 2 Possible Causes • Problem with the test strip. • Problem with the meter. • Very high glucose (above 500 mg/dL • HIGH control solution applied when What You Should Do 1. If you have symptoms such as thirst, fatigue, excess urination, or blurry vision, follow your doctor’s recommendation for treating hyperglycemia.
- Page 51 Error 3 Possible Causes • Incorrect test procedure. For example, putting • Problem with the test strip. • Problem with the meter. What You Should Do 1. Be sure you see the Blood Drop and Test Strip symbols on the display screen before you apply blood or control solution.
- Page 52 Error 4 Possible Causes • Problem with test strip. • Meter malfunction. What You Should Do 1. Conduct a control solution test using a new test strip. If the results of the control solution test are within the range printed on the side of your test strip vial, retest using blood and a new test strip.
-
Page 53: Batteries
6. Batteries Your FreeStyle Flash 3 volt, lithium batteries. The batteries provides enough power for the meter to perform about 500 tests, and to power the display backlight and test light. Important: When the battery symbol appears or when the backlight and test light begin to dim, you should replace your batteries immediately. -
Page 54: Replacing The Batteries
Replacing the Batteries Call Customer Care Toll Free at 1-888-522-5226 Turn the meter over. Press in the battery door clip to open. Swing the battery door up to open, and then off the meter. Install the batteries with the positive (+) sign facing up towards you. -
Page 56: Troubleshooting
Troubleshooting Meter does not enter the test mode after inserting a test strip. Probable Cause The batteries are dead. The batteries are installed incorrectly or the batteries are not installed . Test strip inserted upside down, wrong end in, or incompletely inserted into the meter. - Page 57 Test does not start after applying the blood sample. Probable Cause Blood sample too small . Defective test strip. Sample applied after meter times out (after two minutes) and returns to clock mode. Defective meter or test strips . What to Do Repeat the test using a new test strip and a larger blood sample.
-
Page 58: Caring For Your Meter
Caring for Your Meter Avoid getting dirt, dust, blood, control solution, water, or any • other liquid in the meter’s test strip and data ports. • Store the meter in the carrying case after each use. Cleaning the Meter Clean the outside of the meter using a cloth dampened with one of the following: •... -
Page 59: Meter Specifications
Meter Specifications Assay Method Automatically Enter Clock Mode Battery Life Calibration Hematocrit Measurement Units Memory Operating Relative Humidity Operating Temperature Power Source Result Range Sample Sample Size Dimensions Test Time Weight Coulometric electrochemical sensor Two minutes after last user action Approximately 500 tests Plasma equivalent 15% to 65%... -
Page 60: Index
Index Alarms........... . 36 Apply Blood Sample . -
Page 61: Control Solution Test
Calibration ..........56 Caring for Your Meter. - Page 62 Display Screen..........8-12 Apply Sample .
- Page 63 FreeStyle Lancets........5-6, 22, 26 Lancing at Alternate Sites .
- Page 64 Important Information About Your FreeStyle Flash System...2 Lancets ......... . 5-6, 22, 26 Lancing Device .
- Page 65 Hematocrit ..........56 HI Reading .
-
Page 66: Meter Settings
Time ...........40 Time Format. -
Page 67: Testing Blood Glucose
Symbols, Error ......... . . 46-49 System Check . -
Page 68: Target Range Guideline
Time of Day Plasma glucose range (mg/dL) for people without diabetes Fasting and before meal Less than 110 2 hours after meals Less than 140 Bedtime Not specified Between and 4 Not specified Source: ADA Clinical Practice Recommendations 2003 Meter Serial No. ( (Found on the back of your meter) Software Version No. - Page 69 Abbott Diabetes Care Inc. 1360 South Loop Road Alameda, CA 94502 www.AbbottDiabetesCare.com Call Customer Care Toll Free at 1-888-522-5226 Covered by one or more of the following U.S. Patents: D424,696 and D426,638 and 6,071,391 and 6,120,676 and 6,143,164 and 6,299,757 and 6,338,790 and 6,071,391 and 6,120,676 and 6,143,164 and 6,299,757 and 6,338,790 and 6,461,496 and 6,503,381 and 6,591,125 and 6,592,745 and 6,616,819 and 6,618,934 and 6,676,816 and 6,749,740 and 6,893,545.
Need help?
Do you have a question about the FreeStyle Flash Blood Glucose Monitor and is the answer not in the manual?
Questions and answers