Swann DVR4-1000 User Manual
Hide thumbs
Also See for DVR4-1000:
- Operating instructions manual (24 pages) ,
- Specifications (2 pages) ,
- Easy setup manual (2 pages)
Table of Contents
Advertisement
Advertisement
Table of Contents

Subscribe to Our Youtube Channel
Related Manuals for Swann DVR4-1000


Summary of Contents for Swann DVR4-1000
-
Page 1: User Manual
DVR4-1000™ User Manual SW242-DU2 www.swannsecurity.com SR242-DU2-10005 EN160109... -
Page 2: Fcc Verification
Getting Started FCC Verification: NOTE: This equipment has been tested and found to comply with the limits or Class B digital device, pursuant to part 15 of the FCC Rules. These limits are designed to provide reasonable protection against harmful interference in a residential installation. -
Page 3: Table Of Contents
Approximate Hard Drive Recording Times------17 General Recording and Playback Connecting the DVR to a Computer Display Layout---------------------------------------------------------------9 Auto-Switching Feature---------------------------------------------9 DVR4-1000™ PC Viewer Software--------------------18 Changing Camera Views----------------------------------------10 Introduction------------------------------------------------------------------18 Basic Recording---------------------------------------------------------10 System Requirements---------------------------------------------18 Before Entering the Menu System----------------------10 Running PC Viewer Software-------------------------------18 Playback Mode-----------------------------------------------------------10 Disconnecting the DVR4-1000™------------------------19... -
Page 4: Package Contents
Package Contents The following contents are included in the standalone DVR pack: DVR Unit Instruction Manual Easy Setup Guide Remote Control USB Cable Software CD Security Stickers DVR Power Supply Power Supply Cable Video Cable Using the Remote Control for the First Time The remote control contains a built-in battery that must be activated before use. -
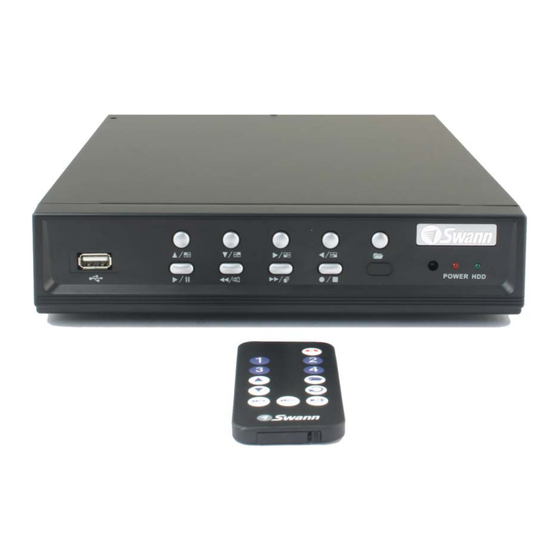
Page 5: Front Panel
Front Panel 1. USB Connection 7. Remote Control Sensor Connect to PC to Aim the remote control at download or playback the sensor footage 8. Power Indicator 2. Up Arrow Light is on when DVR is Move cursor up in menus powered on or switches to camera 1 in view mode... -
Page 6: Rear Panel
Rear Panel 1. Video Output 5. CH4 Output to monitor or TV Input for Camera 4 2. CH1 6. NTSC/PAL Switch Input for Camera 1 Set to NTSC to North America and PAL for Europe 3. CH2 and Australia Input for Camera 2 7. -
Page 7: Connecting Cameras And Power
Connecting Cameras and Power The DVR4-1000™ requires at least 1 camera connected for full functionality. Follow these steps to connect cameras to the DVR. 1. If you have an extension cable, connect your camera to the extension. 2. Connect the BNC connector to VIDEO IN, CH1 on the back of the DVR. -
Page 8: Connecting The Dvr To A Tv/Monitor
Connecting the DVR to a TV/Monitor The DVR4-1000™ comes with a BNC to RCA video cable that will fit most modern TV’s. Your TV or monitor will need a free VIDEO INPUT to connect the DVR. Follow these steps to connect your TV/Monitor. -
Page 9: Display Layout
Display Layout 1. Date & Time Display 4. Record Mode Year/Month/Day Each or Quad 2. Video Status 5. Recording Indicator V-LOSS appears when no signal is detected 6. Motion Detected Motion indicator 3. Channel Indicator Current channel in full 7. Type of Recording screen view Motion (M), Timer (T) or No recording (-) -
Page 10: Changing Camera Views
Note: The DVR4-1000™ requires at least one camera connected to begin recording; a “VIDEO LOSS” message will appear if no camera is present. The DVR4-1000™ will automatically begin recording when powered on if a camera is connected. -
Page 11: Time Search
Time Search The DVR4-1000™ has a built-in search feature that allows you to enter a specific date and time to quickly search through recorded footage. While in playback mode, push the Menu button to bring up the list of recordings... -
Page 12: Navigating The Menu System
Navigating the Menu System The DVR4-1000™ has many adjustable features to customize and suit various applications. Navigate the menus using these commands. Menu Button – enter or exit menu - return to previous menu Buttons – move cursor - change value/select button... -
Page 13: Time Setup
Time Setup: Set the current Date & Time using the arrow buttons Adjust the date in Year-Month-Day - YYYY/MM/DD Adjust the time in 24hr clock format in hour, minute, seconds - HH:MM:SS Camera Setup Menu Camera: Settings for current camera Live ON/OFF: Turns selected camera on/off Record ON/OFF: Set the selected camera for viewing only –... -
Page 14: Record Setup Menu
Record Setup Menu Record Mode: Each: Each camera will be recorded separately - on playback, each camera can be zoomed to full screen. Quad: All 4 cameras are recorded as one image - no zoom is available on playback Video Quality: Set recording quality Low, Medium or High Record Frame Rate: Set Frame Rate up to maximum 30 fps NTSC (4 Channels x 7.5 fps) or 25 fps PAL (4 Channels x 6.25 fps) Record Schedule Menu... -
Page 15: Motion Setup Menu
Motion Setup Menu Channel Sensitivity: Set the sensitivity of each camera from 1-9 (1 being least sensitive and 9 being most sensitive) Note: Motion detection recording will not be activated unless specified in Record Schedule/Programmed Record as above Setting the sensitivity to “0” will turn off motion detection for the chosen camera Recording with Motion Detection When Motion settings have been set exit all menus and press the... -
Page 16: Hard Drive Setup Menu
Hard Drive Setup Menu Overwrite Enabled: Choose yes to enable the automatic overwrite option – hard drive will automatically overwrite the oldest event when it becomes full Master HDD Size: The total hard drive size Master HDD Used: The total memory used in MB and percentage full Master HDD Format: When formatting the hard drive you will be prompted to enter your password to prevent unauthorized tampering System Restore Feature... -
Page 17: Approximate Hard Drive Recording Times
Approximate Hard Drive Recording Times The following table is an approximate guide to recording times for an 80GB hard drive. This is a general guide only as complexities and changes in an image will vary storage sizes. -
Page 18: Dvr4-1000™ Pc Viewer Software
DVR will display “USB CONNECTING” and you will be unable to operate the DVR until you disconnect the USB cable. Next, From the Start menu, find the DVR4-1000™ folder and click the icon named “DVR4-1000 PC USB Viewer”. The software will detect the DVR and load the last recorded image on the hard drive. -
Page 19: Disconnecting The Dvr4-1000
Disconnecting the DVR4-1000™ When you have finished using the software and are ready to disconnect, simply unplug the USB cable from the DVR. DO NOT “Stop” the USB Storage Device in the Windows taskbar to prevent data loss or corruption. -
Page 20: Searching For Specific Events
1. Capture MYS Video – This option will save selected video in the proprietary .MYS format. Video files in this format are preserved as they were written to the DVR4-1000™ 2. Capture AVI Video – This option will save selected video in .AVI format, commonly read by most computers... -
Page 21: Capturing Avi Video
PC 4. Click ‘Stop Capturing’ to stop the recording. The file will now appear in the default directory C:\DVR4-1000\Capture_MYS\ Capturing AVI Video 1. Navigate the viewer to a position you would like to begin recording and click the pause button in player controls 2. -
Page 22: Capturing A Jpeg Image
Capturing a JPEG Image 1. Navigate the viewer to a position you would like to begin recording and click the pause button in player controls 2. Click the ‘Capture JPEG Image’ button to create an image 3. A dialog box will appear showing the location and filename in year- month-day-time format of when it was recorded MYS Player Layout... -
Page 23: Playing Mys Files
Note: If you have already stored MYS files on the computer and wish to view them you do not need to have the DVR4-1000™ connected to the PC. The program will default to MYS Viewer mode when the DVR is not present. -
Page 24: Specifications
Specifications Operating System Embedded RTOS Video Input NTSC/PAL Video Input 4CH Composite Channel Video Output 1CH Composite Channel Display Frame NTSC 120 fps (4 x 30 fps) 100 fps (4 x 25 fps) Recording Frame NTSC Max. 60 fps Rate(QUAD) Max. -
Page 25: Limited Warranty - Terms & Conditions
Returns will be rejected unless clearly marked with a Return Authorisation number supplied by the Swann Tech Department. xii. Swann reserves the right to replace any faulty unit that is no longer in production with a current model of similar or equivalent type. xiii. -
Page 26: Technical Support
Swann Technical Support Worldwide Email support tech@swannsecurity.com UNITED STATES toll free AUSTRALIA toll free 1-800-627-2799 1300 138 324 1-877-274-3695 (M 9am-5pm AUS ET) (Su, 2pm-10pm US PT) (Tu-F 1am-5pm AUS ET) (M-Th, 6am-10pm US PT) (Sa 1am-9am AUS ET) (F 6am-2pm US PT) New Zealand toll free USA Exchange &...
Need help?
Do you have a question about the DVR4-1000 and is the answer not in the manual?
Questions and answers