Table of Contents
Advertisement
Quick Links
Advertisement
Table of Contents

Related Manuals for Garmin StreetPilot GPS StreetPilot GPS


Summary of Contents for Garmin StreetPilot GPS StreetPilot GPS
- Page 1 StreetPilot owner’s manual reference guide...
- Page 2 Information in this manual is subject to change without notice. GARMIN Corporation reserves the right to change or improve its products and to make changes in the content without obligation to notify any person or organization of such changes. Visit the GARMIN website for downloadable upgrades to the operating software and the Owner’...
-
Page 3: About This Manual
Before getting started with your GPS, check to see that your GARMIN StreetPilot package includes the following items. If you are missing any parts, please contact your GARMIN dealer immediately. Standard Package: StreetPilot ColorMap Unit with Detachable Antenna Owner’... -
Page 4: Cautions And Warnings
Do not mount the StreetPilot in a place where the driver or passengers are likely to impact it in an accident or collision. The mounting hardware provided by GARMIN is not warranted against collision damage or the consequences thereof. -
Page 5: Software License Agreement
United States of America copyright laws and international copyright treaties. You further acknowledge that the structure, organization and code of the Software are valuable trade secrets of GARMIN and that the Software in source code form remains a valuable trade secret of GARMIN. You agree not to decompile, disassemble, modify, reverse assemble, reverse engineer or reduce to human readable form the Software or any part thereof or create any derivative works based on the Software. -
Page 6: Fcc Compliance
Introduction FCC Compliance The GARMIN StreetPilot has been tested to comply with FCC Standards for home and office use. It complies with Part 15 of the Federal Communications Commission (FCC) limits for Class B digital devices. This equipment generates, uses, and can radiate radio frequency (RF) energy and, if not installed and used in accordance with instructions, may cause harmful interference to radio communications. -
Page 7: Limited Warranty
GARMIN Corporation warrants this product to be free from defects in materials and manufac- ture for one year from the date of purchase. GARMIN will, at its sole option, repair or replace any components that fail in normal use. Such repairs or replacement will be made at no charge to the customer for parts or labor. -
Page 8: Table Of Contents
Introduction Table of Contents Section One - INTRODUCTION About This Manual...i Cautions & Warnings...ii Software License Agreement...iii FCC Compliance...iv Limited Warranty...v “How To” Index...vii StreetPilot Unit...viii Section Two - QUICK-START Battery/Card Installation...1 Keypad Usage...2 Turning the Unit On and Off...3 Screen Brightness/Contrast...4 Dash Mounting and External Power...5 Finding Your Location...6... -
Page 9: How To" Index
Change the Map Page display...20 Create and use a route...54 Find an address or intersection...48-51 Find nearest cities or waypoints...14, 41-44 Initialize the GPS receiver (first time use)...6 Install batteries...1 Learn about the Map Page...15-25 Learn how to operate the unit’ s function keys...2-12 Load Map Data Cards...1... -
Page 10: Streetpilot Unit
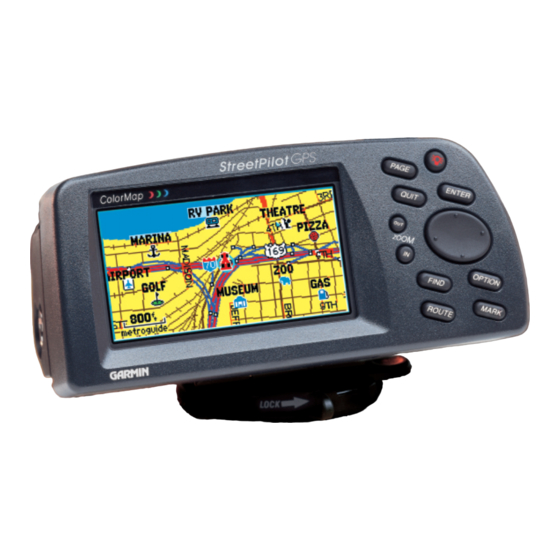
Introduction StreetPilot Unit LCD Display Antenna 16 Color DSTN LCD Rotate upright for best with Backlighting satellite reception (Map Page shown) Keypad Compartment Door Refer to Page 2 for Insert AA Batteries and optional Key descriptions Map Data Cards here. viii... -
Page 11: Install Batteries
Lithium battery when the AA batteries are removed. Map Data Cards may be purchased from your GARMIN dealer or directly from GARMIN. Up to 50 maps may be downloaded to a blank card using a GARMIN MapSource CD-ROM and following instructions provided with the MapSource CD-ROM. -
Page 12: Keypad Usage
Quick-Start The POWER Key Keypad Usage Turns the unit on and off. A momentary press while the power is on activates the backlight/contrast adjustment window. Press and hold to turn the StreetPilot off. The PAGE Key Changes between the main pages and returns the display from an option window back to a main page. The QUIT Key Returns the display to a previous page. -
Page 13: Turning The Streetpilot On And Off
Turning the StreetPilot On and Off To turn the StreetPilot on: 1. Press and hold the red POWER key until the power tone sounds. 2. The Title Page will be displayed for a few seconds while the unit conducts a self-test (top right picture). -
Page 14: Screen Brightness/Contrast
Quick-Start Screen Brightness/Contrast Screen Brightness/Contrast Adjustment Adjusting Screen Brightness and Contrast The StreetPilot screen lighting may set to a variety of levels for different lighting conditions and personal preferences. To adjust the screen brightness: 1. Press the POWER key for a moment. A window appears on the screen with a brightness control and a Contrast control (picture at left). -
Page 15: Dash Mounting And External Power
Your StreetPilot is designed to be portable, allowing you to easily transport the unit from vehicle to vehicle or take it with you once you reach your destination. A Dash Mount Kit consisting of a mounting bracket, mounting base, required hardware and adhesive pads is included in the StreetPilot package. -
Page 16: Finding Your Location
Your GPS receiver can only receive signals from satellites which are above the horizon, so it needs to know what satellites to look for at any given time. In order to determine which satellites are above the horizon, your GPS needs to either be told its general location (“initialized”) or given the... - Page 17 If the StreetPilot is unable to calculate your location after a few minutes: 1. A ‘Poor Satellite Reception’ box appears on the screen (top right picture). 2. If you are indoors, or would otherwise like to simulate GPS location and motion, use the ROCKER keypad to highlight Start Simulator and press the ENTER key.
-
Page 18: Using The Simulator
Quick-Start Using the Simulator Simulator “On” Selection You can start the Simulator Mode if you are indoors where the StreetPilot is unable to receive signals from GPS satellites. It is useful to do this when planning a trip or finding cities, and (if using MetroGuide Map Data) addresses, intersections, or businesses. -
Page 19: Main Page Sequence
The StreetPilot features two main pages, the Map Page and the Dashboard page. Press the PAGE or QUIT key to switch back and forth between the two main pages. If the StreetPilot is navigating to a destination, there is a third page called the Road Sign Page. The diagram below shows the relationship between the main pages when this is the case. -
Page 20: Map Zooming And Panning
Quick-Start Map Zooming and Panning Small Area - More Detail Large Area - Less Detail Once the StreetPilot calculates your location, you may find it enjoyable just to view the Map Page and watch your movement along roads and streets. There will be time later to learn about the ‘Find’ and ‘Route’... -
Page 21: Trip Computer Option Key
Now, try taking a look at the Trip Computer by pressing the PAGE key until you see the steering wheel and a dashboard (top right picture). The page shows your speed, an odometer, and other valuable information. Refer to page 26 for additional information. The OPTION Key The StreetPilot has an OPTION key which you may press at any time to see a menu of options for the page you are viewing. -
Page 22: Making Keypad Entries
Quick-Start Making Keypad Entries ‘Time Zone’ Field Highlighted Time Zone Option Highlighted Changing between pages and zooming the map in and out are not the only functions of the keypad. The keypad is also used for finding and entering information. There are street addresses, points of interest, and city names to find. - Page 23 Making a character entry to name a Personal Waypoint: 1. Press the MENU key to display the ‘Mark Personal Waypoint’ page. 2. Use the ROCKER keypad to highlight the waypoint name field and press ENTER. The first digit of the waypoint name is highlighted. 3.
-
Page 24: Using Find And Goto
Quick-Start Using Find and Goto Find Menu Nearest Cities As an example, imagine that you are driving in Denver, Colorado while looking at the Map Page. You are on your way to an appointment in Castle Rock and you want to know what direction to go, the distance away, and how much time is required to drive there. -
Page 25: The Map Page
Satellite Icons direction of travel at the top of the map. If the StreetPilot GPS receiver has yet to calculate your location, there is a flashing question mark over the vehicle pointer and the status line at the top of the page screen displays, ‘Acquiring Satellites’. -
Page 26: Zooming
Reference The Map Page Zooming The distance between these two tick marks is 1/4 mile. If you are driving along a road which is shown on the map, the vehicle pointer will often be shown moving down the road. This occurs when your location and direction you are driving indicate that you probably are on that street. -
Page 27: Driving Status
The top of the Map Page indicates your Driving Status: The direction you are driving; one of eight possible directions - North (N), South (S), East (E), West (W), NE, SE, SW, or NW. The name of the road or street you are driving on (if the StreetPilot has selected a road). -
Page 28: Map Panning
Reference Map Panning Arrow Pointer Panning Saving a Selected Map Feature as a Waypoint The pan function, allows you to identify features on the map, and to move the map to view additional areas not currently shown on the screen. To activate the pan function: 1. -
Page 29: Personal Waypoints
You may see an area or features on the map that you would like to go to. For example, you can pan to a city, road, lake, or river and create a Personal Waypoint. You will receive directional guidance there after the waypoint has been created. To create a Personal Waypoint on the Map: 1. -
Page 30: Goto A Waypoint
Reference Goto a Waypoint Going To a Personal Waypoint Map Page Options Map Page Options To go to a highlighted Personal Waypoint 1. Use Steps 1 through 3 of the previous page to create a Personal Waypoint on the Map Page. 2. -
Page 31: Map
Measure Distance - Allows you to compute the distance between any two points you choose on the Map Page, whereas regular map panning only allows viewing of the distance and direction from your current location to a point on the map. To measure the distance between two points: 1. -
Page 32: Customizing The Map
Reference Customizing the Map ‘Customize Map’ Screen ‘Orientation’ Options When you select Customize Map from the Map Page options, a page is displayed with three file tabs, ‘General Settings’, ‘Points’, and ‘Vehicle’ (top left picture). ‘General Settings’ File Tab The General Settings File Tab includes a map window to the side. It allows you to monitor the vehicle’... -
Page 33: Customizing The Map
Reference Customizing the Map Track Log - The StreetPilot records your location and stores it in internal memory. When the Track Log is On, the recorded points are displayed on the Map Page. The unit stores the most recently recorded points. - Page 34 Reference Customizing the Map “Points’ File Tab Selecting a Map Scale ‘Points’ File Tab (top left picture) Waypoints - Allows you to determine which map scales (if any) show Personal Waypoints. Points of Interest - Allows you to set which map scales (if any) show Points of Interest, such as Food / Drink locations.
- Page 35 To modify the display of Points of Interest: 1. Use Steps 1 - 6 from the previous page (Waypoint Display Modification). This sets the map scales on which Point of Interest symbols are displayed and the text size for the Point of Interest name.
-
Page 36: The Dashboard Page
Reference The Dashboard Page Trip Computer View Satellite Status View To view the Dashboard Page, press the PAGE key until you see the page resembling an automobile dashboard with a steering wheel. The Dashboard Page has two different views, the Trip Computer view and the Satellite Status view. -
Page 37: The Trip Computer
Trip Computer View If you are making a long trip, you will find the Trip Computer very useful. It indicates your current speed and many helpful statistics about your trip. The following are useful suggestions to aid in maximizing the use of the Trip Computer: Be certain to reset the Trip Computer before beginning the trip. - Page 38 Reference The Trip Computer Trip Computer Information Speed - (Displayed at the top of the dashboard area) The current speed atwhich you are traveling. Odometer - (Displayed in a box, below the speed display) A running total of distance traveled, based up on the distance between second-by-second location readings, since the Trip Computer was last reset.
- Page 39 Total Time - The total length of time that the StreetPilot has been tracking your location, since the Trip Computer was last reset. This is always equal to Driving Time plus Stopped Time. Additional Information: When the StreetPilot is in the Simulator mode, the simulated motion may be controlled from the Trip Computer View: Pressing the UP area of the ROCKER keypad increases the speed by 10 miles per hour (mh).
-
Page 40: Satellite Status
The Satellite Status view of the Dashboard Page shows you status information that helps you understand what the GPS receiver is doing at any given time, it is a page that you can refer back to as you use the StreetPilot. It features a sky view of available satellites, corresponding signal strength bar graphs, and your current accuracy. -
Page 41: Satellite Status
If you have moved the StreetPilot several hundred miles since the last time it navigated using satellite signals, you may find that the StreetPilot will calculate your location more quickly if you set the approximate initial location. To set the initial location: 1. -
Page 42: System Setup
Reference System Setup System Setup “Pop Up” Options Windows The System Setup Pages (top left picture) can be accessed in two ways. All option menus include System Setup as a choice. In addition, at any time you may press the OPTION key twice to display the System Setup. -
Page 43: System Setup
To restore the factory settings: 1. Use the ROCKER keypad to move the cursor to the file tab for which you want to restore the factory settings. 2. Press the OPTION key. A window is displayed with Restore Factory Settings highlighted (top right picture). -
Page 44: General' File Tab
Reference ‘General’ File Tab ‘General’ File Tab (see top left picture) Simulator - Allows you to operate the StreetPilot indoors to plan trips and find locations when the unit is unable to receive GPS satellite signals. Can be set to Off or On. The Simulator Mode is especially useful if you are indoors and wish to try the StreetPilot features. -
Page 45: Alarms' File Tab
‘Alarms’ File Tab (top right picture) Approaching Waypoint Alarm - Provides an alarm message once you are within a set time (choices range from 15 seconds to five minutes) from your turn or destination waypoint. As you approach the waypoint, a message occurs when your estimated arrival time is within the alarm time entered. Speed Alarm - Provides an alarm message as a reminder when your speed exceeds a preset limit. -
Page 46: Time' File Tab
Reference ‘Time’ File Tab ‘Time’ File Tab (see top left picture) Time Format - Allows the current time to be displayed using a 12 or 24-hour clock. Tme Zone/UTC Offset - Used to determine the current local time. To set the Time Zone: 1. -
Page 47: Comm Port' File Tab
Serial Data Format - Allows you to control the input/output format used when connecting the StreetPilot to external devices. Six format settings are available: GARMIN Data Transfer - the proprietary format used to exchange waypoint, route, and track log data with a PC or with another StreetPilot. - Page 48 RCTM Format To select a ‘Transfer Mode’ : If the GARMIN format is selected, highlight the ‘Transfer Mode’ field and press the ENTER key. Select the desired setting (top left picture) and press the ENTER key. The ‘Transfer Mode’ field allows you to specify what information to request or send to a second StreetPilot.
-
Page 49: Marking Your Location As A Personal Waypoint
Marking Your Location as a Personal Waypoint It is useful to mark a location, so that you can drive to it again later. These locations are called ‘Personal Waypoints’. The StreetPilot can hold up to 500 Personal Waypoints. To mark your location as a Personal Waypoint: Press the MENU key. - Page 50 Reference Marking Your Location Waypoint Symbol Page Marking a Personal Waypoint To change the Personal Waypoint symbol: 1. Highlight the Personal Waypoint symbol (immediately to the right of the waypoint name) and press the ENTER key. 2. Use the ROCKER keypad to select the desired symbol. There are about 50 symbols to choose from (top left picture).
-
Page 51: Finding A City
You can search for Personal Waypoints, Cities or Exits that are included in the StreetPilot basemap. In addition, if you are using optional MetroGuide map data, you can search for and find Points of Interest, Addresses, or Intersections. Using the StreetPilot Find Function to Find a City To illustrate the procedure for finding items with the StreetPilot, follow the example of finding a City. -
Page 52: Finding A City
Reference Finding a City Finding a City by Name Moving to Alphabetical List To find a City by Name: 1. If the ‘Nearest Cities’ list is on the screen, press the OPTION key, select Find by Name and press the ENTER key. Cities are listed in alphabetical order. If you have searched for a City before, the name of that City is shown when you first get to this page (top left picture). - Page 53 To find a City using the Last Used list: 1. From anywhere in the StreetPilot programming, press the FIND key and then the OPTION key, to select the Last Used List (top right picture). Highlight ‘Last Used Cities’ and press the ENTER key, they are ordered by how recently you have selected them.
-
Page 54: Finding A Personal Waypoint
Reference Finding a Personal Waypoint Viewing Waypoint Information Page Move On Map Option Finding a Personal Waypoint is very similar to finding a City (refer to page 41). When you select Find Personal Waypoints, you may search for them using the ‘Nearest’, ‘by Name’ or ‘Recently Used’ list. If you have yet to create any Personal Waypoints, there may not be any entries in the ‘Nearest’... -
Page 55: Deleting Personal Waypoints
To delete Personal Waypoints: 1. Use one of the previously described methods of highlighting a Personal Waypoint name on the ‘Nearest’ or ‘by Name’ lists, then press the OPTION key. 2. To delete the highlighted waypoint, select Delete Waypoint (top left picture) and press the ENTER key. 3. -
Page 56: Finding A Point Of Interest
Reference Finding a Point of Interest Selecting a Point of Interest Major Category Find By Name Option Finding a Point of Interest (within a MetroGuide Map Data coverage area ) Finding a Point of Interest is also very similar to finding a City (see page 41). When you select Find Points of Interest after pressing the FIND key, you will see a box with the eight major categories. - Page 57 3. Use the ROCKER keypad to scroll through the list and make a selection then press the ENTER key to display the list of names for the type you selected (top left picture). The list will be displayed by “Nearest” or “By Name” 4.
-
Page 58: Finding An Address
Reference Finding an Address Editing a Number Entering the Street Name Finding an Address (within a MetroGuide map data coverage area ) The procedure for finding Addresses and Intersections is a little different than Personal Waypoints, Cities, or Points of Interest. To find an address, you enter a Number and a Street. Optionally, you can also enter a City to narrow down the search a little bit. - Page 59 9. Once you see the Street you are looking for on the screen, or can see that you are getting close to it (top right picture), press the ENTER key to move down to the alphabetical list. 10. Use the ROCKER keypad to select the desired Street (picture to the right) and press the ENTER key.
- Page 60 Reference Finding an Address Best Search Matches Displayed Address Information Page 12. Press the DOWN area of the ROCKER keypad to highlight Search and press the ENTER key to begin the search. If more than one matching Address is found, the results of the search are shown with the best matches at the top of the list (top left picture).
-
Page 61: Finding An Intersection
Finding an Intersection (within a MetroGuide Map Data coverage area) Finding an Intersection is similar to finding an Address (see page 48), with the exception that you enter two streets. To find an Intersection: 1. Use the same procedure for finding an Address, except enter two Street names, instead of a Number and a Street. - Page 62 Reference Driving on a Direct Goto After you have used the FIND key to find someplace that you would like to go, one of the things you can do is select ‘Go to it’ to select it as a destination and the StreetPilot will help guide you to it. The Map Page on a Direct Goto One of the first things you will notice is that the Map Page changes (picture below): The Driving Status at the top of the page tells you what direction to go (North, South,...
-
Page 63: Navigating On A Direct Goto
The Road Sign Page on a Direct Goto The other major difference when the StreetPilot is navigating on a Direct Goto is that a new page called the Road Sign Page (top right picture) is displayed between the Map Page and the Dashboard Page. A pointer shows the direction from your current location to the destination, based on your direction of travel. -
Page 64: Routes
Reference Routes Creating a New Route Pointing To a Starting Point To Start a Route Although the StreetPilot does not automatically give turn-by-turn directions when a destination is chosen, you can select your starting point and your destination and then manually select a route by choosing the roads and streets you wish to travel. -
Page 65: Creating A Route
5. To have intermediate points on the route, use this same procedure to select the first turn on the route and press the ENTER key. If there is a single road that connects the new point and the previous point, the route will follow that road. Otherwise, your route will follow a straight line between the two points. -
Page 66: Editing An Existing Route
Reference Editing an Existing Route “New Route Created” Box Editing an Existing Route 7. When all the desired points have been added to the route, press the PAGE key. The ‘New Route Created’ box is shown with an assigned name for the new route (Refer to the top left picture). 8. - Page 67 5. Press the ENTER key. 6. If you selected a route line to insert a new turn, use the ROCKER keypad to “drag” the route line to the point where you want to insert a new turn (top right picture) and press the ENTER key. If you selected a turn to view or edit it (middle right picture), you now have the choice to Review, Remove, or Move the waypoint, or move the panning arrow to the Next waypoint.
-
Page 68: Selecting/Deleting A Route
Reference Selecting or Deleting a Route Selecting Route Direction Deleting a Route To select an existing route for navigation: 1. Press the ROUTE key to view the Route menu. 2. Highlight Start Navigation and press the ENTER key. A box comes on the screen with a list of the routes stored in the unit’s memory. -
Page 69: Copying A Route
There are times when you would like to create a route that is similar to one that already exists. For example, there may be more than one way for you to get from “Point A” to “Point B”. To do this, copy the route, and then move or add intermediate turns. -
Page 70: Driving On A Route
Reference Driving on a Route Map Page on a Route Once you have created a route and have selected Start Navigation, the StreetPilot will give you progressive guidance. Just as on a Direct Goto, the Map Page and the Road Sign Page are the two primary sources of this guidance. - Page 71 The Road Sign Page on a Route When the StreetPilot is navigating on a Route, the Road Sign Page may be displayed, as was described on page 53 for a Direct Goto. Remember, that on a Direct Goto, the Road Sign Page shows the Direction to Go, directions to the destination, the Distance to Go and the Arrival Time/Time to Go.
- Page 72 Reference Driving on a Route Displaying One Route Turn Arriving at the Final Destination To display only one route turn at time: 1. From the Road Sign Page, press the OPTION key. 2. Highlight Show One Turn and press the ENTER key (top left picture). You can change back by using a similar procedure and selecting Show More Turns.
-
Page 73: Section Four - Appendicesa Accessories
Power/Data Cable with bare wires (Not shown)... Part Number: 010-10082-00 8ft Extension Cable for GA 26C Antenna (Not Shown)... Part Number: 010-10152-00 Handheld/Portable Antenna (Replacement)...Part Number: 011-00445-00 Appendix A Accessories Contact GARMIN Customer Service or your GARMIN Dealer to obtain Replacement Parts and Optional Accessories. GARMIN Customer Service... - Page 74 System requirements are: Pentium processor, Windows 95, Windows 98, or Windows NT 4.0, 16 MB minimum RAM, 20 MB free hard disk space, CD-ROM drive, 256-color display adapter and monitor, mouse or other pointing device. Uses data transfer cable provided with the StreetPilot. Contact your GARMIN Dealer or GARMIN Customer Service to order MapSource CD-ROM’ s .
-
Page 75: B Specifications
PHYSICAL Case: Fully-gasketed, high-impact plastic alloy, waterproof to IPX7 standards Size: 3.19”H x 6.81”L x 2.56”D (8.1 x 17.3 x 6.5 cm) Weight: 1 pound 4oz (567 g) with batteries Display: 3.75” diagonal, 240 x 128 pixel, 16 color, backlit Antenna: Detachable with standard BNC-type connector Temp. - Page 76 1 The temperature rating for the StreetPilot may exceed the usable range of some batteries. Alkaline batteries can rupture at high temperatures. 2 With optional GARMIN GBR 21 Beacon Receiver Input. 3 Subject to accuracy degradation to 100m 2DRMS under the U.S. DOD-imposed Selective Availability (SA) Program.
-
Page 77: C Wiring/Interfaces
DGPS (Differential GPS) corrections are accepted in RTCM SC-104 version 2.0 format through the Data In line. The GARMIN GBR 21 is the recommended beacon receiver for use with the StreetPilot. Other beacon receivers with the correct RTCM format may be used, but may not correctly display status or allow tuning control from the GPS unit. - Page 78 Power/Data Cable with bare wire leads (P/N 010-10082-00). WARNING: the terms of the GARMIN Warranty require that the Power/Data Cable with bare wire leads be installed by experienced installers at a qualified installation facility, (i.e. electrical accessory installation center, auto, or marine dealer service center).
-
Page 79: D Maintenance
The StreetPilot is programmed to provide “pop-up” messages concerning operational characteristics and conditions. Refer to Appendix E. Remedy Replace batteries. Move to a new location. of the sky. Reinstall batteries. Return unit to GARMIN for service. Replace batteries. Appendix D Maintenance Trouble-Shooting Guide To resolve problems that cannot be... -
Page 80: E Messages
Appendix E Messages Battery Power is Low - The batteries in your unit are low and no longer capable of supporting unit operation. Install new batteries. Data Card Checksum Failure - There is an error in the unit’ s database. Service is required. Data Transfer Complete - The unit has finished uploading or downloading information to the connected device. -
Page 81: F Navigation Terms
Appendix F Navigation Terms Arrival Time - The estimated time of day you will reach a destination, using current speed and track. Direction to Go - The direction from your location to a destination point. Distance to Go - The distance from your location to a destination point. Driving Avg - Your average speed of travel during the time the vehicle has been in motion, since the Trip Computer was last reset. -
Page 82: G Utc Offset Tables
Appendix G Universal Time Coordinate (UTC) Offset Chart To determine your longitudinal zone: press the MARK key to mark a waypoint and observe the longitudinal coordinates by selecting “Show Lat/ Lon” from the options menu. Match it to a set of values on the chart to the right and select the Offset value to be entered in the UTC Offset field on the Time tab of the System Setup menu. -
Page 83: H Index
Cautions...ii-iii Accessories...63 Cities Accuracy Circle...15 Finding by Name...42 Addresses Finding Nearest...41 Finding...48 Information...43 Information...50 On Map...43 Number...48 Comm Port...37 On Map...50 Contrast, Screen...4 Selecting...48-50 Copying a Route...59 Street...49 Current Time...17, 36 Alarms...35 Antenna, Removing...68 Approaching Waypoint Dashboard Page...9, 26 Alarm...35 Dashboard Mounting...5 Arrival Alarm...35, 62 Data Entry...12... - Page 84 Appendix H Index Map Data Cards...16 Installing...1 Intersections Map Page...9, 10, 15-25 Finding...51 Options...21 Information...51 MENU Key...21 On Map...51 Maximum Speed...28, 71 Selecting...51 Resetting...29 Streets...51 Measuring Distances...21 Messages...70 Mounting...5 Keypad...2, 12 ROCKER Keypad...2 Navigation Info...17 Latitude/Longitude...23 Starting...53 Lodging, Finding ...46 Stopping...21, 56 Terms...71 Units ...34...
- Page 85 Standard Accessories...63 ROUTE Key...2 Starting Navigation...58 Route Line...55, 60 Street Names...49 Routes...54-62 Stopping Navigation...22, 53, 58 Copying...59 Creating...54 Stopped Time...28, 71 Sunrise/Sunset Times...36 Deleting...58 Symbols, Personal Waypoint Driving On...60 Editing...56 ...40 System Setup...12, 32 List...58, 59 Naming...56 Starting Navigation...58 Table of Contents ...vii Stopping Navigation...
- Page 86 Notes: Use this space to record landmarks that you want to retain for future use, but are deleting from the waypoint list contained in the StreetPilot to make space for new more active waypoints.
- Page 87 • Lost or Stolen unit tracking If you have previously registered your GARMIN product purchase using a mail-in registration card, we invite you to re-register NOTE: using our NEW on-line system. Many services provided by our new product registration system are now being automated and re- registering your purchase ensures you the best possible support from GARMIN.
- Page 88 © 1999-2000 GARMIN Corporation GARMIN International 1200 E 151 Street, Olathe, KS 66062 U.S.A. GARMIN (Europe) Ltd. Unit 5, The Quadrangle, Abbey Park Industrial Estate, Romsey, SO51, 9AQ U.K. GARMIN (Asia) Corp. No. 68, Jangshu 2 Road, Shijr, Taipei County, Taiwan www.garmin.com...
Need help?
Do you have a question about the StreetPilot GPS StreetPilot GPS and is the answer not in the manual?
Questions and answers