Table of Contents
Advertisement
Advertisement
Table of Contents

Related Manuals for Janome 385.8080200


Summary of Contents for Janome 385.8080200
- Page 1 JANOME SEWING MACHINE Owner's Manual MAQUINA DE COSER Manual de Instrucciones MACHINE A COUDRE Manuel d'instructions Model, Modelo, ModUle 385.8080200 Sears, Roebuck and Co., Hoffman Estates, IL 60179 U.S.A. www.sears.com Sears Canada Inc., Toronto, Ont., M5B 2B8 CANADA www.sears.ca 843-800-212...
- Page 2 iMPORTANT SAFETY iNSTRUCTiONS When using an electrical appliance, basic safety precautions should always be followed, including the followings: Read all instructions before using this appliance. DAN G E R To reduce the risk of electric shock: 1. An appliance should never be left unattended when plugged in.
- Page 3 Sewing Machine Model M_quina de Coser Modelo Machine & Coudre Mod61o Spool p in SETTING UP YOUR MACHINE Portacarretes 1. You'll find the spool pin on the top cover. Pull up the spool pin. Brochesa bobines 2. Plug foot controlintomachine receptacle.Then connectpowersupplyplug intoany 110/120 volt A.C.
- Page 4 Shuttle Threading Carefree stitching depends on the Big Lanzadera Enhebrado Aguja Puntada libre de cuidado depende de las GRANDE Needle Navette Enfilage Aiguille Le plaisir de coudre depends des GRANDS NEEDLE: Flat side away from you. AGUJA: Con el lado piano hacia atrds. AIGUILLE: Le cSt_ plat doit 6tre dans le sens Oppos6 _, vous.
- Page 5 Tension Oiling Feeding and the Little Lubricaci6n Tensi6n Avarice y los Peque_os Entra_nement Lubrification Tension et dos Petits FEEDING (Material does not feed properly) AVANCE (Material no avanza bien) ENTRA'INEMENT (Avance irr_gui_re du tissu) Check stitch length Verifique el largo de puntada V6rifiez la Iongueur du point Check drop feed lever Verifique el mando de...
- Page 6 PRACTICAL STITCH CHART TABLEAU SYNOPTIQUE REFERENCIA DE PUNTADA STITCH 1. PA1TERN 2. LEDDISPLAY 4, PRESSER F OOT PUNTADA 1. PATReN 2. PANTALLA 4. PRENSATELAS POINT 1. POINT 2. AFFICI-IANGEI_ LECTRONIQUE 4. PIEDPRESSEUR Prensatelas dezigzag Zigzag foot Pied zigzag Straight Stitch ol 02 03 04 Zigzag foot Puntada recta...
- Page 7 INSTRUCCIONES DE SEGURmDAD UMPORTANTES ATENCION Su m_.quina de coser est& diseSaday construida s61o para uso dom6stico. Antes de usar esta m&quina de coser, lea este manual y todas las reglas de seguridad e instrucciones operativas. PELIGRO- Para reducer el riesgo de descarga el6ctdca: La m&quina nunca se debe desatender cuando se ha conectado.
- Page 8 IMPORTANTES CONSIGNES DE SECURITE ATTENTION Votre machine & coudre n'est con_ue et construite que pour I'usage m_nager. Avant d'utiliser cotte machine b.coudre, veuillez lire ce manual et suivre toutes les rbgles de s_curit_ et les consignes d'utilisation. DANGER- Comment r6duire le risque de choc 61ectrique: Une machine ne devrait jamais _tre laiss6e sans surveillance Iorsqu'elle est branch_e.
- Page 9 WARRANTY FULL 25 YEAR WARRANTY ON DEFECT IN MATERIAL OR WORKMANSHIP For 25 years from the date of purchase Sears will, free of charge, repair defects in material or workmanship which appear in the internal mechan ca part of the sewing macn he.
- Page 10 WARRANTY FULL 25 YEAR WARRANTY ON DEFECT IN MATERIAL OR WORKMANSHIP For 25 years from the date of purchase Sears will free of charge, repair defects in material or workmanship which appear n the nternal mechanica part of the sew ng machine. FULL TWO YEAR WARRANTY ON ELECTRICAL EQUIPMENT...
-
Page 11: Table Of Contents
Table of Contents SECTION 1. ESSENTIAL PARTS ....... Sewing from the Edge of Thick Fabric ......Name of Parts ............Using Walking Foot (Even foot) ........Extension Table and Free Arm Sewing ......Quilting bar for the walking foot ........, To detach .............. - Page 12 INDICE SECClON 1. COMPONENTES PRINClPALES ..3 Costura a partir del borde de una tela gruesa ....33 Nombre de las piezas ..........C6mo usar el prensatelas uniforme ... ;....35 Mesa de extensi6n y confecci6n con brazo libre ..5 Barra de acolchado para el prensatelas uniforme ..
- Page 13 TABLE DES IViATi_:RES PARTIE 1. PIECES MAITRESSES ......R6gler la longueur du point .......... Nora des pi_ces ............Changer la position de descente de I'aiguille ....31 Plateau extensible et couture en bras libre ....Utiliser les guides de couture ........- Retirer le plateau ...........
-
Page 14: Section 1. Essential Parts
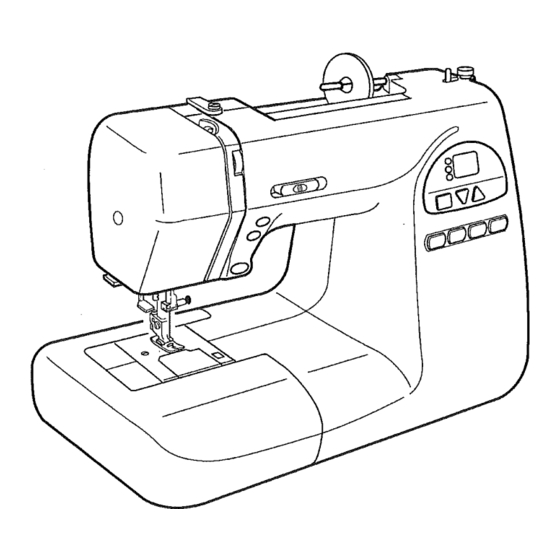
SECTION 1. ESSENTIAL PARTS Name of Parts Direct pattern selection keys Mode selecting key Down (-) key Up (+) key LED display (_ Spool holder (large) Spool pin Bobbin winding thread guide Thread guide @ Thread take-up lever @ Thread tension dial @ Face plate (_ Thread cutter @ Automatic... -
Page 15: Secclon 1. Componentes Princlpales
SECCION 1. COMPONENTES PRINCIPALES PARTIE 1. PIECES MAITRESSES Nombre delas piezas Nom des pi_ces Teclas de selecci6n directa de patr6n Touches de s61ection directe des points (_ Tecla de selecci6n de modalidad Touche de s61ection du mode (_ Tecla Menos (-) Touche (-) Tecla M4s (+) Touche (+) -
Page 16: Extension Table And Free Arm Sewing
Extension Table and Free Arm Sewing . To detach: Pull the extension table to the left. ° To attach: Slide the extension table along the free arm, inserting the pin into the hole to attach. 0 Extension table (_Pin (_Hole •... -
Page 17: Mesa De Extensi6N Y Confecci6N Con Brazo Libre
Plateau extensible et couture en bras libre Mesa de extensi6n y confecci6n con brazo libre ° Retlrer le plateau: , Desmontaje: Tirer le plateau vers la gauche. Tire de la mesa de extensi6n hacia la izquierda. , Remettre le plateau en place "... -
Page 18: Available Accessories And Attachments
Available Accessories and Attachments To order partsand accessories listedbelow, call: 1-800-4-MY-HOME®(1-800-469-4663) (USA and CANADA) 24hours a day, 7 days a week When orderingparts and accessories, provide the following information: 1. Part Number 2. Part Name 3. Model Number of Machine Ref. -
Page 19: Accesorios Y Refacciones Disponibles
Accessoires et pi_ces disponibles Accesorios y refacciones disponibles Pour commander les pi6ces et les accessoires list6s ci- AI ordenar partes y accesorios, proporcione la siguiente dessous, oomposez informaci6n. 1-800-LE-FOYER (1-800-533-6937) 1. N0mero de parte 24h/24, 7j/7 2. Nombre de la parte 3. -
Page 20: Section 2. Getting Ready To Sew
SECTION 2. GETTING READY TO SEW Connecting the Power Supply 1. Turn the power switch OFF. 2. Insert the foot control jack into the machine socket. 3. Insert the machine plug into the machine socket. 4. Insert the power supply plug into the outlet. 5. -
Page 21: Secclon 2. Preparativos Para Coser
PARTIE 2. SE PREPARER A COUDRE SECC|ON 2. PREPARATIVOS PARA COSER Brancher la machine Conexi6n a la fuente el6ctrica 1. Mettre le bouton de mise en marche sur la position OFF 1. Apague la m_quina. (arr6t), 2. Introduzcala clavijadei pedal de controlen el 2. -
Page 22: Function Keys And Buttons
, Function Keys and Buttons Q Reverse stitch button While the reverse stitch button is pressed, the machine sews backwards when the pattern 01, 02, 10 or 11 ($ _= _ _ ) has been selected. The machine will immediately lock the stitches and stop automatically when other stitch has been selected. -
Page 23: Teclas De Funciones Y Botones
Teclas de funciones y botones Touches et boutonsfonctionnels (_) Le bouton de marche arri_re (_ Bot6n de puntada inversa Lorsque le bouton de marche arri&re est enclench_, AI oprimir el botSn de puntada inversa, la m&quina cose en reversa si ha seleccionado el patr6n 01,02, 10 u 11 machine coud en sens inverse. - Page 24 (_ Mode selection Press this button to enter one of the following modes. [] Pattern selection mode: Press the Up.or Down.key until the pattern number of the desired stitch appears on the LED display. Stitch width adjusting mode: Press the Up _ key to increase the stitch width or Down _ key to decrease.
- Page 25 (_ Touche de s_lection du mode (_) Tecla de selecci6n de modalidad Appuyer sur ce bouton pour utiliser un des modes suivants. Oprima este bot6n para acceder a una de las siguientes modalidades. Mode de s_lection du point Modaiidad de selecci6n de patr6n: Appuyer sur la touche (_ou sur la touche Oprima la tecla M_.s _...
-
Page 26: Dropping The Feed Dog
Dropping the Feed Dog The feed dog can be lowered by the drop feed lever for sewing on buttons, manual embroidery etc. Push the drop feed lever to the right to lower the feed dog. Push the lever to the left to raise the feed dog, it will return to the up position when starting the machine. -
Page 27: Descenso De Las Garras Transportadoras
Abaisser la griffe d'entratnement Descenso de las garras transportadoras Las garras transportadoras pueden bajarse con la palanca Pour abaisser la griffe d'entrafnement, utfliser le levier de descenso de garras transportadoras para Confeccionar d'entra'_nement utilis6 pour coudre les boutons, pour faire les broderies &... -
Page 28: Raising And Lowering The Presser Foot
Raising and Lowering the Presser Foot The 13resser foot lifter raises and lowers the presser foot. You can raise it about 0.6 cm (1/4") higher than the normal up position for easy removal of the presser foot, or to help you to place thick fabric under the foot. Lowered position (_) Normal up position ®... -
Page 29: Ascenso Y Descenso Del Prensatelas
Lever et baisser le pied presseur Ascenso y descenso del prensatelas Le releveur du piedpresseur permet de lever et d'abaisser El elevador del prensatelas baja y sube el prensatelas. le piedpresseur. Puede elevar el prensatelas aproximadamente 0.6 cm (1/4") IIest possible de relever le pied presseurenviron0,6 cm m_s alto que la posici6n superior normal para facilitar el (1/4 de pouce) plus haut que la position d'61_vationnormale,... -
Page 30: Changing The Needles
Changing the Needles WARNING: Turn OFF the power switch before changing the needle. Loosen the needle cramp screw and pull out the needle. Insert a new needle into the needle cramp with the flat side facing back. Push the needle up against the stopper pin and tighten the needle cramp screw firmly. -
Page 31: Cambio De La Aguja
Changer I'aiguille Cambio de la aguja ATENCIO_I: ATTENTION: I_teindre la machine avant de changer I'aiguille. Apague la m_tquina antes de cambiar la aguja. [] Afloje el tornillode sujeci6n de la aguja, extraiga la aguja Desserrer la vis du pince-aiguille et retirer I'aiguille. e inserte una aguja nueva en el soporte con el lado Ins6rer une ncuvelle aiguille dans le pince-aiguille piano hacia atr=Ss. -
Page 32: Winding The Bobbin
Winding the Bobbin Removing the bobbin Slide the hook cover release button to the right, and remove the hook cover. Lift the bobbin out. O Hook cover release button (_ Hook cover (_ Bobbin Setting the spool of thread Place the spool of thread on the spool pin with the thread coming off the spool as shown. -
Page 33: Enrollado De La Bobina
Enrollado de la bobina Remplir la canette Extracci6n de la bobina Retirer la canette Deslice el bot6n de Iiberaci6n de la tapa del gancho Faire glisser le bouton d'ouverture du couvercle vers la droite et retirer le couvercle. suavemente hacia la derecha y quite la tapa. Sortir la canette. -
Page 34: Inserting The Bobbin
inserting the bobbin [] Placethe bobbinin the bobbinholderwith the thread runningcounter-clockwise. End of the thread Bobbinholder [] Guide the thread into the slot A on the front side of the bobbin holder. Draw the thread to the left sliding it between the tension spring blades. (_) Slot A Continue to draw the thread lightly through the tension blades until it slips into slot B. -
Page 35: Lnserci6N De La Bobina
Inserci6n de la bobina Mettre en place la canette Placer la canette dans le porte-canettes. Le fil devra se Coloque la bobina en el soporte de la bobina, con el hilo d6rouler dans le sens inverse des aiguilles d'une montre. saliendo en sentido antihorario. -
Page 36: Threading The Machine
Threading the Machine Threading the machine O Spool (_) Spool holder (_ Presser foot lifter Raise the presser foot. Press the needle Up/Down button twice to bring the take-up lever to its highest position. Draw the end of the thread with your left hand and hook around the upper thread guide while holding the thread at the spool with your right hand. -
Page 37: Enhebrado De La M&Quina
Enhebrado de la mdquina Enfilage de la machine Enhebrado de la mdquina Enfilage de la machine _) Carrete O Bobine (_ Soportedel carrete Supportde bobine (_) Elevador del prensatelas Releveurde pied presseur [] Levanteel prensatelas. Oprima del bot6n de ascenso y Relever le pied presseur. -
Page 38: Automatic Needle Threader
Automatic Needle Threader [] Raise the needle to itshighest positionby pressing the needle Up/Down button twice. Raise the presserfoot. Depressthe needlethreader knob as far as it will go. The hookcomes out through the needle eye from behind. Q_ Needle threader knob Q Hook [] Draw the thread down around the threader guide and under the hook. -
Page 39: Estiramiento Del Hilo De La Bobina
Enfilage automatique Enhebrador automdticode la aguja Relever I'aiguille aussi haut que possible en appuyant Levantela aguja a la posici6n mds alta oprimiendodos deux fois sur le bouton de rdglage de I'dl_vation de veces el bot6n de ascenso y descenso de la aguja. I'aiguille Levante el prensatelas. -
Page 40: Section 3. Utility Stitches
SECTION 3. UTILITY STITCHES ® ® ® Straight Stitch Machine setting olo_ 0_ 04 _) Pattern: + _=.t,.L 01 02 03 04 @€= @)LED display @)Foot: A: Zigzag foot Starting to sew Raise the presser foot and place the fabric on the machine. -
Page 41: Seccion 3. Puntadas De Uso General
SECCII_ON PUNTADAS DE USO PARTIE 3. LES POINTS UTILITAIRES GENERAL Le point droit Puntada recta R_glage de la machine ol _ o3 04 Configuraci6n de la mdquina Q Point _/ol, o[_ (!) Patr6n _ _ = o, Q Affichage _lectronique Pied A : pied zigzag (_) Prensatelas... -
Page 42: Adjusting The Stitch Length
Adjusting the Stitch Length Pressthe mode selectionkey_ to enter stitch length adjustingmode. The LED displayshows "2.2" (defaultsetting). Pressthe Down (-') key to decrease stitch length. Pressthe Up (+) key to increase stitch length. The stitch lengthcan be varied from 0.0 to 5.0. Reverse stitch length cannot be set longer than 2.5. -
Page 43: Ajuste De La Longitud De Puntada
Ajustedela Iongitud depuntada Rdgler la Iongueur du point Oprima la tecla de selecci6n _ de modalidad para Appuyer sur la touche de s_lection _ du mode et choisir cambiar a la modalidad de ajuste de Iongitud de puntada. le mode de r_glage de la Iongueurdu point. En la pantalla aparece "2.2"... -
Page 44: Using The Seam Guide Lines
Using the seam guide lines The seam guideson the needle plate and hookcover helpyou to measureseam allowance. Numbers 4/8" 5/8" 6/8" Distance (cm) The number indicatesthe distance from the center NOTE: needle position. • Guide lines Q Center needleposition (_ Distance from the center needle position Sewing from the Edge of Thick Fabric The black buttoniocks the zigzag foot to avoid slipping when sewingfrom the extreme edge or... -
Page 45: Como Usar Las Ifneas Gufa De Costura
C6mo usar las lineas gufa de costura Utiliser lee guides de couture Las gufas de costura de la piaca de agujas y la tapa del Les guides de couture de la plaque & aiguille et du gancho le ayudan a medir el margen de la costura. couvercle du boffier vous permettront de mesurer la valeur de couture. -
Page 46: Using Walking Foot (Even Foot)
Using Walking Foot (Even foot) This is a specialattachment for hard-to-feed materials. Thisfoot preventsthe fabric from slipping or puckeringby feeding fabrics with upper and lower feed dogs. Even foot is great for fine fabrics, knits, leatherand matching plaids. [] Turn off the switch. Raise the needle and presser foot. -
Page 47: C6Mo Usar El Prensatelas Uniforme
pied tagriffes C6mo usar el prensatelas uniforme Utilisation I_ste es un accesorio especial para materiales que son Le pied _ griffes est un accessoire particulier permettant dificiles de alimentar. Este prensatelas evitar que la tela se travailler avec des tissus difficiles & positionner sur la deslice e frunza, al alimentar la tela con las garras machine. -
Page 48: Variety Of Straight Stitching
Variety of Straight Stitching ® (_ Pattern: Straight stitch (_ Foot A: Zigzag foot For seaming garments, zipper application and more. Pattern #02 _ is used for seaming along the edge. (_ Pattern: Lock-A-Matic stitch ® (_ Foot A: Zigzag foot Seaming with auto reverse stit#hes at the beginning and end. -
Page 49: Diversas Puntadas Rectas
Diversas puntadas rectas Diff_rents points droits Patr6n Puntada recta (D Point Point droit ® Prensatelas A: Prensatetas de zigzag ® Pied A: Pied zigzag Pour coudre les v_tements, les fermetures _clair et Para costuras de prendas, aplicaciones de cremalleras mucho m_s. autres Se utiliza el patr6n 02 para confeccionar cesturas a Io... -
Page 50: Basic Zigzag Stitch
Basic Zigzag Stitch Machine setting I o (o O Pattern i1-11 (_ LED display Q Foot A: Zigzag foot Zigzag stitch is one of the most useful and versatile stitches. It is used for overcasting, mending, appliqu6 also used as a decorative stitch. NOTE: Use an interface when sewing on the stretch fabric such as knit, jersey or tricot. -
Page 51: Puntada B#Tsica En Zigzag
Puntada bdsica en zigzag Le point zigzag de base Configuraci6n de la mdquina Rdglage de la machine Patr6n Point (_) Pantalla (_) Affichage _lectronique (_) Prensatelas A: Prensatelas de zigzag (_) Pied A : Pied zigzag Le point zigzag est I'un des points les plus utiles et les plus La puntada de zigzag es una de las m_s _tiles y vers_tiles. -
Page 52: Overcasting (Zigzag Stitch)
Overcasting (Zigzag stitch) ® ® Machine setting i ml O Pattern i LIJ (_ LED display ® Foot A:Zigzag foot or C:Overcasting foot CAUTION." Do not set the stitch width less than 5 when using the overcasting foot to prevent the needle from hitting the wires on the foot. -
Page 53: Sobrehilado (Puntada En Zigzag)
Sobrehilado (Puntada en zigzag) Surjeter (Point zigzag) R_glage de la machine Configuraci6n de la mdquina O Patr6n O Point (_) Pantalla (_) Affichage 61ectronique (_) Prensatelas A: Prensatelas de zigzag o (_) Pied A: Pied zigzag ou C: Prensatelas de sobrehilado C: Pied de surjet ATENCION: ATTENTION;... -
Page 54: Serging Stitch
Serging stitch ® ® Machine setting (]) Pattern (_) LED display (_) Foot C i Overcasting foot CAUTION: Do not set the stitch width less than 5 when using the overcasting foot to prevent the needle from hitting the wires on the foot, This stitch is used for finishing the raw edges of stretch fabrics that tend to unravel. -
Page 55: Puntada De Sobrehilado
Puntada de sobrehilado Point de surfilage R_glage de la machine Configuraci6n de la m_quina (_ Point O Patr6n Affichage _lectronique (_ Pantalla (&) Pied C :Pied de surjet _) Prensatelas C: Prensatelas de sobrehilado ATENCI6N: ATTENTI()N: No ajuste ia anchura de puntada a menos de 5 si utiliza el Ne pas r_gler la largeur du point &... -
Page 56: Automatic Buttonhole
Automatic Buttonhole There are three different types of buttonhole available. Square buttonhole (#06): Widely used for medium to heavy weight fabrics Round end buttonhole (#07): For fine to medium fabrics, such as blouses and children's garments Keyhole buttonhole (#08): For medium to heavy weight fabrics, such as jackets and overcoats Square buttonhole ®... -
Page 57: Ojal Automatico
Boutonniere automatique Ojal automdtico II existe trois types diff_rents de boutenni6ies. Hay tres tipos de ojales disponibles. Les boutonnieres carrdes (N.06): Ojal cuadrado (06): Utilis_es en g6n@al pour les tissus moyens ou Iourds, Se utiliza para telas medianas y gruesas, Les boutonnieres _ bout rend (N.07): Ojal redondo... - Page 58 [] Raise t heneedle a nd foot. P lace theautomatic buttonhole foot w ithitspinjustunder thegroove o f thefootholder. Lower thepresser bartoattach t he foot. O Groove (_)Pin [] Pull t hebutton holder open totheback (A), a nd place thebutton init.Push thebutton holder closed ( B)tohold thebutton.
- Page 59 [] Relever I'aiguille etlepied. Placer lepied p our [] Levante laaguja yelprensatelas. Coloque el boutonnieres automatique defagon & ceque latige se prensatelas para ojales autom_.ticos con elposte j usto trouve juste en-dessous delarainure du support du debajo delamuesca del s oporte del p rensatelas. Baje l a barra d el p rensatelas para montar elprensatelas.
- Page 60 [] Depress thefootcontrol tosewa buttonhoie. Themachine will s ewa buttonhole inthefollowing order: (1) Step 1and2:Front b artack andleftrow @)Starting P oint (2)Step 3:Right r ow (3) Step 4:Back bartack a nd locking s titches a tthe O End point (4) LED shows each sewing step and a dot will blink when the buttonhole is finished.
- Page 61 Appuyer sur la commande & p6dale et coudre une Oprima el pedal de control para coser el ojal. boutonniere. La m_quina coser_, el ojal en el siguiente orden: La machine coud les boutonnieres dans I'ordre suivant : (1) Pasos 1 y 2: Remate delantero y ilia izquierda. (1) E_tapes 1 et 2 : barrette derenfort et Iorlgueur de gauche @ Punto inicial...
-
Page 62: Adjusting The Buttonhole Width And Density
-Adjusting the buttonhole width and density (1) Adjusting the buttonhole width Press the mode selection key _ to enter the stitch width adjusting model Press the Down(-) key to decrease buttonhole width. Press the Up (+) key to increase buttonhole width. The buttonhole width can be varied from 2.5 to 7.0. -
Page 63: Ajuste De La Anchura Y La Densidad De Ojales
R6gler la densit6 et la largeur des boutonnieres Ajuste de la anchura y la densidad de ojales (1) R6gler la largeur des boutonnieres (1) Ajuste de la anchura del ojal Appuyer sur la touche de s61ection _ du mode et choisir Oprima la tecla de selecci6n _ de modalidad para... -
Page 64: Round End/Keyhole Buttonhole
Round end/Keyhole buttonhole ® ® Machine setting (i) Pattern or u @ LED display ® Foot R: Automatic buttonhole foot m !Z.I] Li iJj The sewingsequence is the same as square buttonhole Refer to pages 48-50 for sewing instruction. Starting point (_) End point Adjusting the buttonhole... -
Page 65: Ojal Redondo Y De Bocallave
Boutonni6re & bout rond / & oeillet ojal redondo y de bocallave R_glage de la machine Configuraci6n de la m_quina (])Point U' ou _ Patr6n (_ Pantalla (_) Affichage _lectronique (_ Pied R:Pied pour boutonnieres (_ Prensatelas R:Prensatelas para ojales autom4ticos automatique La secuencia de costura es la misma que se sigue para el... -
Page 66: Corded Buttonholes
Corded Buttonholes Machine setting ® ® Q Pattern Ir,, 1 Q LED display LI iL-I ® Foot R: Automatic buttonhole foot [] With the buttonhole foot raised, hook the filler cord on the cord spur on the back of the buttonhole foot. Bring the ends toward you under the foot, and hook the filler cord ends into the forks on the front of the foot to hold them tight. -
Page 67: Ojales Acordonados
Boutonnibres gans_es Ojales acordonados R_glage de la machine Configuraci6n de la m_quina (_ Point O Patr6n (_ Pantalla (_) Affichage 61ectronique (_ Pied (_) Prensatelas R:Prensatelas para ojales autom_,ticos R:Pied pour boutonnieres automatique Le pied pour boutonnieres lev6, accrocher le cordon sur Levante el prensatelas para ojales, enganche el cord6n... -
Page 68: Sewing On Buttons
Sewing on Buttons ® ® Machine setting O Pattern (_) LED display i LI/ ® Foot F: Satin stitch foot (_) Feed dog Dropped Adjust the Stitch width as necessary. [] Press the mode selection key to enter stitch width E£[] adjusting mode. -
Page 69: Confecci6N De Botones
Coudre les boutons Confecci6n de botones Rdglage de la machine Configuracidn de la mdquina Point Patr6n (£) Pantalla (_ Affichage _lectronique (_) Pied (&) Prensatelas F: Prensatelas para puntadas F : Pied pour points de raso satin (_) Griffe d'entra'_nement Baiss_e (_. -
Page 70: Darning
Darning ® Machine setting (_ Pattern (_ LED display ® Foot R: Automatic buttonhole foot Pull the button holder fully to the back. Draw the needle thread to the left through the hole on the foot. AAAAAAAA Lower the needle into the fabric where start to sew. IIIIlllllllllll{ Lower the foot and depress the foot control. -
Page 71: Zurcido
Zurcido Repriser R_glage de la machine Configuraci6n de la m_quina O Point Patr6n (_ Affichage _lectronique (_ Pantalla _) Pied (_ Prensatelas R: Prensatetas para ojales R: Pied pour automAticos boutonnieres automatique Mueva el portabotones totalmente hacla atr&s. Lleve el hilo de la aguja por la izquierda, a trav_s del Tirer le pince-boutons vers I'arri6re aussi loin que possible. -
Page 72: Zipper Application
Zipper Application ® ® Machine setting ['-' I ] O Pattern ® LED display ® Foot Ei Zipper foot To attach the zipper foot: (1) Attach the zipper foot with the pin on the right, when sewing on the left side of the zipper. (2) Attach the zipper foot with the pin on the left, when sewing on the right side of the zipper. -
Page 73: Aplicaci6N De Cremalleras
Couture des fermetures dclair Aplicacien de cremalleras R_glage de la machine Configuraci6n de la mdquina (_) Patr6n (_ Point Pantalla (_) Affichage _lectronique Prensatelas E:Prensatelas para cremalleras (_) Pied E: Pied pour boutonnieres Montaje del prensatelas para cremalleras: Mise en place du pied& fermeture 6clair: (1) Monte el prensatelas para cremalleras... - Page 74 [] Attach the foot with the pin on the right. Sew through all the layers from the end of the zipper opening, guiding the zipper teeth along the edge of the foot. [] Stop the machine 5 cm (2") before the foot reaches the slider on the zipper tape.
-
Page 75: Pour Coudre
Monte el prensatelas con el poste del lado derecho. Fixer lepied & fermeture 6clair en positionnant la tige & Cosa a trav6s de todas las capas desde el extremo de la droite. Coudre routes les 6paisseurs depuis I'extr6mit6 abertura de la cremallera, guiando los dientes de la de I'ouverture de la fermeture 6clair en guidant les dents... -
Page 76: Blind Hem Stitch
Blind Hem Stitch ® Machine setting (_ Pattern _ or (_ LED display ® Foot G: Blind hem foot Fold hem with the wrong side up forming a 0.4-0.7 cm (3/16-5/16") allowance. Wrong side of the fabric (_ 0.4-0.7 cm (3/16-5/16") (1) On heavy weight fabrics that ravel, the raw edge should be overcast first. -
Page 77: Puntada De Dobladillo Invisible
L'ourlet invisible Puntada de dobladillo invisible Configuraci6n de la m_quina R_glage de la machine ®Poiot i ou (_) Patr6n (_) Pantalla (_) Affichage 61ectronique (_) Pied G:Pied pour ourlet (_ Prensatelas G: Prensatelas de dobladillo invisible invisible Plier un ourlet avec I'envers du tissu face & vous de Haga un dobladillo con el reverso de la tela hacia arriba, dejando un margen de 0.4 a 0.7 cm (3/16"... -
Page 78: Stitches
SECTION 4. SEWING APPLICATION AND DECORATIVE STITCHES © Knit Stitch [ ij] Machine setting Pattern LED display Foot A: Zigzag foot This stitch is recommended for finishing the edge of knit fabrics. Sew along the fabric edge leaving an extra allowance. After finish sewing, trim a!lowance close to the stitches. -
Page 79: Y Puntadas Decorativas
SECCION 4. CONFECCION PARTE 4. COUTURE ET POINTS DECORATIFS APLiCACIONES Y PUNTADAS DECORATIVAS Le point tricot R_glage de la machine Punta de tejido (£) Point Configuraci6n de la m_quina (_ Affichage 61ectronique Patr6n (_) Pied A:Pied zigzag (_) Pantalla (_) Prensatelas A: Prensatelas de zigzag Se recomienda... -
Page 80: Appliqu
Appliqu_ ® ® Machine setting 28 29 30 31 (2o1 @ Pattern ® LED display Foot F: Satin stitch foot Baste or glue applique pieces on the fabric. Stitch around the applique making sure the needle falls along the outer edge of the applique. When turning corners, lower the needle down into the outer edge of the applique, and raise the presser foot to pivot the fabric. -
Page 81: Aplicaci6N
Aplicaci6n Le point pour appliques Configuraci6n de la m4quina R_glage de la machine Patr6n _ =' _° _' O Point (_) Pantalla _ _ _ _ _) Affichage _lectronique (_) Prensatelas F: Prensatelas para puntadas deraso (_) Pied F: Pied pour points satin Hilvane o pegue las piezas de aplicaci6n a la tela. -
Page 82: Smocking
Smocking Machine setting (_) Pattern (_) LED display ® Foot F: Satin stitch foot Set the thread tension dial at 1-3, and stitch length at 3-4, sew straight lines 1 cm (3/8") apart across the area to be smocked. Knot the needle and bobbin threads along one edge. Pull the bobbin threads and distribute gathers evenly. -
Page 83: Fruncido Ornamental
Fruncido ornamental Le point smocks Contiguraci6n de la m_.quina R_glage de la machine O Patr6n 3s43 4445 C_)Point 3643444s Q Pantalla (_ Affichage _lectroniq ue (_) Prensatelas F: Prensatelas para puntadas de raso (_ Pied F:Pied pour po nts satin Ajuste la per!lla de tensi6n de hilo entre 1 y 3, ajuste la R6gler le cadran de tension du fil sur 1-3 et la [ongueur du perilla de Iongitud de puntada a 3 o 4 y cosa Iheas rectas... -
Page 84: Quilting
Quilting ® ® Machine setting '-' I} O Pattern (_ LED display ® ® Foot A: Zigzag foot (_ Quilting bar Loosen.the quilting bar screw on the back of the foot holder and insert the quilting bar into the hole. Set the quilting bar at the desired position and tighten the screw to secure it. -
Page 85: Acolchado
Acolchado Le matelassage R_glage de la machine Configuraci6n de la mdquina (_ Point (_ Patr6n (_) Pantalta Affichage _lectronique . . Prensatelas A: Prensateias de zigzag (_) Pied A:Pied zigzag O Barra de acolchado (_ Guide ouateur Afloje el tomillo de la barra de acolchado en la parte trasera Desserrer la vis du guide euateur se trouvant sur I'arriere du del prensatelas... -
Page 86: Pattern Combination
Pattern Combination ® ® Machinesetting 27 41 Q Pattern (_) LED display ® Foot F: Satin stitch foot You can sew a combination of decorative pattern with the aid of the auto lock button. Example: To sew a combination of two units of the pattern #27 _ and one unit of #47 @. -
Page 87: Combinaci6N De Patrones
Combinaci6n de patrones Combinaison de points Conflguraci6n de la mdquina Rdglage de la machine Patr6n 27 47 O Point Q Pantalla Affichage _lectronique (_ Prensatelas F: Prensatelas para puntadas _) Pied F:Pied pour points satin Usted puede coser combinaciones de patrones decorativos II est possible de ccudre une combinaison de points con la ayuda del bot6n de bloqueo autom&tico. -
Page 88: Adjusting Stretch Stitch Balance
Adjusting Stretch Stitch Balance The sewing results of the stretch stitch patterns may vary depending upon the sewing conditions, such as sewing speed, type of the fabric, number of layers, etc. Always make test sewing on a scrap piece of the fabric that you wish to use. -
Page 89: Ajuste De Equilibrio De Puntada Elastica
Ajuste de equilibrio de puntada eldstica R_gler I'dquilibre des points extensibles Los resultados de los patrones de puntadas el4sticas Lorsque vous utilisez des points extensibles, le r_sultat est pueden variar segQn las condiciones de la operaci6n de influenc6 par des _16ments tels que la vitesse de couture, le costura, como son la velocidad de costura, el tipo de tela, el type de tissu, le nombre de couches, etc. -
Page 90: Cleaning Hook Race And Feed Dog
Cleaning Hook Race and Feed Dog WARNING; Raise thepresser foot and needle, and then unplug the machine. DO NOT dismantle the machine other than as explained in this section. Remove the needle and presser foot. Screwdriver (_ Setscrew (_) Needle plate Remove the setscrew and needle plate. -
Page 91: Limpieza Del Canal Del Gancho De La Bobina Y Las Garras Transportadoras
Limpieza del canal del gancho de la bobina y las garras Nettoyer la coursi_re et la griffe d'entrafnement transportadoras ATTENTION: ATENCION: Relever le pied presseuret I'aiguille,puis d_brancherla Levanteel prensatelas y la aguja y desconecte la machine.NE PAS d_monterla machinesi ce n'est en m4quina. -
Page 92: Problems And Warning Signals
PROBLEMS AND WARNING SIGNALS When beep sounds and the LED display shows warning signal, follow the guidance below to deal with. Visual signal Cause and Action The foot control has been disconnected while sewing. Turn OFF the power and connect the foot control. A button is pressed when the machine halts due to the overload. -
Page 93: Problemasy Senales De Advertencia
PROBLEMAS Y SEIklALES DE ADVERTENCIA Cuando la m&quina emita un sonido yen la pantalla aparezca una seSal de advertencia, siga estos paso para resolver el problema. SeSal visual Pantalla Causa y acci6n El pedal de control se desconect6 durante la costura. Apague la m&quina y conecte el pedal de control. -
Page 94: Problemes Et Avertissements
PROBLEMES ET AVERTISSEMENTS Lorsque vous entendez un bip sonore et que des avertissements apparaissent sur I'affichage 61ectronique, suivez les indications ci-dessous: Avertissements Visuels: Ecran Cause et action La commande & p6dale a 6t6 d6branch6e pendant la couture. €:teindre la machine re-brancher la commande &... -
Page 95: Troubleshooting
Troubleshooting Condition Cause Reference The needlethread The needle thread is not threaded properly. See page 24 breaks. The needle thread tension is too tight. See page 16 3. The needle is bent or blunt. See pag e 18 4. The needle is incorrectly inserted. -
Page 96: Identificai6N Y Resoluci6N De Problemas
Identificaci6n y resoluci6n de problemas Problema Causa Referencia 1. El hilo de la aguja no est_ enhebrado correctamente. Paguina 25 El hilo de la aguja se 2. La tensi6n del hilo de la aguja es muy alta. Paguina 17 rompe. 3. -
Page 97: La Tension Du Fil De I'aiguille N'est Pas Assez 61Ev6E
En cas de probl_me " Probl_me Causa Referencia Le fil deI'aiguillese Le fil de I'aiguille n'est pas penfil_ correctement, Page 25 casse. La tension du fil d'aiguille est trop forte. Page 17. Page 19 3. L'aiguille est torde ou _mouss_e. 4. - Page 98 For repair of major brand appliances in your own home... no matter who made it, no matter who sold it! 1-800-4-MY-HOME ® Anytime, day or night (1 =800-469-4663) (U.S.A and Canada) www.sears,com www.sears,ca For repair of carry-in products like vacuums, lawn equipment, and electronics, call for the location of your nearest...
Need help?
Do you have a question about the 385.8080200 and is the answer not in the manual?
Questions and answers
My Janome 8080 code is saying SP. What does this mean and what should I do about it?
The SP code on a Janome 8080 sewing machine indicates that a button was pressed while the machine was stopped due to an overload. To address this:
1. Wait at least 15 seconds for the machine to reset.
2. If the overload was caused by tangled threads, remove the tangled threads.
This should resolve the issue.
This answer is automatically generated
Como puedo devanar la máquina
To wind the bobbin on the Janome sewing machine model 385.8080200, follow these steps:
1. Pass the thread through the hole in the bobbin from the inside to the outside.
2. Place the bobbin onto the bobbin winder spindle.
3. Push the bobbin winder spindle to the right.
4. Hold the free end of the thread with your hand.
5. Press the foot control pedal to start winding.
6. Stop the machine after a few turns and cut the thread near the hole in the bobbin.
7. Press the foot control again to continue winding. The machine will stop automatically when the bobbin is full.
This answer is automatically generated
La máquina me marca SP
Stitches are uneven on top and bottom. Seems like the smallest version of zigzag.
I broke the spool pin on my janome 8080200 Can it be removed and replaced ?