Table of Contents
Advertisement
Quick Links
Advertisement
Table of Contents

Subscribe to Our Youtube Channel
Related Manuals for Janome 385.4052LX200


Summary of Contents for Janome 385.4052LX200
- Page 1 SEWING MACHINE Owner's Manual MAQUINA DE COSER Manual de instrucciones MACHINE .&.COUDRE Manuel d'instructions Model, Modelo, ModUle 385.4052LX200 Sears, Roebuck and Co., Hoffman Estates, IL 60179 U.&A° www, sears,corn 502-800-102 Sears Canada Inc.,Toronto, OnL, M5B 2B8 CANADA www.searsca...
- Page 2 iMPORTANT SAFETY INSTRUCTPONS CAUTION Your sewing machine is designed and constructed only for HOUSEHOLD Before using this sewing machine, read this manual and follow all Safety Rules and Operating Instructions DA NG ER- To reduce the r isk o f e lectric shock: This sewing machine should never be left unattended when plugged in Always unptug this sewing machine...
- Page 3 HNSTRUCC ONES DE SEGURnDAD HMPORTANTES ATENCn6N Su m#,quina de coser est#, diseRada y construida s6lo para usa dom6stico Antes de usar esta m__quina de coser, lea este manual y todas tas reglas de seguridad e instrucciones operativas PELU GRO- Para reducir el riesgo de descarga et_ctrica: La m&quina nunca se debe desatender cuando se ha conectado..
- Page 4 IMPORTANTES CONStGNES DE S¢:CURITE ATTENTION Votre machine & coudre n'est con_ue et censtruite que pour l'usage m6nager Avant d'utiliser cotte machine & coudre, veuiUez lire ce manual et suivre routes Ies r6gles de S6curit6 et los consignes d'utitisation DANGER- Comment r6duire le risque de chec 61ectrique: Une machine ne devrait jamais 6tre laiss6e sans surveillance...
- Page 5 WARRANTY FULL 25 YEAR WARRANTY ON DEFECT IN MATERIAL OR WORKMANSHIP For 25 years from the date of purchase, .Sears will, free o! charge, repair defects in materia] or workmanship which appear in the internal mechanical part of the sewing machine FULLTWOYEAR WARRANTY ON ELECTRICAL...
- Page 6 WARRANTY FULL 25YEAR WARRANTY ON DEFECT IN MATERIAL OR WORKMANSHIP For 25 years from the date of purchase, Sears will free of charge repair defects inmateriat or workmanship which appear in the internal mechanical part of the sewing machine. FULL TWO YEAR WARRANTY ON ELECTRICAL EQUIPMENT OF SEWING...
- Page 7 SECTION V DECORATIVE STITCHING ....SECTION 1.ESSENTIAL PARTS ......Names ofParts ............Quilting ............. Extension Table ( Accessory Storage Box) ....4 Applique ..............Shell Tuck ............. Foot Storage Compartment ........Available Accessories and Attachments ....6 Patchwork ..........SECTION II,GETTING READY TOSEW ......
- Page 8 SECCION I COMPONENTES PRtNCIPALES ..3 [PreparaciSn de la tela:] ..........Nombres delas piezas .......... [Para coser] ............Mesa d eextensi6n (caja d eafmacenamiento Puntada de dobladillo invisible ........accesorios) ..............SECClON V,,PUNTADAS DECORAT[VAS ....... 49 Compartimiento dealmacenamienoto deprensatelas ,,,5 Acolchado ................
- Page 9 SECTION I.LES PIECES MATTRESSES ....... Coudre une fermeture eclair .......... Noms d es pieces ..........[Preparation dutissu:] ........43 Plateau extensible (boitier derangement [Pour coudre] .............. Coudre unourlet invisible ..........accessoires) ................SECTION VLES POINTS DECORATIFS ....49 Compartiment derangement situ_ darts l esocfe d ela...
-
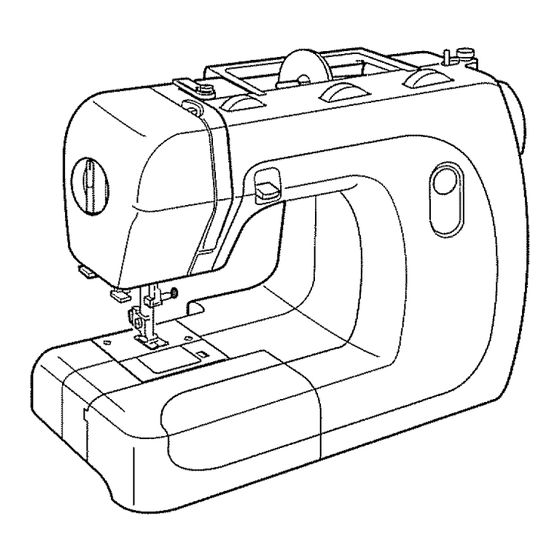
Page 10: Section I. Essential Parts
SECTION i. ESSENTIAL PARTS Names of Parts (_ Pattern indicating window (_ Stitch length dial Stitch width dial Spool holder (Large) Spoot pin (_ Thread tension dial Bobbin winder thread guide (_ Thread take-up lever Pressure adjusting dial Face plate @ Thread cutter @ Needle threader @ Needle plate... - Page 11 SECCI(_N I. COMPONENTES SECTION I. LES PIECES MAITRESSES PRINCIPALES Noms des pi_,ces Nombres de las plazas • Fen6tre d'indication du module (_ Ventanaindicadorade patr6n Q Cadran de r_gtage de la Iongueur du point (_ Perilla de longitud de puntada _) Cadran de r_glage de la largeur du point Perilla de anchura de puntada Q Porte-bobine (grand) Q Soporte de carrete (grande)
-
Page 12: Extension Table (Accessory Storage Box)
Extension Table (Accessory Storage Box) Detaching and attaching the table <Detaching the table> Pull the table away from the machine, as illustrated 10 Extension table <Attaching the table> Push the extension table until it snaps into the machine. Hole For free arm sewing it can be used for: - stitching sleeves, waistbands,... - Page 13 Plateau extensible Mesa de extensi6n (caja accesorios) (boitier de rangement des accessoires) de almacenamiento Retirer et remettre ie plateau en place Montaje y desmontaje de la mesa <Retirer le plateau > <Des montaje de la mesa> Tirer sur le plateau, cemme le montTe I'itlustration Separe la mesa de la m,_quina, tat come se itustra C) Plateau extensible Mesa de extensi6n...
-
Page 14: Available Accessories And Attachments
Available Accessories and Attachments To order parts and accessories listed below, call: 1-800-366-PART (1-800-366-7278) (USA only) CST, 7 days 6 am-11 a week 1-800-4-MY-HOME (1-800-469-4663) (CANADA only) day, 7 days 24 hours a week ordering parts and accessories, provide When following information: Part... -
Page 15: Accesorios Y Refacciones Disponibles
Accesorios y refacciones disponibles Accessoires et pi_ces disponibles Pour commander lee piL_ces et los accessoires list6s ci-dessou& AI ordenar partes y accesorios, proporcione la siguiente composez informaci6n: 1-800-LE°FOYER (1-800-533-6937) 1 Nt.imero de parte 24h/24, 7j/7 2 Nombre de la parte 3 Modelo de la m_quina Pour commander des pi_ces ou accessoires, veuillez preparer... -
Page 16: Section I!, Getting Ready To Sew
SECTION I!, GETTING READY TO SEW Connecting the Machine to the Power Supply 1 Turn off the power switch, 2 Insert the machine plug into the machine socket 3, Insert the power supply plug into the outlet 4 Turn the power switch "ON" (_ Power switch Q Machine plug ®... -
Page 17: Para Coser
SECCION !!. PREPARATIVES PARA COSER SECTION II. SE PRI:tPARER ,&.COUDRE Brancher la machine Conexi6n de la m_quina al suministro el6ctrico 1 Apague ia m_quina 1 Metlre Bouton de mise en marche sur la position OFF 2 tnserte el conector de la m_quina al recept_culo de la (Eteint) 2 Ins6rer le fil dans la fiche de la machine m&quina. - Page 18 Reverse Stitch Button While the reverse stitch button is pressed, the machine sews backwards. Reverse stitch button Dropping the Feed Dogs ® For dropping the feed dogs, push the lever to the right as illustrated, , After sewing, push the lever to the left side for up position.
-
Page 19: Bot6N De Puntada Inversa
Bot6n de puntada inversa Le bouton point arri_re AI oprimir el bot6n de puntada inversa, ta m&qutna cose hacia Lorsque le bouton de point arribre est enclench& la machine arras coud en sens inverse (_) Bot6n de puntada inversa (_ Le bouton point artiste Abaisser fee griffes d'entrafnement... -
Page 20: Pressure Adjusting Dial
Presser Foot Lifter The presser foot lifter raises and lowers the presser fool You can raise it about 0,6 cm (t/4") higher than the normal up position for easy removal of the presser foot, or to help you to place heavy fabric under the foot. (_ Lowered position O Normal up position (_ Highest position... -
Page 21: Elevador Del Prensatelas
Elevador del prensatelas Releveur du pied presseur Le releveur du pied presseur permet de tever et d'abaisser ie E1elevador del prensatelas baja y sube el prensatelas.. Puede elevar el prensatelas aproximadamente 0.6 cm (1/4") pied presseur m_.s alto que ]a posici6n superior normal para facilitar el I1est possible de le relever environ 0.6 cm (1/4 de pouce) plus desmontaje del prensatelas o colocar totes gruesa_, debajo de] haut que la position d'81evation normale, ce qui vous permet... - Page 22 Changing the Needle Turn off the power switch and turn the handwheel toward you to raise the needle at its highest position, and lower the presser foot Loosen the needle clamp screw by turning it counterclockwise. Remove the needle from the needle clamp, Needle clamp Insert a new needle into the needle clamp with...
-
Page 23: Cambio De La Aguja
Cambio de la aguja Changer l'aiguille Apague la m,_quina y gire el volante hacia usted pare clever la Couper I'alimentation de ]a machine, puis toumer le volant vers aguja aia posici6n m_s alto y baje el prensatelas sol pour lever I'aiguille at la mettle dons ]a position la plus [] Alloje eI torntllo de Ia abrazadera de la aguja, gir_,ndelo an 6levee Abaisser le pied presseur. -
Page 24: Selecting Needle And Fabric
Selecting Needle and Fabric For general sewing, use needle sizes 1 t or 14, A fine thread and needle should be used for sewing lightweight fabrics, so the fabric will not be marred. Heavy fabrics require a needle large enough to pierce the fabric without fraying the needle thread in the needle set, there is one each of sizes t 1, 14, 16, and I8, and a blue needle, Use the blue needle to eliminate skipped stilches when sewing knits and synthetic fabrics.,... - Page 25 Selecci6n de hilo y tela Para el cosido general sa uti!izan agujas del tama o 11 o I4 Los hilos y agujas de_gados debar n utilizarse par a coser tejidos ligeros evitando as qua stos se puadan echar a perder Cesa tejidosgruesos con una aguja le suficientemente gruesa come para que pueda penetrar el tejidosin qua el hi]o de la aguja se deshilache En _acaja de agujas hay una aguja de cada tama e 1t.
- Page 26 Choix de I'aiguilte et tissu Pour les coutures normales, utilisez une atguil{e n"tl ou 14 On devrait uti]lser du fll fin et une aiguilie fine avec tea tissus l gers pour nepas les endommager Les ttssus leurds n cessitent une aiguiHe assez grosse pour percerte tissu sans effi$ocher le fil de I aiguille Dans un jeu d atguille&...
- Page 27 (blank p age) (pAglna bfanca) (page b lanche)
- Page 28 Winding the Bobbin Removing the bobbin Gently slide the hook cover plate release button to the right, and remove the cover plats. Lift the bobbin O Hook cover plate release button Horizontal spool pin Lift up the spool pin, Place the spool of thread on the spool pin with the thread coming off the spool as shown, []Ordinary spool...
-
Page 29: Remplir La Canette
Enrotlado de la bobina Remplir la canette Extracci6n de la bobina Retirer la canette Faire lentement glisser le bouton d'ouverture du couverele vers Deslice el bot6n de Hberac_6n de la tapa del gancho fa droite et retirer le couvercle suavemente hacia _aderecha y quite la tapa Soutever la canette Extraiga la bobina O Bouton d'ouverture du couvercle... -
Page 30: Inserting The Bobbin
Inserting the Bobbin Remove the hook cover and place the bobbin in the bobbin holder with the thread running counter-clockwise,, Guide the thread into the notch A on the front side of the bobbin holder+ Draw the thread to the left sliding it between the tension spring blades (_) Notch A Continue to draw the thread lightly until it slips... - Page 31 tnserci6n de la bobina InsUrer [a canette [] Quite ta tapa del gancho y coloque la bobina en el soporte. [] Retirer le couvercle du crochet et placer la canette clans le con el hito saliendo en senttdo antihorario porte-canette en faisant tourner le til dans le sens inverse des aiguilles d'une montre [] Faire passer te fil par I'encoche A situ_e sur l'avant du porte- [] Gufe el hilo a la muesca A de la parte delantera del soporte...
-
Page 32: Threading The Machine
Threading the Machine Threadingthe machine Raise the presser foot lifter. Raise the thread take-up lever to its highest position by turning the handwheel counterclockwise reDraw the end of the thread with your left hand and hold the spool with your right hand as shown and place it around the upper thread guide. - Page 33 Enfiler la machine Enhebrado de la m_quina Enfiler la machine Enhebradode ia mdquina " Levante et prensatelas. * Lever le dispositif de levage du pied presseur, * Levante la palanca tirahilo ala posIct6n m_s a{ta, girando el " Lever ie releveur de fil aussi haut qua possible en faisant volante en sentido antihorario tourner le volant dans Ie sans inverse des aiguilles d'une montre...
-
Page 34: Automatic Needle Threader
Automatic Needle Threader Raise the needle to its highest position and push down the needle threader knob until it stops.. The hook comes out through the needle eye from behind it. Needle threader knob (_) Hook Pull the thread down around the thread guide, then pass the thread from the right and under the hook as shown. -
Page 35: Enfile-Aiguille Automatique
Enfile-aiguille automatique Enhebrador autom_tico de la aguja [_ Faire rnonter i'aiguilte aussi haut que possible et pousser au m Levante la aguja a la posici6n m_s attay optima la periIla dei maximum le bouten de I'enfile-aiguifle vers le bas Le crochet enhebrador de agujas hasta que se detenga E1 gancho passe par le chas de I'aiguille en passant par derriere... -
Page 36: Pattern Selector
Pattern Selector Dial Select the pattern by turning the pattern selector dial and the selected pattern is shown in the pattern indicating window Raise the needle above the fabrics and raise the presser foot when you turn the pattern selector dial, Pattern selector dial... - Page 37 Perilla de selecci6n de patrSn Cadran de s_lection du module de point Seleccione et patr6n girando fa perilla de selecci6n hasta que el Choisir votre mod_te de point en tournant le cadran de patr6n deseado aparezca en la ventana indicadora. s_lection, Le mod_te de point choisi apparail darts la fen_tre Levante la aguja sobre la teta y levante el prensatelas al girar ]a Lever I'aiguille au-dessus du tissu et lever le pied presseur...
-
Page 38: Section Ill. Basic Sewing
SECTION ill. BASIC SEWING Straight Stitch Sewing Machine setting Stitch pattern : ® ® ® (_) Presser foot: A: Zigzag foot (_ Thread tension dial: (_ Stitch width: 0 or 5 (_) Stitch length: 1.5-4 _,-v'v'kJ e::_ ..€33 Start sewing Hold the fabric and threads with your left hand, and turn the handwheel toward you and lower the needle to pierce the fabric at the start sewing position.. - Page 39 SECCION II1. OPERACIONES B,_SICAS SECTION II!. COUTURE DE BASE COSTURA Coudre des points droits R_glages de la machine Costura puntada recta Configuraci6n m_quina de la O Modele de point : (_) Pied presseur : A : Pied zigzag PatrOn de puntada (_) Cadran de reglage de ta tension du fil : (_) Prensatelas: A: Prensatefas de zigzag...
- Page 40 SECTION iV UTILITY STITCHgNG Straight Stretch Stitch Machine setting € (_ Stitch pattern: ® ® ® Presser foot: A: Zigzag foot (_ Thread tension dial: Stitch width: 0 or 5 (_) Stitch length: =--'_v'v'= ..sl s= This strong, durable stitch is recommended where both elasticity and strength are needed to insure comfort and durability...
- Page 41 SECCI6N IV. PUNTADAS DE USO GENERAL SECTION IV, LES POINTS UTILITAIRES Puntada el_stica recta Le point extensible droit Configuraci6n de la m_quina R_glages de ta machine O Patr6n de puntada: Mod61e de point: (_) Prensatelas: A: Prensatelas de zigzag Pied presseur: A: Pied zigzag (_) Periila de tensi6n de hilo: __.)Cadran de reglage de la tension du fit:...
-
Page 42: Tricot Stitch
Zigzag Stitching ® Machine setting (_) Stitch pattern: ® ® ® (_) Presser foot: A: Zigzag stitch foot (_ Thread tension dia!: 2-5, (_ Stitch width: 0,,5-4 (_ Stitch length: Simple zigzag stitching is widely used for overcasting, applique, sewing on buttons etc, also preventing the fabrics from fraying at raw edges, "h Tricot Stitch... - Page 43 Le point zigzag Puntada en zigzag Rdglages de ia machine Configuraci6n de la mdquina (_) Mod61e de point: O Patr6n de puntada: Q Pied presseur: A : Pied zigzag (_) Prensatelas; A:Prensatelas de puntada (_) Cadran de r_g}age de la tension du ill: de zigzag (_) Largeur du point: Perit]a de tensi6n de hito:...
-
Page 44: Automatic Buttonhole
Automatic Buttonhole Machine setting Stitch pattern: Presser foot: R: Automatic buttonhole ® ® ® foot (_) Thread tension dial: Stitch width: c_:_ -_'_/k_c:_ ..0..5-1 (_) Stitch length: The size of buttonhole is automatically set by placing the button in the rear of the automatic buttonhole foot R -4_The button holder of the foot takes a button size up to 2,5 cm (I) in diameter. - Page 45 Les boutonnieres automatiques Ojal autom_tico Configuraci6n de la m_quina R_glages de la machine (_ Patr6n de puntada: O ModUle de point: _2222_ Prensatelas: ('_ Pied presseur: R; Pied & R: Prensatelas pare ojales autom&ticos boutonniere (_) Perila de tenst6n de hito: automatique (_ Cadran de r_glage de la tension du fiE: Q Anchura de puntada:...
- Page 46 Depress the foot control to sew a buttonhole. The machine will sew the front barrack, left row, back bartack and right row automatically.. Stop the machine at the ending point.. @ Ending point Raise the presser foot and cut the both needle and bobbin threads leaving 10 cm (4")thread ends..
- Page 47 Optima e] pedal de control pare coser et ojal Appuyer sur la commande & p_date pour coudre une La m_quina coser#, autom_.ticamente el remate delentero, fa boutonniere La machine coud automatiquement ilia izquIerda, el remate trasero y la ilia derecha. Detenga la barrettes de renfort avant, gauche, arfi6re et droite ArrOter la machine &...
- Page 48 Corded Buttonholes Machine setting (_ Stitch pattern: (_ Presser foot: R: Automatic BH foot ® ® ® (_) Thread tension dial: Stitch width: Stitch length: 05-1 With the buttonhole foot raised, hook the filler cord on the cord spur at the back of the buttonhole foot, Bring the ends toward you under the buttonhole foot until they clear the front end.
- Page 49 Ojales acordonados Les boutonni6res gans_es Configuraci6n de la m,_quina Rdglages de la machine (_ Mod_le de point: (_ Patr6n de puntada: R: Pied & (_) Prensatelas: R: Prensatelas para oiales Q Pied presseur: autom&ticos boutonniere (_ Perilla de tensi6n de hilo: automatique (_ Anchura de puntada: (_) Cadran de r_glage de la tension du fil:...
-
Page 50: Zipper Application
Zipper Application Machine setting (_ Stitch pattern: ® ® ® Presser foot: E: Zipper foot (_ Thread tension dial: Stitch width: _) Stitch length: 1,5-4 ..,.,= < To attach the zipper foot> To sew the left hand side of the zipper, attach the zipper foot with the pin on the right hand side, To sew the right hand side of the zipper, attach the zipper foot with the pin on the left hand side,... -
Page 51: Coudre Une Fermeture
Coudre une fermeture _clair Aplicaci6n de cremalleras Configuraci6n de la m_quina R_glages de la machine (_ Patr6n de puntada: O Modele de poin!: Q Prensatelas: E : Pied & E: Prensatetas para Pied presseu: cremalleras semelle etroite (_ Peril]a de tensiSn de hilo: pour fermetures _clair (_) Anchura de puntada:... - Page 52 [TO sev_ Fold back the left seam allowance, Turn the right seam allowance under to form a 0,2 to 03 cm (1/8') fold., Place the zipper teeth next to the fold and pin it in piaceo (_ Bottom side fabric (_) End of the opening (_) Zipper teeth ®...
- Page 53 [Para coser] [Pour coudre] Dobte hacia arras eI margen de la costura izquierda Dobte m Replier I'espace laisse vers I'arri_re Plier I'espace du cSt_ hacia abaje el margen de la costura derecha para formar un droit en dessous pour former un pli de' 0,2 a 0,3 cm (1/8 de doblez de 0,2 a 03 cm (1/8"),.
- Page 54 Blind Hem Stitch Machine setting C) Stitch pattern: ® ® ® Presser foot: G: Blind hem foot (_) Thread tension dial: Stitch width: =--_,_v'v,= ..sl s2 (_) Stitch length: Use the same color thread as the fabric, On heavy weight fabrics that ravel, the raw edge should be overcast first, Fold up the hem the desired amount and pin in place,...
- Page 55 Puntada de dobladillo invisible Coudre un ourlet invisible Configuraci6n de la mdquina Rdglages de la machine O PatrSnde puntada; O ModUle de point : Q Prensatelas: G: Prensatetas de dobladil]o G : Pied & outlet Q Pied presseur : invisible invisible (_) Pedlla de tensi6n de hilo: Cadran de r_glage de la tension du ill:...
-
Page 56: Quilting
SECTION V, DECORATIVE STITCHING Quilting Machine setting Stitch pattern: (_) Presser foot: A: Zigzag foot + + + ! (_) Thread tension dial: Stitch width: 0 or 5 (_) Stitch length: 1.5-4 _--.v_Jo ..sl s= The quilting bar will help to keep the stitching lines straight Insert the quilting bar in the opening, and slide it at the desired width. - Page 57 SECCION V. PUNTADAS DECORATiVAS SECTION V, LES POINTS DECORATIFS Acolchado Le matelassage Configuraci6n de ta mdquina R_glages de la machine Patr6n de puntada: Modele de point : (_ Prensatelas: A: Prensatelas de zigzag (_ Pied presseur : A : Pied zigzag (_ Perilla de tension de hilo: (_ Cadran de n_glage de la tension du ill: O Anchura de puntada:...
-
Page 58: Shell Tuck
-,., Shell Tuck Machine setting ® ® ® (_D Stitch pattern: (_) Presser foot: F: Satin stitch foot (_ Thread tension dial: (_) Stitch width: ..$1 S2 (_) Stitch length: ,_, Adjust the needle thread tension and test the stitch on the actual fabric for the best results°... -
Page 59: Le Point Entre-Deux
Alforza tipo concha marina Le point de coquille Configuraci6n de la m_qu[na R_glages de la machine (_ ModUle de point : (L) Patr6n de puntada: O Prensatelas: F: Prensateias para (_ Pied presseur : F: Pied pour puntadas de raso points satin (_ Pedlla de tensi6n de hilo: (_) Cadran de reglage de la tension du ill:... -
Page 60: Smocking
Smocking Machine setting ® @ Presser foot: A: Zigzag foot Thread tension dial: (_ Stitch width: Stitch length: ..St S2 ,_, Set the stitch length at "$2" for the pattern" _ " Straight stitch Set the thread tension dial at t-3, and stitch length dial at 3-4, sew straight lines t cm (3/8") apart across the area to be smocked, (_ 1cm (3/8") -
Page 61: Fruncido Ornamental
Fruncido ornamental Le point smocks / nid d'abeiile Configuraci6n de la m_quina R_glages de la machine ®P=rOndep°ntada: I !i I ®Mod=ede point: Prensatelas: A: Prensatelas de zigzag Pied presseu: A : Pied zigzag (_ Perilla de tensi6n de hilo: 2-.6 (_ Cadran de reglage de la tension du ill: 2--6 (_) Anchura de puntada:... - Page 62 Stretch Stitch Patterns Machine setting Stitch pattern: Patterns group A Patterns group B (_) Presser foot: A: Zigzag stitch foot (_) Thread tension dial: Stitch width: ® Stitch length: • "$I" for stitch patterns group A, -1-. "S2" for stitch patternsgroup B ®...
- Page 63 Les mod61es de points extensibles Patrones de puntadas et_sticas Configuraci6n de la m_quina R_glages de la machine O Patr6n de puntada: Grupo A de patrones O ModUle de point : Modeles du Grupo B de patrones groupe A Modeles du (_) Prensatelas: A: Prensatetas de puntada de zigzag...
- Page 64 ..Twin Needle Sewing ={' A :_'B Machine setting Patterns group A Stitch pattern: ® ® ® Patterns group B A: Zigzag stitch foot or (_ Presser foot: F: Satin stitch foot (_) Thread tension dial: _ ---_//_::_ ..(_ Stitch width: _ "$1"...
-
Page 65: Costura Con Aguja Doble
Costura con aguja doble Coudre avec des aiguiltes jumel_es Configuraci6n de la m_quina R_glages de la machine d_ Patr6n de puntada: Grupo A de patrones O Modeie de point : Modeles du groupe A Grupo B de patrones ModUles du groupe B O Prensatelas: (_ Pied presseur : A : Pied zigzag... - Page 66 Using Even Foot This is a special attachment for hard-to-feed materials, This foot prevents the fabric from slipping or puckering by feeding fabrics with upper and lower feed dogs Even foot is great for fine fabrics, knits, leather and matching plaids Turn off the switch.
- Page 67 C6mo usar el prensatelas uniforme Utilisation du pied & griffes I_ste es un accesorio especial para materiaies que son Le pied & gdffes est un accessoire particulier pe_mettant de dificiles de altmentar Este prensatelas evitar qua la te]a se travailler avec des.tissus diffici]es & positionner sur la deslice o frunza, al alimentar la te_a con las garras machine, Ce pied emp_che que le tissu ne glisse ou se transportadoras...
-
Page 68: Cleaning The Bobbin Holder
SECTION Vh CARE OF YOUR MACHINE Cleaning Hook Race Feed Cleaning the bobbin holder Notes: ,, Raise the presser foot and needle, then unplug the machine, ,, Do not dismantle the machine other than as explained in this section, Remove the needle and presser foot. Remove the setscrews on the needle plate and pull it up stightiy with both hand, then remove it to the back.,... - Page 69 SECCION Vl. CUIDADO DE LA tVt/_.QUINA SECTION Vl. ENTRETIEN DE VOTRE DE COSER MACHINE Limpieza del canal del gancho de la bobina y las Nettoyer la coursi_re et la griffe d'entrainement Nettoyer le porte-canettes garras transportadoras Limpieza del soporte de la bobina Remarques: * Lever le pied presseur et raiguiIle, puis d_brancher la Notas:...
-
Page 70: Troubleshooting
Trouble Shooting Reference Cause Condition The needle thread is not threaded properly, Page 24 The needle thread Page 12 The needle thread tension is too tight breaks. Page 14 3, The needle is bent or blunt, Page 14 4, The needle is incorrectly inserted., 5 The needle thread and the bobbin thread are not set Page 30 properly under the presser foot at the start of sewing,... - Page 71 Identificaci6n y resoluci6n de problemas Causa Problema E1 hilo de ta aguja no est& bien enhebrado P_tgnia 25 El hilo de la aguja El hiio de _aagijja est_ demasiado tense P_gnia 13 se rompe. La aguja est& roma o doblada P&gnia 15 La aguja est_ mat insertada..
- Page 72 D_tecter les pannes Probl_me Causes possibles Le fit de I'aiguitle n'a pas 6tO enflle correctement. Page 25 Rupture du fil de 2 La tension du fif de I'aiguilte est trop eievee Page13 i'aiguilleo 3, L_aigui]le est tordue ou emoussee Page I5 4 Uaiguilte n'a pas eta correctment inseree, Page !5 5 Los fils de raigui[le et de fa canette n'ont pas eta places...
-
Page 74: Installation
Sewing Machine Model 4052L× M_quina de Coser Modelo Machine d Coudre ModUle SETTING UP YOUR MACHINE Spool pin Poflacarretes 1 You'll find the spool pin on the top cover. Pull up the spool pin Broches a bobines 2 Plug foot control into machine receptacle Then connect power supply plug into any 110/120 volt A C wall outlet. - Page 75 and the Little Feeding Oiling Tension I Caretree stitching depends Needte Shuttle Threading ylos Pequo_os Avance Lubrtcaslon Tension Pontads I_bre de cuidado dependo do fas GRANDE Agula Lanzgdera Enhebrado et des Pett_S Enttainemenl Lnbr{flcallon TensloR Lo pf_i_lr do coudte depends des GRANDS Alguills Navetlo...
-
Page 76: Practical Stitch Chart
PRACTICAL STITCH CHART REFFERENCIA DE PUNTADA TABLEU SYNOPTIQUE ('STITCH 3 STITCHWIDTH I_ PRESSER FOOT_ STITCHPATt'ERN2. STITCH LENGTH 4 TENSIONCONTROL PUNTADA 3.N_CHUP.A DEPUIffADA 4 ¢ONTFIOL DE TENSION PATRON DEPUt#!'_A 2 LONGITUD DE PUNTADA '_ PRENSATELAS POINT '_,MODELE DE POIt'_ 2. LONGUEUR DU POINT 3. - Page 77 • • _ , , • • it fixed, at your home or ours! Your Home For repair-in your home-of all major brand appliances, lawn and garden equipment, or heating and cooling systems, no matter who made it, no matter who sold it! For the replacement parts, accessories owner's manuals that you need to do-it-yourself.
Need help?
Do you have a question about the 385.4052LX200 and is the answer not in the manual?
Questions and answers