Table of Contents
Advertisement
Available languages
Available languages
Advertisement
Chapters
Table of Contents

Related Manuals for CVS CVS 271244


Summary of Contents for CVS CVS 271244
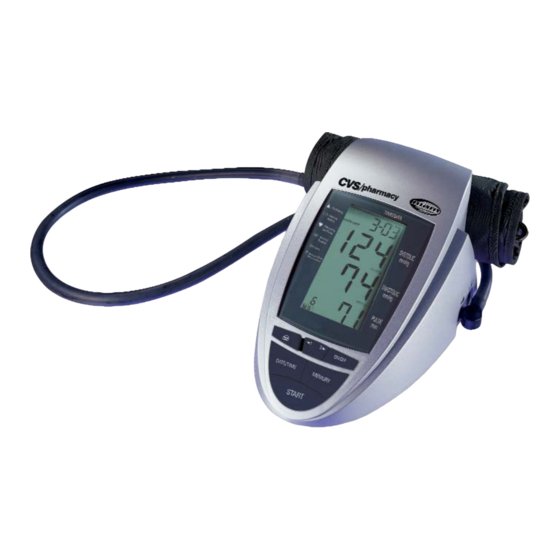
- Page 1 DIGITAL ADVANCED AUTOMATIC Blood Pressure Monitor Product #271244 Instruction Manual Instrucciones de Uso Questions? Preguntas? 1-866-464-6184 PLEASE NOTE: THIS MEDICAL INSTRUMENT MUST BE USED ACCORDING TO INSTRUCTIONS TO ENSURE ACCURATE READINGS.
-
Page 2: Table Of Contents
Table of contents Introduction Features of your blood pressure monitor Important information about using your blood pressure monitor Important information on the subject of blood pressure and its measurement 2.1. How does high/low blood pressure arise? 2.2. Which values are normal? 2.3. -
Page 3: Introduction
1.1. Features of your Digital Advanced Blood Pressure Monitor Your CVS/Microlife blood pressure monitor is a fully automatic digital blood pressure measuring device for use on the upper arm. It enables very fast and reliable measurement of the systolic and diastolic blood pressure as well as the pulse by way of the oscillometric method. -
Page 4: Important Information On The Subject Of Blood Pressure And Its Measurement
2. IMPORTANT INFORMATION ON THE SUBJECT OF BLOOD PRESSURE AND ITS MEASUREMENT 2.1 How does high/low blood pressure arise? The level of blood pressure is determined in the circulatory center of your brain and adjusts to a variety of situations through feedback from the nervous system. To adjust blood pressure, the strength and frequency of the heart (Pulse), as well as the width of circulatory blood vessels are altered. -
Page 5: What Can Be Done If Regular High/Low Values Are Obtained
A single measurement is rarely your real result. An average of three readings is medically proven to provide the most accurate result. With the push of a single button, the Microlife Average Mode blood pressure monitor takes three consecutive measurements, and calculates the average. -
Page 6: Components Of Your Blood-Pressure Monitor
(e.g. by accidental removal of the AC adapter from the socket) the instrument must be reset by removing the plug from its socket and re-inserting the connectors. Please consult CVS/Microlife if you have questions relating to the AC adapter. 4.3. Cuff connection Insert the cuff tube into the opening provided on the left side of the instrument, as shown in the diagram. -
Page 7: Setting The Time And Date
4.4. Setting the time and date This blood pressure monitor incorporates an integrated clock with date display. Time and date are recorded along with pressure and pulse. After new batteries have been inserted, the clock begins to run from the follow- ing setting: 2000-01-01 12:00 O’clock. -
Page 8: Reading The Set Date
Cuff size is dependent upon the circumference of the arm (measured in the center). The permissible range is printed on the cuff. If this is not suitable for your use, please contact Microlife USA. Large cuff sizes are sold sep- arately. -
Page 9: Fitting The Cuff
5.3. Fitting the cuff a) Pass the end of the cuff through the flat metal ring so that a loop is formed. The Velcro closer must be facing outwards. (Ignore this step if the cuff has already been prepared.) b) Place the cuff over the left upper arm so that the tube is closer to your lower arm. -
Page 10: Measurement Mode Selection (Single Or Average Mode)
Clinical studies demonstrate taking multiple blood pressure readings and calculating an “average” is more likely to determine your true blood pressure. Your CVS/Microlife Average Mode unit allows you to switch the unit to an Average Mode setting that automatically takes multiple readings! -
Page 11: Measuring Procedure
Pulse preserve the batteries. g) When the unit is set to the Microlife Average Mode setting, 3 separate measurements will take place in succession after which your result is calculated. There is a 15 second resting... -
Page 12: Memory - Recall Of The Measurements
(Sold on www.CVS.com or call 866-464-6184 to order) This unit can be used in connection with the Microlife thermal printer. When used in conjunction with the Thermal Printer, your blood pressure monitor will print out measurements stored in the memory by simply pressing the PRINTER button. -
Page 13: Error Messages/Troubleshooting
7. ERROR MESSAGES/TROUBLESHOOTING If an error occurs during a measurement, a corresponding error code is displayed (Example: Error no. 1) Error Number Possible Cause(s) Err 1 The systolic pressure was determined but afterwards the cuff pressure fell below 20 mmHg. This situation can occur if the tube becomes unplugged after the systolic blood pressure has been measured. -
Page 14: Care And Maintenance, Accuracy Check
Association (RWTüVEssen). • If you have any questions regarding the use of this blood pressure monitor, please call toll free 1-866-464-6184 or visit our web site at www.microlife.com. Never attempt to repair the instrument yourself! • Any unauthorized opening of the instrument invalidates all warranties! 8. -
Page 15: Warranty
9. WARRANTY Your CVS/Microlife blood pressure monitor is guaranteed for a lifetime against manufacturers’ defects for the original purchaser only, from date of purchase. The warranty does not apply to damage caused by improper handling, accidents, professional use, not following the operating instructions or alterations made to the instrument by third parties. -
Page 16: Technical Specifications
11. TECHNICAL SPECIFICATIONS: Weight: 650g (with batteries) Size: 124 (W) x 205 (L) x 81 (H) mm Storage temperature: -20 to +50°C Humidity: 15 to 90% relative humidity maximum Operation temperature: 10 to 40°C Display: LCD-Display (Liquid Crystal Display) Measuring method: Oscillometric Pressure sensor: Capacitive... - Page 17 2.2. ¿Cuáles son los valores normales? 2.3. ¿Qué puede hacerse si se obtienen de modo regular valores altos/bajos? 2.4. Tecnología MAM (CVS/Microlife Average Mode - Modo Promedio de CVS/Microlife) 3. Componentes de su monitor de tensión arterial 4. Utilización del monitor de tensión arterial 4.1.
-
Page 18: Introducción
1. INTRODUCCIÓN 1.1. Características de el tensiometro Automatico Su monitor es un dispositivo digital de medición de la tensión arterial totalmente automático con tecnología MAM integrada para ser usado en el brazo. Este monitor permite una medición muy rápida y fiable de la ten- sión arterial sistólica y diastólica, así... -
Page 19: Cuáles Son Los Valores Normales
2. Información importante sobre la presión sanguínea y su medición 2.1. ¿Cómo se origina la tensión arterial alta/baja? El nivel de la tensión arterial se determina en una zona del cerebro, en el llamado centro circulatorio, y se adapta a cada situación concreta por retroalimentación, a través del sistema nervioso. Para ajustar la tensión arterial se modifican la potencia y la frecuencia cardiacas (pulso), así... - Page 20 Otras informaciones • En presencia de valores mayoritariamente normales en condiciones de reposo, pero excepcionalmente altos en condiciones de esfuerzo físico o psíquico, puede presentarse una «hipertensión lábil», si ésta persiste acudir al médico. • Valores de la presión diastólica medidos correctamente superiores a 120 mmHg, requieren un tratamiento médico de inmediato.
-
Page 21: Componentes De Su Monitor De Tensión Arterial
Una sencilla medida es raramente su resultado real. Un promedio de tres medidas está médicamente comprobado que provee los resultados más exactos. Con oprimir un sencillo botón, el medidor de presión arterial con tecnología Modo Promedio de Microlife, toma tres medidas consecuti- vas, y calcula el promedio. -
Page 22: Instalación De Las Pilas
Es posible hacer funcionar este instrumento medidor de la tensión arterial con un reductor de voltaje de c.a. CVS/Microlife (salida 6 V c.c. / 600 mA con conector DIN). a) Enchufe el conector de c.a. en el conector hembra situado en la parte posterior del instrumento. -
Page 23: Ajuste De La Hora Y La Fecha
4.4. Ajuste de la hora y la fecha Este monitor de tensión arterial registra automáticamente l a fecha y la hora de cada medición. Esta información es muy importante, ya que la tensión arterial normalmente varía a lo largo del día. Cuando se colocan pilas nuevas, la indicación de fecha/hora muestra los siguientes valores de ajuste: 2000-01-01 12:00 horas. -
Page 24: Lectura De La Fecha Ajustada
(medido en el centro). El intérvalo admisible está impreso sobre el brazalete. Si éste no es adecuado para usted, póngase en contacto con su distribuidor. Nota: ¡Use únicamente brazaletes CVS/Microlife clínicamente homologados! • Un brazalete suelto o una bolsa de aire que sobresalga hacia un lado producirá valores de medición erróneos. - Page 25 5.3. Ajuste del brazalete a) Pasar el extremo del brazalete (con tope de goma integrado) a través del arco metálico, formando un lazo. El cierre de velcro se encuentra en el exterior. (si el brazalete ya está preparado como se ha descrito, sáltese este paso). b) Colocar el brazalete en el brazo izquierdo de tal modo que el tubo sea dirigido hacia el antebrazo.
-
Page 26: Selección Del Modo De Medición (Sencillo Ó Promedio)
Los estudios clínicos demuestran que tomar múltiples lecturas de la tensión arterial y calcular una “media” a partir de las mismas es más adecuado para determinar la verdadera tensión arterial. Su unidad CVS/Microlife de modo media le permite conmutarla a un modo media especial (MAM) que efectúa varias mediciones de forma automática. -
Page 27: Interrupción De Una Medición
c) Una vez alcanzada la presión de inflado adecuada, la bomba se detiene y la presión comienza a decaer gradualmente. Se visual- TIME izan las presiones del brazalete. En caso de que la presión de inflado no sea suficiente, el monitor vuelve a inflar el brazalete automáticamente hasta un nivel más elevado. -
Page 28: Recuperación De Las Medidas De La Memoria
última medición se efectuó en el modo media). 6. FUNCIONES DE LA IMPRESORA Es posible utilizar esta unidad junto con la impresora de diagnóstico Microlife. La unidad puede imprimir las medidas guardadas en la memoria pulsando el botón IMPRESORA. Hay disponibles dos tipos de formato. -
Page 29: Cómo Imprimir Todas Las Medidas Guardadas En La Memoria (Impresión De Datos Con Gráfico)
6.2.Cómo imprimir todas las medidas guardadas en la memoria y un gráfico de datos. (Impresión de los datos con gráfico) a) Antes de pulsar el botón IMPRESORA seleccione el objetivo correcto de la impresora. b) Conecte la impresora al monitor y actívela (para más detalles remítase al manual de la impresora). - Page 30 Otros posibles funcionamientos defectuosos y sus posibles soluciones: Si se producen problemas durante el uso del dispositivo deberá comprobar los siguientes puntos y si es necesario tomar las medidas correspondientes: Funcionamiento defectuoso Remedio La pantalla permanece vacía al conectar el 1.
-
Page 31: Cuidados Y Mantenimiento, Verificación De Precisión
Otras informaciones • El nivel de la tensión arterial está sujeto a fluctuaciones incluso en personas sanas. Es importante comparar medidas tomadas bajo las mismas condiciones y a la misma hora del día. (¡Condiciones de tranquilidad!) • Para obtener la licencia, este dispositivo ha sido sometido a estrictos ensayos clínicos y ha sido supervisado por especialistas en cardiología experimentados. -
Page 32: Garantía
9. Garantía El medidor de presión arterial CVS/Microlife esta garantizado de por vida contra defectos del manufacturero. Esto aplica solamente para el comprador original, y desde la fecha de compra. Esta garantía no aplica a daños causados por el manejo impropio, accidentes, uso profesional, el no seguir las instrucciones de operación, ni alteraciones hechas al instrumento por terceras personas. -
Page 33: Especificaciones Técnicas
11. ESPECIFICACIONES TÉCNICAS: Peso: 503 g (con pilas) Tamaño: 124 (lancho) x 205 (largo) x 81 (alto) mm Temperatura de almacenamiento: –20 a +50 °C Humedad: 15 a 90 % de humedad relativa máxima Temperatura de funcionamiento: 10 a 40 °C Pantalla: Pantalla LCD (pantalla de cristal líquido) Método de medición:... - Page 34 CVSAA1-2-A04-2...
Need help?
Do you have a question about the CVS 271244 and is the answer not in the manual?
Questions and answers