Table of Contents
Advertisement
Quick Links
Advertisement
Table of Contents

Subscribe to Our Youtube Channel
Related Manuals for Gaggenau AW 200-790


Summary of Contents for Gaggenau AW 200-790
- Page 1 Operating and Assembly Instructions AW 200-790 AW 201-790 Extractor Hood...
-
Page 2: Table Of Contents
AW 200-790 AW 201-790 Preface Safety notes 1. Important notes 1.1 For your safety 1.2 Operating for the first time 1.3 About use 2. Features 3. Operation 4. Cleaning and care 5. Maintenance 6. Assembly instructions 6.1 Technical data 6.2 Installation... -
Page 3: Preface
Preface Fig. 1 With your new extractor hood, working in the kitchen will be even more fun. The appliance offers you a number of advantages: – a good extraction capacity with low noise values, – a large number of control functions, –... -
Page 4: Read And Save These Instructions
Safety notes Read And Save These Instructions. WARNING - TO REDUCE THE RISK OF FIRE, ELECTRIC SHOCK, OR INJURY TO PERSONS, OBSERVE THE FOLLOWING: a.) Use this unit only in the manner intended by the manufacturer. If you have questions, contact the manufacturer. -
Page 5: Important Notes
1. Important notes 1.1 For your safety – Damaged appliances must not be operated. – The appliance must only be connected by an authorised specialist, paying attention to the relevant regulations of the power supply companies and the regional construction regulations. -
Page 6: Operating For The First Time
– In the event of malfunctions, first of all check the household fuses. If the problem has nothing to do with the power supply, please contact your specialist dealer or your local Gaggenau after- sales service. – When children become old enough to operate... -
Page 7: Grease Filters
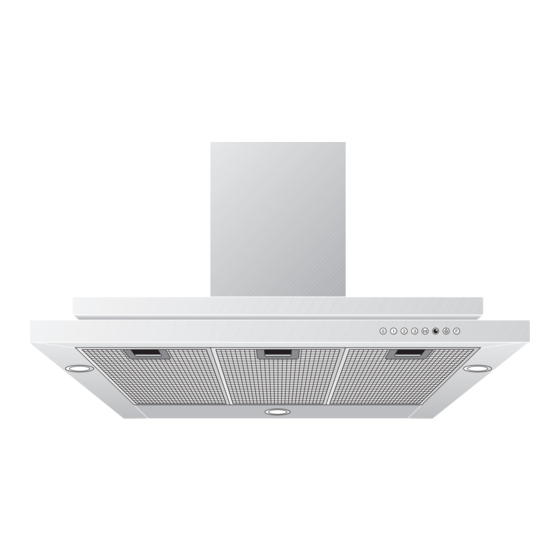
2. Features Fig. 2 Delayed shut-off Extraction level intensive Extraction level 3 Extraction level 2 Extraction level 1 Motor off Fig. 3 1 Ventilation duct 2 Control panel 3 Grease filters 4 Lighting Installation accessories for exhaust air mode Stainless steel-design ventilation duct: LK 010-012 for ceiling heights of 7 ´... -
Page 8: Fan Levels
3. Operation Fig. 4 Fig. 5 After they have been pressed, all functions selection keys except 0 (“Motor off”) are backlit in green. Light The lighting can be switched on or off, regardless of whether the wall extractor is in operation, by pressing the When you briefly press the increased up to the maximum level. - Page 9 Fig. 6 Fig. 7 Fig. 8 The Int key for the intensive level should be pressed when browning and frying in an open pan (see Fig. 6). If you have switched on the hood by selecting the intensive level, it will be switched off again automatically after 5 minutes.
- Page 10 Fig. 9 Fig. 10 Fig. 11 Fig. 12 Special functions: Intensive time: You can set the intensive level running time to 3, 5 or 10 minutes by simultaneously pressing the Int key and the 1, 2 or 3 key and you can store this setting (see Fig.
-
Page 11: Cleaning And Care
4. Cleaning and care Fig. 13 Fig. 14 Cleaning the grease filters The grease filter saturation display F flashes after an operating time of 30 hours to you indicate to you that you should clean the grease filter (see Fig. 3). The grease filters can of course be cleaned at any time, even if the grease filter saturation display has not started to flash. -
Page 12: Cleaning The Extractor Hood
Cleaning the extractor hood Clean the exterior of your extractor hood with a soft cloth and mild detergent solution. Do not use any strong, caustic or abrasive cleaning agents. Do not use any abrasive sponges or brushes either. Clean the stainless-steel extractor hood (AW 200) with stainless steel cleaner. -
Page 13: Lamp Replacement
If the power supply is functioning correctly, but your appliance still does not work, please contact your Gaggenau dealer who will provide you with the address and telephone number of your nearest manufacturer’s authorized service agent or contact Gaggenau USA on (800) 828-9165. -
Page 14: Assembly Instructions
6. Assembly instructions WARNING - TO REDUCE THE RISK OF FIRE, ELECTRIC SHOCK, OR INJURY TO PERSONS, OBSERVE THE FOLLOWING: a.) Installation work and electrical wiring must be done by qualified person(s) in accordance with all applicable codes and standards, including fire-rated construction. -
Page 15: Installation
6.2 Installation The applicable regulations of the energy supply companies and the regional construction regulations must be observed when installing the hood. This hood has been approved for installations as low as 30 ´ ´ and as high as 36 ´ ´ above the cooktop. The hood can be used in the exhaust or circulating air mode . - Page 16 Flexible aluminium pipes, corrosion-protected sheet metal pipes and exhaust air pipes whose material conforms to fire B1 in accordance with DIN 4102 can be used. Exhaust air pipes should have a nominal diameter of 6 ´ ´ / 150 mm. Pay particular attention to ensuring that –...
- Page 17 " " " " 3" " 16" 4" " min. 30” Fig. 19 Fig. 20 Important: before marking the securing holes, make sure that no electricity or water lines or other lines are laid at the drilling points in the wall. Proceed as follows: –...
- Page 18 Fig. 21 Fig. 22 Fig. 23 – Secure the hood on the wall with the four screws b (Fig. 21 and 22). For exhaust air mode proceed as follows: – Establish the pipe connection. – Establish the electrical connection. – Stainless steel chimney only (LK 010-012/022): pull the protective film off the chimney’s trims.
- Page 19 Fig. 24 Fig. 25 For circulating air mode use the installation set included with the ventilation ducts LK 010-112/122 und LK 011-112/122. You also need an activated charcoal filter (KF 001-010). Proceed as follows: – Slightly loosen the screws of the retaining bracket for the chimney paneling.
- Page 20 GAGGENAU HAUSGERÄTE GMBH 780 DEDHAM STREET CARL-WERY-STR. 34 · 81739 MÜNCHEN CANTON, MA 02021 GERMANY Y (0 89) 45 90 - 03 Y 800.828.9165 FAX (0 89) 45 90 - 23 47 www.gaggenau-usa.com...
Need help?
Do you have a question about the AW 200-790 and is the answer not in the manual?
Questions and answers