Table of Contents
Advertisement
Available languages
Available languages
Advertisement
Table of Contents

Related Manuals for Kenmore 116.22614


Summary of Contents for Kenmore 116.22614
- Page 1 Use & Care Guide Manual de Uso y Cuidado I<enmor_ Models/Moddos: ]]6o22614 Vacuum Cleaner Help Line: 1-877-531-7321 8:00am-5:00pm EST, M-F (U.S.A. and Canada) Sears Brands Management Corporation Hoffman Estates, IL 60179 www.kenmore.com www.sears.com www.kmart.com...
- Page 2 Master Protection Agreements .................... Notes ..........................Requesting Assistance Or Service ................Back Cover Please read this guide. It will help you assemble and operate your new Kenmore vacuum cleaner in the safest and most effective way. For more information about vacuum cleaner...
- Page 3 Kenmore One Year Limited Warranty When installed, operated and maintained according to all supplied instructions, if this appliance fails due to a defect in material and workmanship within one year from the date of purchase, call 1-800-4-MY-HOME® to arrange for free repair.
- Page 4 Read all instructions in this guide before assembling or using your vacuum cleaner. WARNING: Your safety is important to us. To reduce the risk of fire, electrical shock, injury to persons or damage when using your vacuum cleaner, follow basic safety precautions including the fallowing:...
-
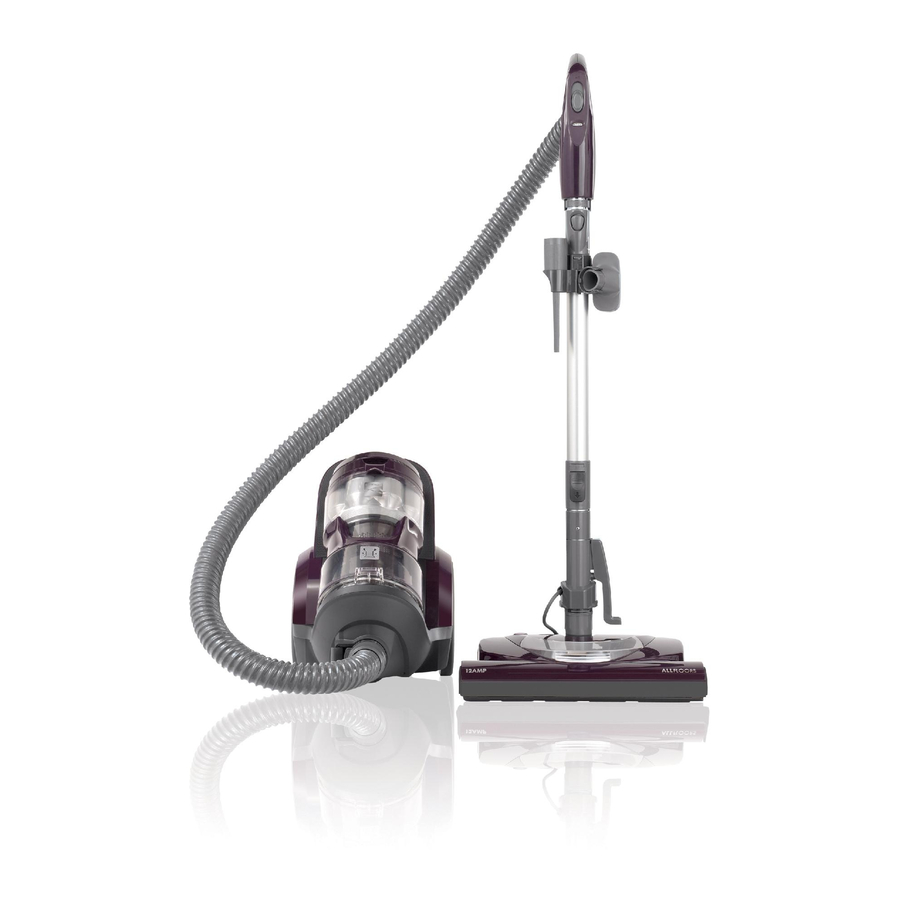
Page 5: Product View/Features
is important to know your vacuum cleaner's parts and features to ensure itsproper and safe use. Review these before using your vacuum cleaner. Handle & Hose Assembly_ Attachments & Caddy__ Telescoping Wand_ REPLACEMENT PARTS Part No. Part No. Item Style No. in USA in Canada Belt... -
Page 6: Telescoping Wand/Attachments
TELESCOPING WAND & ATTACHMENTS HandSe Quick Pet PowerMate Wand Wand Length Adjust -Handle Release Pedal POWERMATE Pile Height Belt Reset Headlic Pedal Furniture Guard _uick Release Pedal Belt... - Page 7 HANDLE & HOSE ASSEMBLY 3-Way On/Off Switch Off/Floe /Carpet Hose Swivel CANISTER Carrying Filter (Inside) Cord Rewind Dust Cup Cord Tray Hose Port HEPA Media Exhaust Filter (Inside)
- Page 8 PACKING LiST (page 2). Use this list Button-- to verify that you have received all the components of your new Kenmore vacuum cleaner. POWERMATE --Telescoping Insert telescoping wand into PowerMate Wand until the wand button snaps into place. A noticabte "click"...
- Page 9 HOSE ATTACHMENTS Align the hose latch tab and notch in Install the crevice tool and dusting brush canister hood and insert hose into into the caddy as shown. canister until it snaps in ptace. Hose Latch Crevice Tab__ • Notch To remove: Press hose latch tab inward...
-
Page 10: How To Start
CAUTION Moving parts! To reduce the risk of personal injury, DO NOT touch the agitator when vacuum cleaner is on. Contacting the agitator whlle it is rotating can cut, bruise or cause other injuries. Always turn off and unplug from electrical outlet before servicing. Use caution when operating near children. -
Page 11: Suggested Pile Height Settings
3. Lower handle from upright position 5. Select a switch position on the handle. pressing on the handle release pedal. OFF - turns off both the canister and the PowerMate motors. FLOOR - turns on the canister motor Handle only. CARPET - turns on both the canister and the... - Page 12 VACUUMING TiPS WARNING WARNING Personal injury Product Damage Personal injury Hazard Hazard Use care if canister is placed on stairs, may fall, causing personal injury or DO NOT run over power cord with property damage. PowerMate. Personal injury or product damage could result.
- Page 13 ATTACHMENTS ATTACHMENTS CAUTION TELESCOPING WAND DO NOT attach or remove handle or 1. To remove telescoping wand from telescoping wand while vacuum cleaner is PowerMate, lock telescoping wand in This could cause sparking and straight-up position. damage the electrical contacts. ATTACHMENTS ON HANDLE NOTE: If the...
-
Page 14: Thermal Protector
ATTACHMENT USE TABLE CLEANING AREA Between Bare Carpeted ATTACHMENT Fu,nlturo ] Cushions] Drapes 1 Stairs FI ..Floors/Rugs Wails Crevice fool Dusting brush PowerMate Pet PowerMate 1. Always clean attachments before using on fabrics. 2. 3-way switch should be in FLOOR position. 3. -
Page 15: Suction Control
BELT RESET SUCTION CONTROL The PowerMate has built-in protection The suction control allows you to change vacuum suction for different fabrics against motor and belt damage should the agitator jam. If the agitator slows down or carpet weights. stops, the belt reset shuts off the PowerMate. -
Page 16: Removing Clogs
REMOVING CLOGS The vacuum cleaner creates suction that picks up dirt. Rapidly moving air carries the dirt to the dust bag through the airflow passages. The dust bag Jetsthe air pass through, while it traps the dirt. For best cleaning results, keep the airflow passage open. -
Page 17: Emptying Dust Cup
EMPTYING DUST CUP TO REMOVE DUST CUP TO EMPTY DUST CUP 1. Rotate dust I. Turn off and unplug vacuum cleaner. Dust Cup Handle cup handle the vertical '2. Lift dust cup handle located at the top of the dust cup. position. -
Page 18: Pre-Filter Cleaning
PRE-FILTER CLEANING To Reinstalh The pre-filter is located inside the dust cup. Check the pre-filter frequently clean when dirty. 1. Align the slots -Tabs on the pre-fiiter 1. Remove the dust cup as outlined in the . Slots DUST CUP CLEANING (page 17). -
Page 19: Primary Filter Cleaning
PRIMARY FILTER CLEANING To Relnstalh primary filter located inside the dust cup lid. 1. Place the primary filter into the dust cup lid. It is recommended to clean the primary filter with cold water at least every (]) month. Check the primary filter frequently and clean when dirty. -
Page 20: Exhaust Filter Changing
EXHAUST FILTER CHANGING 3. Replace exhaust filter cartridge. Place WARNING the new filter cartridge into the exhaust filter tray as shown. Fire and/or Electrical Shock Hazard Do not operate with a clogged exhaust filter or without the exhaust filter exhaust filter fray installed. HEPA MEDIA EXHAUST FILTER Exhaust The exhaust... -
Page 21: Belt Changing And Agitator Cleaning
Always follow all safety precautions when performing maintenance on the PowerMate. WARNING Electrical Shock Or Personal Injury Hazard. Always turn off and unplug vacuum cleaner before performing maintenance to the vacuum cleaner. Failure to do so could result in electrical shock or personal injury from vacuum cleaner suddenly starting. -
Page 22: To Clean Agitator
TO CLEAN AGITATOR: iMPORTANT NOTE: In order to keep cleaning efficiency Turn off and unplug vacuum cleaner from electrical outlet. Check and remove hair, high and to prevent damage to your vacuum stringand lint build-up frequently in the cleaner, the agitator must be cleaned every PowerMate agitator and end cap areas. -
Page 23: Agitator Servicing
AGITATOR SERViCiNG TO REPLACE AGITATOR ,_WARNING ASSEMBLY Electrical Shock Or Personal injury Hazard 1. Remove PowerMate cover, belt and Turn off and unplug vacuum cleaner elec= agitator assembly. See "To Remove Belt" in BELTCHANGING AND AGITATOR frlcal supply before performing malnte= nonce to the vacuum cleaner. - Page 24 Review this table to find do-it-yourself solutions for minor performance problems. Any other service needed should be performed by a Sears or other qualified service agent. WARNING Always turn unplug vacuum cleaner before performing maintenance to the vacuum cleaner. Failure to do so could result in electrical shock or personal injury.
- Page 25 1. Adjust setting. Vacuum cleaner picks 1. Wrong pile height setting. 2. Open suction control. up moveable rugs Suction too strong. -or- PowerMate pushes too hard. Light won't work. 1. Burned out light bulb. Change light bulb. 2. Tripped overload protector Remove items...
- Page 26 Master Protection Agreements Congratulations on making a smart purchase. Your new I<enmore® product is designed and manu- factured for years of dependable operation. But like all products, it may require preventive main- tenance or repair from time to time. That's when having a Master Protection Agreement can save you money and aggravation.
- Page 27 - 27 -...
- Page 29 Cubierta Posterior Par favor lea esto cjufa que le ayudara a ensamblar y operar su aspiradora nueva de Kenmore en una manero m6s secjura y efectiva. Para mas informaci6nacerca del cuidado y operaci6n de esta aspiradora, Ilame a su tiendo Sears mos cercana.
- Page 30 Sears Parts & Repair Center (Centro de Reparaciones y Piezas Sears) o a otro distribuidor Kenmore para que reparen el aparato de forma gratuita. Siesta aspiradora se utiliza para otros fines que no sea uso familiar privado, esta garanfia es v61ida solamente durante 90 dras desde la fecha de compra.
- Page 31 Lea las instrucciones en este manual antes de armar o usar su aspiradora. 4k ADVERTENCIA Su seguridad es muy importante para nosotros. Para reducir ei riesgo de incendio, choque electrico, lesi6n corporal o daEos al utilizar su aspiradora, act_e de acuerdo con precauciones b&sicas de seguridad,...
-
Page 32: Partes De Reemplazo
Es importante conocer laspiezas ycaracterfsticas desu aspkadora para asegurar suusa ade- cuado y seguro. Examlnelas antes deusar su aspiradora. Ensamb_e manguera Accesorios bandeja__ Tube Telesc6pico__ Aspiradora PARTES DE REEMPLAZO Pieza N° Pieza N° Objeto EstiloNo. en EUA en Canad6 Correa CB-3 20-5218 20-40]]8... - Page 33 TUBE TELESCOPICO & ACCESORIOS de ffberaci6n rapida deJ mango Pet PowerMote Telesc6pico CepiHo para sacudir Bot6n de ajuste -Pedal de liberacibn del mango Indicador de nivel de pelo de Bot6n de restauraci6n "Reset" Protector de clon de nivel de pelo de la alfombra Protector muebles--...
- Page 34 ENSAMBLE DE MANGUERA Y MANGO Interruptor de encendido/ apagado de tres posiciones (Off/FSoor/Carpet) (Apagado/Piso/Alfromba) Dispositivo de la manguera CANISTER Manija de trans primario (dentro) Bot6n de Contenador de polvo el_ctrico ._jadel filtro Intrada al manguera Filtro de escape HEPA (dentro)
- Page 35 " LISTA DE EMBALAJE (P6g 1). Use esta lista para verificar que ha recibido todos los componentes de su nueva aspiradora Kenmore. POWERMATE iTube Introduzca el tubo en la PowerMate hasta t61escopique Bouton que el bot6n det tubo quede fijo en d'ajustement posici6n.
- Page 36 ACCESORIOS MANGUERA CoJoque la herramienta pora hendiduras Alinee la pestaSa de sujeci6n de la y la cepillo para sacudir en la bandeja. manguera y la ranuro de la cubierta recept6culo e introduzca la manguera Herramienta para el recept6cuio hasta que quede fija en posici6n.
-
Page 37: Para Comenzar
CUIDADO iPartes en movlrnlento! Para reduclr el rlesgo de da_os corporales, no toque el agitador cuando la asplradora est6 encendlda. El tocar el agltador mientras que est6 girando puede cortar, contusionar o causar otras lesiones. Siempre apague desconecte tomacorriente antes de dar rnantenlrnlento. Tenga culdado al asplrar cerca de ni_os. - Page 38 5. Seleccione una posici6n del interruptor en el mango. 3. Baje el tubo desde la posici6n OFF - apaga motores vertical pisando el pedal recept6culo y de la liberaci6n PowerMate. mango. Pedal de FLOOR - s61o en- liberaci6n ciende e[ motor del mango recept6culo.
-
Page 39: Sugerencias Para Aspirar
SUGERENCIAS PARA ASPIRAR _ADVERTENCIA Petlgro de lesi6n personal ¥ da_o al _roducto Tenga cuidado si coloca el recept6culo No otropelle el cord6n el_ctrico con la sobre escalones. Si se cae, podrio cousar Peligro de lesi6n personal PowerMate. Hay un petigro de lesi6n corporal o unos dodos de posesiones. - Page 40 ACCESORIOS ACCESORIOS DEL TUBO _CUIDADO 1. Para refirar el tubo de la PowerMate, col6- quelos en la posici6n vertical de bloqueo. NO insfale ni retire el mango nl los tubos cuando la aspiradora est_ encendida. Esto podria causar chispas y da6ar los contac- tos el_ctricos.
- Page 41 CUADRO DE usa DE LOS ACCESORIOS AREA A LIMPIAR Entre Pisos Pisos ACCESORIO Mueblo,1 coji,o, 1 Cortlna,1 E,cal ..d..biafra, al_ombrodo,/Parade, alfornbras Herramlenta para hendiduras Cepillo para sacudir PowerMate Pet PowerMate 1. Siempre limpie los accesorios antes de usar sabre telas. 2.
-
Page 42: Motor Protector
CONTROL DE ASPIRACION MOTOR PROTECTOR El control de aspiraci6n lepermite cambiar la Esta aspiradora confiene una v61vula de potencia d e aspiraci6n de laaspiradora de- paso de aire que sirve coma V61vula de pendiendo delgrosor de latela o alfombra. paso y cuando un bloqueo impida que La aspiraci6n se disminuye, para limpiar corfi- circule el aire al motor se abre has y tapetes ligeros, abriendo el control;... -
Page 43: Remover Obstrucciones
REMOVER OBSTRUCCIONES 5La aspiradora crea succi6n o aspiraci6n que levanta la tierra. Esta r6pida corriente de aire im- pulsa la tierra a trav6s de los conductos de aire hasta la bolsa para polvo. La bolsa para polvo atrapa la tierra, pero permite el paso del aire. Para Iograr los mejores resultados de limpieza, mantenga abiertas las vfas de aire. - Page 44 VACIAR ELCONTENADOR DE POLVO PARA RETIRAR EL CONTENADOR PARA VACIAR EL CONTENADOR DE POLVO DE POLVO 1. Apague y desconecte la aspiradora. 1. Gire el mango contenador del contenedor de palvo de basura a la 2. Levante el cerrojo del canasto de basura posici6n vertical.
- Page 45 LIMPIEZA DEL PRE-FiLTRO Para relnstalar: El pre-filtro se encuentra dentro contenedor de basura. Inspeccione 1. Alinee Io ranura frecuencia el pre-fiitro y ffmpielo si est6 sucio del pre-fittro /]- Lang0etas la leng[Jeta _,,,, / I Ranuras I. Retiror el contenador de polvo.
- Page 46 LIMPIEZA DEL FITRO PRIMARIO Para remplazar: El filtro primario encuentra dentro de la 1. Poner el filtro primario dentro de la tapa det contenedor basura. tapa del contenedor de polvo. Es recomendable limpiar el filtro con agua frra par Io menos cada 1 mes. Revisar el filtro primario y limpiarlo cuando sea necesario.
-
Page 47: Filtro De Escape = Hepa
CAMBIO DEL FILTRO DE ESCAPE 3. Reemplace el cartucho del filtro de ADVERTENCIA escape. Coloque un nuevo cartucho de filtro en la bandeja del filtro coma se Pellgro de choque el_ctrlco muestra. No opere can un filtro de escape bloqueada o sin el filtra de escape a la cubierta de_ filtra de escape instalados. -
Page 48: Cambio De La Correa Y Limpieza Del Agitador
Siempre deber6n seguirse todas las precauciones de seguridad antes de efectuar man- tenimiento en la PowerMate. ADVERTENCIA Pellgra de chaque el_ctrlco o lesi6n corporal Descanecte la corriente antes de efectuar mantenimiento a su aspiradora. De Io contraria podria produclrse un choque el_ctrica a causar lesi6n corporal si la aspiradora arranca de manera imprevista. -
Page 49: Limpieza Del Agitador
PARA RETIRAR LA CORREA LIMPIEZA DEL AGITADOR NOTA: Para mantener una alta eficiencia correa nueva sobre el de limpieza y evitar el dafio a la aspi- impulsor de1 radora, hay que limpiar et agitador cada 1. Instale una motor y vez que se cambia la correa. - Page 50 CAMBIO DE LA BOMBILLA ADVERTENCIA CUIDADO Peligro de choque el_ctrico o lesi6n cor= No use una bombllla de m6s de 9W poral (13V). Cuando se use la aspkadora pot un largo perlodo de tiempo, el Apagu_ y desconecte la unidad antes de calor de la bombilla puede calentar las limpiarla o darle servicio.
-
Page 51: Cuidado Del Agitador
CUIDADO DEL AGITADOR PARA CAMBIAR EL AGITADOR _ADVERTENCIA 1. Retire la cubierta, correa y ensamble del Peligro de choque el_ctrico o lesi6n corporal agitador de la PowerMate Consulte "Para reti- rar la correa" bajo CAMBIO DE LA CORREAY Desconecte la corriente antes de efectuar LIMPIEZA DELAGITADOR. - Page 52 Revise este recuadro para encontrar soluciones a problemas que puede corregir usted mlsrno. Cualquler otro servlclo debe ser realizado par SEARS u afro agente de servlclo calificado. ADVERTENCIA Apague y desconecte la asplradora antes de efectuar el rnantenimiento a su aspi= radora.
- Page 53 La aspiradora Sevanta 1. Ajuste incorrecto de nivel de 1. Ajuste el nivel. tapetes o es dificil pelo de la olfombra. empujar Sa 2. Abra el control de aspiraci6n. 2. Aspiraci6n demasiado potente. PowerMate. La luz no funciona. 1. Bombilla fundida. Cambie Io bombillo.
- Page 54 Acuerdos Maestros de Protecci6n Enhorabuena hacer compra intelicjente. Su nuevo producto Kenmore ® est6 diseffado y fabricado para ofrecerle afros de funcionamiento confiable. Pero al igua[ que todos los productos pueden precisar un mantenimiento preventivo o alcjuna reparaci6n vez en cuando.
- Page 55 - 27 -...
- Page 56 Your Home For troubleshooting, product manuals and expert advice: managemylife www.managemylife.com For repair - in your home - of all major brand appliances, lawn and garden equipment, or heating and cooling systems, no matter who made it, no matter who sold it! For the replacement parts, accessories and owner's manuals that you need to do=it=yourself.
Need help?
Do you have a question about the 116.22614 and is the answer not in the manual?
Questions and answers