Belkin N1 vision User Manual
Wireless modem router
Hide thumbs
Also See for N1 vision:
- User manual (623 pages) ,
- Brochure & specs (4 pages) ,
- Specification (2 pages)
Table of Contents
Advertisement
Quick Links
Download this manual
See also:
User Manual
Advertisement
Table of Contents

Subscribe to Our Youtube Channel
Related Manuals for Belkin N1 vision


Summary of Contents for Belkin N1 vision
- Page 1 User Manual Wireless modem router...
-
Page 2: Table Of Contents
Table of Contents 1. Introduction . . . . . . . . . . . . . . . . . . . . . . . . . . . . . . . . . . . . . . 1 Advantages of a Wireless Network . -
Page 3: Introduction
Introduction thank you for purchasing the Belkin N1 Vision Wireless modem router (the router) . Following are two short sections—the first discusses the benefits of home networking, and the other outlines best practices that maximize your wireless home network range and performance . Please be sure to read through this user manual completely, and pay special attention to the section entitled “Placement of your Wireless Networking Hardware for... -
Page 4: Placement Of Your Router
. A conventional radio uses one antenna to transmit a data stream . Belkin’s N1 mimo technology, on the other hand, uses three antennas . this design helps combat distortion and interference . - Page 5 . to achieve the best wireless network coverage for your “wireless clients” (i .e ., computers enabled by Belkin Wireless Notebook Network Cards, Wireless desktop Network Cards, and Wireless usB Adapters): •...
- Page 6 . • For Belkin wireless networking products, use the detailed site survey and wireless channel information included with your wireless network card . see your network card’s user guide for more information .
- Page 7 Introduction Secure Connections, VPNs, and AOL secure connections typically require a user name and password, and are used where security is important . secure connections include: • Virtual Private Network (VPN) connections, often used to connect remotely to an office network • The “Bring Your Own Access” program from America Online (Aol), which lets you use Aol through broadband provided by another cable or Adsl service • Most online banking websites • Many commercial websites that require a user name and...
-
Page 8: Product Overview
. the following is a list of features that make your new Belkin router an ideal solution for your home or small office network . - Page 9 . Belkin Troubleshooting Assistant CD the troubleshooting Assistant software takes the guesswork out of setting up your router . this software automatically determines your network settings for you and sets up the router for connection to your isP .
- Page 10 Product Overview Integrated N1 Wireless Access Point N1 mimo is an exciting new wireless technology based on the draft ieee 802 .11n specification . it employs mimo (multiple input multiple output) smart-antenna technology that achieves data rates of up to 300mbps .* Actual throughput is typically lower than the connected data rate and will vary depending on your networking environment .
-
Page 11: Knowing Your Router
Knowing your Router Package Contents • Belkin N1 Vision Wireless Modem Router • Quick Installation Guide • Belkin Assistant CD with User Manual • RJ45 Ethernet Networking Cable • RJ11 Telephone Cord • ADSL (Asymmetric Digital Subscriber Line) Microfilter* • Power Supply *Adsl microfilter varies by country . if it’s not included, you will need to purchase one . System Requirements • An active ADSL service with a telephone wall jack for connecting the router •... -
Page 12: Hardware Characteristics
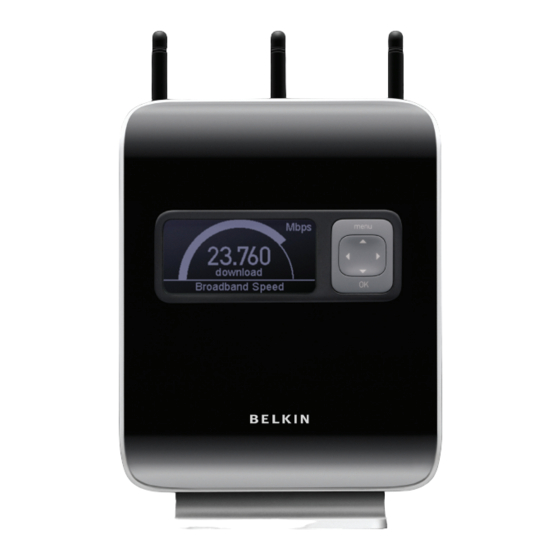
Knowing your Router Hardware Characteristics the router has been designed to be placed on a desktop . All of the cables exit from the BACK of the router for better organization and utility . the router’s interactive display is easily visible on the FroNt of the router to provide you with information about network activity and status . - Page 13 Knowing your Router Interactive Display the interactive display is on the front of the router, which indicates which features are in operation . 4-Way Keypad the keypad enables the movement of the up, down, left, and right function that may apply to the screen shown in the interactive display .
- Page 14 Knowing your Router ADSL port to wired computers to power DC 12V / 1.25A Reset...
- Page 15 Knowing your Router Connections to Wired Computers – Yellow Ports Connect your wired (non-wireless) computers to these ports . These ports are RJ45, 10/100/1000 auto-negotiation, auto- uplinking ports for standard utP category 5 or 6 ethernet cable . the ports are labeled 1 through 4 . use the gray cable provided to connect your computer to any one of these ports .
-
Page 16: Connecting And Configuring Your Router
Connecting and Configuring your Router Verify the contents of your box. You should have the following: • Belkin N1 Vision Wireless Modem Router • Quick Installation Guide • Belkin Assistant CD with User Manual • RJ45 Ethernet Networking Cable • RJ11 Telephone Cord • Power Supply... - Page 17 Adsl splitter) . NOTE: some Adsl connections require a microfilter . Your Adsl provider can tell you if you need one . Belkin includes a microfilter in regions known to use them . You may or may not have received one in your box .
- Page 18 “Adsl” on the back of your new router . rotate the antennas up . open a web browser on that computer . the Belkin router setup Wizard should appear automatically . if it doesn’t, enter “routersetup” into the web-address field and press the “enter”...
-
Page 19: Step 2 Set Up The Router - Using The Plug-And-Play
Set Up the Router – Using the Plug-and-Play Router Setup open a web browser on that computer . the Belkin router setup Wizard should appear automatically . if it doesn’t, enter “router setup” into the web- address field and press the “enter” key on your keyboard . - Page 20 You will see the Congratulations screen when your router can connect to the internet . You have finished installing your new Belkin router and can begin surfing by opening another browser and going to any website . You may also choose to change your network...
- Page 21 Connecting and Configuring your Router Interactive Display the router’s interactive display is a powerful instrument for viewing your network information . the display can provide essential router- status information such as the state of the internet connection to details such as each device usage and speed of the internet connection .
- Page 22 Connecting and Configuring your Router Internet Connection this icon shows you when the router is connected to the internet . No internet connection has been detected solid White router is connected to the internet Blinking White internet connection was detected; router is not currently able to connect to the internet ADSL Connection...
- Page 23 Connecting and Configuring your Router Wireless Computers this icon represents if there are any wireless connections present . Wireless device is not present solid White Wireless device(s) is connected to the router Security this icon indicates wireless security . Wireless security is oFF solid White Wireless security is oN Broadband Download...
- Page 24 Connecting and Configuring your Router Connections/Speed this screen displays all devices currently connected to the router and the speed of the broadband data that is being downloaded or uploaded per each device . Usage Past 24 Hours this screen displays all devices currently connected to the router and their broadband usage over a period of 24 hours .
- Page 25 Connecting and Configuring your Router Menu Screen Push the “menu” button to open the display’s menu options . the menu option allows you to enable features within the router . the following outlines the details of each feature within the menu section . Wireless Security select Wireless security by pressing the “oK”...
- Page 26 Connecting and Configuring your Router to make a WPs connection, select the “New Connection” option . to do so, you must have WPs enabled on the computer or device connecting to the router . You will need to push the WPs button in your computer or device within two minutes .
- Page 27 Connecting and Configuring your Router Troubleshooting Assistant CD Belkin has provided our Assistant software to make installing your router a simple and easy task . You can use it to get your router up and running in minutes . the Assistant software requires that your...
- Page 28 Connecting and Configuring your Router Note for Windows Users: if the setup Assistant does not start up automatically, select your Cd-rom drive from “my Computer” and double-click on the file named “setup .exe” to start the setup Assistant . Select Country select your country from the drop- down box .
- Page 29 Connecting and Configuring your Router Verifying Hardware Connections the setup Assistant will now verify your hardware connection . Naming your Wireless Network the setup Assistant will display the default wireless network name or service set identifier (ssid) . this is the name of your wireless network to which your computers or devices with wireless network adapters will connect .
- Page 30 Connecting and Configuring your Router Requesting Internet Account Info (if needed) select your isP from the drop-down boxes . if your internet account requires a login and password, you will be prompted with a screen similar to the illustration below . Click “Next” to continue .
- Page 31 Connecting and Configuring your Router Checking Internet Connection We are almost done . the setup Assistant will now check your connection to the internet . Congratulations You have finished installing your new router . You will see the Congratulations screen when your router can connect to the internet .
- Page 32 Connecting and Configuring your Router Optional: Assistance Connecting Other Computers this optional step will help you to connect additional wired and wireless computers to your network . Follow the on-screen instructions . once you have verified that your other wired and wireless computers are properly connected, your network is set up and working .
-
Page 33: Step 3: Set Up Wireless Security - Run The Security Assistant Software
Connecting and Configuring your Router Step 3 Set Up Wireless Security – Run the Security Assistant Software Now that your network is set up and working, it is recommended that you turn on wireless security to prevent unauthorized access to your network from neighboring wireless-enabled computers . - Page 34 Connecting and Configuring your Router 3.2 Creating a Network Key enter a network key (PsK) for your wireless network and click “Next” to continue . 3.3 Transferring the Key After setting up your wireless security, you will have to transfer the network key to each of your wireless computers .
-
Page 35: Alternate Setup Method
Alternate Setup Method Step 1 Hardware Connections – Follow the Quick Installation Guide (QIG) see the QiG or step 1: Hardware Connections from the previous section . Step 2 Set your Computer’s Network Settings to Work with a DHCP Server see the section in this user manual called “manually Configuring Network settings”... - Page 36 Alternate Setup Method Logging into the Router You will see the router’s home page in your browser window . the home page is visible to any user who wants to see it . to make any changes to the router’s settings, you have to log in . Clicking the “login”...
- Page 37 Alternate Setup Method (5) (4) (10) Quick-Navigation Links You can go directly to any of the router’s advanced ui pages by clicking directly on these links . the links are divided into logical categories and grouped by tabs to make finding a particular setting easier to find .
- Page 38 Alternate Setup Method Login/Logout Button this button enables you to log in and out of the router with the press of one button . When you are logged into the router, this button will change to read “logout” . logging into the router will take you to a separate login page where you will need to enter a password .
- Page 39 Alternate Setup Method Step 4 Configuring your Router for Connection to your Internet Service Provider (ISP) The “Internet/WAN” tab is where you will set up your Router to connect to your internet service Provider (isP) . the router is capable of connecting to virtually any isP’s system provided you have correctly configured the router’s settings for your isP’s connection type .
- Page 40 Alternate Setup Method Connection Type From the “Connection type” page, you can select one of these five connection types based on the instruction provided by your isP: • PPPoE • PPPoA • Dynamic/Fixed IP (1483 Bridged) • Static IP (IPoA) • Modem Only (Disable Internet Sharing) select the type of connection you use by clicking the radio button (1) next to your connection type and then clicking “Next”...
- Page 41 Alternate Setup Method Setting your ISP Connection Type to PPPoE or PPPoA PPPoe (Point-to-Point Protocol over ethernet) is the standard method of connecting networked devices . it requires a user name and password to access the network of your isP for connecting to the internet . PPPoA (PPP over Atm) is similar to PPPoe, but is mostly implemented in the uK .
- Page 42 Alternate Setup Method 6. Encapsulation – select your encapsulation type here . (supplied by your isP) VC-MUX: PPPoA Virtual Circuit multiplexer (null encapsulation) allows only one protocol running per virtual circuit with fewer overheads . LLC: PPPoA logical Control allows multiple protocols running over one virtual circuit (more overhead) .
- Page 43 Alternate Setup Method Setting your Connection Type to Dynamic/Fixed IP (1483 Bridged) this connection method bridges your network and isP’s network together . the router can obtain an iP address automatically from your isP’s dHCP server or accept a fixed iP address assigned by your isP . For Dynamic IP connection: 1.
- Page 44 Alternate Setup Method Setting your ISP Connection Type to Static IP (IPoA) this connection type is also called “Classical iP over Atm” or “CliP”, which your isP provides to a fixed iP for your router to connect to the internet . 1.
- Page 45 Alternate Setup Method Setting your Connection Type to Modem Only (Disable Internet Sharing) in this mode, the router simply acts as a bridge passing packets across the dsl port . it requires additional software to be installed on your computers in order to access the internet .
- Page 46 Setting Custom Domain Name Server (DNS) Settings A “domain Name server” is a server located on the internet that translates universal resource locaters (urls) like “www .belkin .com” to iP addresses . many internet service Providers (isPs) do not require you to enter this information into the router .
- Page 47 When you install the router, its own mAC address will be “seen” by the isP and may cause the connection not to work . Belkin has provided the ability to clone (copy) the mAC address of the computer into the router .
-
Page 48: Using The Web-Based Advanced User Interface
Using the Web-Based Advanced User Interface using your internet browser, you can access the router’s Web-Based Advanced user interface . in your browser, type “192 .168 .2 .1” (do not type in anything else such as “http://” or “www”) then press the “enter” key . You will see the router’s home page in your browser window . Viewing the LAN Settings Clicking on the header of the lAN tab will take you to the lAN tab’s... -
Page 49: Changing Lan Settings
Subnet Mask there is no need to change the subnet mask . this is a unique, advanced feature of your Belkin router . it is possible to change the subnet mask if necessary; however, do Not make changes to the subnet mask unless you have a specific reason to do so . the... - Page 50 . Local Domain Name the default setting is “Belkin” . You can set a local domain name (network name) for your network . there is no need to change this setting unless you have a specific advanced need to do so .
-
Page 51: Viewing The Dhcp Client List Page
Using the Web-Based Advanced User Interface Viewing the DHCP Client List Page You can view a list of the computers (known as clients), which are connected to your network . You are able to view the iP address the computer, the host name (if the computer has been assigned one), and the mAC address of the computer’s network interface... - Page 52 . the ssid is your network name . the default network name of the router is “Belkin N1 Wireless” followed by six digits that are unique to your router . Your network name will look something like “Belkin_N1_Wireless_123456”. You can change this to anything you...
- Page 53 Using the Web-Based Advanced User Interface Changing the Wireless Channel there are a number of operating channels from which you can choose—in the united states, there are 11 and in the united Kingdom (and most of europe), there are 13 . in a small number of other countries, there are other channel requirements .
- Page 54 Using the Web-Based Advanced User Interface Using the Bandwidth Switch this switch allows you to set the router’s wireless bandwidth modes . there are several modes available: 20MHz only setting the router to this mode allows only 20mHz operation . this mode is compatible with N1, draft 802 .11n-, 802 .11g-, and 802 .11b-compliant devices, but will limit N1, draft 802 .11n-compliant devices’...
- Page 55 . use protected mode if your network consists of a mix of Belkin N1 Wireless Cards and 802 .11g or 802 .11b cards on your network . if you are in an environment that includes little to no 802 .11g or 802 .11b wireless network traffic, you will achieve the best N1 wireless...
- Page 56 Using the Web-Based Advanced User Interface Using Wi-Fi Protected Setup WPs uses WPA2 for encryption . it does not provide additional security, but rather, standardizes the method for securing your wireless network . You may use either the Push Button Configuration (PBC) method or PiN method to allow a device access to your wireless network .
- Page 57 Using the Web-Based Advanced User Interface Wi-Fi Protected setup (WPs): enabled or disabled . Personal identification Number (PiN) method: in this method, a wireless client wishing to access your network must supply a 4- or 8-digit PiN to the router . After clicking “enroll”, you must start the WPs handshaking procedure from the client within two minutes .
- Page 58 WPA2 (KB893357) . the update is available from: http://support.microsoft.com/?kbid=893357 IMPORTANT: You also need to ensure that all your wireless client cards/adapters support WPA2, and that you have downloaded and installed the latest driver . most of the Belkin wireless cards have driver updates available for download from the Belkin support site: www.belkin.com/networking.
- Page 59 Using the Web-Based Advanced User Interface Setting WPA/WPA2-Personal (PSK) like WPA security, WPA2 is available in both WPA2-Personal (PsK) mode and WPA2-enterprise (rAdius) mode . typically, WPA2- Personal (PsK) is the mode that will be used in a home environment, while WPA2-enterprise (rAdius) is implemented in a business environment where an external radius server distributes the network key to the clients automatically .
-
Page 60: Setting Wpa Security
Using the Web-Based Advanced User Interface IMPORTANT: make sure your wireless computers are updated to work with WPA2 and have the correct settings to get proper connection to the router . Setting WPA Security Note: to use WPA security, your wireless network cards must be equipped with software that supports WPA . - Page 61 Using the Web-Based Advanced User Interface Setting Guest Access Within the WPA security page, the Guest-Access feature is available . select this option to create a separate network that allows guests to connect to the internet while keeping them away from accessing your network, computers, and private files .
-
Page 62: Setting Wep Encryption
Using the Web-Based Advanced User Interface Setting WEP Encryption Note to Mac users: the “Passphrase” option will not operate with Apple AirPort . to configure encryption for your mac computer, set the ® ® encryption using the manual method described in the next section . select “128-bit WeP”... - Page 63 Using the Web-Based Advanced User Interface Using a Hexadecimal Key A hexadecimal key is a mixture of numbers and letters from A–F and 0–9 . 64-bit keys are 10 digits long and can be divided into five two-digit numbers . 128-bit keys are 26 digits long and can be divided into 13 two-digit numbers .
-
Page 64: Setting Mac Address Control
Using the Web-Based Advanced User Interface Setting MAC Address Control the mAC address filter is a powerful security feature that allows you to specify which computers are allowed on the wireless network . Note: this list applies only to wireless computers . this list can be configured so any computer attempting to access the wireless network that is not specified in the filter list will be denied access . - Page 65 Using the Web-Based Advanced User Interface Setting up an Allow Access List select the “Allow” radio button to begin setting up a list of computers allowed to connect to the wireless network . Next, in the “mAC Address” field that is blank , type in the mAC address of the wireless computer you want to be able to access the wireless network, then click “<<Add”...
-
Page 66: Configuring The Firewall
Using the Web-Based Advanced User Interface Configuring the Firewall Your router is equipped with a firewall that will protect your network from a wide array of common hacker attacks including: • IP Spoofing • Land Attack Ping of Death (PoD) • Denial of Service (DoS) • IP with zero length • Smurf Attack •... - Page 67 Using the Web-Based Advanced User Interface Configuring Internal Forwarding Settings the Virtual servers function will allow you to route external (internet) calls for services such as a web server (port 80), FtP server (Port 21), or other applications through your router to your internal network . since your internal computers are protected by a firewall, computers outside your network (over the internet) cannot get to them because they cannot be “seen”...
- Page 68 Using the Web-Based Advanced User Interface Setting Client IP Filters the router can be configured to restrict access to the internet, e-mail, or other network services at specific days and times . restriction can be set for a single computer, a range of computers, or multiple computers .
- Page 69 Using the Web-Based Advanced User Interface Enabling the Demilitarized Zone (DMZ) the dmZ feature allows you to specify one computer on your network to be placed outside of the firewall . this may be necessary if the firewall is causing problems with an application such as a game or video conferencing application .
-
Page 70: Using Dynamic Dns
Using the Web-Based Advanced User Interface Using Dynamic DNS the dynamic dNs service allows you to alias a dynamic iP address to a static host name in any of the many domains dyndNs .org offers, allowing your network computers to be more easily accessed from various locations on the internet . - Page 71 Using the Web-Based Advanced User Interface Setting up the Router’s Dynamic DNS Update Client You must register with dyndNs .org’s free update service before using this feature . once you have your registration, follow the directions below . enter your dyndNs .org user name in the “user Name” field enter your dyndNs .org password in the “Password”...
- Page 72 Using the Web-Based Advanced User Interface Blocking an ICMP Ping Computer hackers use what is known as “pinging” to find potential victims on the internet . By pinging a specific iP address and receiving a response from the iP address, a hacker can determine that something of interest might be there .
-
Page 73: Utilities
Using the Web-Based Advanced User Interface Utilities the “utilities” screen lets you manage different parameters of the router and perform certain administrative functions . -
Page 74: Restarting The Router
Using the Web-Based Advanced User Interface Restarting the Router sometimes it may be necessary to restart or reboot the router if it begins working improperly . restarting or rebooting the router will NOT delete any of your configuration settings . Restarting the Router to Restore Normal Operation Click the “Restart Router”... - Page 75 Using the Web-Based Advanced User Interface Restoring Factory Default Settings using this option will restore all of the settings in the router to the factory (default) settings . it is recommended that you back up your settings before you restore all of the defaults . Click the “restore defaults”...
- Page 76 Using the Web-Based Advanced User Interface Saving a Current Configuration You can save your current configuration by using this feature . saving your configuration will allow you to restore it later if your settings are lost or changed . it is recommended that you back up your current configuration before performing a firmware update .
- Page 77 Using the Web-Based Advanced User Interface When the save is complete, you will see this window . Click “Close” . the configuration is now saved . Restoring a Previous Configuration this option will allow you to restore a previously saved configuration . Click “Browse”...
- Page 78 Using the Web-Based Advanced User Interface You will be asked if you want to continue . Click “oK” . A reminder window will appear . it will take up to 60 seconds for the configuration restoration to complete . Click “oK” . A 60-second countdown will appear on the screen .
-
Page 79: Updating The Firmware
Using the Web-Based Advanced User Interface Updating the Firmware From time to time, Belkin may release new versions of the router’s firmware . Firmware updates contain feature improvements and fixes to problems that may have existed . When Belkin releases new firmware, you can download the firmware from the Belkin update website and update your router’s firmware to the latest version . - Page 80 Using the Web-Based Advanced User Interface Downloading a New Version of Firmware if you click the “Check Firmware” button and a new version of firmware is available, you will see a screen similar to the one below: to download the new version of firmware, click “download” . A window will open that allows you to select the location where you want to save the firmware file .
- Page 81 Using the Web-Based Advanced User Interface When the save is complete, you will see the following window . Click “Close” . the download of the firmware is complete . to update the firmware, follow the next steps in “updating the router’s Firmware”...
- Page 82 Using the Web-Based Advanced User Interface the “update Firmware” box will now display the location and name of the firmware file you just selected . Click “update” . You will be asked if you are sure you want to continue . Click “oK” . You will see one more message .
-
Page 83: Changing System Settings
Using the Web-Based Advanced User Interface Changing System Settings the “system settings” page is where you can enter a new administrator password, set the time zone, enable remote management, and turn on and off the NAt function of the router . Setting or Changing the Administrator Password the router ships with No password entered . - Page 84 You cannot set the clock yourself . Enabling Remote Management Before you enable this advanced feature of your Belkin router, MAKE SURE YOU HAVE SET THE ADMINISTRATOR PASSWORD . remote management allows you to make changes to your router’s settings from anywhere on the internet .
- Page 85 Using the Web-Based Advanced User Interface Advanced Feature: the “remote Access Port” option allows you to configure the desired “remote Access Port for remote management” feature . the default access port is set to port 80 .
- Page 86 Enabling/Disabling UPnP uPnP (universal Plug-and-Play) is yet another advanced feature offered by your Belkin router . it is a technology that offers seamless operation of voice messaging, video messaging, games, and other applications that are uPnP-compliant . some applications require the router’s firewall to be configured in a specific way to operate...
-
Page 87: Manually Configuring Network Settings
Manually Configuring Network Settings set up the computer that is connected to the Adsl modem First using these steps . You can also use these steps to add computers to your router after the router has been set up to connect to the internet . - Page 88 Manually Configuring Network Settings Manually Configuring Network Settings in Mac OS X Click on the “system Preferences” icon . select “Network” from the “system Preferences” menu . select “Built-in ethernet” next to “show” in the Network menu .
-
Page 89: Manually Configuring Network Settings
Manually Configuring Network Settings Select the “TCP/IP” tab . Next to “Configure” , you should see “manually” or “using dHCP” . if you do not, check the PPPoe tab to make sure that “Connect using PPPoe” is Not selected . if it is, you will need to configure your router for a PPPoe connection type using your user name and password . - Page 90 Manually Configuring Network Settings Manually Configuring Network Settings in Windows 2000, NT , or XP ® Click “start”, “settings”, then “Control Panel” . double-click on the “Network and dial-up connections” icon (Windows 2000) or the “Network” icon (Windows XP) . right-click on the “local Area Connection”...
- Page 91 Manually Configuring Network Settings Manually Configuring Network Adapters in Windows 98SE or Me right-click on “my Network Neighborhood” and select “Properties” from the drop-down menu . Select “TCP/IP Settings” for your installed network adapter. You will see the following window . if “specify an iP address” is selected, your router will need to be set up for a static iP connection type .
-
Page 92: Recommended Web Browser Settings
Recommended Web Browser Settings in most cases, you will not need to make any changes to your web browser’s settings . if you are having trouble accessing the internet or the advanced web-based user interface, then change your browser’s settings to the recommended settings in this section . Microsoft Internet Explorer 4.0 or Higher ®... - Page 93 Recommended Web Browser Settings make sure there are no check marks next to any of the displayed options: “Automatically detect settings”, “use automatic configuration script”, and “use a proxy server” . Click “oK” . then click “oK” again in the “internet options” page . Netscape Navigator 4.0 or Higher...
-
Page 94: Troubleshooting
Troubleshooting Assistant CD does not automatically start. if the Cd-rom does not start the Assistant software automatically, it could be that the computer is running other applications that are interfering with the Cd drive . 1. If the Assistant software’s Welcome screen does not appear within 15-20 seconds, open up your CD-ROM drive by double-clicking on the “My Computer”... - Page 95 Troubleshooting 2. Unplug power to the Router for 10 seconds, and then plug the power back into the Router. Ensure that the Router’s “router” Display is on. If not, check to make sure that the AC adapter is connected to the Router and plugged into a wall outlet. 3.
- Page 96 This will cause the Router to reattempt communication with the ADSL line. If the “ADSL” icon on the Router is not lit after completing these steps, please contact Belkin Technical Support. 3. Try shutting down and restarting your computer.
- Page 97 4. You may need to configure your Router to meet the specific requirements of your ISP. To search our knowledge base for ISP-specific issues, go to: http://web.belkin.com/support and type “ISP” into the “Product Support Search” text box. if you are still unable to access the internet after verifying these...
- Page 98 3. Please refer to the instructions provided by the publisher of your firewall software for instructions on configuring the firewall to allow Internet access. if you are still unable to access the internet after disabling any firewall software, please contact Belkin technical support .
- Page 99 Troubleshooting I can’t connect to the Internet wirelessly. if you are unable to connect to the internet from a wireless computer, please check the following items: 1. Look at the lights on your Router. They should be as follows: • The “router” icon should be on. • The “radio wave” icon above the “router” icon should be on.
- Page 100 (as opposed to wirelessly), ensure that “Broadcast SSID” is enabled. This setting is found on the Router’s wireless “Channel and SSID” configuration page. if you are still unable to access the internet after completing these steps, please contact Belkin technical support .
- Page 101 Troubleshooting • My wireless network performance is inconsistent. • Data transfer is sometimes slow. • Signal strength is poor. • Difficulty establishing and/or maintaining a Virtual Private Network (VPN) connection. Wireless technology is radio-based, which means connectivity and the throughput performance between devices decreases when the distance between devices increases . other factors that will cause signal degradation (metal is generally the worst culprit) are obstructions such as walls and metal appliances .
- Page 102 Troubleshooting I am having difficulty setting up Wired Equivalent Privacy (WEP) security on my Belkin Router. 1. Log into your Router. Open your web browser and type in the IP address of the Router. (The Router’s default is 192.168.2.1.) Log into your Router by clicking on the “Login”...
- Page 103 Router. For example: C3030FAF4BB2C3D44BC3D4E7E4 = 128-bit key 8. Click “OK”, and then “Apply” to save the settings. if you are Not using a Belkin wireless client card, please consult the manufacturer’s user manual for that wireless client card .
- Page 104 . Download the patch here: http://www.microsoft.com/downloads/details. You also need to download the latest driver for your Belkin Wireless Network Card from the Belkin support site . other operating systems are not supported at this time . microsoft’s patch only supports devices with WPA-enabled drivers such as Belkin N1 products Download the latest driver at http://web.belkin.com/support...
- Page 105 Troubleshooting I am having difficulty setting up Wireless Protected Access (WPA) security on a Belkin wireless client card for a home network. Clients must use the same key that the router uses . For instance, if the key is “smith Family Network Key” in the router, the clients must also use that same key .
- Page 106 Troubleshooting I am NOT using a Belkin client card for a home network and I am having difficulty setting up Wireless Protected Access (WPA) security. if you are not using a Belkin Wireless desktop or Wireless Notebook Network Card that is not equipped with WPA-enabled software, a file from microsoft called “Windows XP support Patch for Wireless...
- Page 107 Troubleshooting 3. Under the “Wireless Networks” tab, click the “Configure” button and you will see the following screen. 4. For a home or small business user, select “WPA-PSK” under “Network Administration”. Note: select WPA (with radius server) if you are using this computer to connect to a corporate network that supports an authentication server such as a radius server .
- Page 108 Troubleshooting Wireless Comparison Chart 11Mbps link 5x faster than 10x faster 10x faster than Wired speed rate/baseline 802.11b* than 802 .11b* 802 .11b* over the air* Common Common Common Common Common household household household household household devices such devices such devices such devices such devices such...
- Page 109 Troubleshooting Free Tech Support You can find additional support information on our website www.belkin.com through the tech-support area . if you want to contact technical support by phone, please call the number you need from the list below* . *local rates apply...
-
Page 110: Information
Modifications the FCC requires the user to be notified that any changes or modifications to this device that are not expressly approved by Belkin international, inc ., may void the user’s authority to operate the equipment . Canada-industry Canada (iC) the wireless radio of this device complies with rss 139 &... - Page 111 Belkin product you must take the following steps: 1 . Contact Belkin international, inc ., at 501 W . Walnut st ., Compton CA 90220, Attn: Customer service, or call (800)-223-5546, within 15 days of the occurrence .
- Page 112 Belkin reserves the right to review the damaged Belkin product . All costs of shipping the Belkin product to Belkin for inspection shall be borne solely by the purchaser . if Belkin determines, in its sole discretion, that it is impractical to ship the damaged equipment to...
-
Page 113: Ec Declaration Of Conformity
NN10 6GL ENGLAND Representative lkin Ltd (residing in the EC holding the TCF) Product / Apparatus N1 VISION MODEM ROUTER Type Number F5D8632-4 V1000 Variants include All Country variations Declaration I declare that above product conforms to all the applicable requirements of EU Directive1999/5/EC and is CE-marked accordingly: Article 3.1a:... - Page 114 +46 (0) 8 5229 1874 fax P75618uk •F5D8632-4 © 2008 Belkin international, inc . All rights reserved . All trade names are registered trademarks of respective manufacturers listed . mac, mac os, Apple, and AirPort are trademarks of Apple inc ., registered in the u .s .
Need help?
Do you have a question about the N1 vision and is the answer not in the manual?
Questions and answers