Table of Contents
Advertisement
Quick Links
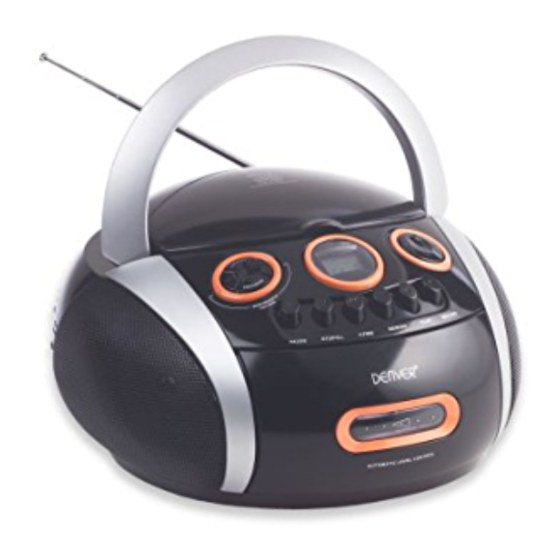
Location of controls
(1)
FUNCTION SWITCH
CD/TAPE(OFF)/RADIO
(2)
BAND SWITCH
(3)
FM ANTENNA
(4)
CD DOOR
(5)
TUNING KNOB
(6)
BASS BOOST BUTTON
(7)
CD SKIP/SEARCH/FOLDER
FORWARD BUTTON
(8)
CD SKIP/SEARCH/FOLDER
BACKWARD BUTTON
(9)
CD PROGRAM BUTTON
(10) CD REPEAT BUTTON
(11) CD STOP BUTTON
(12) CD PLAY/PAUSE BUTTON
(13) CD LCD DISPLAY
(14) STEREO HEADPHONE JACK
(15) VOLUME CONTROL KNOB
(16) AC SOCKET
(17) BATTERY DOOR
(18) FM STEREO LED INDICATOR
(19) CASSETTE COMPARTMENT
(20) CASSETTE RECORD BUTTON
(21) CASSETTE PLAY BUTTON
(22) CASSETTE REWIND BUTTON
(23) CASSETTE FAST FORWARD
BUTTON
(24) CASSETTE STOP/EJECT
BUTTON
(25) CASSETTE PAUSE BUTTON
(26) SPEAKER LEFT
(27) SPEAKER RIGHT
English - 1
Advertisement
Table of Contents

Related Manuals for Denver TCM-208


Summary of Contents for Denver TCM-208
- Page 1 Location of controls FUNCTION SWITCH (14) STEREO HEADPHONE JACK CD/TAPE(OFF)/RADIO (15) VOLUME CONTROL KNOB BAND SWITCH (16) AC SOCKET FM ANTENNA (17) BATTERY DOOR CD DOOR (18) FM STEREO LED INDICATOR TUNING KNOB (19) CASSETTE COMPARTMENT BASS BOOST BUTTON (20) CASSETTE RECORD BUTTON (21) CASSETTE PLAY BUTTON CD SKIP/SEARCH/FOLDER FORWARD BUTTON...
-
Page 2: Battery Operation
AC OPERATION Before operation please be sure that the VOLTAGE on the set corresponds to the VOLTAGE of your local area. Unravel the AC Line Cord, insert one end into the AC jack on the set, and the other end into a standard AC outlet. BATTERY OPERATION Disconnect the AC Cord Set completely. -
Page 3: Recording From The Radio
to close. Slide the FUNCTION SWITCH to TAPE position. Depress the PLAY BUTTON. Adjust the VOLUME CONTROL KNOB to your desired listening level. To stop the tape, depress the STOP/EJECT BUTTON. Fast Forward and Rewind The tape can be fast FORWARDED or REWOUND by depressing the FAST FORWARD BUTTON or REWIND BUTTON respectively. -
Page 4: Play/Pause Mode
When CD is playing, do not open the CD Door. Open the CD DOOR by pull up the CD DOOR. Put a CD disc into the CD COMPARTMENT and close the CD DOOR. Set the FUNCTION SWITCH to “CD” position. NOTE : Ensure the CD Door is closed properly and locked in place. -
Page 5: Repeat All
3. Though the sound stops, the disc will continue to spin. To re-start playing, press the CD PLAY/PAUSE BUTTON once again. The music will start from the exact position where it was interrupted. 4. To stop the CD, press the CD STOP BUTTON once whether the CD is in Play or Pause mode. - Page 6 Program Mode 1. During the CD stop mode, press the PROGRAM BUTTON once. The PROGRAM INDICATOR “PROG” will light up and blink continuously while the CD LCD DISPLAY will show the number of Program to be memorized starts from the first program “ ”.
- Page 7 4. To check the program you have stored after complete programming, press the PROGRAM BUTTON step by step during the CD stop mode. Note : While PROGRAM INDICATOR is flashing, never press the CD STOP BUTTON otherwise all programmed memory will be cancelled automatically.
-
Page 8: Repeat Folder
PLAY/PAUSE MODE 1. When the PLAY/PAUSE BUTTON is pressed during stop mode, the first track will be played. The PLAY INDICATOR “ ” will be lighted. The CD LCD DISPLAY will show the specific folder and track number being played. NOTE : a. - Page 9 3. REPEAT ALL : When the REPEAT BUTTON is pressed three times, the “ALL REPEAT” INDICATOR will be shown. The whole disc can be played continuously. 4. TO CANCEL THE REPEAT FUNCTION Press the REPEAT BUTTON until the REPEAT INDICATOR disappears from the LCD DISPLAY.
- Page 10 2. Repeat above procedure until all desired tracks have been programmed. A total of 20 tracks can be stored in memory. After complete programming, LCD DISPLAY will show “ ” and the “PROG” indicator will blink continuously. 3. To start the PROGRAMMED playback, press the CD PLAY/PAUSE BUTTON once and the CD PLAY INDICATOR “...
-
Page 11: Maintenance
MAINTENANCE CLEANING THE TAPE HEADS Clear the heads frequently to remove dust and tape residue. Dirt on the heads will impair the sound quality of both recording and playback. WARNING: TO PREVENT FIRE OR SHOCK HAZARD, DO NOT EXPOSE THE APPLIANCE TO RAIN OR MOISTURE.
Need help?
Do you have a question about the TCM-208 and is the answer not in the manual?
Questions and answers