Advertisement
Available languages
Available languages
Quick Links
USE ANDCARE
MANUAL
MANUEL
D'UTILISATION
Model, M odUle
DAC7024DE
Read andFollov/All Safety Rutes
andOperaling i nstructions Before
F]rst U se of This Product.
Ve_ElezI_e attenlivement
loseonsignes d_s_curit_ e t los
Instructions d'ulflls&lion event
I'u=Jlisatton l nltialede
ce produit.
f
,, ,_
. .
,
,,,,,,,,
_,_,
__
_ _
_
_
..................
_It_
1
_ _
......
_
I_ Ill
Ill
_
II
I
_2_2
,:......................
;_
I
,_ _®
®;
Room Air Conditioner
Table of contents
.......................
1
Climatiseur de piGce
Table of contents
15
DanbyP|'oducts L imited, G uelph,Ontario CanadaN1H6Z9
DanbyP_'oducls tnc,,Findlay, O hioUSA 45840
lO,Ol.
Advertisement

Related Manuals for Danby Silhouette DAC7024DE


Summary of Contents for Danby Silhouette DAC7024DE
- Page 1 _2_2 _It_ ..I_ Ill ,_ _® Model, M odUle ,:...... ®; DAC7024DE Read andFollov/All Safety Rutes andOperaling i nstructions Before F]rst U se of This Product. Room Air Conditioner Table of contents ....... Ve_ElezI_e attenlivement loseonsignes d_s_curit_ e t los Instructions d'ulflls&lion event...
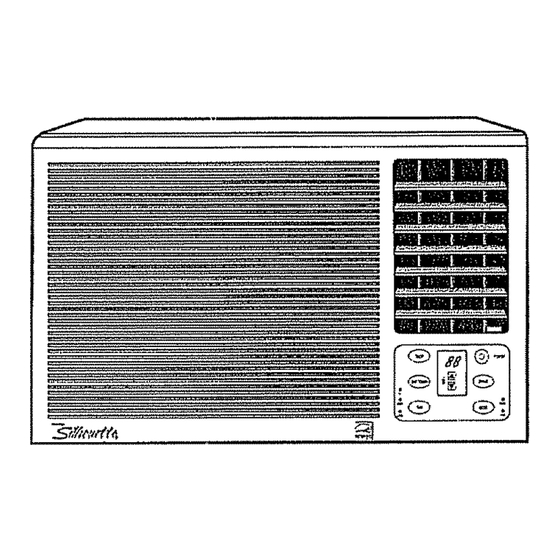
- Page 2 Page Introduction ..............Unit Specifications ............. Electrical Specifications ............Energy-Saving T_ps............Window Installation ............Operating Instructions ............Care and Maintenance ............. Trouble Shooting Guide ............Warranty ..............Exterior Air Inlet tnierior__ Air Inlet Interior Air Outlet Air Filler - Fresh Air Ventilation Switch Electronic Controls Power Cord...
- Page 3 '1'1 l#iiI{_t_li[oii[,l_ Thank you for choosing a Danby Silhouette RoomAir Conditioner to cool your home. This Use and Care Manual provides information necessary for the proper care and maintenance of your new Room Air Condittoner_ If propedy maintained, your air conditioner will give you many years of trouble free operation.
- Page 4 Table 1 : Suggested Individual Branch Circuit NameplateAmps AWG Wi_eSize" 1o All wiring must comply with local and national 5,0 to 12 electrical codes and must be installed by a AWG- American Wi_e_age qualified electrician. Ifyou have any questions * Based en copperwire at 60 _Ctemperaturerating. regarding the fo)(owIng instructions, contact a qualified electric(an.
- Page 5 Your R oom AirCondilloner unitisdesigned t o Start your air conditioner bolero outdoor air be highly efficient in energy savlngs_ Follow becomes hot and uncomfodable, This avoids an these recommer_dations Ior greater eltidenoy_ initial period of discomfod while unit is cooling off the room, Select thermostal selling Ihal suits your comiod needs and reave lherrnosla! at that...
- Page 6 Your unit Is designed to evaporate condensation under normal conditions However, under Because the compressor is located on the conbols extreme humidity conditions, excess condensation side of the unit (righl side), this side wilt be heavlel: may cause basepan to overflow to the outside. and more awkward to manipulate, Inadequate The Unit should be installed where condensation...
- Page 7 Preparation to Remove the Air Conditioner SIIde_Out Chassis (Aft Models) • Position the air condilioner in the normal (upright) posil_on. Remove the air fitter by grasping the tiIler handle i....l" (on front grill) and sliding il lo the right, Ftgo 2 •...
- Page 8 See Fig, f8., 2, Assembly of the Upper & Lower Channels, to Cabinet. (All Models) C. For proper condensation run-off it wil_ be • "L"Shaped Top Channel: Install the "L"shaped necessary to adjusl the angle/pitch ot the window channel to the top of tile cabinet as shown [n Fig. brackets.
- Page 9 _*_:::::*':: 3/16" M m_Imorn Pitch WindowSash Braokel Assembly Leveling Scrm'," Outer Wall Construction Fig. 18 WindowSnsh 0 o o o o 0 E2 SolidPtecec,IWood "L'Shaped FoamSIdp ..L Mounling Channel 5. Installation of the Cabinet Fig 14 ( All Models) A.
- Page 10 6. tnslaIling the Slide-Out Chassis into Cabinet: (please seek assistance for this procedure) • Carefully slide Ihe air conditioner back into the cabinet., (in window) Note: Ground wire must be re-installed before completing next step. • Reinstall (slide-out-chassis) security screws Fig.7 removed earlier from the (lower left/right) side o! the cabinet.
- Page 11 7, Electronic Control Features LED DISPLAY: The LED window disptays the following information independently • Set Cooling Temperature • Ambient Room Temperalure • Auto on!off Timer Programs • E1 = (Clean Air Filter) NOTE: During normal operating condilions, (alter all settings are complete) the LED readout will always delautt to show (display) the "ambient room Control Panel...
- Page 12 direotly above the COOL or FAN mode wil! Ifluminale, identifying the selected mode Ls POWER: operational+ Press the POWER keypad to lure the unit on/off TIMER: TEMPERATURE SETTINGS: Press this keypad to activate the "auto slart I auto slop" timer programs. Aulo start]slop programs can Press the up keypad to increase the set (operaling) be programmed from 0 - 12 hours.
- Page 13 3_ When Ihe air inlet grill and cablnel are dirty, wash In lukewarm water, (below 40°C (104"i:): FAN: For very dirty conditions, wash with soapy water Press t his keypad t oactivate l heappropriate or a neulra! cleaning agent. speed s elling° Each depression elIhekeypad will alternate through H igh, Medium, Low fanspeed AIR FILTER INFORMATION...
- Page 14 Frequently,a problem is minor and a service call may not be necessary, use thistroubleshootingguide for a possible setulion If Ihe unit continues to operale improperly+ call Danby's Toll Free Number 1-800-263-2629 for assistance, or call one of our service depots listed in the enclosed "Authorized Service Depot"listingprovided...
-
Page 15: Air Conditioner
\v_ean_ir::s,mn_4ion_, _er any Sale o f Goc_s _ orl_e lend.f ono_statue I she_e_ express_ gu_rantee.,L _eptesent_Ibna o_ gaa_anleea U_:led (C_d_)_ Danby P rodu_Ls 1o_ a nyd_agesIo _nons or exelud_ Sa>'a asherein p_o'.'Tded. O_nby P I_ud..:, Inc (US.A), sh_ll not b eresponsive damagns e _g Iron t he _ ,elIun_n of theunit end bylhe p a_r.h.a_... - Page 16 Page Introduction ..............Fiche signal_tique ............Specifications e_ectdques ............Conseits d'_conomie d'6nergie ..........Installation dans la fen_lre ............. Instructions de fonctionnement ..........Precautions et entretien ............Guide de d_pannage ............Garantie ..............Sortie d'air In1_ieum Commuteteur de venl_al_on d'air frais .Commandes _lec(ronlques .Cordon d'a_[mentalton...
- Page 17 Nous vous remercions d'avoir cholsi un climatiseur de chambre Danby Silhouetle pour reiroidirvolre togemenL Ce manue_d_utilisation et d'enlretien lournit les renseigr_ements necessatres pour prendre soin el entrelenir volra nouveau cl[ma]Jseur de p_cs.. S'il est adequatement entrelenu, volta climatiseur vous donnera de nornbreuses armies d'ulitisation sans probl_me.
- Page 18 "1 '"i -"¸..... memm.'+] _ _ I;;I[,H.+_ I [H,_ [,.']I _ I _ il;| [t,]i.lJ + "Ira,were Tableau 1 : Circuit de derivation Indlvlduel sugg+r6 Puissance nominals:amp_tes C_,libre A WG" Teus_esc,lblages dolvent _ tre conlormessux 5,0 b 12 codes_leclriques Iocaux e!nationaux e tdoivent AWGAmerican V_teG_ge _tre instali_s...
- Page 19 Votre cllmatlse_ui" de pTEcee_t con_u pour _tre Commencez & fairs fonclionner volts climallseur d*une grands efficacit_ dens l'_conomle d'_nergte_ avanl que rair exl_rieur ne soil chaud el Po_r l'augmenter encore, veuitl_zsuivre fes inconlorlable. Cola 6vitera une p6riode d'inconfort recommendations ci-dessous : Iorsque Pappareil commence _, refroidir la pi_ce- S_lecltonnez un r_glage du Ihermostal qui 5, Quand los lemp_ratures exl_deures sonl assez...
- Page 20 Volre eppareil a _l_ con_u pour qua la condensation s'_vapore dens des condilions normales° Cependant, en presence d'une humidil_ extreme, un surplus de Comma le compresseur se l_ouve du c6t_ des condensation paul provoquer un d_bordemenl de ta commandes de I'unil_ (oSt_ droll), ca cSt_ esl plus cuvette de base vers re×t6rieur L'apparell dolt _lre Iourd et plus di_cile &...
- Page 21 1. Pr_paralton pour enlever le chassis coulissant du climattseur (Tous]es mod_les) Meltez f'appareil _ {a position normale (verl[cale)< Enlevez le filtre _ air en salsissant la poign_e du IIllre (grille fronlale) _! en la glissan! vers la droile. </ (Fig. 2) i........
- Page 22 Mesurez la Iongueur de t'inl_rieurdu rebord de la fen_tre et t_ouvezle centre, tel qu'il est rnontr_ ,_ia Fig 17. Med_les DAC7024DE : Mesurez 8,071 po _ partir de cheque c6t_ du centre et marquez ces poinls AI[gnez la rentsen V sur le support avec cheque...
- Page 23 WindowSash r---'==t=ji--_i-o o o oO o o o o Oo "7.._ ..It If L.-_ Canal d e eande " Fig. 19 montage a n mousse _,_E:_7_L 5, Inslattation du caisson forrne d e Fig.t4 _ L ,, (Tous tes mod_les) Placez le caisson du climaltseurdans la fan,Ire avec le caner de montage en forme de _,L.
- Page 24 6. Inslallation du chassis coulissant dans le caisson (veutllezdemanderde I'alde pour eerie _tape) Faites glisser avec soin le ciimatiseur vers t'arri_re dens le caisson (dans la ten_tre). Remarque : Le ftl de mlss _ la terra doit _tre rdinstatl6 event de procdder _ la prochaine _tape.
- Page 25 7. CARACT,eRISTIQUES DES COMMANDES TOUCHE NUMERIQUE : Acltve (augmente) los I_LECTRIQUES r_giages de temp_.rature. TOUCHE NUMERIQUE : Active (diminue) lee AFFICHAGE DEL : La len_lre des DEL aNiche r_glages de temp_ralure, rirt!ormation su]vante de faqon ind_pendante. R_glage de la temperature de refroidlssemenl Temperature ambianle de Ie pl_ce Programmes de minutede autometique...
- Page 26 MODE : Appuyez sur cette touchenum_dque pour choisir te mode de tenor|on appropri_.. ALtMENTATION : Appuyez sur ta touche num0rique (Venli/ateudRefroidissement) Cheque p_essionsur la ALIMENTATION pour met|re t'appareit en marche ou touche MODE va altemer entre le mode ,, I'arr6tero REFROIDISSEMENT ,oet ,, VENTfLATEUR ,,.
- Page 27 l_Jj_lll={![_i[o]ll.l!_J_=,_l_tie}l I _ it=!,_iRl.lnJii=l Information sur [e flltre _ air VENTILATEUR ; Appuyez sur cello touche pour actlver Le ti]fre &air joue un r0le lr_s impodant dane _es re r_glage de vitesse appropri_e du venlilateul:, niveaux do fonclionnemenl de lout climaliseur. Un ftllre Chaque preseion sur Ia touchehumOr!qua va atlemer air propre rnaxlmisera !'efftcacit8 du refroidissemenl.
- Page 28 St I'appareil conlinue ,_ real Ionctionner, cornposez le num_ro sans frets de Danby au 1-800.262-2629 pour demander de t'aide, ou appefez quelqu'un de nos d_pets de services, _num_r_s dens la lisle foumie avec col apparell - D_pel aulods_ de services ,,.
-
Page 29: Garantie
GARANTIE LIMITI_E CLIMATISEUR _l _t:_aleil dequ_'_eelg_rBnt'_ e_emp] de'_utvice d_rr_a_i_ p_rr_l_ra eId_!_br_n, s]les!u_l_ d_%leeo_ndilio_ _ales le_s Gelfe guan_e de_to((_Jle ( t'd ,_Facha_ur ir_=j del'ap_ae_i] ue_u p._l DanbI,' ou p_rFun dess_.ff3t,';boteurs ag.'_sel e_e ne_ul _l_e((_(',_ktl_e COHDlllOh!S EXCLUSIO)18 En_u de(a _nle, ir n 'e_(_ auc_me autr_ ger_nlle, sex e_pri_'_e _ ladle., co_il(_ ou_0(_senle_ic, n, q_'elle... - Page 30 _ la portia de le main tors de ;a commande de piece ou service: . Genre de produit . Num6ro de mod_te • Num_ro de p_ce • Description de la pl_ce Danby Producls Limited,Guelph, O ntario CanadaN1H6Zg DanbyProducls lnc,,FindIay, O hioUSA45840 Pdr,t_l in C_n_ (P R.C )
Need help?
Do you have a question about the Silhouette DAC7024DE and is the answer not in the manual?
Questions and answers