Table of Contents
Advertisement
Advertisement
Table of Contents

Related Manuals for Brookstone Stunt Copter


Summary of Contents for Brookstone Stunt Copter
- Page 1 Stunt Copter Ultra-lIgHt. Ultra-faSt. fOr all SkIll levelS.
-
Page 2: Table Of Contents
Table of conTenTs Warnings and Cautions . . . . . . . . . . . . . . . . . . . . . . . . . . . . . . . . . . . . . . . . . . . . . . . . . . . . . . . . . . . . . .2 FCC Information . -
Page 3: Important Safety Instructions
caUTIon • TO REDUCE THE RISK OF ELECTRIC SHOCK, DO NOT REMOVE COVER . THERE ARE NO SERVICEABLE PARTS INSIDE . • TO REDUCE THE RISK OF FIRE OR ELECTRIC SHOCK, DO NOT EXPOSE THIS UNIT TO RAIN OR MOISTURE . The lightning flash with arrow-head symbol within an equilateral triangle is intended to alert the user to the presence of uninsulated “dangerous voltage”... - Page 4 DanGeR To reduce the risk of electric shock, burns, fire or injury: Do not use while bathing or in a shower . Do not place or store unit where it can fall or be pulled into a tub or sink . 3 .
-
Page 5: Battery Warnings
11 . Never operate this unit if it has a damaged cord or plug, if it is not working properly, or if it has been dropped or damaged, or dropped into water . If the unit’s power supply cord or plug is damaged, do not attempt to fix it yourself . 12 . - Page 6 • ALWAYS handle Li-Po batteries with extreme caution . NEVER place the Li-Po helicopter battery in a place where the contact tabs could inadvertently be connected to each other via coins, keys, tools or any other metallic objects . If anything happens to complete the circuit across the connect tab, the batteries will likely be damaged and may cause injury .
-
Page 7: Fcc Information
fcc InfoRMaTIon This device complies with Part 15 of the FCC Rules . Operation is subject to the following two conditions: 1 . This device may not cause harmful interference . 2 . This device must accept any interference received including interference that may cause undesired operation . -
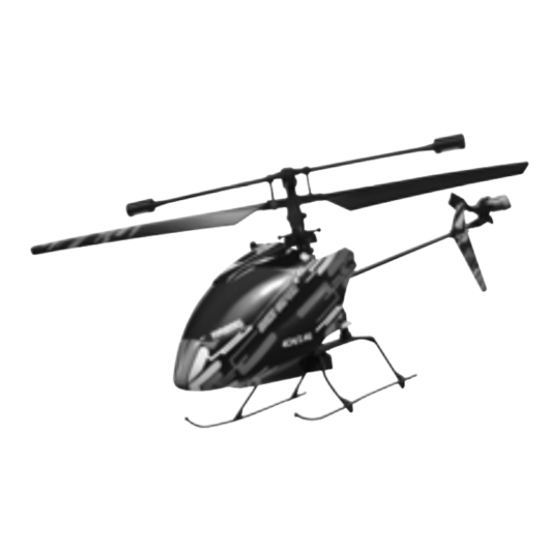
Page 8: Location Of Parts And Controls
locaTIon of PaRTs anD conTRols (coPTeR) Stabilizer Bar Tail Rotor Main Rotor Blades Blade Interchangeable Head Power Indicator Light Interchangeable Battery Landing Gear Remote Control Display Battery Mode (Speed) Channel Turning Direction Throttle Indicator Forward & Throttle Trim Indicator Backward Trim Direction Trim Indicator Banks Trim Indicator Forward &... -
Page 9: Location Of Parts And Controls
locaTIon of PaRTs anD conTRols (ReMoTe conTRol) Antenna Power Indicator Light Channel Select Button Mode (Speed) Button Throttle Sensitive Trim Forward & Backward Trim Forward & Backward, Throttle, Left & Right Banks Left & Right Turning Control Control Power On/Off Direction Trim Banks Trim... -
Page 10: Remote Control Battery Installation
ReMoTe conTRol baTTeRY InsTallaTIon 1 . Remove the battery cover and battery pack from the remote control . 2 . Install 6 AA alkaline batteries into the battery pack according to the polarity indicators and then install the pack in the remote as shown in the diagram below . 3 . -
Page 11: Charging The Interchangeable Battery
chaRGInG The InTeRchanGeable baTTeRY This helicopter comes with 2 interchangeable batteries, make sure to fully charge the batteries before you fly the helicopter . 1 . Plug one or both batteries into the included charger (A) . Charging from remote control (B): •... -
Page 12: Helicopter Battery Installation
helIcoPTeR baTTeRY InsTallaTIon 1 . When the interchangeable battery is fully charged load it into the battery compartment of the helicopter . 2 . Keep the battery’s metal edge facing the helicopter’s battery socket . Slide the battery into the helicopter’s battery socket until it stops . 3 . -
Page 13: Operation: Preparing For Flight
oPeRaTIon: PRePaRInG foR flIGhT • Verify that there are 6 “AA” batteries inside the remote control unit and the helicopter's battery has been installed correctly . • Make sure to be in a large space with an open radius of at least 50 feet . •... -
Page 14: Flying Tips
for multi Person Play: 1 . Before starting, make sure that the power on the remote is in the OFF position . Also make sure that there are no other 2 . 4 G devices in the area . 2 . Each person will have to sync their helicopter individually, at a different time, to avoid interference . -
Page 15: Understanding Helicopter Trim Adjustments
UnDeRsTanDInG helIcoPTeR TRIM aDJUsTMenTs turn left/right trim • If your helicopter nose rotates to the left or right uncontrollably, you may need to utilize the DIRECTION TRIM buttons . • If your helicopter over rotates CLOCKWISE (to the right), push and release the DIRECTION TRIM button repeatedly to left side until the turning stops and proper flight is maintained . - Page 16 forward/Backward trim • If your helicopter is moving forwards or backwards automatically, you may need to adjust the FORWARD/BACKWARD TRIM buttons . • If your helicopter flies forward, push and release the FORWARD/BACKWARD TRIM button back repeatedly until the moving stops and proper flight is maintained .
- Page 17 • If your helicopter is not steadily hovering and is banking to the left or right automatically, you may need to adjust the BANKS TRIM buttons . • If your helicopter banks to the left, push and release the BANKS TRIM button repeatedly to the right until the banking stops and proper flight is maintained .
-
Page 18: Channel Select Button
channel selecT bUTTon Press the CHANNEL SELECT button on the top right of the remote to toggle between Basic Pilot (3 channel flight) and Stunt Pilot (4 channel flight) . basIc PIloT flIGhT conTRols (3 channel flIGhT) On the following page is a list of Basic Pilot flight functions on your wireless remote control and how they will affect your helicopter . - Page 19 Move the Throttle down to decrease Move the Throttle up to increase the speed of the main rotor and the the speed of the main rotor and the helicopter will descend . helicopter will rise up . Move the Direction Control left and Move the Direction Control right the helicopter will turn left .
-
Page 20: Stunt Pilot Flight Controls (4 Channel Flight)
sTUnT PIloT flIGhT conTRols (4 channel flIGhT) Are you ready for Stunt Pilot 4 Channel Flight? Be careful . . . Some of the control locations have changed from Basic 3 Channel Flight—and it takes some practice . While learning to fly your helicopter it is best to start with a large space until you get used to the basic controls . - Page 21 Move the Direction Control up and Move the Direction Control down and the helicopter will move forward . the helicopter will move backward . Move the Direction Control left and Move the Direction Control right and the helicopter will bank to the left . the helicopter will bank to the right .
-
Page 22: Advanced Flight Controls
aDvanceD flIGhT conTRols Once you have mastered the basic flight controls of your helicopter it’s time to try your hand at some more advanced flying techniques like forward and reverse sweeping turns . 1 . To make a forward sweeping turn, first push the Direction Control stick all-the-way forward until the control stick touches the upper edge of the remote (see the diagram on the following page) . -
Page 23: Advanced Flight Maneuvers
aDvanceD flIGhT ManeUveRs Clockwise Counter- Sweep Clockwise Sweep Push the throttle to Push the throttle to forward and then forward and then push the control stick push the control stick straight forward straight forward Keep the throttle in Keep the throttle in position and then position and then move to right... -
Page 24: Parts Replacement Instruction
PaRTs RePlaceMenT InsTRUcTIon CONteNtS: 1 upper propeller blade 1 tail rotor 4 connecting rods helIcoPTeR PRoPelleR sYsTeM Your helicopter propeller system is a precision instrument that may need repair or replacement from time to time for optimal flight function . Crash landing from high-speed aerial flights may cause damage to your helicopter's propeller or propeller connecting rods . - Page 25 2 . Broken propeller. Replacing Propeller: The propeller is subject to damage as you learn to properly fly and control your helicopter . If, after a crash, your helicopter loses control easily or flies erratically you should carefully inspect your entire propeller system for any sign of damage .
-
Page 26: Replacing Connecting Rod And Direction Connecting Rod
RePlacInG connecTInG RoD anD DIRecTIon connecTInG RoD Diagram 1 There are 2 propeller connecting Ther e is one p r opeller conne cting Broken connecting rod . Broken connecting rod . rods on the propeller and 2 direction connecting rods . Diagram 2 Replacing connecting rod . -
Page 27: Replacing The Upper Propeller Blade
RePlacInG The UPPeR PRoPelleR blaDe Using the included screwdriver, turn Remove the broken blade and counter clockwise to remove the screw . carefully replace with a new one . Using the included screwdriver, turn When you tighten the screw you should clockwise to tighten the screw . -
Page 28: Replacing The Tail Propeller Blade
RePlacInG The TaIl PRoPelleR blaDe Hold the very middle part of the tail Remove the broken propeller and pull it straight up . tail propeller blade . Carefully replace with a new one Push straight down and put it in proper position . as shown above . - Page 29 noTes...
-
Page 30: Warranty
(“Warranty Period”). If a defect arises and a valid claim is received within the Warranty Period, at its option, Brookstone will either 1) repair the defect at no charge, using new or refurbished replacement parts, or 2) replace the product with a new product that is at least functionally equivalent to the original product, or 3) provide a store credit in the amount of the purchase price of the original product. - Page 31 Brookstone may provide their own warranties to the purchaser, but Brookstone, in so far as permitted by law, provides these products “as is . ” This warranty does not apply to: a) damage caused by failure to follow instructions relating to product’s use or the installation of components;...
- Page 32 Find thousands more great ideas online 796083 Merrimack, New Hampshire USA 03054 • 800-846-3000 • Brookstone . c om...
Need help?
Do you have a question about the Stunt Copter and is the answer not in the manual?
Questions and answers