
Related Manuals for Leigh SUPERJIG-12-18-24


Summary of Contents for Leigh SUPERJIG-12-18-24
- Page 2 Your New Leigh Dovetail Jig Congratulations! You now own a most useful and versatile dovetailing tool. The Leigh Superjig Dovetail Jig will help you cut an infinite variety of joints, and all of its major functions are described in detail in this manual, plus there's a slide-out Quick Reference Guide underneath the jig.
- Page 3 Chapter 14 – Box Joints .................... 55 Chapter 15 – Hints and Tips ..................61 Appendix I – Attaching the Leigh e-Bush to the Router ........65 Appendix II – Bit Selection ..................67 Appendix III – Jig Parts List ..................73...
- Page 4 The Leigh jig’s guidefinger assembly can be in any one of four joint modes, depending on what type of joint and which part of the joint you are cutting.
- Page 5 SUPERJIG-12-18-24 User Guide CONTENTS and STANDARDS Which Way Round Should the Board Go? As virtually all dovetail joinery is used to make boxes, drawers and chests etc., we devised these simple (and hopefully intuitive) icons to indicate which side of a board faces inwards or outwards on the finished “box”,...
- Page 6 SUPERJIG-12-18-24 User Guide CONTENTS and STANDARDS...
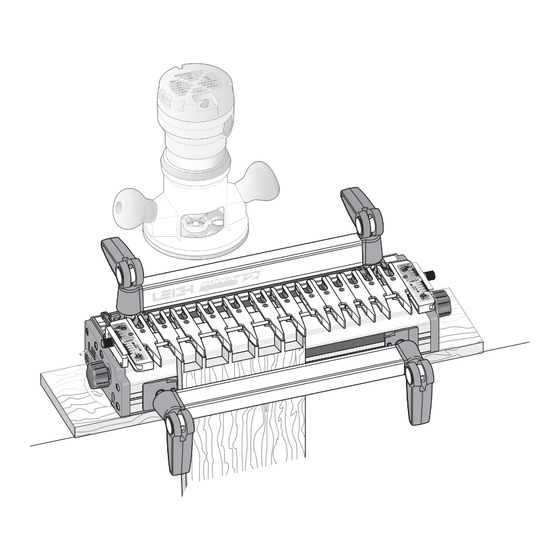
- Page 7 Using the Clamps Make Sure You Have All the Parts. Before you start to assemble your Leigh SUPERJIG, check to make sure you have received all the required parts. The small carton you removed from the end of the main...
- Page 8 Chapter 1 -12-18-24 User Guide UPER JIG ASSEMBLY, MOUNTING, AND USING THE CLAMPS Install Side Stops Insert two clamp T-bolts through 1-2 Insert the two front clamp T-bolts through the jig body the rear jig body holes and place a “stepped” rear side stop over holes.
- Page 9 -12-18-24 User Guide Chapter 1 UPER JIG ASSEMBLY, MOUNTING, & USING THE CLAMPS 90˚ 90˚ 90˚ 90˚ 90˚ 90˚ Now you need two boards about ¾" x 6" x 8" long 1-8 Align Front Side Stops Clamp one square ended board [20 x 150 x 200mm].
- Page 10 , the nylon stop rod through its storage hole in the left end items left over: and the pin wrench in its slot in the right hand end housing 1 Leigh jig user guide 1 Straight bit 1 DVD instruction video (English only)
- Page 11 -12-18-24 User Guide Chapter 1 UPER JIG ASSEMBLY, MOUNTING, & USING THE CLAMPS 1-19 The Jig Clamps Use a piece of flat, even-thickness wood 1-20 A smooth, firm action is enough to engage the clamp. to familiarize yourself with the jig cam clamps. You will operate Rule of thumb: If you can't throw the lever by pressing the end the cam-action speed clamps every time you use the jig, so get of it firmly with your thumb, reduce the tension.
- Page 12 Chapter 1 -12-18-24 User Guide UPER JIG ASSEMBLY, MOUNTING, AND USING THE CLAMPS...
- Page 13 Template Guidebush System Selection Chart...
Need help?
Do you have a question about the SUPERJIG-12-18-24 and is the answer not in the manual?
Questions and answers