Table of Contents
Advertisement
Quick Links
- 1 Contents and Standards
- 2 Chapter 1 - Jig Assembly, Mounting, and Using the Clamps
- 3 Chapter 7 - Router Preparation
- 4 Chapter 8 - through Dovetail Procedures
- 5 Chapter 9 - Variably Spaced Half-Blind Dovetail Procedures
- 6 Chapter 10 - Single Pass Half-Blind Dovetails
- 7 Chapter 14 - Box Joints
- 8 Appendix III - Jig Parts
- Download this manual
Advertisement
Table of Contents

Related Manuals for Leigh Super12


Summary of Contents for Leigh Super12
- Page 1 Leigh Router Joinery Jigs Dedicated Customer Support 1-800-663-8932 Joining Tradition with Today...
- Page 2 Your New Leigh Dovetail Jig Congratulations! You now own a most useful and versatile dovetailing tool. The Leigh Superjig Dovetail Jig will help you cut an infinite variety of joints, and all of its major functions are described in detail in this user guide, plus there’s a slide-out Quick Reference Guide underneath the jig.
-
Page 3: Table Of Contents
Chapter 14 – Box Joints .................... 57 Chapter 15 – Hints and Tips ..................63 Appendix I – Attaching the Leigh e-Bush to the Router ........67 Appendix II – Bit Selection ..................69 Appendix III – Jig Parts ..................... 75 Appendix IV –... - Page 4 The Leigh jig’s guidefinger assembly can be in any one of four joint modes, depending on what type of joint and which part of the joint you are routing.
- Page 5 SUPERJIG-12-18-24 User Guide CONTENTS and STANDARDS Which Way Round Should the Board Go? As virtually all dovetail joinery is used to make boxes, drawers and chests etc., we devised these simple (and hopefully intuitive) icons to indicate which side of a board faces inwards or outwards on the finished “box”, and which side of the board faces outward (toward you, the operator), when it is clamped in the jig.
-
Page 6: Standard Equipment
VRS can be used with a small shop vac or a large built in system. The VRS is easily attached without jig modification. Each VRS comes complete with all mounting hardware needed for any Leigh 24" D-Series jig, all Super Jigs or the earlier model Leigh D1600. -
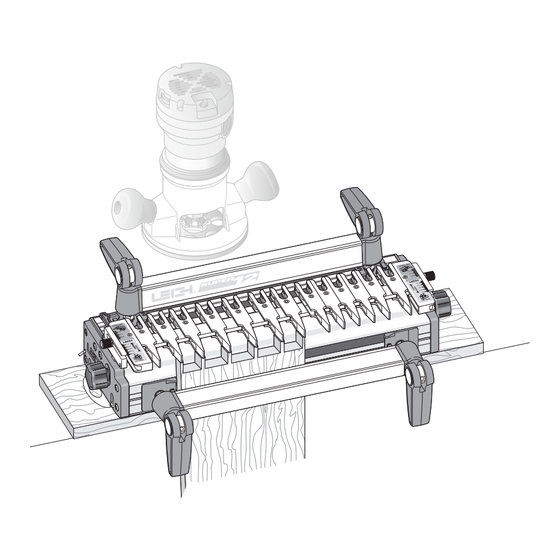
Page 7: Chapter 1 – Jig Assembly, Mounting, And Using The Clamps
Using the Clamps Make Sure You Have All the Parts. Before you start to assemble your Leigh SUPERJIG, check to make sure you have received all the required parts. The small carton you removed from the end of the main carton contains: 1. - Page 8 Decide which end at least 5"[125mm] wide. Length : 26" for Super12, 32" for Super18, of the jig you wish to access the “Quick Reference” instruction 40" for Super24 [660, 830 or 1000mm respectively]. Clamp it to the ...
- Page 9 "x 6"[20 x 150mm] finger support board as raise them to full height and tighten the knobs. shown. Lengths: 11"[280mm] for Super12, 17"[430mm] for Note: For clarity, the set lines on support brackets are shown in Super18, and 23"[600mm] for Super24. Use MDF or plywood red in this user guide.
- Page 10 , the nylon stop rod through its storage hole in the left end items left over: and the pin wrench in its slot in the right hand end housing 1 Leigh jig user guide 1 Straight bit 1 DVD instruction video (English only) 1 Collet Reducer...
- Page 11 -12-18-24 User Guide Chapter 1 uper JIG ASSEMBLY, MOUNTING, & USING THE CLAMPS 1-19 The Jig Clamps Use a piece of flat, even-thickness wood 1-20 A smooth, firm action is enough to engage the clamp. to familiarize yourself with the jig cam clamps. You will operate Rule of thumb: If you can't throw the lever by pressing the end the cam-action speed clamps every time you use the jig, so get of it firmly with your thumb, reduce the tension.
- Page 12 Chapter 1 -12-18-24 User Guide uper JIG ASSEMBLY, MOUNTING, AND USING THE CLAMPS...
-
Page 13: Chapter 2 – Adjusting The Finger Assembly
2-3 Loosen about half the guidefingers and practice unlock- 2-4 Do not over-tighten the guidefinger lock screws. The Leigh ing, moving, positioning and re-locking them. Always press on screwdriver provided will give ample torque for easy lock-up with- the center of the guidefinger when tightening the screws. - Page 14 Chapter 2 -12-18-24 User Guide uper ADJUSTING THE FINGER ASSEMBLY 2-5 Always tighten unused guidefingers before routing, as 2-6 You can adjust the guidefingers by eye, or by measurement router vibration may cause loose screws and finger lock parts to to suit a set of plans.
- Page 15 The guidebush is the vital link between router and jig. All joints created on a Superjig are routed with the unique e7* elliptical guidebush, a Leigh innovation that provides precise joint fit adjustment for box joints and sliding dovetails. If your router doesn’t accept the e7-Bush, you can use an alternative guidebush with some limitations.
-
Page 16: Chapter 3 – The Leigh E-Bush And Optional Guidebushes
" " " 3-5 To fit the Leigh eBush directly to your router, the router 3-6 Think of the router base as a clock face. Make a small scratch base must have a 1-3/8" diameter counter bore. If your router... -
Page 17: Chapter 4 – Basic Jig Functions And Scale Modes
SUPERJIG - CHAPTER 4 Basic Jig Functions and Scale Modes Here are the basics for understanding the different Superjig dovetail modes and settings. THE FOUR SCALE MODES This line is for the finger assembly The Finger Assembly attaches to the support scales. - Page 18 Chapter 4 -12-18-24 User Guide uper BASIC JIG FUNCTIONS AND SCALE MODES 4-2 The guidefinger assembly slides in the support brackets 4-1 The two clamp bars hold workpieces horizontally or above the workpiece. The finger assembly is adjusted in or out ...
-
Page 19: Chapter 5 – Using Your Jig Safely
Always wear hearing protection. completely. Always operate variable speed routers at the fastest Protect yourself from harmful dust with a face mask. For complete comfort and convenience, get yourself a Leigh VRS possible speed. (Vacuum & Router Support) to match your jig model. - Page 20 Make plenty of simple open-face practice cuts without a guidebush before you try to use the router on the Leigh jig. You must, of course, ■ always use a guidebush when routing on the Leigh Jig.
-
Page 21: Chapter 6 – Wood Preparation
SUPERJIG - CHAPTER 6 Wood Preparation "Garbage In - Garbage Out"... This adage of the computer age stands equally true for dovetail jigs. 90° 90˚ 90˚ 90˚ 90° 90˚ Check for squareness: stand both pieces vertically on a flat 6-1 It is vital for accurately aligned joints that stock used on the ... - Page 22 Chapter 6 -12-18-24 User Guide uper WOOD PREPARATION...
-
Page 23: Chapter 7 – Router Preparation
SUPERJIG - CHAPTER 7 Router Preparation Routers used on Super Jigs must have a 1/2" or 8mm collet Fit the e7-Bush . One is included with your Super Jig. . All Super Jig bits have 8mm shanks. Routers with 1/2" collets Some guidebush adaptors may have to be modified to allow adjust- must use the 1/2"... - Page 24 Chapter 7 -12-18-24 User Guide uper ROUTER PREPARATION 7-5 Depth of Cut: The depth of cut always refers to the actual 7-6 Depth of cut is not the distance the bit projects from the depth of the cut into the wood beneath the guidefingers ...
-
Page 25: Chapter 8 – Through Dovetail Procedures
Procedures In these instructions for using the Leigh Superjig dovetail Jig, we recommend using certain bits and board sizes just because they are easy to work with. When you have cut some practice joints and gained confidence in your ability to get the results you want, feel free to use the bit selection charts on the following page and in Appendix II, to plan whatever dovetail routing you need for your projects. - Page 26 Chapter 8 -12-18-24 User Guide uper THROUGH DOVETAIL PROCEDURES Through Dovetail Bit Selection " " " " " " " T H R O U G H D O V E T A I L B I T C U T T I N G D E P T H All through dovetail bits have 8˚...
- Page 27 -12-18-24 User Guide Chapter 8 uper THROUGH DOVETAIL PROCEDURES 8-5 Clamp the finger support board in the rear clamp. See 8-6 Place the finger assembly on the support brackets in Chapter 1, section 1-12 TD PINS mode, flat on the spacer board, and with the scale set on the ⁄...
- Page 28 Chapter 8 -12-18-24 User Guide UPER THROUGH DOVETAIL PROCEDURES � 8-11 Lock the left-most guidefinger with its center-line about 8-12 Leave three guidefingers over the board. Lock the right- ⁄ "[3mm] in from the left edge of the board to form a half-pin. most guidefinger with its center-line about ⁄...
- Page 29 -12-18-24 User Guide Chapter 8 UPER THROUGH DOVETAIL PROCEDURES 8-17 Place the router on the finger assembly and adjust the router 8-18 Plug in the router and rout out the half-pin and pin sockets. until the dovetail bit tip is level with the center of the pencil line. Use only light side pressure on the guide fingers.
- Page 30 Chapter 8 -12-18-24 User Guide uper THROUGH DOVETAIL PROCEDURES 8-22 How the TD PIN Scales Work The dimensions on the TD Pin scale indicate the major width of the pin to be routed . This matches the size of dovetail bit just ...
- Page 31 -12-18-24 User Guide Chapter 8 uper THROUGH DOVETAIL PROCEDURES 8-27 Remove the test pin board from the jig and test it for fit in 8-28 If it is too tight, move the finger assembly in (away from one of the tail boards. you) by one division on the scale.
- Page 32 8-34 To form angled dovetails, refer to the Technical bulletin (i.e., the side edges of each board are not in line), then either the “How to Rout Angled Through Dovetails on your Leigh Jig”. You ends of the boards are not square, the board widths are not exactly can download a printable file of the bulletin from our website: equal, or there is a concentricity problem (see 7-2 to 7-9).
- Page 33 " [11,1] up to "[21] " - " [6-13] No.70-8 No.140-8 The Leigh e7-Bush or a straight barrel 7/16" OD guide bush diameter up to "[21] up to " [10] No.60-8 are the only guide bushes that can be used with Super Jigs.
- Page 34 Chapter 8 -12-18-24 User Guide uper THROUGH DOVETAIL PROCEDURES Project Settings...
-
Page 35: Chapter 9 – Variably Spaced Half-Blind Dovetail Procedures
SUPERJIG - CHAPTER 9 Variably Spaced Half-Blind Dovetail Procedures IMPORTANT! The most commonly misunderstood aspect of routing half-blind dovetails is how the dovetail bit’s depth of cut is used to adjust the joint fit, and how the angle of the bit affects that depth of cut. Review this chapter for a clear understanding of this concept. - Page 36 Important! Read This About HB Depth of Cut Bit selection is critical. You need to Note: Leigh bits 101-8, 112-8 and 128-8 • Half-blind PINS and TAILS are rout- select a specific dovetail bit for your half- are optional.
- Page 37 A different depth of cut requires a differ- time precision fit. All dovetail jigs require trial and error tests to ent angled bit. Leigh offers five different angled dovetail bits for attain fine fitting joints. The good news; we give a starting depth ...
- Page 38 This will allow easy movement of the guidefingers. edge. The Leigh jig, however, allows for an infinite variety of joint designs, and boards of different thicknesses can be joined to each other as shown in this illustration.
- Page 39 -12-18-24 User Guide Chapter 9 uper VARIABLY SPACED HALF-BLIND DOVETAIL PROCEDURES � � 9-14 Ignoring the extreme outer guidefinger next to the scale 9-15 If the gaps between the guidefinger tails are wider than about (which just supports the router), loosen enough of the adja- ⁄...
- Page 40 Chapter 9 -12-18-24 User Guide uper VARIABLY SPACED HALF-BLIND DOVETAIL PROCEDURES � � 9-21 If you're mounting Thin Pin Boards: 9-20 Clamp a scrap board in the front of the jig so that the Minimum recommended pin board thickness is ⁄...
- Page 41 -12-18-24 User Guide Chapter 9 uper VARIABLY SPACED HALF-BLIND DOVETAIL PROCEDURES � � 9-26 Remove the pin board and test for fit. If the joint is loose, 9-27 Keep the test tail board that fits well, and mark it with the as shown here, you need to increase the bit cutting depth by the number of the bit you used to rout it.
- Page 42 " -up [16] No.112-8 " [13] up to 1"[26] " -up [14] No.120-8 " [11,1] " [11] 9-QR3 On the Leigh Superjig, all half-blind dovetails are routed up to 1"[26] " -up[12] No.128-8 guidebush " [9] using the e7-Bush or a ⁄...
-
Page 43: Chapter 10 – Single Pass Half-Blind Dovetails
Half-Blind Dovetails Why rout “single pass” dovetails on a variably spaced Leigh jig? Well, you just may need to reproduce or restore a late 19th or early 20th century drawer which has similar, machine made joints. Or, if you are making a lot of drawer boxes and are not so concerned with the traditional “hand-cut look”, then routing both drawer fronts and sides... - Page 44 • Depth of cut must be as specified for each of the five Fit the provided Leigh e7-Bush to the router as shown bits shown above. Exception: See fig.11-26. Note: Leigh below and set at No.10, or use a standard ⁄...
- Page 45 A different depth of cut requires a differ- time precision fit. All dovetail jigs require trial and error tests to ent angled bit. Leigh offers five different angled dovetail bits for attain a fine fitting joint. The good news; we give a starting depth a range of cut depths.
- Page 46 Chapter 10 -12-18-24 User Guide uper SINGLE PASS HALF-BLIND DOVETAILS Board Width Chart Add up to ¼" [6mm] or subtract up to 1/8" [3mm] ⁄ [22] ⁄ [156] ⁄ [289] (SJ-18) ⁄ [44] 7 [178] ⁄ [311] 7/8" ⁄ [67] ⁄...
- Page 47 -12-18-24 User Guide Chapter 10 uper SINGLE PASS HALF-BLIND DOVETAILS 10-14 With the scale set on 10-15 Slide across enough guide fingers to cover the drawer ⁄ "[12,7mm], raise the finger assem- bly about ⁄ "[2mm] above the drawer front ...
- Page 48 Chapter 10 -12-18-24 User Guide uper SINGLE PASS HALF-BLIND DOVETAILS �/��[0,�mm] 10-20 Keep the test tail board that fits well, and mark it with 10-21 When you have the proper tightness of fit, check the the number of the bit you used to rout it. For quick set-up next flushness.
- Page 49 -12-18-24 User Guide Chapter 10 uper SINGLE PASS HALF-BLIND DOVETAILS 10-26 Tail Boards "[16mm] and thicker. Use the same procedure to rout “single pass” dovetails with side thicknesses from ⁄ " to 1"[16 to 25mm] except: The stop rod is not used ...
- Page 50 Chapter 10 -12-18-24 User Guide uper SINGLE PASS HALF-BLIND DOVETAILS...
-
Page 51: Chapter 11 – Rabbeted Half-Blind Dovetails
SUPERJIG - CHAPTER 11 Rabbeted Half-Blind Dovetails Before attempting rabbeted half-blind dovetails, first master the techniques of flush half-blind dovetails in Chapter 9, Variably Spaced Half-Blind Dovetails. Note: Rabbeted half-blind dovetails cannot be routed in a single pass – the lip of a drawer front makes it impractical, as each piece would have to be routed separately, in which case it is easier to use the variably spaced method. - Page 52 Chapter 11 -12-18-24 User Guide uper RABBETED HALF-BLIND DOVETAILS � 11-6 The drawer side will now be stepped in from the side stop 11-5 Stick the block to the jig face with double-sided tape, by the width of the rabbet, bringing the sockets in line with making sure it touches the side stop.
-
Page 53: Chapter 12 – Asymmetric Dovetails
SUPERJIG - CHAPTER 12 Asymmetric Dovetails For certain procedures, you will need to use both ends of the Leigh Superjig Jig. Asymmetrical joint layouts are one example. On the Superjig, no joints will be truly symmetrical, but they can look symmetrical. Apparent symmetry is desirable for aesthetic reasons, but is not required for strength. - Page 54 Chapter 12 -12-18-24 User Guide uper ASYMMETRIC DOVETAILS 12-5 Another example of asymmetry is the top corners of a slant- 12-6 At the back of the desk both sides and top are flush, so the front desk. The joints themselves may be symmetrical, but they rear edges are set against the side stops.
- Page 55 -12-18-24 User Guide Chapter 12 uper ASYMMETRIC DOVETAILS � � � 12-11 Note: If, in the slant-front desk example, the pins were in the 12-12 Asymmetric “Single Pass” Dovetails desk top and the tails in the sides, then all the parts would be routed Single pass dovetails become asymmetrical when a board width in the opposite ends of the jig to those shown in the previous steps.
- Page 56 Chapter 12 -12-18-24 User Guide uper ASYMMETRIC DOVETAILS...
-
Page 57: Chapter 13 – Sliding Dovetails
SUPERJIG - CHAPTER 13 Sliding Dovetails With the Finger Assembly in HALF-BLIND DOVETAIL TAILS (HB TAILS) mode, install the cross-cut fence Inches Millimetres Sliding Dovetail slots are cut across the board face. Active Guide Surface HB TAILS KEEP the finger assembly in the same mode Sliding Dovetail tails are cut across the board end edge Inches... - Page 58 Chapter 13 -12-18-24 User Guide uper SLIDING DOVETAILS 13-2 Using the cross cut fence as a guide surface for the guidebush, 13-1 With the finger assembly in the HB TAILS mode, the you can make lateral router cuts across the faces of horizontal cross cut fence fits into the recesses in the ends of the tail guides boards (dovetail slots), and...
- Page 59 -12-18-24 User Guide Chapter 13 uper SLIDING DOVETAILS 13-7 Marking Out: Do not mark the slot positions on the board 13-8 On the test slot board only, square the marks across the faces, Mark the edges of both slot boards together for perfectly level face.
- Page 60 Chapter 13 -12-18-24 User Guide uper SLIDING DOVETAILS 13-13 Check to see if this short slot is centred on the pencil line. 13-14 Now rout sliding dovetail slots in the two main slot boards If not, adjust the finger assembly in or out and re-test on the other with the boards in the horizontal position in the rear clamp, slot lines as necessary until the slot is centred.
- Page 61 -12-18-24 User Guide Chapter 13 uper SLIDING DOVETAILS � � 13-19 Test the joint for fit. The tail should be too big. If it is 13-20 If the tail is too wide move the finger assembly in too small, adjust the finger assembly outward by at least half the ...
- Page 62 Chapter 13 -12-18-24 User Guide uper SLIDING DOVETAILS 13-25 Dovetail slots preferably are routed from left to right because the bit’s clockwise rotation pulls the guidebush against the fence. However; as when routing close to both ends of a board, it may be necessary to rout slots from right to left.
-
Page 63: Chapter 14 – Box Joints
SUPERJIG - CHAPTER 14 Box Joints Actual Joint Sizes The Superjig finger assembly was originally designed solely for dovetailing. Adapting the assembly for box jointing was a serendipitous combination of luck (existing guides approximately the correct dimension) and clever design; the e7-Bush and Spacer. - Page 64 Chapter 14 -12-18-24 User Guide uper BOX JOINTS Choose your Board Width: Choose a joint size from the chart below: 5/ 1 6"[8mm] or 5/8"[16mm]. For Symmetrical joint board widths: Use the red column. For Asymmetrical joint board widths: Use the grey column. The number in the first column (white) for each joint size equals the total number of pins and sockets for the board width in the grey...
- Page 65 -12-18-24 User Guide Chapter 14 uper BOX JOINTS 14-1 Bit and Guidebush selection Only the e7-Bush and 14-2 ⁄ "[8mm] Box Joints. ⁄ " bit that came with S are required for all S Place the finger assembly on the support brackets in the HB TAILS uperjig uperjig box joints.
- Page 66 Chapter 14 -12-18-24 User Guide uper BOX JOINTS 14-7 Lower the finger assembly onto the spacer board and double- 14-8 Rout one end of the scrap board. Rout into each finger check that the bit depth is down to the center of the pencil line ...
- Page 67 -12-18-24 User Guide Chapter 14 uper BOX JOINTS 14-13 All box joint boards are clamped alternating face side in 14-14 Rout both ends of boards 1 and 3 with their edges against and face side out [icon] always with the same side edge against the side stop.
- Page 68 Chapter 14 -12-18-24 User Guide uper BOX JOINTS 14-19 Rout both ends of boards 1 and 3 but only rout between 14-20 Now rout both ends of boards 2 and 4, with the common the guide finger sides not between the finger openings ...
-
Page 69: Chapter 15 – Hints And Tips
SUPERJIG - CHAPTER 15 Hints and Tips Here are some special techniques and ideas to help you get the most out of your Leigh Superjig. � 15-1 Through Dovetail Pins With the straight bit, carefully 15-2 Rout through on the right side until the bit is climb-rout from right to left. - Page 70 (Leigh bits 170 HSS or 170C solid carbide). 15-7 Dovetail Tails Tearout With the dovetail bit, most 15-8 To help prevent this, back up the cut with the end-grain of tearout occurs at the top left exit of the cut.
- Page 71 -12-18-24 User Guide Chapter 15 uper HINTS AND TIPS 15-11 A single scrap piece can be C-clamped on the back of half- 15-12 On face cuts, whether using a straight bit or a dovetail bit, blind tails, but make sure you protect the workpiece from the clamp climb routing or back routing will leave a clean edge;...
- Page 72 Chapter 15 -12-18-24 User Guide uper HINTS AND TIPS...
- Page 73 Guidebush Adaptors The Leigh e-Bush fits directly to some popular routers such as Porter Cable, Black & Decker, and Dewalt. Many other makes, e.g. Bosch, Fein, Festool, Milwaukee etc., offer or come with base adaptors that accept the e-Bush. Leigh offers eight adaptors, plus the Bosch RA1100 and RA1126, allowing the use of over one hundred other router models, new and old.
- Page 74 ATTACHING THE LEIGH e‑Bush TO A ROUTER Template Guide Bushing and Adaptor Selection Leigh dovetail jigs require a router fitted with a guide bushing. An adaptor may be required to fit the bushing to the router. See www.leighjigs.com for the complete list of routers.
- Page 75 SUPERJIG - Appendix II Bit Selection Optional router bits for variably spaced through and half-blind dovetails. Through Dovetails � � � Bit Selection for Through Dovetails the correct depth of cut from the following pages (bits must be 8° for through dovetails). 8°...
- Page 76 G up to 1" [26,0] 1-3/4" [45,0] 2-3/4" [70,0] – e7 or 711C 7/16" [11,1] Joint from Bit No. 75-8 * Bits 80-8, 120-8, and 140-8 come standard with Leigh Super Jigs Numbers in brackets are millimeters **Maximum pin board thickness = ⁄ "...
- Page 77 No. 140-8* 5/16" [7,9] G up to 1" [26,0] 1-3/4" [45,0] 2-3/4" [70,0] – e7 or 711C 7/16" [11,1] Joint from Bit No. 50 * Bits 80-8, 120-8, and 140-8 come standard with Leigh Super Jigs Numbers in brackets are millimeters...
- Page 78 Appendix ii -12-18-24 User Guide uper BIT SELECTION Half-Blind Dovetails � � � dovetails, not the maximum depth. must Bit Selection for Half-Blind Dovetails not be varied, except for minor adjustments for Both parts of a half-blind dovetail are cut with the same joint fit.
- Page 79 No. 112-8 1/2" [12,7] ~1/2" [13,0] ~3/8" [9,5] 1-3/4" [44,0] 2-21/64" [59] 12° e7 or 711C 7/16" [11,1] * Bits 80-8, 120-8, and 140-8 come standard with Leigh Super Jigs Numbers in brackets are millimeters Joint from Bit No. ���, ���-8...
- Page 80 HB 1-Pass No. 128-8 1/2" [12,7] ~3/8" [9,5] 7/32"[5,5] 1-3/4" [45,0] 2-1/8" [54,0] 18° e7 or 711C 7/16" [11,1] * Bits 80-8, 120-8, and 140-8 come standard with Leigh Super Jigs Numbers in brackets are millimeters Joint from Bit No. ��8...
- Page 81 SUPERJIG - Appendix III Jig Parts See parts list and drawing on the following pages. When ordering parts, please quote the jig model, serial number, part number, part description and quantity required. Pay particular attention to the scale measurement, and let us know if yours is inch or metric.
- Page 82 JIG PARTS LIST How to Order Parts Order directly from Leigh by calling toll free 800-663-8932, or if you’re outside North America contact your national distributor. Have your jig information ready — You’ll need the jig model, serial number, Note: Place the finger assembly in half-blind mode part number, part description and quantity required.
- Page 83 -12-18-24 User Guide Appendix III uper JIG PARTS LIST 7225R 7225R 7200 7215 7220 7215 7210 7220 (Threaded Nut) 7210 (Threaded Nut) 7230 8312/ 8318/ 8324 7230M 8050 7125 7120 7115 7235 7235M 7250 8412/ 8418/ 8424 7255 8060 8005 8170 7100 8180...
- Page 84 Appendix III -12-18-24 User Guide uper JIG PARTS LIST...
-
Page 85: Customer Support
Our Commitment to You Leigh Industries takes pride in its commitment to providing excellence in customer service and support. This user guide is designed to provide you with the answers to any questions you have. However, if you require assistance, please feel free to contact our technical support staff or a distributor listed below. - Page 86 Leigh Router Joinery Jigs Joining Tradition with Today Printed in Canada...
Need help?
Do you have a question about the Super12 and is the answer not in the manual?
Questions and answers