Table of Contents
Advertisement
Quick Links
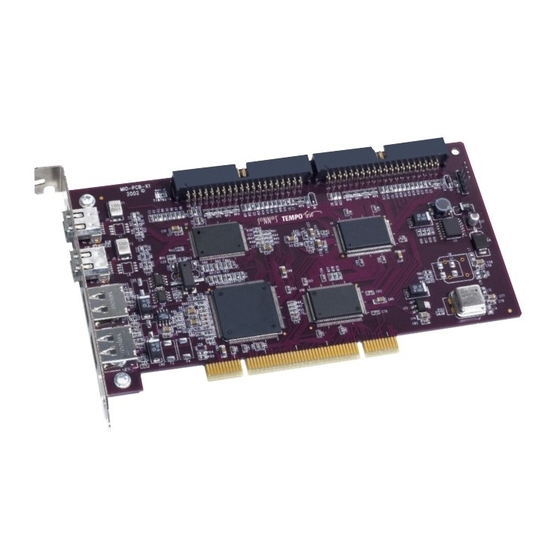
PCI Adapter Combo Card with ATA/133, FireWire
Quick Start Guide for Tempo Trio
You Should Have
The following items should be included in your product package:
• One Tempo Trio PCI Combo Card for Windows PCs
• One Ultra ATA Cable (supporting two internal hard drives)
• Eight screws (for mounting hard drives)
• One Tempo Trio Windows Drivers diskette
The following items may be required for installation:
• Medium Phillips screwdriver
• Small flat blade screwdriver
• Needle nose pliers
• Drive mounting brackets/carriers or drive mounting sleds
(sold separately)
• One additional Ultra ATA Cable (sold separately)
• One or more power cable Y-adapters (sold separately)
You may need the following items to connect peripherals to the Tempo Trio:
• One or more FireWire (IEEE 1394) cables (sold separately)
• One or more USB cables (sold separately)
• One or more USB hubs (sold separately)
Hardware and Operating System Requirements
The Tempo Trio requires the following in order to operate in your system:
• One available PCI 2.1 slot
• Pentium II (or equivalent) or higher
• Windows 98SE, Windows Me, Windows 2000, or Windows XP
• One or more available drive bays (depending on configuration)
.
Support Note:
We recommend that you make a backup of important
information on your system's current hard drive(s) prior to installing new
hardware or software.
When handling computer products, you must take care to prevent components
from being damaged by static electricity. Before opening your computer or
removing parts from their packages, always ground yourself first by touching an
unpainted metal part of the computer, such as a port access cover, and work in
an area free of static electricity; avoid carpeted areas. Handle all electrical com-
ponents only by their edges, and avoid touching connector traces and compo-
nent pins.
Remember to register your product online at http://registration.sonnettech.com to be informed of future upgrades and product releases.
Software updates and links are available from the Sonnet web site at www.sonnettech.com. • Online support form available at http://supportform.sonnettech.com.
Sonnet Technologies Customer Service hours are Mon.-Fri., 7 a.m.–5 p.m. Pacific Time • Customer Service Phone: 1-949-472-2772 • E-mail: support@sonnettech.com
Sonnet Technologies, Inc., 15 Whatney, Irvine, California 92618-2808 USA • Tel: 1-949-587-3500 Fax: 1-949-457-6350
©2002 Sonnet Technologies, Inc. All rights reserved. Sonnet, the Sonnet logotype, Simply Fast, the Simply Fast logotype, and Tempo are trademarks of Sonnet Technologies, Inc.Tempo Trio includes technology by FirmTek, LLC.
Other product names are trademarks of their respective owners. All specifications subject to change without notice. Printed in the USA. QS-FWU2-W-E-112102
For Windows
®
PCs
®
, and USB 2.0
Advertisement
Table of Contents

Related Manuals for Sonnet TEMPO Trio


Summary of Contents for Sonnet TEMPO Trio
- Page 1 Sonnet Technologies, Inc., 15 Whatney, Irvine, California 92618-2808 USA • Tel: 1-949-587-3500 Fax: 1-949-457-6350 ©2002 Sonnet Technologies, Inc. All rights reserved. Sonnet, the Sonnet logotype, Simply Fast, the Simply Fast logotype, and Tempo are trademarks of Sonnet Technologies, Inc.Tempo Trio includes technology by FirmTek, LLC.
-
Page 2: Installation Preparation
Quick Start Guide for Tempo Trio (Windows Version) Installation Preparation Prior to installing the Tempo Trio into your system, you should read the section Tempo Trio in your computer’s user manual that addresses PCI card installation. START HERE! USB 2.0 Driver Installation—All Windows Versions PCI slots This section describes the installation of USB 2.0 drivers to enable USB 2.0 device... -
Page 3: Windows 98Se Driver Installation
Depending on your system’s configuration before you install the Tempo Trio (for example, you’ve previously installed a USB card), some of the drivers required to support the Tempo Trio card may have already been installed. If this is the case, you may not need to perform some of the steps listed. - Page 4 25. When the next window appears, select “Search for best driver for your device (Recommended),” and then click Next. 26. Insert the Tempo Trio Windows Drivers diskette into your floppy drive, select “Specify a location,” then type A:\WIN9X-ME, and then click Next.
-
Page 5: Windows Me Driver Installation
Tempo Trio (for example, you’ve previously installed a USB card), some of the drivers required to support the Tempo Trio card may have already been installed. If this is the case, you may not need to perform some of the steps listed. -
Page 6: Windows 2000 Driver Installation
Tempo Trio (for example, you’ve previously installed a USB card), some of the drivers required to support the Tempo Trio card may have already been installed. If this is the case, you may not need to perform some of the steps listed. -
Page 7: Windows Xp Driver Installation
Tempo Trio (for example, you’ve previously installed a USB card), some of the drivers required to support the Tempo Trio card may have already been installed. If this is the case, you may not need to perform some of the steps listed. -
Page 8: Drive Jumper Settings
Tempo Trio Hard Drive Installation Preparation: Prior to installing the Tempo Trio and hard drives into your system, you should familiarize yourself with the parts to be installed. We also strongly recommend that you read the sections in your computer’s user manual that address hard drive and PCI card installation. - Page 9 (or master*) single (or master*) 8. Route the Ultra ATA cable to the Tempo Trio card; avoid heat sinks and make *jumpers must be set to master setting when two drives connected to one cable sure the cable(s) will not get crushed or pinched by any part of the case Figure 6 when you reassemble your computer.
- Page 10 WARNING: Until they have been formatted, hard drives attached to the Tempo Trio will not appear under My Computer, and can’t be used; this also applies to drives with data on them, previously used in other computers. Please be aware that formatting a drive erases any data present.
- Page 11 Quick Start Guide for Tempo Trio (Windows Version) Drive Formatting—Windows 98SE and Windows Me (continued) 16. When the Format window appears, select “Full” under Format Type, and then click Start (Figure 9). 17. When the warning window appears, click OK.
- Page 12 WARNING: Until they have been formatted, hard drives attached to the Tempo Trio will not appear under My Computer, and can’t be used; this also applies to drives with data on them, previously used in other computers. Please be aware that formatting a drive erases any data present.
- Page 13 WARNING: By default, NTFS will be selected as the file system to use when you format drives. Unless you need to move the Tempo Trio and hard drive(s) to another computer running Windows 98SE or Windows Me, you should use the default (NTFS) file system choice. Windows 98SE and Windows Me are incapable of using NTFS-formatted drives;...
- Page 14 WARNING: Until they have been formatted, hard drives attached to the Tempo Trio will not appear under My Computer, and can’t be used; this also applies to drives with data on them, previously used in other computers. Please be aware that formatting a drive erases any data present.
- Page 15 WARNING: By default, NTFS will be selected as the file system to use when you format drives. Unless you need to move the Tempo Trio and hard drive(s) to another computer running Windows 98SE or Windows Me, you should use the default (NTFS) file system choice. Windows 98SE and Windows Me are incapable of using NTFS-formatted drives;...
- Page 16 • When a USB 2.0 peripheral is connected to a USB 1.1 peripheral, which is in turn connected directly to the Tempo Trio, the USB 2.0 peripheral will operate at USB 1.1 speeds. Connect USB 2.0 and USB 1.1 devices separately to the Tempo Trio’s two USB ports.
Need help?
Do you have a question about the TEMPO Trio and is the answer not in the manual?
Questions and answers