Table of Contents
Advertisement
Quick Links
Advertisement
Table of Contents

Related Manuals for Apogee One


Summary of Contents for Apogee One
- Page 1 User’s Guide September 2011...
-
Page 2: Table Of Contents
Do I need the Maestro Mixer? Install Apogee Software Maestro Mixer - Controls Connect the USB cable Maestro Mixer - Audio software settings Choose ONE for Mac Sound I/O Maestro Mixer - Maestro settings Connect Headphones or Speakers Maestro Menus Open iTunes and Play... -
Page 3: Package Contents
The following items should be included in the ONE package: Breakout Cable USB Cable QuickStart Guide Software CD ONE by APOGEE – User’s Guide... -
Page 4: Introducing One
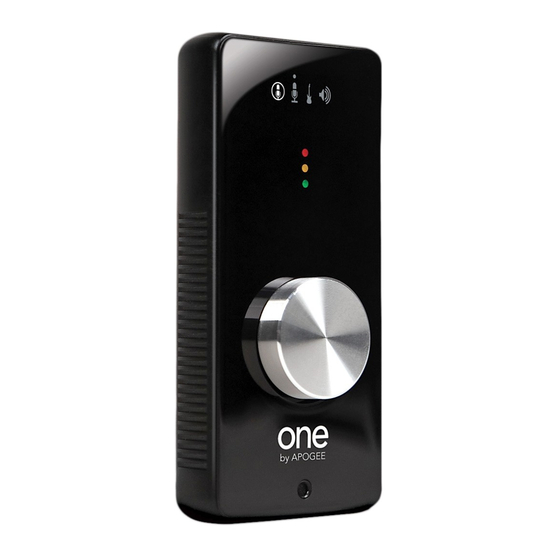
Breakout Cable Port USB Port Apple’s GarageBand, ONE empowers you to create professional recordings anywhere. With ONE, you can record a single channel of audio 48V Indicator using a specially tuned internal microphone, an Encoder Function instrument input for guitar, bass or keyboard, or a Indicators world-class microphone pre amp input. -
Page 5: Quick Start
Quick Start This Quick Start section describes how to set up ONE with your Apple As ONE is powered through the USB Macintosh computer, connect speakers or headphones to play back connection, the LED will light, music and podcasts with iTunes, and connect mics and instruments indicating that ONE is now powered on. -
Page 6: Open Itunes And Play
If another Encoder Funtion LED is lit, click the encoder once until the In the Maestro Control window, select one of the following options LED is lit, then turn the encoder. from the Input menu: Int Mic - to use ONE’s internal mic... -
Page 7: Open And Set Up Garageband '09
Real Instrument. At the in GarageBand’s meters. See bottom of the window, select Mono 1 the ONE User’s Guide for a more (ONE) in the Input Source menu and detailed description of setting select On in the Monitor menu. -
Page 8: Connecting One
USB hub. • lt’s recommended to install Apogee software as described on page 3. If Apogee software isn’t installed, it’s possible to set most parameters in OSX’s Audio MIDI Setup, as described on page ONE by APOGEE – User’s Guide... -
Page 9: Connecting Headphones
• Connect powered monitors to ONE’s front panel jack using your headphones include a 1/8” to 1/4” adaptor, remove it before an adaptor cable with an 1/8” stereo plug to connect to ONE and making the connection. two suitable plugs for connection to your speakers. -
Page 10: Connecting A Home Stereo
• Connect ONE’s breakout cable to the rear panel connector, adaptor cable with an 1/8” stereo plug to connect to ONE and and connect the microphone to the ONE breakout cable’s two RCA plugs to connect to the stereo component’s CD or Aux (XLR) input. -
Page 11: Connecting An Instrument
Connecting an Instrument Connecting a Line output (CD, Mixing console) As a general rule, it’s recommended to connect balanced sources • Connect a guitar, bass or keyboard to the ONE breakout cable’s to ONE’s (XLR) input and unbalanced sources to ONE’s (1/4”) -
Page 12: Hardware And Software Controls
Hardware and Software Controls ONE is designed to be simple to use but controllable with a variety Setting the Input Gain of hardware and software controls, described in this section. Though To set the gain (i.e the recording level) of ONE’s active input, click... -
Page 13: Os X Audio Midi Setup
Select Inst to use an instrument connected to the input. 3 To set ONE’s input gain, use the Volume slider under Audio ONE operates at a sample rate of 44.1kHz or 48kHz . In most cases Input. the sample rate is set by the audio application with which ONE is 4 Select an output operating characteristic in the Audio Output streaming audio. -
Page 14: Os X System Preferences - Sound
OS X System Preferences - Sound The OS X System Preferences Sound window provides settings to choose ONE for Mac sound input and output and control ONE’s input/output parameters. If you didn’t choose ONE for Mac sound I/O in step 3 of the Quickstart guide, you may do so in this window. -
Page 15: Apogee Control Panel (Logic Pro 8, Garageband)
Apogee Control Panel (Logic Pro 8, GarageBand) The Apogee Control Panel, found in Apple’s Logic Pro 8 and GarageBand software, provides control of ONE settings. Maestro Control ONE by APOGEE – User’s Guide... -
Page 16: Apogee Maestro
Apogee Maestro Apogee Maestro software provides the most complete control of ONE, including control of all parameters, store/recall of configurations and low-latency mixing. To open Maestro, choose Applications > Apogee Maestro. Maestro consists of two windows, Maestro Control and Maestro Mixer, described below. -
Page 17: Maestro Control - Continued
2 Select Amp when ONE's output is connected to an instrument amplifier. ONE's output level is fixed (i.e. hardware and software output level controls won't change the output level) and reduced to a level better suited for instrument amplifier inputs. -
Page 18: Maestro Mixer - Overview
As anyone who has spoken on a phone call with echo knows, relatively short delays can confuse the timing of any conversation, spoken or musical. Figure A ONE by APOGEE – User’s Guide... -
Page 19: Do I Need The Maestro Mixer
The Maestro mixer serves to provide a low latency listening mix By routing the hardware input directly to the hardware output and while recording. Therefore if you’re using ONE to listen to iTunes or mixing in playback as shown in Figure B, it’s possible to create a audio from another program, there’s no need to use the mixer. -
Page 20: Maestro Mixer - Controls
The following Maestro Mixer controls are used to create a listening mix while recording with ONE. Input 1 - This fader adjusts the level of ONE's hardware input in the listening mix. The input is routed to the center of the output stereo field. -
Page 21: Maestro Mixer - Audio Software Settings
From Software and Input faders to establish a balance between the input and playback signals. If you’ve found a good balance but the To Hardware’s Over LEDs light, reduce the Input and From Software faders equally. ONE by APOGEE – User’s Guide... -
Page 22: Maestro Menus
Enable Pop-ups - Check this box to enable Pop-ups, icons that appear on the Mac display when the ONE hardware encoder is rotated to indicate the encoder’s current function and relative level. Two example Pop-ups are shown below. -
Page 23: Maestro Menus - Continued
Mixer window; choose Reset All to reset all mixers. Reset Routing - Choose this menu item to reset routing on supported interfaces to default. ONE’s routing is not assignable, thus this menu item is greyed out when only ONE is connected. ONE by APOGEE – User’s Guide... -
Page 24: Apogee Maestro 2
Devices sidebar, regardless of whether the connection is made via Symphony PCI card, USB or FireWire. Hardware settings are displayed by first selecting one or more interfaces in the Devices sidebar and then clicking on a tab. -
Page 25: Input Tab Window, Output Tab Window
2. Speaker Out Selection - This menu selects the software output that is sent to ONE’s output. 3. Speaker Out Level - This knob controls the output level. Mute - Engage this to mute ONE’s output. ONE by APOGEE – User’s Guide... -
Page 26: Device Settings Window, Mixer Tab Window
6. Software Return Fader - This stereo input channel provides level control, metering, and mute/solo functions for the signal from the software application containing playback. Mixer Master - This is the level control and meter for the mixer’s output. ONE by APOGEE – User’s Guide... -
Page 27: System Setup Window, Menu Bar Menus
Maestro when the Mac is started. Check Display Pop-ups to show top panel encoder adjustments. Hide Apogee Maestro 2 - Choose this menu item to hide the Maestro application. Hide Others - Choose this menu item to hide all other open applications. -
Page 28: Menu Bar Menus
Close - Choose this menu item to close the Preferences panel when opened. Rescan - Choose this menu item to re-initialize the link between Maestro software and Apogee hardware connected to the Mac, in the case where the hardware is correctly connected and powered on but not detected in Maestro. -
Page 29: Low Latency Mixing
As anyone who has spoken on a phone call with echo knows, relatively short delays can confuse the timing of any conversation, spoken or musical. ONE by APOGEE – User’s Guide... -
Page 30: Maestro Mixer Settings
Apogee Maestro 2 Maestro Mixer Settings Initially, set the Input, Software Return, and Mixer Master faders to 0 dB. On the Output tab of Maestro, set the output to Mixer. ONE by APOGEE – User’s Guide... -
Page 31: Maestro Mixer Settings
Return and Mixer Master’s meters. Use the Software Return and Input faders to establish your desired balance between the input and playback signals. If you’ve found a good balance but the Mixer Master’s Over LEDs light, reduce the Mixer Master fader. ONE by APOGEE – User’s Guide... -
Page 32: Working With One
In this section you’ll find answers to questions that might arise while using ONE as part of a Mac-based recording system. The I/O Buffer setting found in most audio software is one of the most crucial, but often ignored, settings in a Mac-based recording How do I set a recording level? system. -
Page 33: What Sample Rate Should I Record At
If you find yourself rarely turning the output past a very low output level (say, -35 dB), decrease the input sensitivity on the speaker. If, on the other hand, you find yourself setting ONE for full output and the speakers aren’t loud enough, increase the input sensitivity. - Page 34 Neumann U87 or AKG to record quickly and easily - to preserve an inspiration, capture an 414. If you’re connecting a condenser mic to ONE, be sure to select ambience or record a conversation. Once you’ve selected Int Mic as Ext 48V Mic in the Maestro Control Input menu.
-
Page 35: Configuring Core Audio Applications
Under the Logic Pro menu, choose Preferences. Preferences > Audio. Click Device, then click Core Audio. Click Recording. Select ONE in both the Input and Monitor menus. Close the Preferences window In the Core Audio pane, select ONE after making settings. -
Page 36: Final Cut Pro
GarageBand ‘08 (or previous) Choose Final Cut Pro > Audio/ Video Settings. Click on the A/V Devices tab. Select ONE in the Audio menu. Click on the A/V Devices tab. Click OK. Select ONE in the Audio menu. Click OK. -
Page 37: Mainstage
Live Choose Live > Preferences Choose MainStage > Preferences Click Audio/Midi Click on the Audio tab. Select ONE in the Audio Output and Select CoreAudio in the Driver Type Audio Input menus menu. Set I/O Buffer Size to 128 Select ONE in both the Audio Input... -
Page 38: Motu Digital Performer
In the Configure Hardware Driver window, select CoreAudio in the topmost menu. In the Devices window, click on VST Select One in the device list. Audio System. Set Buffer Size to 128. Select ONE in the ASIO Driver Set Host Buffer Multiplier to 1. -
Page 39: Troubleshooting
• Press ONE’s top panel encoder until the icon LED is lit, and turn • When the encoder is set to an input, the top panel meter displays the encoder clockwise. - Page 40 Registration and Warranty Information Please register this unit online at: Be sure to register your ONE, either by filling in the enclosed Registration Card or by completing the on-line registration form at our Web site: http://www.apogeedigital.com/support/. If you do http://www.apogeedigital.com/register/ so, Apogee can contact you with any update information.
- Page 41 If this equipment does cause harmful interference to radio or television reception, which can be determined by turning the equipment off and on, the user is encouraged to try to correct the interference by one or more of the following measures: 1.
- Page 42 For FAQs and more ONE support information, please visit the Apogee Website: http://www.apogeedigital.com/onesupport Apogee Electronics Corporation 1715 Berkeley St. Santa Monica, CA 90404 U.S.A. 00+1 310-584-9394 email: support@apogeedigital.com ONE by APOGEE – User’s Guide...
Need help?
Do you have a question about the One and is the answer not in the manual?
Questions and answers