Table of Contents
Advertisement
Quick Links
Oxygen Analyzer
OPERATING INSTRUCTIONS FOR
M M M M O O O O D D D D E E E E L L L L B B B B D D D D S S S S
Oxygen Analyzer
Tox ic g a se s a nd o r fla mma ble liq uids ma y be pr es e nt in this mon itor ing s y stem.
Personal protective equipment may be required when servicing this instrument.
Hazardous voltages exist on certain components internally which may persist
for a time even after the power is turned off and disconnected.
Only authorized personnel should conduct maintenance and/or servicing.
Teledyne Analytical Instruments
3 3 3 3 0 0 0 0 0 0 0 0 0 0 0 0
DANGER
P/N M71903
11/30/01
ECO # 01-
i
Advertisement
Table of Contents
Troubleshooting

Related Manuals for Teledyne BDS 3000


Summary of Contents for Teledyne BDS 3000
- Page 1 Personal protective equipment may be required when servicing this instrument. Hazardous voltages exist on certain components internally which may persist for a time even after the power is turned off and disconnected. Only authorized personnel should conduct maintenance and/or servicing. Teledyne Analytical Instruments...
- Page 2 BDS 3000 Before conducting any maintenance or servicing, consult with authorized supervisor/manager. Teledyne Analytical Instruments...
- Page 3 Any safeguards required such as locks, labels, or redundancy, must be provided by the user or specifically requested of Teledyne at the time the order is placed.
- Page 4 Instrument configured for Vacuum Service BDS 3000-V: The 19" Relay Rack Mount units are 19" Rack Mnt: available with one BDS 3000 series analyzers installed in a standard 19" panel and ready to mount in a standard rack. Teledyne Analytical Instruments...
-
Page 5: Safety Messages
NOTE: Additional information and comments regarding a specific component or procedure are highlighted in the form of a note. CAUTION: THE ANALYZER SHOULD ONLY BE USED FOR THE PURPOSE AND IN THE MANNER DESCRIBED IN THIS MANUAL. Teledyne Analytical Instruments... - Page 6 Manuals do get lost. Additional manuals can be obtained from Teledyne at the address given in the Appendix. Some of our manuals are available in electronic form via the internet. Please visit our website at: www.teledyne-ai.com.
-
Page 7: Table Of Contents
2.2.5 Recovery from High Level Oxygen Exposure 2.2.6 Background gas compatibility 2.2.7 Stability 2.2.8 Maintenance 2.3 Sample System 2.4 Electronics and Signal Processing Installation ................... 19 3.1 Unpacking the Analyzer 3.2 Mounting the Analyzer 3.3 Rear Panel Connections Teledyne Analytical Instruments... - Page 8 BDS 3000 3.3.1 Gas Connections 3.3.2 Electrical Connections 3.3.2.1 Primary Input Power 3.3.2.2 50-Pin Equipment Interface Connector 3.4 Electrolyte Refill of BDS Sensor 3.5 Testing the System 3.6 Sensor Protection Mode Operation ..................33 4.1 Introduction 4.2 Using Data Entry and Function Buttons 4.3 The System Function...
- Page 9 5.4 System Self Diagnostic Test 5.5 Major Internal Components 5.6 Cleaning 5.7 Troubleshooting Appendix ..................73 Specifications A-2 Recommended 2-Year Spare Parts List A-3 Drawing List A-4 19-inch Relay Rack Panel Mount A-5 Application notes A-6 Material Safety Data Sheet Teledyne Analytical Instruments...
-
Page 10: List Of Figures
Figure 2-7: Electronic Component Location ........16 Figure 2-8: BDS 3000 Electronics Block Diagram......17 Figure 3-1: Model BDS 3000 Front Panel ........20 Figure 3-2: Required Front Door Clearance ......... 20 Figure 3-3: Rear Panel of the Model Ultra Trace 3000....21 Figure 3-4: Equipment Interface Connector Pin Arrangement .. - Page 11 Figure 5-2: Removing Fuse Block from Housing ......67 Figure 5-3: Installing Fuses ............67 Figure 5-4: Rear Panel Screws ............. 69 Figure 5-5: Vacuum Degassing for the BDS Oxygen Sensor..71 Figure A-1: Single 19" Rack Mount (dimensions in mm) ....76 Teledyne Analytical Instruments...
- Page 12 BDS 3000 List of Tables Table 3-1: Analog Output Connections ......... 24 Table 3-2: Alarm Relay Contact Pins ..........25 Table 3-3: Remote Calibration Connections ......... 26 Table 3-4: Range ID Relay Connections........27 Table 4-1: Characters Available for Password Definition: .... 42 Table 4-2: Linear Output for a 0-100 ppm O2 Range....
- Page 13 Since the use of this instrument is beyond the control of Teledyne, no responsibility by Teledyne, its affiliates, and agents for damage or injury from misuse or neglect of this equipment is implied or assumed.
-
Page 15: Introduction
Oxygen Analyzer is a versatile microprocessor-based instrument for detecting oxygen at the parts-per-billion (ppb) level in a variety of gases. This manual covers the Model BDS 3000 General Purpose flush-panel and/or rack-mount units only. These units are for indoor use in a non- hazardous environment. -
Page 16: Front Panel (Operator Interface)
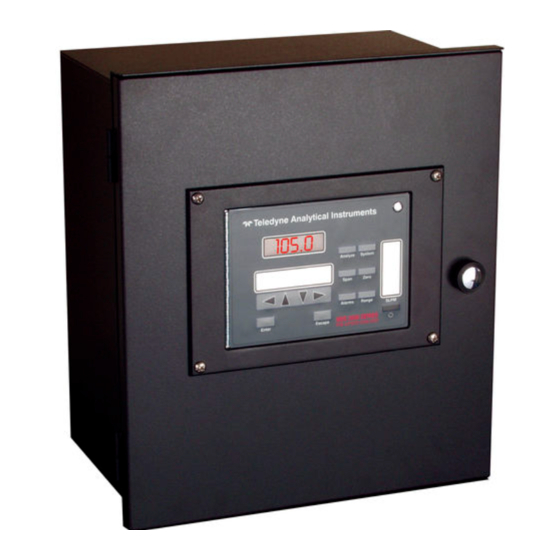
Front Panel (Operator Interface) The standard BDS 3000 is housed in a rugged metal case with all controls and displays accessible from the front panel. See Figure 1-1. The front panel has thirteen buttons for operating the analyzer, a digital meter, an alphanumeric display, and a window for viewing the sample flowmeter. -
Page 17: Figure 1-1: Bds-3000 Front Panel
Data Entry Keys: Six touch-sensitive membrane switches are used to input data to the instrument via the alphanumeric VFD display: • Left & Right Arrows Select between functions currently displayed on the VFD screen. Teledyne Analytical Instruments... - Page 18 Introduction BDS 3000 • Up & Down Arrows Increment or decrement values of functions currently displayed. • Moves VFD display on to the next Enter screen in a series. If none remains, returns to the Analyze screen. • Escape Moves VFD display back to the previous screen in a series.
-
Page 19: Rear Panel (Equipment Interface)
Some of those depicted are optional and may not appear on your instrument. The connectors are described briefly here and in detail in Chapter 3 Installation. Figure 1-2: Model BDS 3000 Rear Panel • Universal AC power source. - Page 20 Note: If you require highly accurate Auto-Cal timing, use external Auto-Cal control where possible. The internal clock in the Model BDS 3000 is accurate to 2-3 %. Accordingly, internally scheduled calibrations can vary 2-3 % per day. Teledyne Analytical Instruments...
-
Page 21: Operational Theory
BDS Sensor 2.2.1 Principles of Operation The BDS oxygen sensor technology developed at Teledyne Analytical Instruments is a result of TAI’s heavy investment on R&D and expertise established during the half-century’s manufacturing of electrochemical oxygen sensor. - Page 22 Operational Theory BDS 3000 the potentiostat constitute a feedback-control loop. The potentiostat technology has been well accepted in the field of electrochemistry, and proven effective in eliminating polarization of the reference electrode and automatic compensating electric resistance in the cell.
-
Page 23: Figure 2.1: Cross Section Of The Bds Oxygen Sensor
2nd working electrode. At the Counter Electrode, OH is oxidized back to oxygen. While the 2nd working electrode allows OH to move through, it prevents the dissolved oxygen from the top portion of the sensor to reach Teledyne Analytical Instruments... -
Page 24: Gas Flow Rate
2nd working electrode. NOTE: BDS technology and sensor is a patent pending technology of Teledyne Analytical Instruments in the United State of America as well as many foreign countries. To learn more about BDS technology, please visit TAI’s web page at http://www.Teledyne-AI.com... -
Page 25: Gas Pressure
Figure 2.4 is a typical purge-down curve for a new BDS sensor which had been air saturated. It is normal to take several hours, even days for an air saturated BDS to purge down to a low ppb level. Teledyne Analytical Instruments... -
Page 26: Background Gas Compatibility
Operational Theory BDS 3000 Figure 2.4 Typical Purge-down Curve After Air Saturation S h or t e n i ng t h e ai r exp o s u r e wi l l al l o w a f a s t e r se ns o r r ec o v e r y. -
Page 27: Stability
It is a good practice to check the electrolyte level every month and add de-ionized water into the sensor whenever it is convenient. When running dry gas through the sensor, the gas carries out moisture from the sensor. Therefore, the electrolyte (10% KOH in Teledyne Analytical Instruments... -
Page 28: Sample System
Depending on the mode of operation either sample or calibration gas is delivered. The Model BDS 3000 sample system is designed and fabricated to ensure that the oxygen concentration of the gas is not altered as it travels through the sample system. -
Page 29: Electronics And Signal Processing
Operational Theory Electronics and Signal Processing T he Model BDS 3000 Oxygen Analyzer uses an 8031 m icrocontr ol l er wi th 32 kB of RAM and 128 kB of ROM to cont rol all signal processi ng, i nput / output, and di splay functi ons f or the analyzer . -
Page 30: Figure 2-7: Electronic Component Location
Operational Theory BDS 3000 Figure 2-7: Electronic Component Location Teledyne Analytical Instruments... -
Page 31: Figure 2-8: Bds 3000 Electronics Block Diagram
Oxygen Analyzer Operational Theory Figure 2-8: BDS 3000 Electronics Block Diagram Teledyne Analytical Instruments... - Page 32 Operational Theory BDS 3000 Teledyne Analytical Instruments...
-
Page 33: Unpacking The Analyzer
T he standard model is designed for f l ush panel m ounti ng. F igur e 3-1 i s an i l lust r at ion of the BDS 3000 st andard fr ont panel and mount ing bezel . There ar e four mount ing hol es—one in each corner of t he ri gi d f rame. -
Page 34: Figure 3-1: Model Bds 3000 Front Panel
Installation BDS 3000 Figure 3-1: Model BDS 3000 Front Panel All operator controls are mounted on the control panel, which is hinged on the left edge and doubles as the door that provides access to the sensor and cell block inside the instrument. The door is spring... -
Page 35: Rear Panel Connections
Oxygen Analyzer Installation Rear Panel Connections Figure 3-3 shows the Model BDS 3000 rear panel. There are ports for gas inlet and outlet, power, communication, and both digital and analog concentration output. Figure 3-3: Rear Panel of the Model Ultra Trace 3000 3.3.1... -
Page 36: Electrical Connections
Installation BDS 3000 The inlet gas pressure should be regulated to pressures between 11 to 16 psig to maintain a flow between 0.5 to 1.0 SLPM. If pressure is too low, the flow will drop below 0.5 SLPM at which the output of the sensor is sensitive (see section 2.2.2). -
Page 37: 50-Pin Equipment Interface Connector
20 mA at full scale ppm. (Full scale = 100% of programmable range.) 4–20 mA dc Range ID: 8 mA = Low Range, 12 mA = Medium Range, 16 mA = High Range, 20 mA = 100ppm. Teledyne Analytical Instruments... -
Page 38: Table 3-1: Analog Output Connections
Installation BDS 3000 Table 3-1: Analog Output Connections Function + Range ID, 4-20 mA, floating – Range ID, 4-20 mA, floating + % Range, 4-20 mA, floating – % Range, 4-20 mA, floating + Range ID, 0-1 V dc – Range ID, 0-1 V dc, negative ground + % Range, 0-1 V dc –... -
Page 39: Table 3-2: Alarm Relay Contact Pins
Zero mode to ter minate when done. A synchronous signal must open and close the external zero val ve appropriately. See Remote P robe Connect or. (T he –C opt ion internal valves oper ate automati cally) . Teledyne Analytical Instruments... -
Page 40: Table 3-3: Remote Calibration Connections
Cal Contact Cal Contact Remote Calibration Protocol: To properly time the Digital Remote Cal Inputs to the Model BDS 3000 Analyzer, the customer's controller must monitor the Cal Relay Contact. When the contact is OPEN, the analyzer is analyzing, the Remote Cal Inputs are being polled, and a zero or span command can be sent. -
Page 41: Table 3-4: Range Id Relay Connections
Range 4 ID Contact (Air Cal) Network I/O: A serial digital input/output for local network protocol. At this printing, this port is not yet functional. It is to be used for future options to the instrument. Pins 13 (+) and 29 (–). Teledyne Analytical Instruments... -
Page 42: Electrolyte Refill Of Bds Sensor
Installation BDS 3000 Remote Valve Connections: The Ultra Trace 3000 is a single-chassis instrument, which has no Remote Valve Unit. Instead, the Remote Valve connections are used as a method for directly controlling external sample/zero/span gas valves. See Figure 3-5. -
Page 43: Figure 3-6: Fet Series Resistance
5. Ref. to Figure 3.7 for the method of adding electrolyte to the sensor. It is important that as the sensor is being filled with the electrolyte, filling is accomplished without trapping gas bubbles in the lower part of the sensor. Figure 3.7: Adding Electrolyte to the BDS Sensor Teledyne Analytical Instruments... -
Page 44: Testing The System
Installation BDS 3000 Squirt electrolyte content into the sensor. Do it slowly until the bottom parts of the sensor are fully immersed in the electrolyte. 4. Pour the rest of the electrolyte into the sensor. Gas bubbles in the top portion of the sensor would not affect the sensor performance. - Page 45 For operations frequently encountering oxygen levels above 100 ppm, TAI’s Micro-Fuel-Cell type of oxygen sensor is recommended. The maximum working range with a background of nitrogen gas is 100 ppm. The maximum working range is different for other gas backgrounds. See Section 4.3.9. Teledyne Analytical Instruments...
- Page 46 Installation BDS 3000 Teledyne Analytical Instruments...
-
Page 47: Operation
Set alarm setpoints, and modes of alarm operation (latching, failsafe, etc). Before you configure your BDS 3000, these default values are in effect: LO = 100ppb ppm, MED = 1000 Ranges: ppb, HI = 10 ppm. -
Page 48: Using Data Entry And Function Buttons
Operation BDS 3000 Using Data Entry and Function Buttons Data Entry Buttons: The _ _ arrow buttons select options from the menu currently being displayed on the VFD screen. The selected option blinks. When the selected option includes a modifiable item, the __ arrow buttons can be used to increment or decrement that modifiable item. - Page 49 Oxygen Analyzer Operation Figure 4-1: Hierarchy of Functions and Subfunctions Teledyne Analytical Instruments...
-
Page 50: The System Function
Operation BDS 3000 Any function can be selected at any time by pressing the appropriate button (unless password restrictions apply). The order as presented in this manual is appropriate for an initial setup. Each of these functions is described in greater detail in the following procedures. -
Page 51: Tracking Oxygen During Cal And Alarm Delay
System key once and the first System menu will appear in the VFD display: TRAK/HLD Auto-Cal PSWD Logout More should be blinking. To enter this system menu press TRAK/HLD the ENTER key once: Output Sttng: TRACK Alarm Dly: 10 min Teledyne Analytical Instruments... -
Page 52: Setting Up An Auto-Cal
Note: If you require highly accurate Auto-Cal timing, use external Auto-Cal control where possible. The internal clock in the Model BDS 3000 is accurate to 2-3 %. Accordingly, internally scheduled calibrations can vary 2-3 % per day. To setup an Auto–Cal cycle:... -
Page 53: Password Protection
If a password is assigned, then setting the following system parameters can be done only after the password is entered: span zero settings, setpoints, analysis definitions, switching between alarm range and manual override, setting up an , and assigning a autoranging auto-cal Teledyne Analytical Instruments... -
Page 54: Entering The Password
Operation BDS 3000 . However, the instrument can still be used for analysis or password for initiating a self-test without entering the password. If you have decided not to employ password security, use the default password TETAI. This password will be displayed automatically by the microprocessor. -
Page 55: Installing Or Changing The Password
Table 4-1 below. When you have finished typing the new password, press Enter. A verification screen appears. The screen will prompt you to retype your password for verification. A A A A A Retype PWD To Verify Teledyne Analytical Instruments... -
Page 56: Table 4-1: Characters Available For Password Definition
Operation BDS 3000 Wait a moment for the entry screen. You will be given clearance to proceed. A A A A A <ENT> TO Proceed Table 4-1: Characters Available for Password Definition: ¥ ® " & < > Use the arrow keys to retype your password and press ENTER when finished. -
Page 57: Logout
Password Reentered 4.3.5 System Self-Diagnostic Test The Model BDS 3000 has a built-in self-diagnostic testing routine. Pre-programmed signals are sent through the power supply, output board and sensor circuit. The return signal is analyzed, and at the end of the test the status of each function is displayed on the screen, either as OK or as a number between 1 and 3. -
Page 58: Version Screen
Operation BDS 3000 During preamp testing there is a countdown in the lower right corner of the screen. When the testing is complete, the results are displayed. Power: OK Analog: OK Preamp: 3 The module is functioning properly if it is followed by OK. A number indicates a problem in a specific area of the instrument. -
Page 59: Negative Value Display
2.00 is selected the maximum working range of the analyzer is 50 ppm. Any reading above this, may saturate the amplifier. The automatic sensor shutdown function will become Teledyne Analytical Instruments... -
Page 60: Troubleshooting Screen
Operation BDS 3000 active automatically when the reading goes over 50 ppm as described in Section 3.6. 4.3.10 Troubleshooting Screen This System function provides access to troubleshooting information. This information will be helpful to TAI technical support staff. Note: To use this function, it is recommended that known span gas be flowing through the system before entering this function. -
Page 61: Temperature
4 mA DC. Provided that negative readings are allowed ( this is set in the system menu as well ). If the value is set to zero of FS (full scale), the analog outputs work in standard form and this is the default. Teledyne Analytical Instruments... -
Page 62: Zero Baseline Temperature Compensation
Operation BDS 3000 Reading on 0 to 1 VDC 4-20 mA DC Display Output Output 0 % of FS 100 % of FS 20.0 If the value is set to 10% of FS: Reading on 0 to 1 VDC 4-20 mA DC... -
Page 63: Calibration Of The Analyzer
7.0 to 9.0 ppm oxygen in nitrogen. This will require that calibration be performed in the 0-10 ppm analyzer range. Before the cell is ready for calibration, it must be purged with sample gas to a low oxygen level—preferably below 0.1 ppm. If the Teledyne Analytical Instruments... -
Page 64: Zero Cal
Operation BDS 3000 oxygen content of the sample gas is higher than 0.1 ppm, a zero gas such as nitrogen having an oxygen concentration below 0.1 ppm may be required. 4.4.1 Zero Cal The BDS Sensor has a zero offset of less than 5 ppb oxygen. -
Page 65: Manual Mode Zeroing
(ppm/s). #### Zero Slope = #### ppm/s Note: It takes several seconds for the true slope value to display. Wait about 10 seconds. Then, wait until Slope is Teledyne Analytical Instruments... -
Page 66: Span Cal
Operation BDS 3000 sufficiently close to zero before pressing ENTER to finish zeroing . Generally, you have a good zero when sl ope is less than 0.05 ppm/s for about 30 seconds. When slope is close enough to zero, press ENT ER. In a f ew seconds, the screen will update. -
Page 67: Manual Mode Spanning
Use the arrow keys to enter the oxygen concentration of the span gas you are using (999.99 is maximum value of span gas). The __ arrows choose the digit, and the __ arrows choose the value of the digit. Teledyne Analytical Instruments... -
Page 68: Span Failure
Consider this before replacing the cell. The Alarms Function The Model BDS 3000 is equipped with 2 fully adjustable concentration alarms and a system failure alarm. Each alarm has a relay Teledyne Analytical Instruments... - Page 69 This mode requires an alarm to be recognized before it can be reset. In the non-latching mode, the alarm status will terminate when process conditions revert to non-alarm conditions. Teledyne Analytical Instruments...
- Page 70 Operation BDS 3000 4. Are either of the alarms to be defeated? The defeat alarm mode is incorporated into the alarm circuit so that maintenance can be performed under conditions which would normally activate the alarms. The defeat function can also be used to reset a latched alarm.
-
Page 71: The Range Function
Med = 0–1 ppm High = 0–10 ppm. The Model BDS 3000 is set at the factor y to default to autoranging. I n thi s mode, the microprocessor aut omatically r esponds to concent ration changes by swit ching ranges for optimum readout sensitivi ty. If the current range lim its ar e exceeded, the instrument wil l automatically shift to the next higher range. -
Page 72: Setting The Analog Output Ranges
Operation BDS 3000 4.6.1 Setting the Analog Output Ranges To set the ranges, enter the range function mode by pressing the RANGE button on the front panel. L—100 ppb M—1 ppm H—10 ppm Mode—AUTO Use the __ arrow keys to blink the range to be set: low (L), medium (M), or high (H). -
Page 73: The Analyze Function
Signal Output The standard Model BDS 3000 Oxygen Analyzer is equipped with two 0–1 VDC analog output terminals accessible on the back panel (one concentration and one range ID), and two isolated 4–20 mA DC current outputs (one concentration and one range ID). - Page 74 Operation BDS 3000 ppm O Output (VDC) Output (mA DC) 10.4 12.0 13.6 15.2 16.8 18.4 20.0 The analog output signal has a voltage which depends on the oxygen concentration AND the currently activated analysis range. To relate the signal output to the actual concentration, it is necessary to know what range the instrument is currently on, especially when the analyzer is in the autoranging mode.
-
Page 75: Table 4-3: Range Id Output
Oxygen Analyzer Operation Table 4-3: Range ID Output Range Voltage (V) Current (mA) 0.25 0.50 0.75 (0-1000) ppm 1.00 Teledyne Analytical Instruments... -
Page 76: Figure 4-2: Analyzer Power-Up Sequence
Operation BDS 3000 Figure 4-2: Analyzer Power-up Sequence Teledyne Analytical Instruments... -
Page 77: Figure 4-3: Analyzer Span Sequence
Oxygen Analyzer Operation Figure 4-3: Analyzer Span Sequence Teledyne Analytical Instruments... -
Page 78: Figure 4-4: Analyzer Zero Sequence
Operation BDS 3000 Figure 4-4: Analyzer Zero Sequence Teledyne Analytical Instruments... -
Page 79: Maintenance
Unscrew and take the sensor cap off. Use the wash bottle provided to squeeze de-ionized water into the sensor, as shown in Figure 5.1. It is a good practice that water is added before reaching the MIN line. Reinstall the cap after adding water. Teledyne Analytical Instruments... -
Page 80: Fuse Replacement
Maintenance BDS 3000 Figure 5.1 Adding water into the BDS sensor WARNING: THE SENSOR USED IN THE MODEL BDS 3000 OXYGEN ANALYZER USES ELECTROLYTE WHICH CONTAINS POTASSIUM HYDROXIDE, THAT CAN BE HARMFUL IF TOUCHED, SWALLOWED, OR INHALED. AVOID CONTACT WITH ANY FLUID OR POWDER IN OR AROUND THE UNIT. -
Page 81: System Self Diagnostic Test
1. Press the SYSTEM button to enter the system mode. 2. Use the __ arrow keys to move to , and press ENTER. More 3. Use the __ arrow keys to move to , and press ENTER. Self-Test Teledyne Analytical Instruments... -
Page 82: Major Internal Components
Fi gur e 2- 7, in Chapter 2. WARNING: SEE WARNINGS ON THE TITLE PAGE OF THIS MANUAL. The BDS 3000 contains the following major components: Analysis Section Sensor with stainless steel wetted parts Sample system... -
Page 83: Figure 5-4: Rear Panel Screws
2 line, 20 character, alphanumeric, VFD display RS-232 Communications Port. See the drawings in the Drawings section in back of this manual for details. Figure 5-4: Rear Panel Screws To detach the rear panel, remove only the 14 screws marked with an X. Teledyne Analytical Instruments... -
Page 84: Cleaning
Maintenance BDS 3000 Cleaning If the instrument is unmounted at time of cleaning, disconnect the instrument from the power source. Close and latch the front-panel access door. Clean outside surfaces with a soft cloth dampened slightly with plain clean water. Do not use any harsh solvents such as paint thinner or benzene. -
Page 85: Figure 5-5: Vacuum Degassing For The Bds Oxygen Sensor
Reinstall the sensor into the analyzer. Note: A low cost vacuum degas kit (TAI P/N B72098) is available from Teledyne Analytical Instruments. Figure 5-5: Vacuum Degassing for the BDS Oxygen Sensor Teledyne Analytical Instruments... - Page 86 Maintenance BDS 3000 Teledyne Analytical Instruments...
-
Page 87: Appendix
• Relay rack mount. Contains one instrument in one 19" relay rack mountable plate (Optional). Sensor: Teledyne BDS Sensor, patent pending. Sample System: All wetted parts of 316 stainless steel with built-in restrictor. 90 % Response Time: Less than 90 seconds at 25 °C (77 °F) on 10, and 100 ppm range. - Page 88 Appendix BDS 3000 Digital Interface: Full duplex RS-232 communications port. Power: Universal power supply 85-250 V ac, at 47-63 Hz. Operating Temperature: 5-40 °C Accuracy: ±2% of full scale for all ranges at constant temperature. All accuracy specifications are contingent upon the completion of zero and span calibration.
-
Page 89: Recommended 2-Year Spare Parts List
Orders should be sent to: TELEDYNE Analytical Instruments 16830 Chestnut Street City of Industry, CA 91749-1580 Phone (626) 934-1500, Fax (626) 961-2538 Web: www. teledyne-ai. com or your l ocal r epresentative. Teledyne Analytical Instruments... -
Page 90: Drawing List
Appendix BDS 3000 A-3 Drawing List D-71902 Outline Diagram A-4 19-inch Relay Rack Panel Mount Figure A-1: Single 19" Rack Mount (dimensions in mm) Teledyne Analytical Instruments... -
Page 91: Application Notes
Conversons: 1 PSI 2.04 INCHES OF MERCURY (in. Hg.) 1 SCFH = 0.476 SLPM Note: The MSDS on this material is available upon request through the Teledyne Environmental, Health and Safety Coordinator. Contact at (626) 934-1592 Teledyne Analytical Instruments... - Page 92 Appendix BDS 3000 Teledyne Analytical Instruments...
-
Page 93: Material Safety Data Sheet
Section I - Product Identification Product Name: Micro-fuel Cells Mini-Micro-fuel Cells Super Cell, all classes except T-5F Electrochemical Oxygen Sensors, all classes Manufacturer: Teledyne Electronic Technologies Analytical Instruments Address: 16380 Chestnut Street, City of Industry, CA 91749 Phone: (626) 961-9221... - Page 94 Carcinogenicity: NTP Annual Report on Carcinogens: Not listed LARC Monographs: Not listed OSHA: Not listed Other health hazards: Lead is listed as a chemical known to the State of California to cause birth defects or other reproductive harm. Teledyne Analytical Instruments...
-
Page 95: Teledyne Analytical Instruments
The information is believed to be correct but does not purport to be all inclusive and shall be used only as a guide. Teledyne Analytical Instruments shall not be held liable for any damage resulting from handling or from contact with the above product. - Page 96 Appendix MSDS Teledyne Analytical Instruments...
- Page 97 12 data entry keys, 3, 34 BDS sensor, 7, 30, 73 default, 44, 57 acid gas exposure, 13 default password, 36, 40 advantage of, 8 default values, 33 cross section, 9 defeated (relay out), 24 Teledyne Analytical Instruments...
- Page 98 Index BDS 3000 de-ionized water, 65 frozen display. See display delay, 37, 38 function key, 2 detection limit, 8 fuse, 67 diffusion barrier, 8, 9 fuse block, 22 digital input fuse installation, 23 span, 26 gas correction factor. See gas factor...
- Page 99 52, 53 setting, 58 failure, 54 Range, 57 span gas Range, 34 concentration, 49 RANGE button, 58 maximum value, 53 range ID, 6, 15, 27, 38 span sequence, 63 rear panel, 5, 21, 69 spare parts listing, 75 Teledyne Analytical Instruments...
- Page 100 Index BDS 3000 specifications, 73 vacuum fluorescent display, 1 standby button, 25 VCR fitting, 14, 21 startup. See self diagnostic test vent, 11 STNDBY, 4 verification screen, 41 subsystem, 7 Version, 37, 44 swagelock fitting, 14 VFD, 4 SYSTEM, 3...
Need help?
Do you have a question about the BDS 3000 and is the answer not in the manual?
Questions and answers