
Related Manuals for Metronic TouchBOX 3


Summary of Contents for Metronic TouchBOX 3
-
Page 1: Parental Lock
Digital Satellite Receiver Ref : 441327-3 2500 channels Parental lock 2 scarts Wide screen ready DiSEqC 1.2 ��������� ������� ��� ����� �� ��� ���� ��� ��� ����� ����� MET624... - Page 3 CAUTION Your receiver has ventilation slots. These slots must not be obstructed, even partially, in order to ensure proper ventilation. The lifetime of your device depends on these factors. The device may not be exposed to dripping or splashing and no object filled with liquid, such as vases, must be put on the device.
- Page 4 The first time you switch your AccessBOX on, your are prompted to enter the desired language for On Screen Dislplay. This language selection window is also shown after resetting the unit (factory settings). Altering the settings of the receiver requires to go through the menus.
-
Page 5: Table Of Contents
SOMMAIRE 1 Installation advice page 06 2 Installation of a fixed dish on a satellite page 10 3 Installation on several satellites page 11 4 Installation of a motorised unit page 13 5 Connection on an already installed dish page 23 6 Connection on a dual-head system Astra + Hotbird already aligned page 24 7 Connection on a motorised DiSEqC 1.2 unit already aligned... -
Page 6: Installation Advice
1 - Installation advice A - Choice of the location and satellite dish assembling Whatever your choice of installation, your fixing must be stable and vertical. In the event of an obstacle, respect the rule of distances explained below. Eg : if the dish is 3 meters above the ground, and a 7m high tree might hide the satellite, the tree must be at least 6m far from the dish (7-3=4, 4x1,5=6). - Page 7 B - Necessary elements: 1 Satellite dish 13 mm 11 mm 2 Screw and fixing 3 Offset arm 4 Universal LNB 5 Mast or stand off arm Recommended diameter minimum: 40 mm (1,6’’) 6 Satellite receiver 12 mm 10 mm 7 TV set PAL for digital reception and PAL/ SECAM for analogue (to be able to watch it in colour)
- Page 8 C - Assembly and insulation of the «F» plug • The plug must be screwed on the strip iron aluminium. Take care that there is not a strand of the braid in contact with the central heart of the coaxial cable •...
- Page 9 E - Pre-programmed channels and satellites Your receiver is delivered pre-programmed on the main satellites available in Europe. Some satellites require a one-meter satellite dish, you will not be able to receive them with a lower size satellite dish, even if this satellite appears in your pre-programmed channels list. You will use these channels to point your satellite dish towards the satellite you want.
-
Page 10: Installation Of A Fixed Dish On A Satellite
2 - Installation of a fi xed dish on a satellite Read the installation advices, and particulary the paragraph E (page 9). A - Connections The receiver must be disconnected from the mains, connect directly the LNB to the LNB input of the receiver. -
Page 11: Installation On Several Satellites
3 - Installation on several satellites A - Installation of a bi-head satellite dish If the receiver has factory settings (brand new or after reset of the unit), you don’t have to modify the settings to drive a monobloc (dual-head) LNB dish aimed at Astra (19°) and HotBird. In that case, install the monobloc as depicted below and align the dish on HotBird as explained in the previous paragraph. - Page 12 B - Installation of a DiSEqC 1.0 switch If you install 2 or more dishes, or 2 LNB on the same dish, you must connect all the LNB to a switch, featured with one single output, allowing to run one cable between the dish and the receiver.
-
Page 13: Installation Of A Motorised Unit
4 - Installation of a motorised unit A - Foreword This user manual shows you how to install a motorized unit with the motor, ref: 450907-8. Such installation requires some operations, on the motor and on the satellite receiver with which it is supposed to work. - Page 14 B - Elements: 1 Satellite dish 2 Screw and fixing 3 Offset arm 4 Universal LNB 5 Mast or stand off arm Recommended diameter minimum: 40 mm (1,6’’) 6 Satellite receiver 7 TV set PAL for digital reception and PAL/ SECAM for analogue (to be able to watch it in colour) 8 Scart lead male/male 21 pin...
- Page 15 C - Prepare the motor (see diagram 2) Assembling • Make sure the fixing (tube or stand off arm) is stable and strictly vertical. An error bigger than 1 degree (2 cm, or 3/4 inch per meter) from the vertical will preclude the motor for working properly.
- Page 16 Angle adjustment Angle adjustment Look at the Europe map (below) and find your elevation angle in relation to the horizontal line. For example, about 31,5° for Glasgow, 38° for Bordeaux, 39,5° for Napoli, 34,5° for Brussels. When the right angle as been adjusted, tighten the screws.
- Page 17 D - Connection For the installation you will need 2 pie- ces of cable. The first one, roughly 1,5m (5ft) to go from the LNB to the motor, the second one as long as it takes to go from the motor to the receiver. Prepare the cables and assemble the “F”...
- Page 18 F - Prepare the motor You will now store the position of Hot Bird then put back the motor precisely at 0° to assem- ble the satellite dish. 1) Put the receiver on the Hotbird reference channel 2) Give a number to the Hotbird satellite (in any doubt put 4), and then wait until the motor stops turning.
- Page 19 H - Assemble the satellite dish on the motor North South • Assemble the satellite dish and fix it on the motor’s stem. The satellite dish U-Bolt must be as low as possible on the stem. As the motor is at 0°, make sure you perfectly align the dish offset arm with the motor (diagram H1).
- Page 20 K - Alignment / Satellite dish orientation • At the end of the step K, you will receive the Hotbird reference channel on the television screen. Do not go to step L (adjusting the alignment) if you do not receive this channel. 1) Put the receiver on the Hotbird reference channel then display the signal indicator 2) While checking the level, sweep slowly (for 20 seconds) a quarter of a turn on the right, then a quarter of a turn on the left while pivoting the whole (satellite dish + rotor) around the...
- Page 21 east / west Belfast Newcastle Dublin Leeds 16 18 Cork 24 26 28 Liverpool Cardiff Gdansk London Poznan Plymouth Warszawa Todz Wroclaw Krakow Diagram 2 : Angular reading for Atlantic Bird 3...
- Page 22 M - Validation of the satellites For each satellite, you have now to store the right position in the motor. The operation is done for Hotbird and Atlantic Bird 3, you have to do it for Astra, etc. Example for Astra 19° E •...
-
Page 23: Connection On An Already Installed Dish
N - Adjustment of the electronic limits Adjustment of the East limit Adjustment of the East limit • Press the black key to access the Motor Setup menu • Go to the line Move, press and hold the 3 arrow key to drive the motor East and get ready to press the key OK when the border of the dish reaches the obstacle. -
Page 24: Connection On A Dual-Head System Astra + Hotbird Already Aligned
To program your receiver, go to page 11, installation of a Bi-head satellite dish Astra 19,2° + Hot Bird. Caution: you should not alter the satellite dish adjustments or the switch, it is only necessary to program your digital receiver. DiSEqC 1.0 or Tone Burst switch Rear TouchBOX 3 Coaxial cable Scart cable... -
Page 25: Connection On A Motorised Diseqc 1.2 Unit Already Aligned
For an easier installation of your new digital receiver, locate the classification of the satellites used by your previous receiver. Rear Rear TouchBOX 3 TouchBOX 3 Rear Analog Rear Analog Coaxial cable... - Page 26 access to the Motor Setup menu ). • Go to Position field. • With 34 arrow keys, select the number of the satellite that you want to allocate to the current satellite. (Ignore the warning message) • Press OK to confirm, the motor will move to the position #1 stored in its memory. Once the motor has stopped, check that the Quality is higher than 40%.
-
Page 27: Remote Control Description
Remote control description Digital keys. In viewing mode, press these keys to change channel by pressing the number of the channel you want to watch. In the programming mode, these keys are used to enter the digital values. � � �... -
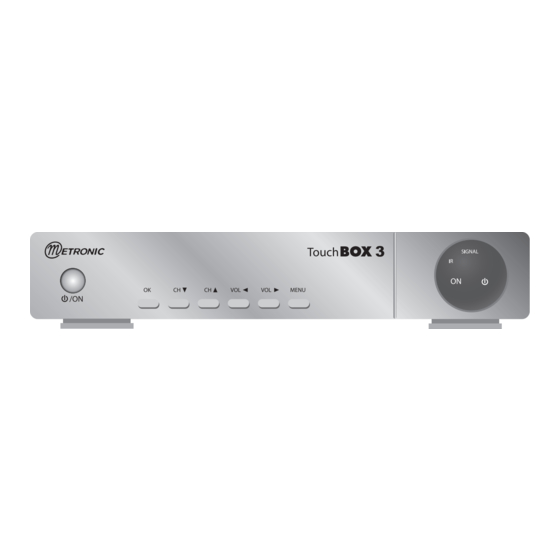
Page 28: Description Of Front And Rear Panel
Description of front and rear panel ��������� ������� ��� ����� �� ��� ���� ��� ��� ����� ����� Infrared receiver (detects the remote control infrared signal). Signal indicator. Switch on if the receiver is good. ON LED. Green when the unit is operating. Standby LED. -
Page 29: Access To A Channel
11 - Access to a channel In viewing mode, 56 keys allow me to change some channels among the list of the pre- programmed channels. You can also reach directly a channel by entering its number. Pressing on the OK key makes the TV channel list appear, highlight then the channel you want to watch with the Up and Down arrow or Page Up / Page Down keys, and press OK to view the channel. - Page 30 B - Automatic channel shearch • Go to MENU / Installation / Auto Scan • On the line Satellite, select with 34 arrow keys the satellite that broadcasts the channel you want to add • On the line TP Freq, press OK to access to the list of transponders (TP). •...
- Page 31 D - Deletion of a transponder Deleting out-of-date transponders speed up the Auto Scan. • Go to MENU / Installation / Manual Scan • On the line Satellite, select with 34 arrow keys the satellite from which you want to delete a TP.
-
Page 32: Modify, Organize And Manage Channels
13 - Modify, Organize and manage channels For the TV list, as well as for the Radio list, you can move, delete rename or lock any channel. A locked channels requires the entry of a secret code to be viewed. A - Delete a channel •... - Page 33 D - Rename a channel • Go to MENU / Channels / Channel Manager. • With the 56 arrows, select the channel to be renamed. • Press the black key to display the Edit window. • Press OK on Edit Channel Name to display the virtual keyboard. •...
-
Page 34: Miscellaneous Settings
14 - Miscellaneous settings A - Language selection In order to choose the language of the On-Screen-Display menu : • Press the MENU key and then the 4 arrow key to select the Config submenu (the most right one). • Select the first sub menu and press OK. •... -
Page 35: Use With A Vcr
VCR rear panel TouchBOX 3 Coaxial cable Scart cable 16 - Use with a VCR Simply connect your video cassette recorder on the VCR scart socket. To record the digital, it is necessary that the receiver is switched on the channel you want to record. Remember that you can automatically switch the receiver ON with the Timer feature. -
Page 36: Timer
17 - Timer The timer is a tool that allows the receiver to switch ON on a specific channel at a programmed time, for scheduled recordings. Attention, the wake up of the digital satellite receiver doesn’t launch the recording on the VCR. Don’t forget to program a timer on your VCR too ! Important notice : some TV set will wake up automatically when the satellite receiver will wake up. -
Page 37: Troubleshooting
18 - Troubleshooting • The screen displays « BAD OR NO SIGNAL». Two causes : 1. The channel you wish to watch has disappeared from the transponder. Get a specialised magazine to know if the parameters of these channels have changed or if it has disappea- red. -
Page 38: Assistance And Advice
To be valid, the certificate of guarantee must be dully filled and send back with the invoice photocopy or the sales slip. Hardware ref.: TouchBOX 3 Date of purchase: Serial number : METRONIC - Node Park Touraine - BP 1 - Tauxigny - 37310 REIGNAC CEDEX Fax : 02 47 346 347 • www.metronic.com... -
Page 39: Channel Gui De
CHANNELS GUIDE Name Name Freq - Pol - SR Freq - Pol - SR Cartomanzia LOTT 11623 V 27500 Hot Bird ------------------------------------------------------------ 11513 H 27500 CFN-CNBC 11900 H 27500 RAI1 11766 V 27500 TVE INTERNACION 11785 H 27500 RAI2 11766 V 27500 Sky Assist 11843 V... - Page 40 CHANNELS GUIDE Name Name Freq - Pol - SR Freq - Pol - SR GOSPEL EUROPE 11178 H 27500 MKTV 12188 V 27500 SA OS download 11178 H 27500 TV PIREAS 12188 V 27500 TV CHILE 11304 H 27500 PROMO 12188 V 27500 Punto Sat...
- Page 41 CHANNELS GUIDE Name Name Freq - Pol - SR Freq - Pol - SR 12713 V 27500 3sat 11954 H 27500 Arrabiaa 12149 V 27500 EuroNews 11954 H 27500 Chai TV 11623 V 27500 Eurosport 11954 H 27500 Diva Futura 11178 H 27500 ZDFdokukanal 11954 H 27500...
- Page 42 CHANNELS GUIDE Name Name Freq - Pol - SR Freq - Pol - SR 12480 V 27500 BBC 1 West 10818 V 22000 TELE 5 12480 V 27500 BBC 1 S East 10818 V 22000 Sonnenklar 12480 V 27500 BBC 1 South 10818 V 22000 KABEL1...
- Page 43 CHANNELS GUIDE Name Name Freq - Pol - SR Freq - Pol - SR Travel Channel 12051 V 27500 CH 3 - Retecapri 12608 H 27500 Vectone World 11642 V 27500 CH 5 - Link 5 12608 H 27500 CommunityChnl 12382 H 27500 My Music 11092 V...
- Page 44 CHANNELS GUIDE Name Name Freq - Pol - SR Freq - Pol - SR LBCI 11785 V 27500 AndalucÍa TV 11811 V 27500 11785 V 27500 Mensaje Portal 11811 V 27500 11785 V 27500 TMSat/La Otra 11811 V 27500 NEW TV 11785 V 27500 TV Galicia...
- Page 45 DIGITAL RADIOS GUIDE Name Name Freq - Pol - SR Freq - Pol - SR HOTBIRD ------------------------------------------------------------ FUN RADIO 12207 V 27500 LE MOUV 12207 V 27500 Le Mouv 10796 V 27500 RADIO NOVA 12207 V 27500 France bleu 10796 V 27500 RADIO FG 12207 V...
- Page 48 Node Park Touraine BP 1 TAUXIGNY 37310 REIGNAC SUR INDRE CEDEX FRANCE www.metronic.com Product made in Asia...
Need help?
Do you have a question about the TouchBOX 3 and is the answer not in the manual?
Questions and answers