Table of Contents
Advertisement
Quick Links
Advertisement
Table of Contents

Related Manuals for Sherwood Scuba SR 7206


Summary of Contents for Sherwood Scuba SR 7206
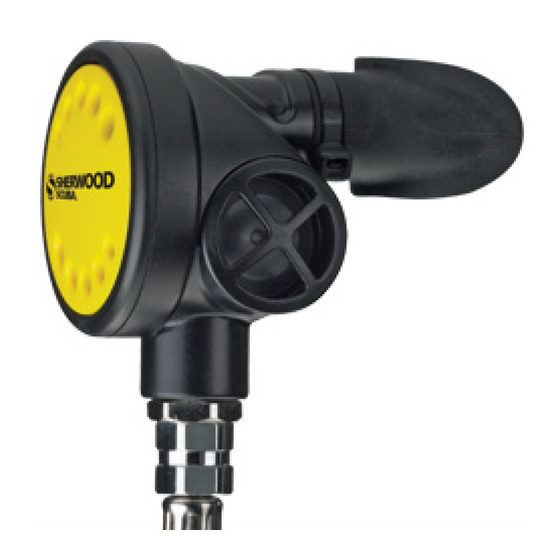
- Page 1 SERVICE INSTRUCTIONS DUAL OCTO SECOND STAGE REGULATOR SR 7206...
-
Page 3: General Instructions
Dual Octo regulators that are subjected to extreme conditions such as daily use or infrequent cleaning may need service more frequently depending on inspection results. Sherwood Scuba offers a standard service kit (P/N 6000-9) that contains the parts that should be replaced at the standard service interval. -
Page 4: Working Conditions
Use of other tools and carelessness may cause damage to the sealing surfaces on the hose fittings requiring replacement of the entire hose. Sherwood does not recommend replacement of the o-ring at the swivel end of the hose if it does not show evidence of wear or damage. - Page 5 www.sherwoodscuba.com 8. Before further disassembly check the alignment of the Demand Lever (7) with regard to the Housing (10). The surface of the Demand Lever that contacts the Diaphragm should be parallel to the Housing within 1/16 inches. Place a straight edge across the Housing to check the alignment of the Demand Lever. (Refer to Illustration 1).
- Page 6 www.sherwoodscuba.com 2) Demand Valve Subassembly 11. If the subassembly shows salt or other mineral deposits that prevent the poppet from moving smoothly, it should be cleaned as an entire unit using an ultrasonic cleaner with a mild cleaning agent. If this fails to remove the deposits, the demand valve subassembly should be disassembled by unthreading the Lock Nut (9) from the Poppet (4).
- Page 7 www.sherwoodscuba.com Reassembly 15. Install the Exhaust Valves using the same gentle stretching technique used for removal. 16. Install each Exhaust Valve Cover using only your fingers to tighten. Use of tools may damage the Exhaust Valve Cover. 17. If the demand valve subassembly was cleaned as a unit and not further disassembled install a new LP Seat (3).
- Page 8 28. Install the Mouthpiece (12) and secure with the Mouthpiece Strap (13). 29. Install the Diaphragm, Retainer and Purge Cover with the Sherwood logo aligned parallel with the axis of the Inlet Fitting.
-
Page 9: Final Check
www.sherwoodscuba.com 30. Install the Cover Ring and hand tighten until there is no gap between the Housing and the Purge Cover. Final Check 31. With pressure applied to the regulator assembly immerse the entire regulator to check for air leaks. Air leaks are most commonly caused by damaged or contaminated o-rings. -
Page 10: Warranty Information
In addition, as an original owner of the Dual Octo Regulator you may be eligible to receive two sets of stan- dard service parts provided that service is performed by an Authorized Sherwood Dealer. Service labor is not included and is the responsibility of the product owner. The Hose Protector on the Dual Octo has two removable plastic rings. - Page 11 Lever 21 7206-4A Diaphragm 8 7206-73 Washer 22 7206-6 Retainer 9 7206-71 Locknut 23 7206-23 Purge Cover 10 7206-5 Housing 24 7206-24 Cover Ring 11 7206-2 Boss, Mouthpiece 25 SWC01 Warranty Ring 12 7206-3 Mouthpiece 26 7206-27 Hose Protector 13 7206-1 Strap, Mouthpiece WARNING Use only Sherwood Scuba parts! Use of other manufacturer’s parts will void all warranties and could result in air delivery failure, causing serious personal injury or death.
- Page 12 www.sherwoodscuba.com...
Need help?
Do you have a question about the SR 7206 and is the answer not in the manual?
Questions and answers