Table of Contents
Advertisement
Advertisement
Table of Contents

Related Manuals for Roberts RD-20


Summary of Contents for Roberts RD-20
- Page 1 RD-20 FM RDS/DAB digital radio Please read this manual before use...
-
Page 2: Table Of Contents
Contents Controls ................2 Specifications ..............16 Battery operation ..............3 Circuit features ..............16 Mains operation ..............3 Mains Supply ..............17 Operating your radio - DAB ..........4 Guarantee ................18 Selecting a station - DAB ..........5 Secondary services - DAB .......... -
Page 3: Controls
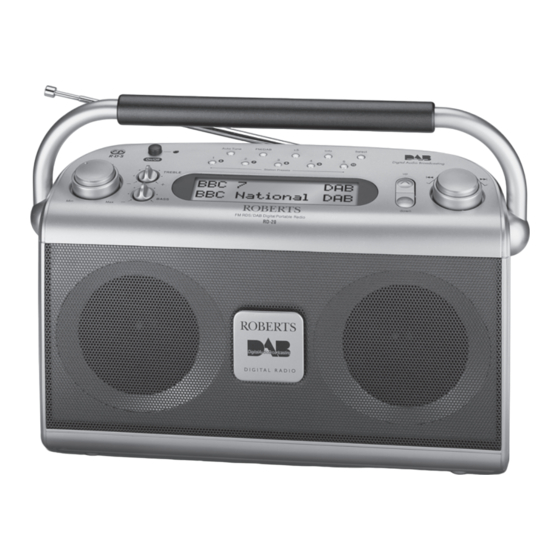
Controls (Top) 1. Telescopic aerial (on rear) 7. Line out socket (on rear) 13. Tuning up button 2. On/Off button 8. FM/DAB button 14. Tuning down button 3. Mains LED indicator 9. +5 button 15. Liquid crystal display (LCD) 4. Station presets 10. -
Page 4: Battery Operation
4. If the radio is not to be used for any extended period of time it is recommended that the batteries are removed from the radio. We would recommend for economy that the RD-20 is used on the mains whenever possible with battery operation for occasional or stand-by use only. -
Page 5: Operating Your Radio - Dab
Operating your radio - DAB 1. Fully extend the telescopic aerial 2. Press the On/Off button to switch on your radio. The display will show "Roberts DAB digital radio" for a few seconds. 3. If this is the first time the radio is used a quick scan of the UK band III DAB channels will be carried out. -
Page 6: Selecting A Station - Dab
Selecting a station - DAB 1. The top line of the display shows the name of the station currently selected. 2. Rotate the Tuning control or press the Up or Down buttons to scroll through the list of available stations. 3. -
Page 7: Secondary Services - Dab
Secondary services - DAB 1. Certain radio stations have one or more secondary services associ- ated with them. If a station has a secondary service associated with it the display will show ">" next to the station name on the station list. The secondary service will then appear immediately after the primary service as you turn the tuning control. -
Page 8: Finding New Stations - Dab
Finding new stations - DAB As time passes new stations may become available. To find new stations proceed as follows:- 1. Press and release the AutoTune button, the display will show Autotune Quick scan. Your radio will perform a scan of the UK DAB frequencies. -
Page 9: Manual Tuning - Dab
Manual Tuning - DAB Manual tuning allows you to tune directly to the various band III DAB channels. UK DAB stations are currently located in the range 11B to 12D. 1. Press and hold down the Select button until the display shows Manual tune. -
Page 10: Operating Your Radio - Fm
Operating your radio - FM 1. Carefully extend the telescopic aerial 2. Press the On/Off button to switch on your radio. The display will show "Roberts DAB digital radio" for a few seconds. 3. Press the FM/DAB button to select the FM band. 4. -
Page 11: Manual Tuning - Fm
Manual tuning - FM 1. Press the On/Off button to switch on your radio. 2. Press the FM/DAB button to select the FM band. Fully extend the Telescopic aerial . 3. Rotate the Tuning control or press the Up or Down buttons to tune to a station. -
Page 12: Display Modes - Fm
Display modes - FM On FM the bottom line of the display can be set to any of the following modes:- 1. Press the Info button to cycle through the various modes. a. Scrolling text Displays scrolling text messages such as artist/ track name, phone in number etc. -
Page 13: Presetting Stations - Dab And Fm
Presetting stations - DAB and FM There are 10 memory presets for each of the 2 wavebands. 1. Press the On/Off button switch on the radio. 2. Tune to the required station as previously described. 3. Press and hold down the required Preset button until the display shows e.g. -
Page 14: Recalling A Preset Station - Dab And Fm
Recalling a preset station - DAB and FM 1. Press the On/Off button to switch on the radio. 2. Select the required waveband by pressing the FM/DAB button. 3. Momentarily press the required Preset button, your radio will tune to the station stored in preset memory. 4. -
Page 15: System Reset
System reset If your radio fails to operate correctly, or some digits on the display are missing or incomplete carry out the following procedure. 1. Switch off your radio 2. Switch on your radio - before the screen shows Roberts DAB digital radio press and hold down the Select button until the display shows System Reset. -
Page 16: Headphone Socket
Headphone socket A 3.5mm Headphone Socket located on the rear of your radio is provided for use with either headphones or an earpiece. Inserting a plug automatically mutes the internal loudspeaker. IMPORTANT: Excessive sound pressure from earphones and head- phones can cause hearing loss. Line out socket A 3.5mm Line out socket located on the rear of your radio is provided for connecting the audio signal to an external amplifier. -
Page 17: General
General • No objects filled with liquids such as vases, shall be placed on the radio. Do not allow this radio to be exposed to water, steam or sand. Do not • It is recommended to operate the product such that there is a minimum leave your radio where excessive heat could cause damage such as in distance (10cm recommended) to adjacent objects in order to a parked car where the heat from the sun can build up even though the... -
Page 18: Mains Supply
Mains supply The RD-20 will operate from a supply of AC 230 volts, 50Hz only. The wire coloured BLUE must be connected to the terminal marked N or coloured BLACK. DO NOT cut off the mains plug from this equipment. If the plug... -
Page 19: Guarantee
In the event that it is not possible to return the instrument to the Roberts' dealer from whom it was purchased, please contact Roberts Radio Technical Services at the address shown on the rear of this manual. - Page 20 ROBERTS RADIO TECHNICAL SERVICES 97-99 Worton Road Isleworth Middlesex TW7 6EG Technical Helpline :- 020 8758 0338 (Mon-Fri during office hours) Website: http://www.robertsradio.co.uk Issue 2...
Need help?
Do you have a question about the RD-20 and is the answer not in the manual?
Questions and answers
Radio crackling all the time
Your Roberts RD-20 radio may be crackling due to the following reasons:
1. Battery Issues – If the batteries are low, a ‘stuttering’ sound or crackling may occur. Try replacing the batteries or using mains power.
2. Aerial Damage – A damaged or broken telescopic aerial can affect reception and cause crackling.
3. Interference – Nearby electronic devices or poor signal strength may cause interference.
4. Incorrect Use – If the radio is not used properly, it may result in poor performance.
Try checking and addressing these issues to improve the sound quality.
This answer is automatically generated