Advertisement
Quick Links
LCD PROJECTOR
LENS REPLACEMENT AND INSTALLATION PROCEDURES
When installing or replacing the Projection Lens, refer to this manual. For
installation of the lens, use the parts designated in the manual. Do not use the
installation manual and Light-Block Sheets in the lens package.
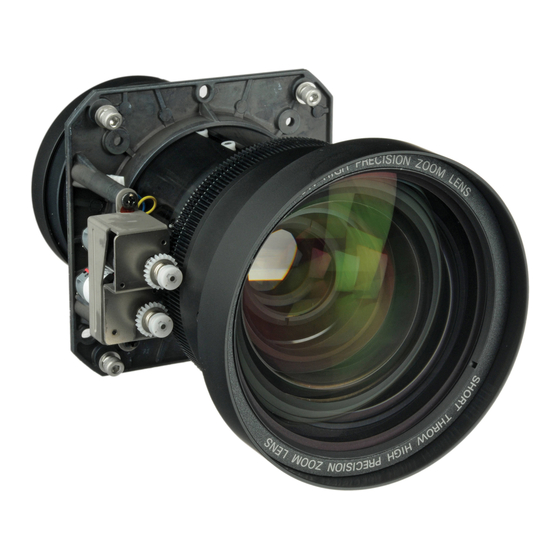
Check the following parts supplied to this projector.
AVAILABLE LENS
This projector applies the Projection Lenses listed below. Use the suitable lens for
where the projector is used.
Model NO.
LNS-W01
LNS-W01Z
LNS-T01
LNS-T01Z
LNS-T02
LNS-W02
LNS-W02Z
LNS-W03
LNS-M01
LNS-M01Z
LNS-S01
LNS-S02
LNS-S02Z
LNS-S03
For installing those lenses, attaching Lens Mounting Adapters or removing Guide Pins is
required. Make sure the Model No. of the lens and the installation procedure on next pages
and be sure to install the lens precisely.
Lens installation and replacement should be made by the qualified service
personnel.
Be sure to install the lens following this procedure precisely.
Do not touch or remove any parts except the lens and related parts. It may
result in malfunctions, electrical shock, fire hazard or other accidents.
Before installing or replacing the lens, check that the Model No. of the
Projection Lens matches to the projector.
When moving or setting up the projector, be sure to replace the Lens Cover
to protect the surface. And be careful not to hold or subject the lens to
strong forces. It may damage the lens, cabinet, or mechanical parts.
For details of the lens and installation, contact the sales dealer where you
purchased the projector.
1AA6P1P2922-- (MV6A) a
CAUTION
LIGHT-BLOCK SHEETS 3 pcs.
LENS MOUNTING ADAPTERS 2 pcs.
ADAPTER SCREWS 8 pcs.
Type
Fixed Short Throw Lens
Fixed Long Throw Lens
Long Throw Zoom Lens
Short Throw Zoom Lens I
Short Throw Zoom Lens II
Semi-Long Throw
Zoom Lens
Standard Zoom Lens I
Standard Zoom Lens II
Standard Zoom Lens III
NOTES ON LENS INSTALLATION
- 1 -
Zoom
Focus
Fixed
Manual
Fixed
Manual
Motor Driven
Motor Driven
Motor Driven
Motor Driven
Fixed
Manual
Motor Driven
Motor Driven
Motor Driven
Motor Driven
Motor Driven
Motor Driven
Motor Driven
Motor Driven
Advertisement

Related Manuals for InFocus LNS-W01


Summary of Contents for InFocus LNS-W01
- Page 1 ADAPTER SCREWS 8 pcs. AVAILABLE LENS This projector applies the Projection Lenses listed below. Use the suitable lens for where the projector is used. Zoom Model NO. Type Focus LNS-W01 Fixed Short Throw Lens Fixed Manual LNS-W01Z LNS-T01 Fixed Long Throw Lens Fixed...
- Page 2 LENS REPLACEMENT AND INSTALLATION PROCEDURE NOTE : The installation procedure and needed parts for lens installation depend on the type of the Projection Lens. Check the Model No. of the Projection Lens and be sure to install or replace the lens following procedure below.
- Page 3 For installing the lenses listed below, removing Guide Pins is required. Before mounting the lens, remove 2 Guide Pins from Lens Mounting Bracket. (See Fig. 4.) Model No.: LNS-W01, LNS-S02, LNS-T01 Connect Lens Motor Lead to the connector "K96T" on the circuit board under the lens. (The model with Lens Motor only.) Fix Lens Motor...
- Page 4 LNS-S02, LNS-S02Z, LNS-S03 TYPE FD1 (610 290 9258) LNS-M01, LNS-T02, LNS-W02 TYPE FE1 (610 293 8937) LNS-M01Z, LNS-W02Z, LNS-S01 LNS-W03 LNS-W01, LNS-T01, LNS-W01Z TYPE FF1 (610 293 8944) LNS-T01Z Fig-6 LIGHT BLOCK SHEET Make sure the sheet figure is correct and put in proper position.
- Page 5 Adjust focus of the Projection Lens. (LNS-W01, LNS-W01Z, LNS-T01, LNS-T01Z and LNS-W03 only.) Set up the projector and project image on the screen. Loosen Focus Lens Lock Screw and rotate Projection Lens to obtain proper focus. After adjusting focus, be sure to lock Projection Lens with Focus Lens Lock Screw securely.
- Page 6 FOCUS ADJUSTMENT (For Model LNS-W03) Set up the projector and project image on the screen. 1. Loosen the Focus Lock Screw on the projection lens. mark (yellow) 2. Rotate the projection lens to obtain proper focus on center area of the screen. When the distance of the screen and lens is 1 meter, mark (yellow) of the lens on Focus Lock Screw position.
- Page 7 LENS MOUNTING ADAPTER INSTALLATION For installing the lenses listed below, attaching Lens Mounting Adapters is required. Model No.: LNS-W02, LNS-S01, LNS-M01 Check the following parts supplied with the adapters. ADAPTER SCREWS 8 pcs. (4 pcs. for mounting Adapters on the lens and 4 pcs. for mounting Lens on the projector.) NOTE: Do not use the screws in the lens package.
- Page 8 - 8 -...
Need help?
Do you have a question about the LNS-W01 and is the answer not in the manual?
Questions and answers