Table of Contents
Advertisement
Advertisement
Table of Contents

Related Manuals for Radio Shack PRO-84


Summary of Contents for Radio Shack PRO-84
- Page 1 20-516 PRO-84 200 channel racing scanner with headphones what’s included scanner • headphones antenna • belt clip w/two screws user’s guide • race frequency list quick start guide Read this user’s guide completely before using your scanner. www.radioshack.com...
-
Page 2: Table Of Contents
Contents The Basics The FCC wants you to know ....4 powering your scanner ....5 using rechargeable batteries . - Page 3 searching for and temporarily storing active frequencies ..... . 28 service search ......28 storing frequencies into channels during service search.
-
Page 4: The Fcc Wants You To Know
using keylock ......51 wired programming ..... . 52 using the display/key backlight . -
Page 5: Powering Your Scanner
powering your scanner You can power your scanner from any of three sources: • internal batteries (not supplied) • standard AC power (using an optional AC adapter) • vehicle battery power (using an optional DC adapter) Before installing batteries, set the switch in the battery compartment to match the type of batteries you will use. - Page 6 Install 2 AA batteries, matching the polarity symbols (+ -). Replace the cover. The Basics...
-
Page 7: Using Rechargeable Batteries
Warning: Set the ALKALINE/RECHARGEABLE switch to RECHARGEABLE only when using nickel cadmium (Ni-Cd) or nickel metal hydride (Ni-MH) rechargeable batteries. Never attempt to recharge non-rechargeable batteries. Non-rechargeable batteries can get hot or explode if you try to recharge them. Cautions: •... - Page 8 The scanner has a built-in circuit that lets you recharge Ni-Cd or Ni-MH batteries while they are in the scanner. To charge the batteries, set ALKALINE/ RECHARGEABLE inside the battery compartment to RECHARGEABLE, install the batteries in the scanner, and connect an external AC or DC adapter to the scanner’s DC 6V jack (see “using AC power”...
- Page 9 until it beeps every 15 seconds and flashes. • To prevent damage to Ni-Cd and Ni-MH batteries, never charge them in an area where the temperature is above 113°F (40°C) or below 40°F (4°C). • If you connect an external power source to the scanner with ALKALINE/RECHARGEABLE set to ALKALINE, CHArg appears but the scanner does NOT charge the batteries.
-
Page 10: Using Ac Power
at the end of their useful life, when taken out of service in the United States or Canada. The RBRC program provides a convenient alternative to placing used rechargeable batteries into the trash or the municipal waste stream, which may be illegal in your area. -
Page 11: Using Vehicle Battery Power
Follow these steps to use the scanner on AC power. Make sure the power is turned off. Insert the Adaptaplug into the AC adapter's cord so it reads TIP +. Then, insert the Adaptaplug into the scanner's DC 6V jack. Plug the AC adapter into a standard AC outlet. - Page 12 Make sure the power is turned off. If the adapter has a voltage switch, set the switch to 6V. Insert the Adaptaplug into the DC adapter’s cord so it reads TIP +. Then, insert the Adaptaplug into the scanner's DC 6V jack. Plug the other end of the adapter into your vehicle’s cigarette-lighter socket.
-
Page 13: Setting Up Your Scanner
setting up your scanner connecting the antenna To attach the supplied flexible antenna to the connector on the top of your scanner, align the slots around the antenna's connector with the tabs on the scanner's BNC connector. Then slide the antenna's connector down over the scanner's connector and rotate the antenna connector's outer ring clockwise until it locks into place. -
Page 14: Connecting An Earphone/Headphone
Note: Always use 50-ohm, RG-58, or RG-8 coaxial cable to connect an outdoor antenna. If the antenna is over 50 feet from the scanner, use RG-8 low-loss dielectric coaxial cable. If your antenna’s cable does not have a BNC connector, your local RadioShack store carries a variety of BNC adapters. -
Page 15: Traffic Safety
• Do not listen at extremely high volume levels. Extended high-volume listening can lead to permanent hearing loss. • After you begin listening, adjust the volume to a comfortable level. • Once you set the volume, do not increase it. Over time, your ears adapt to the volume level, so a volume level that does not cause discomfort might still damage your hearing. -
Page 16: Attaching The Belt Clip
Warning: If you connect an external speaker to the scanner's headphone jack, never connect the audio output line to a power supply and ground. This might damage the scanner. attaching the belt clip To make your scanner easier to carry when you are on the go, use the supplied belt clip. -
Page 17: About Your Scanner
about your scanner We use a few simple terms in this manual to explain the features of the scanner. Familiarize yourself with these terms and the scanner’s features, and you can put the scanner to work for you right away. Simply determine the type of communications you want to receive, then set the scanner to scan those communications. -
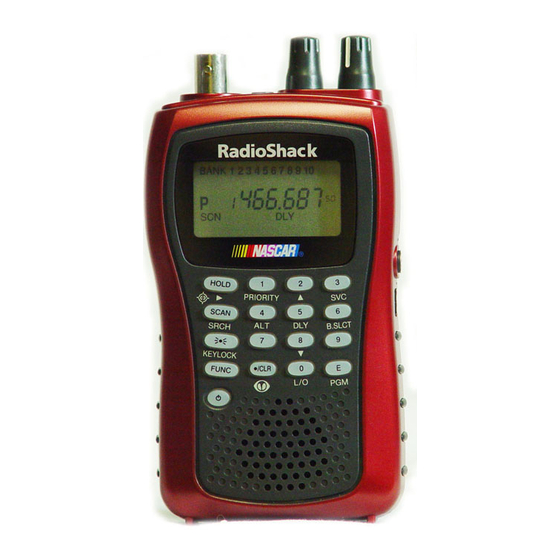
Page 18: A Look At The Keypad
a look at the keypad Your scanner's keys have various functions labeled on the key tops and below the keys. To select the function labeled on a key, simply press the key. To select the function labeled below a key, first press FUNC then release it. - Page 19 SCAN/SRCH: SCAN Scans the stored channels. FUNC+ SRCH Starts chain search or resumes searching. /KEYLOCK: Turns the display and key backlight on or off. FUNC+ KEYLOCK Locks and unlocks the keypad. FUNC Lets you use various functions by pressing this key in combination with other keys. Press and hold for more than 2 seconds to turn the scanner on or off.
- Page 20 3/SVC: 3 Enters a 3. FUNC + SVC Lets you search the five service search banks. 4/ALT: 4 Enters a 4. FUNC + ALT Turns the WX alert function on or off. 5/DLY: 5 Enters a 5. FUNC + DLY Turns the delay function on or off. 6/B.SLCT: 6 Enters a 6.
- Page 21 9 Enters a 9. . /CLR/ . /CLR Enters a decimal point or clears an incorrect entry. FUNC + Jumps directly to the last channel in memory (Ch#200) from any mode. 0/L/O: 0 Enters a 0. FUNC + L/O Lets you lock out a selected channel or skip a specified frequency.
-
Page 22: A Look At The Display
a look at the display The display has indicators that show the scanner’s current operating status. The display information helps you understand how your scanner operates. BANK - appears with numbers (1-10). P - appears when you select a priority channel. SCN - appears when you scan channels. - Page 23 L/O - appears when you manually select a channel you locked out or a skip frequency. - appears when you lock the keypad. - alerts you when the battery power gets low. - appears while you store a frequency into a channel.
-
Page 24: Understanding Banks
understanding banks service banks The scanner is preprogrammed with all the frequencies allocated to the weather, ham, marine, aircraft, and police (fire/emergency) services. channel storage banks To make it easier to identify and select the channels you want to listen to, the 200 channels are divided into 10 channel-storage banks. -
Page 25: Beyond The Basics
operating your scanner turning on the scanner and setting squelch Your scanner is preprogrammed at the factory with two major race series frequencies. See the supplied race frequency list. Note: Make sure the scanner’s antenna is connected before you turn it on. Turn SQUELCH fully counterclockwise. -
Page 26: Police Call Guide
RadioShack Police Call Guide including Fire and Emergency Services, and Official Aeronautical Frequency Directory. We update these directories every year, so be sure to get a current copy. Follow these steps to store frequencies into channels. Press HOLD. Then enter the channel number where you want to store a frequency, then press FUNC + PGM. -
Page 27: Race Scanning Tips
•When you enter a frequency into a channel, the scanner automatically turns on the delay function and DLY appears. When delay is turned on, the scanner automatically pauses scanning 2 seconds after the end of a transmission before scanning proceeds to the next channel. To turn the function off or on, press FUNC + DLY. -
Page 28: Searching For And Temporarily Storing Active Frequencies
• You can find race frequencies at Internet sites or you can obtain up to date frequency lists at the races. • You can program each race team by the car number. For example, program car #24 on channel 24 and car #56 on channel 56 and so •... -
Page 29: Storing Frequencies Into Channels During Service Search
press FUNC + SVC. Service mode appears on the display. When the scanner stops on a transmission, quickly press HOLD to stop searching and listen to the transmission. HOLD appears. In this mode, you can press FUNC + or FUNC + to step through the frequencies. -
Page 30: Scanning The Stored Channels
disappears. Then press E. You can also use the 0-9 keys to select the bank. To continue searching, press FUNC + SVC. If you entered a frequency that has already been entered elsewhere, the scanner sounds an error tone and displays the channel that was duplicated. If you entered the frequency by mistake, press . -
Page 31: Manually Selecting A Channel
• To ensure proper scanning, adjust SQUELCH until the audio mutes. manually selecting a channel You can continuously monitor a single channel without scanning. This is useful if you want to monitor a specific channel, or hear an emergency broadcast on a channel and do not want to miss any details, even though there might be periods of silence. - Page 32 Notes: • Signal Stalker works well for locating the source of strong local transmissions such as mobile and handheld two-way radios in areas with no other strong transmission sources. However, if you are in an area with many transmission sources (such as pager radio transmitters, multi- use radio towers, traffic control devices, etc.), Signal Stalker might not find the transmission you are searching for, or it might find a...
-
Page 33: Setting The Signal Stalker Options
setting the signal stalker options Press FUNC then press and hold for 2 seconds. One of the following signal stalker options appears. S-S.bnd: Lets you select the signal stalker band. S-S.ALt: Lets you select the signal stalker alert settings. Repeatedly press to select the option you want, then press E. - Page 34 Lo On or Lo OFF Air On or Air OFF Hi On or Hi OFF UHF On or UHF OFF 800 On or 800 OFF Repeatedly press until the option you want appears, then press E. Otherwise, press . / CLR if you do not want to select it.
-
Page 35: Using Signal Stalker
Otherwise, press . /CLR if you do not want to select it. When you select the option, press . /CLR to exit the option mode. Otherwise, to continue normal scanning, repeatedly press FUNC until disappears then press SCAN. using signal stalker To turn on Signal Stalker, turn SQUELCH fully clockwise, then press FUNC + once except in... -
Page 36: Skywarn
To turn on Signal Stalker and turn off normal scanning, press FUNC + twice. and - - - - - - flash. To turn off Signal Stalker and turn on normal scanning, press FUNC + three times. disappears. Skywarn The Skywarn function lets you jump directly to the last channel in memory (Channel 200) from any mode by pressing FUNC + . - Page 37 • wall clouds seen in severe thunderstorms (which spawn tornadoes) • severe lowering of a wall cloud • turbulence in a wall cloud • funnel clouds • tornadoes • high water areas • downed power lines • other emergency conditions that affect life or property Listening to Skywarn broadcasts makes it easy to quickly find out about and prepare for inclement...
-
Page 38: Wx Alert
If you tune to a Skywarn frequency when the Skywarn net is not active, you may hear nothing or you may hear amateur radio operators talking on a local repeater system. Most importantly, you get Skywarn reports directly from trained observers - that means you get them several minutes before they can be relayed for broadcast by NOAA and as much as 5 or 10 minutes sooner than you will hear them on local TV or radio! -
Page 39: Chain Search
chain search This feature lets you search through preset frequency ranges. You can also change each range to a range you set. There are three modes within this feature: chain search mode, chain search hold mode, and program band select mode. The preset frequency ranges are: Bank No. -
Page 40: Chain Search Hold Mode
(indicating the search direction) appear. The search bank number being searched flashes. Press 0-9 to enable or disable the search bank number being searched in this mode. Enabled bank numbers appear. Disabled bank numbers disappear. At least one search bank must be enabled. The scanner sounds an error tone if you try to disable all the search banks. -
Page 41: Storing Frequencies Found During Chain Search Into Channel Memory
To resume chain search, press HOLD (if does not appear on the display) or press SRCH (if appears on the display). storing frequencies found during chain search into channel memory You can store frequencies you find in chain search mode or chain search hold mode. Press FUNC + PGM in chain search mode or chain search hold mode. -
Page 42: Program Band Select Mode
program band select mode You can use this mode to define the search range used during a chain search in each search bank. To set the scanner to program band select mode, press FUNC + B.SLCT. SRCH appears. Then select a search bank. -
Page 43: Direct Entry Search
direct entry search You can use direct entry search to search up or down from the currently displayed frequency. If the scanner is scanning or searching, press HOLD. Enter the frequency you want to start from by using the number keys. (Press . /CLR to enter a decimal point). -
Page 44: Direct Entry Search Hold Mode
direct entry search hold mode To stop searching during direct entry search, press HOLD. HOLD appears. In this mode, pressing FUNC changes the search direction downward and pressing FUNC + changes the search direction upward. appears depending on the search direction. -
Page 45: Search Skip Memory
disappears. You can also press 0-9 to select the bank. Press E to store the frequency into the blank channel. If you enter a frequency that has already been stored elsewhere, the scanner sounds an error tone and displays the channel that was duplicated. If you entered the frequency by mistake, press . - Page 46 To skip a frequency, press FUNC + L/O when the scanner stops on the frequency during a search or a search hold. The scanner stores the frequency in memory and automatically resumes the search if it is not in hold. Follow these steps to clear a single frequency from skip memory so the scanner stops on it during a search.
-
Page 47: Delay
delay Sometimes a user might pause before replying to a transmission. To avoid missing a reply on a specific channel, you can program a 2-second delay into any channel or frequency. The scanner continues to monitor the channel frequency for an additional 2 seconds after the transmission stops before resuming scanning or searching. -
Page 48: Turning Channel-Storage Banks On And Off
turning channel-storage banks on and off You can turn each channel-storage bank on and off. When you turn off a bank, the scanner does not scan any of the 20 channels in that bank. While scanning, press the number key that corresponds to the bank you want to turn on or off. -
Page 49: Locking Out Frequencies
Notes: • The scanner does not skip locked-out channels when you use Signal Stalker. You must lock out frequencies instead. See “Locking Out Frequencies.” • You can still manually select locked-out channels. To unlock a channel, manually select the channel, then press FUNC + L/O. -
Page 50: Priority
priority The priority feature lets you scan through channels and still not miss important or interesting calls on specific channels. You can program one stored channel in each bank as a priority channel (10 total). If the priority feature is turned on, as the scanner scans the bank, it checks that bank's priority channel for activity every 2 seconds. -
Page 51: Using Keylock
To turn off the priority feature, press FUNC + PRIORITY. PRI disappears. using keylock Use the scanner's keylock to protect it from accidental program changes. When the scanner's keys are locked, the only controls that operate are SCAN, FUNC, HOLD, , KEYLOCK, and To turn on keylock, press FUNC + KEYLOCK. -
Page 52: Wired Programming
wired programming You can transfer programming data to your scanner using your PC and an optional interface cable (Cat. No. 20-289 or 20-047, available at your local RadioShack store) and software (available at your local RadioShack or www.radioshack.com). Do not use an interface cable other than the specified. -
Page 53: Using The Display/Key Backlight
To set up the program, click on Tools, select Configuration, and select PRO-83 (if necessary). Turn on the scanner. The scanner automatically goes into the wired programming mode. PGM and WirEd appear. Then send the data from the Data frame numbers being received appear. When the scanner has successfully received all data, End appears. -
Page 54: Resetting The Scanner
resetting the scanner If the scanner’s display locks up or stops operating properly, you might need to reset the scanner. Caution: This procedure clears all the information stored in channel memories including the race frequencies. Before you reset the scanner, try turning it off and on to see if it begins working properly. -
Page 55: Frequently Asked Questions
frequently asked questions Q: My scanner isn’t working at all. How do I turn it on? A: The scanner might not be receiving power. Make sure the batteries are installed correctly and are good (if you installed alkaline batteries) or fully charged (if you installed rechargeable batteries). - Page 56 Q: The scanner’s display is dim and hard to see. The scanner also beeps once every 15 to 30 seconds. What’s wrong? A: The scanner might not be receiving enough power or the batteries might not be correctly installed. Make sure the batteries are installed correctly and are good (if you installed alkaline batteries) or fully charged (if you installed rechargeable batteries).
- Page 57 or fully charged (if you installed rechargeable batteries. Also make sure the AC adapter’s or DC adapter’s barrel plug is fully inserted into the scanner’s 6V 300 mA jack. See “using AC power” on Page 10 for more information. If the batteries are OK, the antenna might not be connected or is connected incorrectly.
-
Page 58: Specifications
specifications Frequency Coverage: 25.0000-27.9950 MHz (in 5 kHz steps) 28.0000-29.9950 MHz (in 5 kHz steps) 30.0000-49.9950 MHz (in 5 kHz steps) 50.0000-54.0000 MHz (in 5 kHz steps) 108.0000-136.9875 MHz (in 12.5 kHz steps) 137.0000-143.9950 MHz (in 5 kHz steps) 144.0000-147.9950 MHz (in 5 kHz steps) 148.0000-174.0000 MHz (in 5 kHz steps) 406.0000-419.99375 MHz (in 6.25 kHz steps) 420.0000-449.99375 MHz (in 6.25 kHz steps) -
Page 59: Glossary
glossary ALKALINE/RECHARGEABLE Switch - Lets you select the type of batteries you want to use in the scanner (alkaline or rechargeable) ........5 Channel - a programmable memory location. Channels are grouped into channel-storage banks. Your scanner has 10 channel-storage banks and each bank has 20 channels. -
Page 60: Index
index ALKALINE/RECHARGEABLE Switch ...... 5 Antenna Connecting ............13 Using an Optional Antenna ......13 Attaching a belt clip ..........16 Backlight ..............53 Batteries Charging .............. 7 Installing .............. 5 Belt Clip Attaching ............16 Chain Search ............39 Mode .............. - Page 61 Direct Entry Search ..........43 Earphone Connecting ............14 Extension Speaker Connecting ............15 Frequently Asked Questions ......... 55 FUNC Key ............... 18 Keylock ..............51 Locking Out Channels ........... 48 Locking Out Frequencies ........49 Manually Selecting Channels ........ 31 Priority ..............
- Page 62 Service Banks ............24 Service Search ............28 Squelch Setting ............... 25 Storing frequencies ..........25 During Service Search ........29 Direct Entry Search Mode ........ 44 Chain Search Mode .......... 41 Signal Stalker ............31 Locking Out Frequencies ........49 Setting Options ..........
-
Page 63: Warranty
warranty This product is warranted by RadioShack against manufacturing defects in material and workmanship under normal use for 1 (one) year from the date of purchase from RadioShack company-owned stores and authorized RadioShack franchisees and dealers. For complete warranty details and exclusions, check with your local RadioShack store. - Page 64 Lightweight, and loaded with the frequencies you want! This compact scanner fits in your palm and has an orange backlit display and keypad for easy use at night. Store up to 200 frequencies into memory. Scanner enthusiasts will appreciate the Signal Stalker feature that instantly “locks on”...
Need help?
Do you have a question about the PRO-84 and is the answer not in the manual?
Questions and answers