Friedrich SS08M10 Service & Parts Manual
Standard chassis models kuhl
Hide thumbs
Also See for SS08M10:
- Installation and operation manual (44 pages) ,
- Installation and operating manual (132 pages) ,
- Service manual (87 pages)
Table of Contents
Advertisement
Quick Links
Room Air Conditioners
Room Air Conditioners
Standard Chassis Models
Standard Chassis Models
208-230-Volt:
208-230-Volt:
Cool
208-230-Volt: ES12N33*, ES15N33*, EM18N34*, EM24N34*, EL36N35*
208-230-Volt:
Electric Heat
208-230-Volt: YS12N33*, YM18N34*, YL24N35*
208-230-Volt:
Heat Pump
Kuhl-Serv/PartsMan (9-12)
AUTO FAN
CONTINUOUS
AUTO
C
F
AUTO
°F °C
AUTO
CONTINUOUS
SYSTEM
FAN MODE
AUTO
POWER
FAN SPEED
SCHEDULE
SYSTEM
FAN MODE
SCHEDULE
FAN SPEED
Cool Only
Cool Only
115-Volt:
115-Volt:
SS08N10*, SS10N10*, SS12N10*, SS14N10*, SM15N10*
SS08M10, SS10M10, SS12M10, SS14M10
SS12N30*, SS15N30*, SM18N30*, SM21N30*
SS12M30, SS15M30, SM18M30, SM21M30
SM24N30*,SL22N30*, SL24N30*, SL28N30*, SL36N30*
Cool with Electric Heat
Cool with Electric Heat
Heat Pump with Electric Heat
Heat Pump with Electric Heat
Heat Pump
Heat Pump
115-Volt: YS10N10*
115-Volt:
*Last character may vary
93001402_00
Advertisement
Table of Contents

Related Manuals for Friedrich SS08M10


Summary of Contents for Friedrich SS08M10
- Page 1 Standard Chassis Models Standard Chassis Models Cool Only Cool Only 115-Volt: 115-Volt: SS08N10*, SS10N10*, SS12N10*, SS14N10*, SM15N10* SS08M10, SS10M10, SS12M10, SS14M10 208-230-Volt: 208-230-Volt: SS12M30, SS15M30, SM18M30, SM21M30 SS12N30*, SS15N30*, SM18N30*, SM21N30* SM24N30*,SL22N30*, SL24N30*, SL28N30*, SL36N30* Cool Cool with Electric Heat...
-
Page 2: Table Of Contents
Table Of Contents Important Safety Information ............................. 2-4 Introduction ................................... 5 Model and Serial Number Location ..........................5 Unit Identification ................................6 Performance Data and Specifications .......................... 7 Installation Information/Sleeve Dimensions/Circuit Rating ................... 8 Electrical Data ................................9 Before Operating the Unit ............................10 Kuhl Control Options ..............................11 Control Panel and Display Identification ........................12 Control Panel Operation Instructions ........................13-19... -
Page 3: Important Safety Information
IMPORTANT SAFETY INFORMATION The information contained in this manual is intended for use by a qualified service technician who is familiar with the safety procedures required for installation and repair, and who is equipped with the proper tools and test instruments required to service this product. Installation or repairs made by unqualified persons can result in subjecting the unqualified person making such repairs as well as the persons being served by the equipment to hazards resulting in injury or electrical shock which can be serious or even fatal. - Page 4 • Do not spray or pour water on the return air grille, discharge air grille, evaporator coil, control panel, and sleeve on the room side of the air conditioning unit while cleaning. • Electrical component malfunction caused by water could result in electric shock or other electrically unsafe conditions when the power is restored and the unit is turned on, even after the exterior is dry.
- Page 5 PROPERTY DAMAGE HAZARDS FIRE DAMAGE HAZARDS: • Read the Installation/Operation Manual for the air conditioning unit prior to operating. • Use air conditioner on a single dedicated circuit within the specified amperage rating. • Connect to a properly grounded outlet only. •...
-
Page 6: Introduction
INTRODUCTION This service manual is designed to be used in conjunction with the installation and operation manuals provided with each air conditioning system. This service manual was written to assist the professional RAC (Room Air Conditioner) service technician to quickly and accurately diagnose and repair malfunctions. -
Page 7: Unit Identification
UNIT IDENTIFICATION Model Number Code MODEL NUMBER VOLTS 115 COOLING HEATING REFRIGERANT XXXXXXXXX XXXXXXXXXX FUSE PROTECTED AIR CONDITIONING CO. YS10M10A 60 HZ / 1 PH BTH/HR 6500 BTH/HR 6500 30.1 OZ R410A 600 PSIG HS XXXXXXXXX CIRCUITS USE 15A SAN ANTONIO, TEXAS SERIAL NUMBER VOLTS MIN 108 EER 12.0... -
Page 8: Performance Data And Specifications
* Operates on 115 volt and is not equipped with supplemental heat. Will not provide heat at temperatures below 40°F. Friedrich room air conditioners are designed to operate in outdoor temperatures from 60° F to 115° F. Kühl+ Heat Pump heating information (shown in red) indicates heat pump performance. -
Page 9: Installation Information/Sleeve Dimensions/Circuit Rating
Installation Information / Sleeve Dimensions Thru-the-wall Installation Depth Shell Depth to Window Width Finished Hole Minimum Minimum with Front Louvers Extension Extension Sleeve Height Width Into Room* Outside* Minimum** Maximum Height Width Max. Depth ¾" ¾” 15 /16 " 15 /16 "... -
Page 10: Electrical Data
ELECTRICAL DATA WARNING ELECTRIC SHOCK HAZARD Turn off electric power before service or installation. All electrical connections and wiring MUST be installed by a qualified electrician and conform to the National Electrical Code and all local codes which have jurisdiction. Failure to do so can result in personal injury or death. -
Page 11: Before Operating The Unit
EM24N34, 6-30R YM18N34, YL24N35 All Friedrich room air conditioners are shipped from the factory with a Leakage Current Detection Interrupter (LCDI) equipped power cord. The Figure 1 LCDI device on the end of the cord meets the UL and NEC requirements for cord connected air conditioners. -
Page 12: Kuhl Control Options
07:00 and 18:00. This option will cause your air conditioner to raise temperatures FriedrichLink™ Adapter accessory available through Friedrich authorized to 84°F after typical working hours and on weekends when commercial spaces retailers or www.friedrich.com. See FriedrichLink™ Adapter section on are typically unoccupied. www.friedrich.com for complete details. -
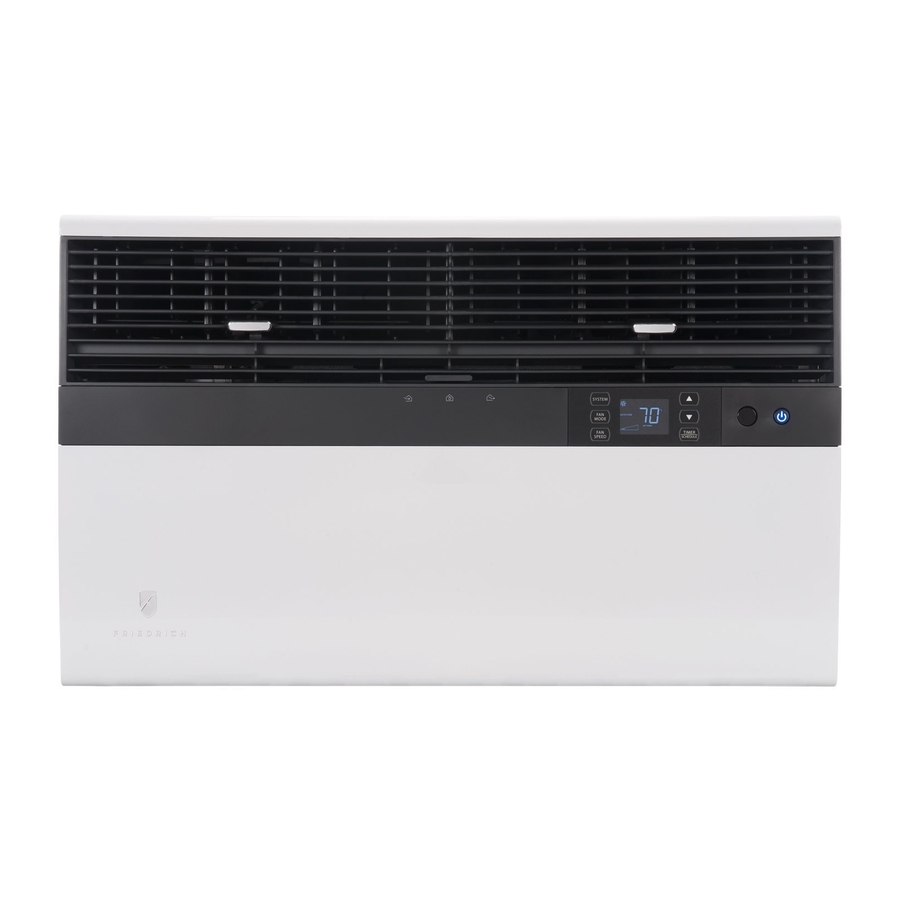
Page 13: Control Panel And Display Identification
Control Panel and Display Identification Let’s check out how to control your air conditioner. On the control panel, just above the POWER , is a liquid crystal display (LCD). All of the control panel function buttons and mode icons can be viewed in Figure 3. Power On –... -
Page 14: Control Panel Operation Instructions
Control Panel Operation Instructions FAN MODE – The button allows you to select between AUTO FAN MODE modes. To select, press once and let go. CONTINUOUS SYSTEM - The button allows you to sequentially select the modes SYSTEM of operation. To select, press once and let go. AUTO MODE Automatically changes between HEAT and COOL (HEAT and COOL ONLY Units) - Page 15 ºF - ºC Select and DOWN - arrows - Pressing either button changes the system's set point (desired room temperature). These buttons are also used for setting the Timer and other programming. AUTO FAN AUTO FAN SET POINT SET POINT FRR132 To switch from degrees Fahrenheit (F) to Celsius (C), press FRR100...
- Page 16 DIM Function Wait Icon There are three separate display brightness levels, AUTO, 20% and full (100%). To change the DIM setting, press the Power button for three seconds. AUTO FAN SET POINT FRR120 The wait icon illuminates when the compressor lockout is active. Control Panel Lock FRR192 To lock the front panel controls, press and hold the...
- Page 17 TIMER OR SCHEDULE OPTIONS 1 OR 2 SELECTION The control system has one Timer and two Schedule functions: Timer (factory default) - Allows you to command the unit to turn ON and OFF at a time you program. Setting the start, stop and day can be found latter in this manual on page 18.
- Page 18 TIMER SETTINGS 1. Set time and day 2. Set start time 3. Set stop time Figure 4 AUTO FAN SET POINT FRR131 Press TIMER SET (Refer to Figure 4) button to exit and save the SET TIME function. The TIMER SET button must be pressed within 15 second. Button inactivity for more than 15 seconds causes the display to time out and return to the normal operating display.
- Page 19 Set theTimer Stop Time Timer ON Scenarios Scenario 1 AUTO FAN AUTO FAN SET POINT SET POINT FRR144 The display shows a normal system. Press and hold the MIN button (Figure 4) for 3 seconds. Note the Timer start - stop times may be set even when FRR156 The display shows a normal operating system.
- Page 20 Timer OFF Scenarios Scenario 1 Timer - Schedule Control Block AUTO FAN SET POINT SCHEDULE FRR166 FRR148 The display shows the unit in Timer mode during an in-active (OFF) period. If the unit is operating in the TIMER or SCHEDULE mode, and you press any bytton except the button, the TIMER icon begins to...
-
Page 21: Remote Control Operation
Remote Control Operation FAN SPEED Button - Used to sequentially select new fan speed, plus AUTO operation. When the button is pressed, the fan speed icon FA N SPEED (triangle) changes to indicate the new speed level. Fan speed automatically Remote Control - Refer to Figures 12 and 13 during operation description. -
Page 22: Remote Control Operation
Remote Control Operation (Continued) Figure 12 DISPLAY AUTO AUTO FAN CONTINUOUS AUTO SYSTEM FAN MODE SYSTEM FAN MODE POWER TEMPERATURE TEMPERATURE POWER DOWN FAN SPEED SCHEDULE SCHEDULE FAN SPEED FRR081 Figure 13 FAN ONLY COOL HEAT ICON ICON ICON SYSTEM MODE AUTO AUTO FAN... -
Page 23: Unit Operation
UNIT OPERATION Front Panel System Mode Sequence (TIMER/SCHEDULE = OFF) There are two system modes of operation. One for a cool only unit (see figure 1) and one for a heat-cool unit (see figure 2). System parameters for each system mode are saved when exiting a system mode, and retrieved when entering a new system mode. -
Page 24: Electronic Control Sequence Of Operation
ELECTRONIC CONTROL SEQUENCE OF OPERATION Compressor and Reversing Valve Control Active Mode Compressor Reversing Valve State Cooling De-Energized Heat - Heat Pump Energized Heat - Electric Fan Only * The Reversing valve stays in the last state until a call for heat or cooling (see figure below) Compressor Operation: The reversing valve only changes when required to provide cooling or heat pump. - Page 25 Heating Mode Control Operation There are two heating methods: Heat Pump and Electric Resistance Heat. There are 3 types of units that provide heating: Heat Pump Only (Model YS10M10) Heat Pump with Electric Heat and Cool with Electric Heat. Heat Control Operation Heat Pump Only Unit (YS10M10 has no electric heat back-up) Once the ambient temperature falls below the Heating Demand Threshold (1.5 ˚F Below the Heat Set Point Temperature), the heating cycle begins.
- Page 26 Heat Pump With Electric Heat Operation This heating is more complex due to the possibility of two heating methods. If the ambient indoor temperature is be- low the heat demand threshold (1.5˚F below the heat set point temperature), and the compressor is not locked out, turn on compressor.
- Page 27 Heat Pump With Electric Heat Operation (Continued) Condition 2 If the Δ (delta) (set point temperature minus the ambient indoor temperature) is greater than 5 ˚F, then the unit will switch to electric heat, if available. The unit will continue to operate with electric heat until the heat demand is satisfied. Note that the electric heat switches on after the Δ...
- Page 28 Compressor Lock Out Time The lockout feature ensures that the compressor is de-energized for a period of time. The timer varies randomly from 180 to 240 seconds The compressor lockout is initiated every time the compressor is “off” due to: (1) Satisfying the temperature set point (2) Changing mode to fan only or heat (3) Turning the unit off...
-
Page 29: Fan Operation
Fan Operation (Front Panel Mode) Heat – Cool – Auto – Fan Only Models starting with SS, SM have 4 speeds. Models with SL, and all Kuhl+ have 3 speeds Speed Selection AUTO AUTO Operation, but never turns Off. Uses cool set point or heat set point vs. -
Page 30: Removing The Front Cover And Unit Chassis
REMOVING THE FRONT COVER REMOVING THE CHASSIS WARNING WARNING ELECTRIC SHOCK HAZARD ELECTRIC SHOCK HAZARD Disconnect power to the unit before Disconnect power to the unit before servicing. Failure to follow this warning servicing. Failure to follow this warning could result in serious injury or death. could result in serious injury or death. -
Page 31: Replacing The Id Coil Thermistor
REPLACING THE INDOOR COIL THERMISTOR Replace the indoor coil sensor. Ensure to properly clip WARNING and insulate it at the same location (see figure below). ELECTRIC SHOCK HAZARD Disconnect power to the unit before servicing. Failure to follow this warning could result in serious injury or death. -
Page 32: Airflow Selection And Adjustment
Airflow Selection and Adjustment Air flow direction adjustment left or right side of the discharge opening. Each of the banks of louvers can be directed left, right, up or down in order to achieve the most optimum move it in the direction that you would like the air to be directed. Please louvers than the other. -
Page 33: Components Testing
COMPONENTS TESTING CAPACITORS FAN MOTOR WARNING A single phase permanent split capacitor motor is used to drive the evaporator blower and condenser fan. A self-resetting overload is located inside the motor to protect against high ELECTRIC SHOCK HAZARD Turn off electric power before servicing. temperature and high amperage conditions. -
Page 34: Components Testing
COMPONENTS TESTING (continued) HEATING ELEMENT TESTING THE HEATING ELEMENT All heat pumps and electric heat models are equipped WARNING with a heating element with the exception of model YS10M10. The other “YS” and “ES” models are ELECTRIC SHOCK HAZARD equipped with a 3.3 KW element. The “YM” and “EM” Disconnect power to the unit before models are equipped with a 4.0 KW element. -
Page 35: Testing The User Interface And Control Board
If the User Interface does not turn on: 1. Make sure the unit has the proper voltage and that it is turned on. 2. Disconnect the User Interface’s wire harness on the control board. 3. Using a voltmeter, check the top and bottom pins of the male connector (see picture below). There should be 5VDC 4. -
Page 36: Refrigeration Sequence Of Operation
REFRIGERATION SEQUENCE OF OPERATION A good understanding of the basic operation of the The refrigerant leaves the condenser Coil through the refrigeration system is essential for the service technician. liquid line as a warm high pressure liquid. It next will pass Without this understanding, accurate troubleshooting of through the refrigerant drier (if so equipped). -
Page 37: R410A Sealed System Repair Considerations
Weigh-in the refrigerant charge into the high side of the system. • Introduce liquid refrigerant charge into the high side of the system. • For low side pressure charging of R-410A, use a charging adaptor. • Use Friedrich approved R-410A filter dryers only. -
Page 38: Sealed Refrigeration System Repairs
R-410A SEALED REFRIGERATION SYSTEM REPAIRS IMPORTANT SEALED SYSTEM REPAIRS TO COOL-ONLY MODELS REQUIRE THE INSTALLATION OF A LIQUID LINE DRIER. EQUIPMENT REQUIRED: High Pressure Gauge - (0 to 750 lbs.) 1. Voltmeter 10. Low Pressure Gauge - (-30 to 200 lbs.) 2. - Page 39 Method Of Charging / Repairs The acceptable method for charging the sealed system is the Weighed in Charge Method. The weighed in charge method is applicable to all units. It is the preferred method to use, as it is the most accurate. The weighed in method should always be used whenever a charge is removed from a unit such as for a leak repair, compressor replacement, or when there is no refrigerant...
-
Page 40: Undercharged Refrigerant Systems
WARNING WARNING HIGH PRESSURE HAZARD ELECTRIC SHOCK HAZARD Turn off electric power before service or Sealed Refrigeration System contains refrigerant installation. and oil under high pressure. Extreme care must be used, if it becomes Proper safety procedures must be followed, necessary to work on equipment with power and proper protective clothing must be worn applied. -
Page 41: Restricted Refrigerant System
Restricted Refrigerant System Troubleshooting a restricted refrigerant system can be at the metering device entrance to the evaporator. The difficult. The following procedures are the more common evaporator in a partial restriction could be partially frosted problems and solutions to these problems. There are two or have an ice ball close to the entrance of the metering types of refrigerant restrictions: Partial restrictions and device. -
Page 42: Hermetics Components Check
HERMETIC COMPONENTS CHECK WARNING WARNING BURN HAZARD Proper safety procedures must be followed, CUT/SEVER HAZARD and proper protective clothing must be worn Be careful with the sharp edges and corners. when working with a torch. Wear protective clothing and gloves, etc. Failure to follow these procedures could Failure to do so could result in serious injury. -
Page 43: Reversing Valve Description/Operation
REVERSING VALVE DESCRIPTION/OPERATION WARNING ELECTRIC SHOCK HAZARD Disconnect power to the unit before servicing. Failure to follow this warning could result in serious injury or death. The Reversing Valve controls the direction of refrigerant “A” and “B” ports of the pilot valve. A third capillary is a common flow to the indoor and outdoor coils. -
Page 44: Testing The Coil
TESTING THE REVERSING VALVE SOLENOID COIL Should the valve fail to shift from coooling to heating, block the air flow through the outdoor coil and allow the WARNING discharge pressure to build in the system. Then switch the system from heating to cooling. ELECTRIC SHOCK HAZARD Unplug and/or disconnect all electrical power If the valve is stuck in the heating position, block the air... -
Page 45: Procedure For Changing Reversing Valve
Touch Test in Heating/Cooling Cycle 6. Protect new valve body from heat while brazing with plastic WARNING heat sink (Thermo Trap) or wrap valve body with wet rag. BURN HAZARD Fit all lines into new valve and braze lines into new Certain unit components operate at valve. -
Page 46: Compressor Checks
COMPRESSOR CHECKS Heat generated within the compressor shell, usually due WARNING to recycling of the motor, is slow to dissipate. It may take anywhere from a few minutes to several hours for the ELECTRIC SHOCK HAZARD overload to reset. Turn off electric power before service or installation. - Page 47 Single Phase Resistance Test Many compressor failures are caused by the following WARNING conditions: Improper air flow over the evaporator. ELECTRIC SHOCK HAZARD Turn off electric power before service or Overcharged refrigerant system causing liquid to be installation. Extreme care must be used, if it returned to the compressor.
-
Page 48: Compressor Replacement
COMPRESSOR REPLACEMENT Recommended procedure for compressor After all refrigerant has been recovered, disconnect suction and discharge lines from the compressor and replacement remove compressor. Be certain to have both suction WARNING and discharge process tubes open to atmosphere. Carefully pour a small amount of oil from the suction RISK OF ELECTRIC SHOCK Unplug and/or disconnect all electrical power stub of the defective compressor into a clean container. - Page 49 SPECIAL PROCEDURE IN THE CASE OF MOTOR COMPRESSOR BURNOUT WARNING ELECTRIC SHOCK HAZARD Turn off electric power before service or installation. Failure to do so may result in personal injury, or death. WARNING HIGH PRESSURE HAZARD Sealed Refrigeration System contains refrigerant and oil under high pressure.
-
Page 50: Routine Maintenance
ROUTINE MAINTENANCE COILS AND BASE PAN WARNING The indoor coil (evaporator coil), the outdoor coil (condenser coil) and base pan should be inspected ELECTRIC SHOCK HAZARD periodically (yearly or bi-yearly) and cleaned of all Turn off electric power before inspections, debris (lint, dirt, leaves, paper, etc.). - Page 51 ROUTINE MAINTENANCE (Continued) NOTICE Do not drill holes in the bottom of the drain pan or the underside of the unit. Not following this notice could result in damage to the unit or condensate water leaking inappropriately which could cause water damage to surrounding property.
-
Page 52: Filter Installation
ROUTINE MAINTENANCE (Continued) Standard filter cleaning, removal and installation instructions Removing filter Filter dissassembly and cleaning STEP 1. STEP 1. NOTE: Figure 1 Figure 3 FILTER FILTER GRIP STEP 2. Remove the filter by grabbing it from its handle, lifting it up and swinging it out. - Page 53 Noises All air conditioners make some noise. Friedrich units are designed to operate as quietly as possible. An air conditioner mounted in a wall is quieter than one mounted in a window. It is important to ensure that the chassis seal gasket (Item 14) is properly installed (refer to installation instructions).
-
Page 54: Service And Assistance/Avalaible Accessories
Window Installation Kits (Standard in Kühl Models without Heat) KWIKS – For all ES and YS models. KWIKM – For all EM and YM models. KWIKL – For all EL and YL models. See www.friedrich.com for additional accessories for your unit. -
Page 55: How To Check And Erase The Diagnostic Codes
How to Check the Diagnostic Codes Erasing the Diagnostic Codes See codes chart on next page. AUTO FAN AUTO FAN SET POINT SET POINT To check the active system errors, press the & keys for 3 sec. Press and hold the buttons simultaneously for 3 sec. -
Page 56: Error Codes And Alarm Status
ERROR CODES AND ALARM STATUS ERROR CODES AND ALARM STATUS Error Problem Control Board's Action Code Front Panel Button Stuck For More Continue to monitor for "OPEN" (Unstuck) switch. Do not process switch Than 20 Seconds input. ENSURE FRONT COVER DOES NOT DEPRESS BUTTONS Input Voltage Out of Specification (103 Open all relays until voltage is back within specs. -
Page 57: Test Mode
Test Mode This function is used to test the compressor operation. By turning it on, it allows the service technician to bypass the compressor’s 3 minute time delay. AUTO FAN SET POINT Press the & buttons simultaneously for 3 seconds. TIMER SCHEDULE MODE... -
Page 58: Thermistors' Resistance Values
THERMISTORS’ RESISTANCE VALUES (This Table Applies to All Thermistors) RESISTANCE TEMP RESISTENCE (K Ohms) TOLERANCE % CENTR 210.889 225.548 240.224 6.50 6.51 178.952 190.889 202.825 6.25 6.25 151.591 161.325 171.059 6.03 6.03 128.434 136.363 144.292 5.81 5.81 108.886 115.340 121.794 5.60 5.60 92.411... -
Page 59: Performance Test Data Sheet
ROOM AIR CONDITIONER UNIT PERFORMANCE TEST DATA SHEET JOB NAME________________________________ TECHS NAME____________________________________ DATE: _______________ MODEL:_______________ SERIAL:________________ HOW IS ALL OF THE INSTALLATION? GOOD BAD ____ ____ IS A C H AS S IS S E A L G AS K E T IN T A L L E D ? IS T H E F R E S H/E XA US T A IR V E N T OP E N ? ____ ____... -
Page 60: Troubleshooting
TROUBLESHOOTING TIPS NOTE: To more accurately identify the problem, first check for current maintenance alerts and their history. Problem Possible Cause Possible Solution Turn the unit to the on position and raise or The unit is turned to the off position, lower temperature setting (as appropriate) to call for operation. - Page 61 TROUBLESHOOTING TIPS (Continued) Problem Possible Cause Possible Solution Do not try to operate your air conditioner in the The outside temperature is below cooling mode when the outside temperature 60° F (16° C). is below 60° F (16° C). The unit will not cool properly, and the unit may be damaged.
- Page 62 COOLING ONLY ROOM AIR CONDITIONERS: TROUBLESHOOTING TIPS Possible Solution Check voltage at compressor. 115V & 230V Low voltage units will operate at 10% voltage variance Temperature not set cold enough or Set temperature to lower than ambient position. room air thermistor inoperative Test thermistor and replace if inoperative.
- Page 63 COOLING ONLY ROOM AIR CONDITIONERS: TROUBLESHOOTING TIPS Possible Solution Replace fuse, reset breaker. If repeats, check Fuse blown or circuit tripped fuse or breaker size. Check for shorts in unit wiring & components Power cord not plugged in Plug it in System button in “OFF”...
- Page 64 COOLING ONLY ROOM AIR CONDITIONERS: TROUBLESHOOTING TIPS Possible Solution Overload inoperative. Opens too Check operation of unit. Replace overload if soon system operation is satisfactory Compressor restarted before Control’s default of 3 minutes wait delay timer inoperative. Replace board. system pressures equalized Check voltage with unit operating.
- Page 65 COOLING ONLY ROOM AIR CONDITIONERS: TROUBLESHOOTING TIPS Possible Solution Sublimation: Ensure that foam gaskets are installed in When unconditioned saturated, between window panes & in between the outside air mixes with conditioned unit & the sleeve. Also, ensure that fresh air, condensation forms on the air/exhaust vents (on applicable models) are in cooler surfaces...
- Page 66 HEAT / COOL ONLY ROOM AIR CONDITIONERS: TROUBLESHOOTING TIPS Possible Solution Bad indoor ambient thermistor Check error codes. Replace as needed. Room temperature Fan speed too low Set at higher fan speed. uneven Opened door, windows, etc. Close doors, windows, etc. (Heating cycle) ATSF (room air sampling feature) disabled Enable ATSF...
- Page 67 HEAT PUMP ROOM AIR CONDITIONERS: TROUBLE SHOOTING TIPS Incorrect wiring Refer to applicable wiring diagram Defective solenoid coil Check for continuity of coil Block condenser coil & switch unit to cooling. Unit cools when Allow pressure to build up in system, then heat is called for Reversing valve fails to shift switch to heating.
- Page 68 HEAT PUMP ROOM AIR CONDITIONERS: TROUBLE SHOOTING TIPS REFRIGERANT SYSTEM DIAGNOSIS - HEATING CYCLE HIGH SUCTION PRESSURE LOW HEAD PRESSURE HIGH HEAD PRESSURE LOW SUCTION PRESSURE Low Airfl ow Outdoor Ambient Too High Refrigerant System Outdoor Ambient Too High Across Outdoor Coil for Operation in Heating Restriction For Operation In Heating...
- Page 69 TROUBLESHOOTING TOUCH TEST CHART: TO SERVICE REVERSING VALVES NORMAL FUNCTION OF VALVE NOTES: VALVE OPERATING * TEMPERATURE OF VALVE BODY CONDITION ** WARMER THAN VALVE BODY POSSIBLE CAUSES CORRECTIONS Cool Normal Cooling Cool *TVB as (2) as (1) Cool Normal Heating Cool *TVB as (1)
-
Page 70: Electronic Control Board Components Identification & Thermistor Voltage
ELECTRONIC CONTROL BOARD COMPONENTS IDENTIFICATION Outdoor Coil Thermistor (Check here for (Blue) 3.3 Volts DC) Indoor Coil Thermistor Low Fan speed (Green) Medium Fan speed High Fan speed Max Fan speed (Heat+Cool units along with Cool models Indoor Ambient Air Thermistor SL28 and SL36 only have 3 fan speeds) (Check here for 3.3 Volts DC) Reversing Valve... -
Page 71: Electronic Control Configuration Instructions
Refer to the table below to determine the appropriate Electronic Control Kit part number by unit model number prefix. Failure to install the correct Electronic Control Kit for the given unit model may result in failure of the product and/or a potentially unsafe operating condition. FRIEDRICH ELECTRONIC CONTROL KIT PART # FRIEDRICH MODEL PREFIX Contents: •... -
Page 72: Cool Only Models
Kϋhl Electronic Control COOL ONLY Models SS08N10-A, SS10N10-A, SS10N10-B, SS12N10-A, SS14N10-A, SS14N10A-A, SM15N10-A, SS12N30-A, SS15N30-A, SM18M30-A, SM21N30-A, SM24N30-A ORANGE ELECTRONIC CONTROL BLUE BLACK Make sure you have configuration correct voltage for your unit (See page 70). BLACK POWER SUPPLY 230/208/115VAC BLACK WHITE WHITE... - Page 73 Kϋhl Electronic Control COOL ONLY Models SL22N30-A, SL24N30-A, SL24N30-B BLUE ELECTRONIC CONTROL BLACK BLACK POWER SUPPLY 230/208/115VAC BLACK WHITE WHITE WHITE TO CAPACITOR BRACKET BROWN BLUE MOTOR TO CHASSIS SCHEMATIC NEUTRAL (115 V) (230/208 V) HIGH FAN MTR MEDIUM L2 OR N COMPRESSOR HERM...
- Page 74 Kϋhl Electronic Control COOL ONLY Models SL28N30-A, SL28N30-B, SL28N30-C BLUE ELECTRONIC CONTROL BLACK BLACK WHITE BLACK BLUE POWER SUPPLY 230/208/115VAC BLACK WHITE WHITE WHITE TO CAPACITOR BRACKET BROWN BLUE MOTOR TO CHASSIS SCHEMATIC NEUTRAL (115 V) (230/208 V) ...
- Page 75 Kϋhl Electronic Control COOL ONLY Models SL36N30-A BLUE ELECTRONIC CONTROL BLACK DISCHARGE AIR INDOOR AMBIENT THERMISTOR THERMISTOR VOLTAGE SELECTOR JUMPER WIRE WHITE BLACK BLUE BLACK POWER SUPPLY 230/208/115VAC BLACK WHITE WHITE WHITE TO CAPACITOR BRACKET BROWN BLUE MOTOR TO CHASSIS SCHEMATIC NEUTRAL (115 V) (230/208 V)
-
Page 76: Wiring Diagrams
Kϋhl Electronic Control COOL with ELECTRIC HEAT Models ES12N33-A, ES15N33-A, EM18N34-A, EM24M34-A WIRING DIAGRAM RELAY BLUE RELAY ELECTRONIC CONTROL BLACK RELAY RELAY HEATER RELAY ORANGE RELAY RELAY COMP LINE_L5 RELAY POWER SUPPLY LINE_N2 230/208/115VAC LINE_L3 BLACK WHITE WHITE TO CAPACITOR BRACKET BROWN BLUE... -
Page 77: Wiring Diagram
Kϋhl Electronic Control COOL WITH ELECTRIC HEAT Models EL36N35-A WIRING DIAGRAM RELAY BLUE RELAY ELECTRONIC CONTROL BLACK RELAY RELAY HEATER RELAY ORANGE RELAY RELAY WHITE BLACK PTCR COMP BLUE BLACK RELAY POWER SUPPLY LINE_L5 LINE_N2 230/208/115VAC LINE_L3 BLACK WHITE WHITE TO CAPACITOR BRACKET BROWN... - Page 78 Kϋhl Electronic Control HEAT PUMP without ELECTRIC HEAT YS10N10-A ORANGE RELAY BLUE RELAY ELECTRONIC CONTROL BLACK RELAY RELAY RELAY RELAY RELAY BLACK COMP LINE_L5 LINE_N2 POWER SUPPLY RELAY 230/208/115VAC LINE_L3 BLACK WHITE WHITE WHITE TO CAPACITOR BRACKET BROWN BLUE MOTOR TO CHASSIS SCHEMATIC NEUTRAL (115 V)
-
Page 79: Heat Pump Models
Kϋhl Electronic Control HEAT PUMP models YS12N33-A, YM18M34-A ORANGE RELAY BLUE RELAY ELECTRONIC CONTROL BLACK RELAY RELAY HEATER RELAY ORANGE RELAY RELAY BLACK COMP LINE_L5 LINE_N2 POWER SUPPLY RELAY 230/208/115VAC LINE_L3 BLACK WHITE WHITE WHITE TO CAPACITOR BRACKET BROWN BLUE MOTOR TO CHASSIS SCHEMATIC... -
Page 80: Heat Pump Model
Kϋhl Electronic Control HEAT PUMP model YL24N35-A ORANGE RELAY BLUE RELAY ELECTRONIC CONTROL BLACK RELAY RELAY HEATER RELAY ORANGE RELAY RELAY BLACK WHITE BLACK COMP BLUE LINE_L5 LINE_N2 BLACK POWER SUPPLY RELAY 230/208/115VAC LINE_L3 BLACK WHITE WHITE WHITE TO CAPACITOR... -
Page 81: Remote Control Replacement Instructions
Kühl Gen2 Remote Control Replacement Remote Control Configuration Instructions For Use with Kühl and Kühl + N models only. (cool only models) (cool & heat models), Contents: Remote Control with Holder • • (2) AAA-batteries Instruction Sheet • ATTENTION! – If the Remote Control Does not Control the Unit, You May Need to Configure it. - Page 82 Kühl Gen2 Remote Control Step 4. Using the Remote Control Increase or Decrease Keys, match the configuration number displayed on the Remote Control to the number shown on the Air Conditioning Unit display (see examples below) Air Conditioning Unit Display Remote Control Display Step 5.
-
Page 83: User Interface Service Kit
Kühl User Interface Service Kit Replacement Instructions For Use with Kühl and Kühl + (cool only models) (cool and heat models) ATTENTION! - Please read these instructions completely before attempting replacement. Always unplug the power supply from the power supply receptacle. Contents: •... -
Page 84: Parts Section
PARTS SECTION Kühl & Kühl+ Standard Chassis Unit Exploded Diagram... - Page 85 PARTS SECTION Kühl & Kühl+ Standard Chassis Unit Exploded Diagram...
- Page 86 62050304 CONDENSOR COIL 61850343 CONDENSOR COIL 61850345 CONDENSOR COIL 61850344 CONDENSOR COIL 61818520 EXPANDED METAL GRILLE PAINTED SML 60169120 SCRIPT FRIEDRICH 2010 "FESTOON" 91002900 SPEEDNUT PUSH TYPE 61850126 EVAPORATOR COIL 61850129 EVAPORATOR COIL 61850128 EVAPORATOR COIL 61850127 EVAPORATOR COIL 61850131...
- Page 87 INNERWALL ASY SML 61850344 CONDENSOR COIL 61821500 ASSY DOOR/SLIDE S/M/L 61818520 EXPANDED METAL GRILLE PAINTED SML 61814805 CONNECTOR FRESH AIR S/M 60169120 SCRIPT FRIEDRICH 2010 "FESTOON" 61817100 DECK SML/MED 91002900 SPEEDNUT PUSH TYPE 61850126 61817000 INSUL L/S PANEL SML EVAPORATOR COIL 61850129...
- Page 88 61850227 CONDENSOR COIL 61850140 CONDENSOR COIL 61850244 CONDENSOR COIL 61850141 CONDENSOR COIL 61818521 EXPANDED METAL GRILLE PAINTED MED 60169120 SCRIPT FRIEDRICH 2010 "FESTOON" 91002900 SPEEDNUT PUSH TYPE 61850108 EVAPORATOR COIL 62050030 EVAPORATOR COIL 62050034 EVAPORATOR COIL 61850130 EVAPORATOR COIL 62050040...
- Page 89 INNERWALL ASY MED 61850141 CONDENSOR COIL 61821500 ASSY DOOR/SLIDE S/M/L 61818521 EXPANDED METAL GRILLE PAINTED MED 61814805 CONNECTOR FRESH AIR S/M 60169120 SCRIPT FRIEDRICH 2010 "FESTOON" 61817100 DECK SML/MED 91002900 SPEEDNUT PUSH TYPE 61817001 INSUL L/S PANEL MED 61850108 EVAPORATOR COIL 61820200...
- Page 90 EL25N35-A EL36N35-A SL22N30-A SL25N30-A SL28N30-A SL36N30-A YL24N35-A 61850238 CONDENSOR COIL 62050222 CONDENSOR COIL 61850246 CONDENSOR COIL 61818522 EXPANDED METAL GRILLE PAINTED LRG 60169120 SCRIPT FRIEDRICH 2010 "FESTOON" 91002900 SPEEDNUT PUSH TYPE 61896305 EVAPORATOR COIL 62050004 EVAPORATOR COIL 62050041 EVAPORATOR COIL 61834801 STRAINER .375 COIL...
- Page 91 AIRFOIL LRG 61850246 CONDENSOR COIL 61818201 INSUL, TOP COVER LRG 61818522 EXPANDED METAL GRILLE PAINTED LRG 61906600 COVER TOP LRG 60169120 SCRIPT FRIEDRICH 2010 "FESTOON" 61817800 BLOWER FRONT LRG 91002900 SPEEDNUT PUSH TYPE 61816902 INSUL INNERWALL LRG 61896305 EVAPORATOR COIL 61807257...
-
Page 92: Addendum 1
Addendum 1 Schedule Table with Energy Saving Values Pre Programmed Residential Schedule Option 1 Period Tues Thur Start Time Start Time Start Time Start Time Start Time Start Time Start Time System Mode Cool System Mode Cool System Mode Cool System Mode Cool System Mode Cool System Mode Cool System Mode... -
Page 93: Warranty
FIRST YEAR ANY PART: If any part supplied by FRIEDRICH fails because of a defect in workmanship or material within twelve months from date of original purchase, FRIEDRICH will repair the product at no charge, provided room air conditioner is reasonably accessible for service. -
Page 94: Authorized Parts Depots
CUSTOMER SATISFACTION and QUALITY ASSURANCE Friedrich is a conscientious manufacturer, concerned about customer satisfaction, product quality, and controlling warranty costs. As an Authorized Service Provider you play a vital role in these areas. By adhering to the policies and procedures you provide us with vital information on each warranty repair you complete. - Page 95 FRIEDRICH AIR CONDITIONING CO. 10001 Reunion Place, Ste 500, San Antonio, TX 78216 P 210-546-0500 l F 210-546-0731 www.friedrich.com Printed in the U.S.A. Kuhl-Serv/PartsMan (9-12)
Need help?
Do you have a question about the SS08M10 and is the answer not in the manual?
Questions and answers