Table of Contents
Advertisement
Available languages
Available languages
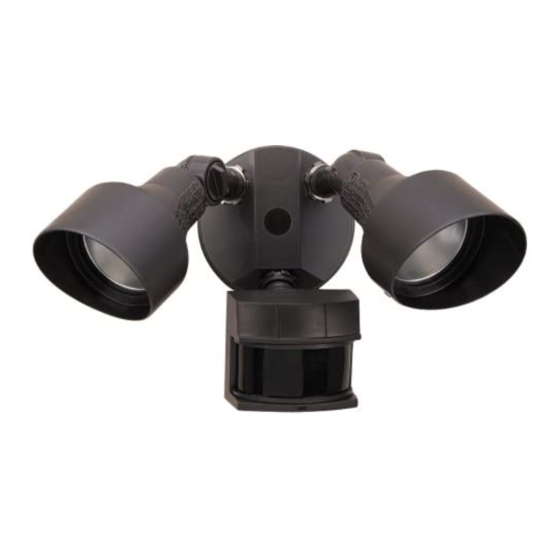
Dual Brite
Motion Sensor
Light Control for
Canadian Tire
Model SL-5597
Features
• Turns on lighting when motion is detected.
• Automatically turns lighting off.
• Dual Brite™ Timer.
• Photocell keeps the lighting off during daylight hours.
• LED indicates motion was sensed (day or night).
This package includes:
Lamp
Holders
Cover
Plate
Light Control
Mounting Strap
Mounting Bolt
Plastic Hanger
Rubber Plug
Requirements
• The Light Control requires 120-volts AC.
• If you want to use the Manual Mode, the control must
be wired through a switch.
• Some codes require installation by a qualified
electrician.
• This product is intended for use with the enclosed
gasket and with a junction box marked for use in wet
locations.
© 2003 DESA Specialty Products™
™
6 Screws
(3 sizes included)
Gasket
Sensor
2 Wire
Connectors
2 Lamps
(installed)
OPERATION
Mode:
On-Time:
Test
5 Sec
Auto
1, 5, 20 min.
Manual
Until Dawn*
* resets to Auto Mode at dawn.
Note: When first turned on wait about 1
the circuitry to calibrate.
Put ON-TIME switch
on the sensor bottom
to TEST and the Dual
Brite™ switch OFF.
Put the ON-TIME switch in the 1, 5,
or 20 minute position.
MANUAL MODE
Manual mode only works at night
because daylight returns the sensor
to AUTO.
Flip the light switch off for one second
then back on to toggle between AUTO
and MANUAL MODE.
Manual mode works only with the ON-
TIME switch in the 1, 5, or 20 position.
Mode Switching Summary
TEST
AUTO
MANUAL MODE
* If you get confused while switching modes, turn the
power off for one minute, then back on. After the
calibration time the control will be in the AUTO mode.
Dual Brite™ TIMER
Light comes on half bright for selected time after dusk
(Off, 3 hr., 6 hr., until dawn). If motion is sensed, the light
turns on full bright for the ON-TIME (1,5, or 20 minutes)
then returns to dim mode.
Works:
Day
x
1
/
minutes for
2
TEST
DUAL BRITE™
ON-TIME
Off 3 6 Dusk to
TEST 1 5 20
Dawn
AUTO
ON-TIME
TEST 1 5 20
1 Second OFF
then ...
... back on.
Move ON-TIME Switch to
1, 5, or 20 minutes
Flip light switch off
for one second then
back on*
598-1038-03
Night
x
x
x
Advertisement
Table of Contents

Related Manuals for Heath Zenith DUAL BRITE SL-5597


Summary of Contents for Heath Zenith DUAL BRITE SL-5597
- Page 1 OPERATION Mode: On-Time: Works: Night Test 5 Sec ™ Dual Brite Auto 1, 5, 20 min. Manual Until Dawn* Motion Sensor * resets to Auto Mode at dawn. Note: When first turned on wait about 1 minutes for Light Control for the circuitry to calibrate.
-
Page 2: Installation
❒ The plastic hanger can be used to hold the fixture INSTALLATION while wiring. The small end of the plastic hanger For easy installation, select an existing light with a wall can be threaded through the hole in the center of the switch for replacement. -
Page 3: Test And Adjustment
❒ Loosen the clamp screw in the TEST AND ADJUSTMENT Clamp sensor ball joint and gently ro- Screw ❒ tate the sensor. Turn on the circuit breaker and light switch. ❒ Walk through the coverage area Ball NOTE: Sensor has a 1 minute warm up period noting where you are when the Joint... -
Page 4: Troubleshooting Guide
TROUBLESHOOTING GUIDE If you experience a problem, follow this guide. SYMPTOM POSSIBLE CAUSE SYMPTOM POSSIBLE CAUSE Lights will 1. Light switch is turned off. Lights stay 1. A lamp is positioned too close to the not come 2. Light is loose or burned out. on continu- sensor or pointed at nearby objects 3. - Page 5 Cuando lo prenda por primera vez espere 1 minutos hasta que el circuito se calibre. Detector de Movimiento Para PRUEBA: Ponga el interruptor de y Control de Luz ON-TIME DUAL BRITE™ tiempo (ON-TIME), al fondo del detector, en Dual Brite™ para la posición de prueba Off 3 6 Dusk to TEST 1 5 20...
- Page 6 ❒ Quite el aparato de luz existente. INSTALACION ❒ Instale la lámina de montaje a la caja de empalme Para una fácil instalación escoja una luz con un usando tornillos apropiados para la caja de empalme. interruptor de pared. ❒ Se puede usar el colgador plástico para sostener el CUIDADO: Para evitar los peligros de incendio aparato mientras se instala el cableado.
-
Page 7: Prueba Y Ajuste
❒ Afloje el tornillo de la grampa PRUEBA Y AJUSTE Tornillo en la unión esférica del de- de la ❒ Prenda el cortacircuitos y el interruptor de luz. tector y gire suavemente el Grampa detector para apuntar. NOTA: El detector tiene un período de cerca de 1 ❒... -
Page 8: Guia De Investigacion De Averias
GUIA DE INVESTIGACION DE AVERIAS Si tiene algún problema siga esta guía. SINTOMA POSIBLE CAUSA SINTOMA POSIBLE CAUSA La luz no se 1. El interruptor de luz está apagado. La luz se 1. Un faro está colocado demasiado cerca enciende. 2. - Page 9 FONCTIONNEMENT Mode: Temps en circuit: En fonction: Jour Nuit Commande d'éclairage Essal 5 secondes Auto 1, 5 ou 20 min. ™ Dual Brite à détecteur Manuel au choix, amanecer* de mouvement, pour * Revient au mode automatique au lever du soleil. ESSAI Canadian Tire Placer l'interrupteur de...
- Page 10 INSTALLATION D’ ÂBLAGE OMMANDE ÉCLAIRAGE Pour faciliter l’installation, choisir un appareil d’éclairage ❒ Couper l’alimentation du circuit d’éclairage au devant être remplacé et qui est déjà commandé par un fusible ou au disjoncteur. interrupteur. ❒ Enlever l’appareil d’éclairage existant. ❒ Installer la bride de montage sur la boîte de jonction AVERTISSEMENT: Pour éviter les risques de brûlure ou d'incendie avec les vis appropriées.
-
Page 11: Essais Et Réglages
❒ Desserrer la vis de blocage ESSAIS ET RÉGLAGES Vis de de la rotule et faire pivoter le ❒ Mettre en circuit le disjoncteur et l’interrupteur blocage détecteur pour pointer. d’éclairage. ❒ Marcher dans la zone de Rotule couverture et noter à quel NOTE: Le capteur doit se réchauffer 1 minute avant endroit... -
Page 12: Guide De Dépannage
GUIDE DE DÉPANNAGE Si vous éprouvez des difficultés, suivre ce guide. SYMPTÔME CAUSE POSSIBLE SYMPTÔME CAUSE POSSIBLE Les lampes ne 1. L’interrupteur d’éclairage est en posi- Les lampes 1. Un projecteur se trouve trop près du s’allument pas. tion hors circuit. restent allumées détecteur de la commande d’éclairage 2.
Need help?
Do you have a question about the DUAL BRITE SL-5597 and is the answer not in the manual?
Questions and answers
I can't reset the light it just stays on all the time . Tried the test mode but don't know if I'm doing it right.