Boss MICRO BR Owner's Manual
Digital recorder
Hide thumbs
Also See for MICRO BR:
- Owner's manual (140 pages) ,
- Owner's manual (136 pages) ,
- Owner's manual (132 pages)
Table of Contents
Advertisement
Owner's Manual
201a
Before using this unit, carefully read the sections entitled: "USING THE UNIT SAFELY"
(p. 2–3) and "IMPORTANT NOTES" (p. 4–5). These sections provide important
information concerning the proper operation of the unit. Additionally, in order to feel
assured that you have gained a good grasp of every feature provided by your new unit,
Owner's Manual should be read in its entirety. The manual should be saved and kept
on hand as a convenient reference.
About the Symbols and icons in this manual
•
Text in square brackets [ ] refers to buttons on the panel of the MICRO BR.
[EXIT]: EXIT button
[UTILITY]: UTILITY button
•
Reference such as (p. **) indicate pages in this manual to which you can refer.
Indicates information that you should be aware of when using the MICRO BR.
Indicates a convenient operation or useful music production technique.
Indicates supplementary information about an operation.
Indicates a reference page.
Indicates an explanation of a term.
202
Copyright © 2006 BOSS CORPORATION
All rights reserved. No part of this publication may be reproduced in any form
without the written permission of BOSS CORPORATION.
BOSS Website http://www.bosscorp.co.jp/
Advertisement
Table of Contents

Related Manuals for Boss MICRO BR


Summary of Contents for Boss MICRO BR
- Page 1 Owner’s Manual should be read in its entirety. The manual should be saved and kept on hand as a convenient reference. About the Symbols and icons in this manual • Text in square brackets [ ] refers to buttons on the panel of the MICRO BR. [EXIT]: EXIT button [UTILITY]: UTILITY button •...
- Page 2 Refer all servicing to your retailer, may be capable of producing sound levels the nearest Roland Service Center, or an that could cause permanent hearing loss. Do authorized Roland distributor, as listed on not operate for a long period of time at a high the “Information”...
- Page 3 • Never handle the AC adaptor body, or its AC adaptor from the outlet, and request output plugs, with wet hands when servicing by your retailer, the nearest Roland plugging into, or unplugging from, an outlet Service Center, or an authorized Roland or this unit.
-
Page 4: Important Notes
Do not use this device in the vicinity of that it may not be possible to restore the data, and such receivers. Roland assumes no liability concerning such loss of data. - Page 5 SD card or on your personal computer once it has been lost. Roland Corporation assumes no liability concerning such loss of data. • Use a reasonable amount of care when using the unit’s buttons, sliders, or other controls;...
-
Page 6: Table Of Contents
Convenient MP3/WAV functionality ............11 Built-in chromatic tuner..................11 Two-way power supply for operation anywhere......... 11 Memory cards that can be used with the MICRO BR ......... 12 Initializing a memory card (SD memory card) ..........12 About the Recording Time ................12 Panel Descriptions ................ - Page 7 Adjusting the recording level ................39 Switching V-tracks..................... 40 Selecting the track to record ................41 Controlling the parameters of two tracks simultaneously (Stereo Link) .. 41 Recording ......................42 Playing back....................... 43 Playing back repeatedly (Repeat)..............43 Adjusting the left/right position (pan) of the playback ......44 Re-recording over a mistake (Punch-in/out) ............
- Page 8 What is MP3?......................91 Audio formats supported by the MICRO BR ..........91 Audio formats not supported by the MICRO BR ......... 91 Files downloaded from music distribution sites........... 91 Handling audio files imported from a music CD ......... 91 Copyright ........................
- Page 9 Notes on Using USB ..................103 With Windows ......................103 Transferring MP3/WAV files ................ 103 Backing up and recovering MICRO BR song data ........104 Breaking the connection with your computer..........105 With Macintosh ....................... 106 Transferring MP3/WAV files ................ 106 Backing up and recovering MICRO BR song data ........
-
Page 10: Introducing The Micro Br
There are four tracks that can be played back power of digital multitrack recording as soon as simultaneously, and each track has eight “virtual you take the MICRO BR out of its box. tracks” (V-tracks). For example, you can record several takes of a... -
Page 11: Convenient Mp3/Wav Functionality
V-Track1 V-Track2 functionality V-Track3 V-Track4 V-Track5 The MICRO BR can function as an MP3 or WAV V-Track6 V-Track7 file player, making it easy to take your favorite V-Track8 music with you for listening. There’s also a Trainer function, which lets you play back MP3/WAV music at a slower tempo or If you’re using V-tracks in your recording,... -
Page 12: Memory Cards That Can Be Used With The Micro Br
Data type For a list of the SD memory cards checked for use Card HiFi (MT2) STD (LV1) LONG (LV2) with the MICRO BR, refer to the separate leaflet Capacity “About SD memory cards.” 32 MB 15 min. 18 min. -
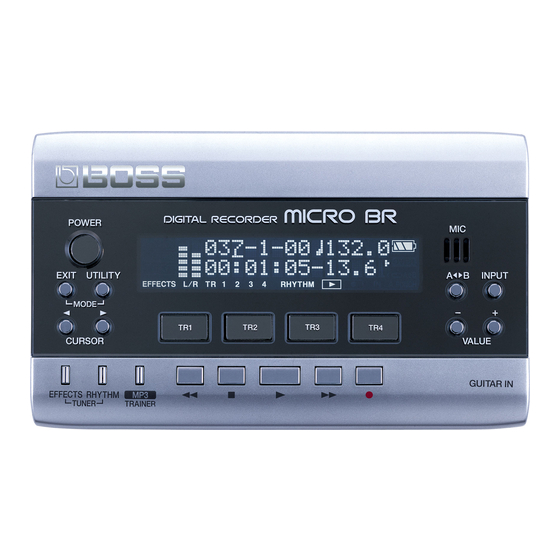
Page 13: Panel Descriptions
Panel Descriptions Top Panel fig.panel-L.eps 6 7 9 10 11 12 TUNER [POWER] This is the power button. It turns the power • Hold down [EFFECT] and press [RHYTHM] on/off. Turns the built-in tuner on/off. [EXIT] [MP3/TRAINER] Returns you to the previous screen, or Switches you to a mode in which you can cancels an operation. - Page 14 Fast-forwards the song while you hold This is a monaural microphone built into the down this button. MICRO BR. If you want to record using the onboard microphone, refer to (p. 39). 18. Display Shows various information such as song...
-
Page 15: Display
Panel Descriptions Display fig.panel-L.eps 11 12 Mode PHONES/LINE OUT. Indicates the current mode. In Bounce mode or Mastering mode, this indicates the respective recording level Display Mode (bounce level or mastering level). (unlit) If nothing is indicated, this means you’re in TR 1 2 3 4 Normal mode. -
Page 16: About The Play Screen
(B). 18. A.PUNCH Lights if auto punch-in is enabled. About the Play screen The basic screen that appears immediately after you switch on the MICRO BR’s power (see below) is called the “Play screen.”... -
Page 17: Normal Mode
About the MP3 screen Rhythm. The level meter indicates the sound from If you power-off the MICRO BR in MP3 mode (p. GUITAR IN, LINE IN/MIC or onboard mic. 92), it will start up in MP3 mode the next time you power-on. -
Page 18: Side Panel (Left)
MICRO BR’s “PlugInPower” setting audio equipment (e.g., stereo amp). USB Connector (MINI B type) Use this connector to connect the MICRO BR “Using plug-in powered microphone” (p. 114) to your computer via a USB cable. This allows data to be transferred between the If you connect the other device (dynamic MICRO BR and your computer (p. -
Page 19: Bottom Panel
“Inserting batteries and a memory card” (p. 20) Strap Hole The strap can be passed through this hole. When the MICRO BR is shipped from the factory, a SD card containing a demo song is installed. HOLD Switch While the power is on, you can turn the HOLD switch ON to disable the operation of all buttons. -
Page 20: Getting Ready To Use The Micro Br
If batteries are already installed, remove them from the battery compartment. Push the memory card inward. fig.batt-cover2.eps Reattach the battery cover. fig.batt-cover5.eps When the MICRO BR is shipped from the factory, a SD card containing a demo song is installed. - Page 21 • Keep the included memory card out of reach of small children to prevent it from being swallowed accidentally. • For more about the memory cards (SD cards) recommended for use with the MICRO BR, refer to the separate leaflet “About memory cards.”...
-
Page 22: Connecting Other Equipment
Getting ready to use the MICRO BR Connecting other equipment Make connections as shown in the following Your equipment must be powered off when diagram. making connections. fig.side-panel-L.eps Side Panel (Left) AC Adaptor (PSA series) Computer Headphones fig.side-panel-R.eps Side Panel (Right) - Page 23 Getting ready to use the MICRO BR fig.MEMO • If there are batteries in the unit while an AC adaptor is being used, normal operation will continue should the line voltage be interrupted (power blackout or power cord disconnection). 926a •...
-
Page 24: Turning The Power On
• Is the MICRO BR correctly connected to your may hear some noise even when the volume external equipment? is turned down, but this does not indicate a • Are the volume controls of the MICRO BR and malfunction. your connected equipment set to the minimum position? •... -
Page 25: Quick Start
Quick Start • This unit, in combination with an amplifier and headphones or speakers, may be capable of producing sound levels that could cause permanent hearing loss. Do not operate for a long period of time at a high volume level, or at a level that is uncomfortable. If you experience any hearing loss or ringing in the ears, you should immediately stop using the unit, and consult an audiologist. -
Page 26: Listening To The Demo Song
• The MICRO BR comes with a demo song in * Make sure that the MICRO BR is in “Normal mode” (p. 42). MICRO BR song format data and a demo song of this data mastered into MP3 file. -
Page 27: Changing The Current Position
Listening to the demo song Changing the current position You can use any of the following methods to change the current position within the song. Operation Explanation Fast-forward The song will fast-forward while you hold down Rewind The song will rewind while you hold down Move to the beginning of the song (00:00:00-00.0) Hold down... -
Page 28: Creating A New Song
Creating a new song If the memory card contains more than one song, the most recently used song will be selected Press [TR4] (EXE). automatically. If you want to record a new song, The new song will be created, and you will proceed as follows. -
Page 29: Selecting The Input
• Lowercase indication: The input is not selected may be low. If this happens, use connection cables that do not contain resistors, such as those from the Roland PCS series. For more about selecting other sources, refer • If you are recording an electric acoustic to “Selecting an instrument to record”... -
Page 30: Using Effects (Insert Effects)
Make sure that the TR1 indication has The currently selected effect patch is changed from “ON” to “OFF.” displayed. MICRO BR is set to output sound without the insert effects applied, allowing you to record sounds without the insert effects. Use CURSOR [... -
Page 31: Using Rhythm
Using rhythm Use CURSOR [ ] to make the Rhy Level indication appear, and use The MICRO BR provides a dedicated rhythm VALUE [-][+] to set the level to “100”. track in addition to its audio tracks 1–4. fig.Disp-RHY-LEVEL100.eps For details, refer to “Section 4. Using rhythm” (p. 82). -
Page 32: Recording
Make sure that the display does not indicate Press The track select screen will appear. The indication will blink in the screen, and the MICRO BR will be in recording standby condition. Press the [TR1]–[TR4] button of the track that you want to record. -
Page 33: Playing Back
Creating a new song Playing back Adjusting the volume of a track Now let’s play back the performance you just recorded. Playing back a recorded performance During playback, press one of the track [TR1]–[TR4] buttons. Use CURSOR [ ] to make the screen indicate Track Level. -
Page 34: Using The Mp3 Player
Using the MP3 player In addition to operating as a multi-track recorder, the MICRO BR can be switched to “MP3 mode” Turn the VOLUME dial to lower the and used as an MP3 or WAV file player. volume. For details, refer to “Section 5. Using MP3 player”... -
Page 35: Practicing Along With An Mp3/Wav File (Phrase Trainer)
Using the MP3 player VALUE [-][+] to select the file number Practicing along with that you want to play. an MP3/WAV file (Phrase Trainer) Use CURSOR [ ] to move the cursor to the playback speed indication, and use VALUE [-][+] to MP3 mode includes a “Phrase Trainer”... -
Page 36: Canceling The Center Sound (Center Cancel)
Using the MP3 player Canceling the center sound Press (Center Cancel) Sounds that are heard from the center (such as vocals and guitar solos) will be Remove the central sound of the playback (e.g., eliminated. vocals or guitar solos). This is helpful if you want Slowly turn the VOLUME dial to adjust the to practice playing along with the backing volume. -
Page 37: Operation Guide
Operation Guide • This unit, in combination with an amplifier and headphones or speakers, may be capable of producing sound levels that could cause permanent hearing loss. Do not operate for a long period of time at a high volume level, or at a level that is uncomfortable. If you experience any hearing loss or ringing in the ears, you should immediately stop using the unit, and consult an audiologist. -
Page 38: Section 1. Recording And Playing Back
Recording and playing back About the data types Recording You must select the “data type” when you create a new song on the MICRO BR. Choose one of the Make sure that the display does not indicate following data types. (p. 42) or (p. -
Page 39: Selecting An Instrument To Record
Section 1. Recording and playing back Selecting an instrument to Adjusting the recording level record As described in “Selecting an instrument Press [INPUT]. to record (p. 39)”, select the audio source that you want to record. Press [TR1] (GTR)–[TR4] (EXT) to select the source (input) that you want to record. -
Page 40: Switching V-Tracks
Section 1. Recording and playing back Switching V-tracks Although the MICRO BR is a four-track multi- • If you lower the INPUT LEVEL, the sound track recorder, each track actually consists of will be recorded at a lower volume, causing eight V-tracks;... -
Page 41: Selecting The Track To Record
Section 1. Recording and playing back Selecting the track to record Controlling the parameters of two tracks simultaneously Press one of the [TR1]–[TR4] buttons. (Stereo Link) Use CURSOR [ ] to access the In some cases you may wish to adjust the Rec Track screen. -
Page 42: Recording
• Switching to the INITIALIZE screen • Undo/Redo • Switching a mode Mastering Mode If you press the MICRO BR’s buttons while recording via the internal mic, clicking Make sure that the display does not indicate sounds resulting from the operation of the buttons may also be recorded along with the rest of the sound. -
Page 43: Playing Back
Section 1. Recording and playing back That location will be registered as the ending Playing back point (B) of the repeated region. fig.Disp-SET-AB.eps Hold down and press The time location will return to 00:00:00-00.0. * When specifying the repeat end point (B), pressing B] at a point that is earlier than the repeat start Press point (A) will cause that point to be reassigned as the... -
Page 44: Adjusting The Left/Right Position (Pan) Of The Playback
Section 1. Recording and playing back Adjusting the left/right position (pan) of the playback Press one of the [TR1]–[TR4] buttons to select the track that you want to adjust. Use CURSOR [ ] to access the Track Pan screen. fig.Disp-TR1-PAN.eps Use CURSOR [ ] or press one of the [TR1]–[TR4] button to select the track... -
Page 45: Re-Recording Over A Mistake (Punch-In/Out)
Track 1 will be the recording track. Press CURSOR [ ] to access the On the MICRO BR, you can choose from two Track Level screen, and set the Tr1 Level methods of doing this; manual punch-in/out and to 100 (p. 33). -
Page 46: Auto Punch-In/Out
Section 1. Recording and playing back At the point where you want to begin re- Auto punch-in/out recording, press “Auto punch-in/out” is the method in which Punch-in will begin, and you’ll be in record punch-in/out begins automatically at the time mode. -
Page 47: Repeatedly Recording The Same Region (Loop Recording)
Section 1. Recording and playing back Play back the song, and use the INPUT Repeatedly recording the LEVEL dial to adjust the volume of the same region (Loop Recording) input source. Listen and compare the input source with The Repeat function (p. 43) lets you repeatedly the track to be re-recorded, and adjust the play back a specified region (the loop region). - Page 48 Section 1. Recording and playing back Press [TR1] several times to make “REC” appear for track 1. fig.Disp-RecTrack-1.eps Track 1 will be the recording track. Press [EXIT]. Press CURSOR [ ] to access the Track Level screen, and set the Tr1 Level to 100 (p.
-
Page 49: Canceling A Recording/Editing (Undo/Redo)
Section 1. Recording and playing back Canceling a Recording/ Reverting to the previous state (Undo) Editing (Undo/Redo) Press [UTILITY]. Occasionally when the recording you make Press [TR3] (UND). doesn’t turn out as you wish, or the settings you fig.Disp-UNDO.eps make for an editing operation are incorrect, and you want to reverse what you have done. -
Page 50: Putting Multiple Tracks Together (Bounce)
“Adjusting the left/right position (pan) of the simultaneous playback of four tracks, when you playback (p. 44)” run out of tracks, the MICRO BR also lets you Play back the song, and adjust the copy the recordings of multiple tracks together volume balance of tracks 1–4. -
Page 51: Listening The Result Of The Bounce-Recording
Section 1. Recording and playing back fig.Disp-RHY-LEVEL100.eps Listening the Result of the Bounce-recording * Confirm the rhythm function is turned off. If you don’t want to record the rhythm Simultaneously press [EXIT] and sound, press [TR1] to turn off the RHYTHM [UTILITY] several times to put the MICRO indication. -
Page 52: Viewing Song-Related Information
Section 1. Recording and playing back Viewing song-related Viewing the remaining recordable time information When you’re in the recording screens, you can display the remaining recordable time as follows. Viewing song information Press [UTILITY]. Here’s how you can view detailed information Use CURSOR [ ] to make the about the song. -
Page 53: Section 2. Editing
Section 2. Editing Editing performances on a tracks (Track Edit) • If the copy destination contains data, that data will be overwritten. These operations let you change the structure of • The copy region you specify must be longer your song by copying track data or moving it to than 1.0 seconds. -
Page 54: The Edit Region And The Number Of Copies
Section 2. Editing The edit region and the number of copies If you pressed [TR3] (ALL) or [TR4] (AB) Specify the units for the edit region. during the copy or move procedure, fig.Disp-TrEdit-function.eps proceed to step 4 of the explanation. Specify the starting time/measure of the edit region, and press [TR4] (NEXT). -
Page 55: Moving Data (Track Move)
Section 2. Editing fig.Disp-TrEdit-repeat.eps Moving data (Track Move) This operation moves the data of the specified region (or the entire track) to another location. * If you’re moving data, skip step 5. * Following this operation, the original location of the * If you’re erasing data, skip steps 4–5. -
Page 56: Erasing Data (Track Erase)
Section 2. Editing Specify the edit region as described in Erasing data (Track Erase) “The edit region and the number of copies” (p. 54). This operation erases data from the specified Specify the region that you want to move region. If you use this operation to erase data, (Start, End) and the time or measure of the any data located later than the erased data will move destination (To). -
Page 57: Exchanging Data (Track Exchange)
Section 2. Editing When you’ve finished setting the edit Exchanging data region, press TR4 [EXE]. (Track Exchange) The display will ask Erase OK? fig.Disp-Erase-OK.eps This operation exchanges data between two tracks. Example: Exchanging the entire contents of tracks 1 and 2 To execute the Erase operation, press fig.02-590 [TR4] (YES). -
Page 58: Managing The Songs You've Recorded
Section 2. Editing Managing the songs Erasing a song (Song Erase) you’ve recorded This operation erases a song from the memory card. Press [UTILITY] then press [TR1] (SNG). Copying a song (Song Copy) Press CURSOR [ This operation copies the currently selected song. fig.Disp-util-song2.eps Press [UTILITY] then press [TR1] (SNG). -
Page 59: Saving Space On The Memory Card (Song Optimize)
Section 2. Editing Saving space on the memory Naming a song (Song Name) card (Song Optimize) When you create a new song, it will When you perform track editing or punch-in/ automatically be given a name such as out, the previous data will remain on the memory “SONG0001.”... -
Page 60: Protecting A Song (Song Protect)
Protect) the song (Song Save) Even after you’ve finished the work of creating a On the MICRO BR, the following content is saved song, you could lose your song by accidentally as song data. recording over it or erasing it. To prevent such •... -
Page 61: Section 3. Using Effects
You can use both the insert effects and reverb patch.” simultaneously, and make settings for each as The MICRO BR contains a wide variety of effect desired. patches that are suitable for vocals and various Here we will explain how to adjust the various instruments. -
Page 62: Editing The Insert Effects Settings
User patches (U) User patches can be rewritten, and the patch data will be stored in the MICRO BR itself. If you’ve When it doesn’t settle on one screen because created a patch that you’ll want to use with other... -
Page 63: Saving Insert Effects Settings (Write)
[TR1] (INS) Inserts a space at the cursor location. • Turn off the power [TR2] (DEL) Deletes the character at the cursor location, • Use a USB cable to connect the MICRO BR to and moves the subsequent characters to- computer ward the left. -
Page 64: Changing How The Insert Effects Are Used
[EXIT]. this method of connection. When writing is completed, you’re returned The MICRO BR lets you change the location to the effect screen. where the insert effects are connected, thus allowing you to use the effect in a variety of ways. - Page 65 Section 3. Using effects INPUT <REC DRY> MASTER This lets you monitor the sound that is processed Use this setting if you want to apply the effect to through the insert effects, but record the sound the overall sound, such as when using the effect before it has passed through the insert effects to modify the sound during bounce-recording, or (i.e., record the “dry”...
-
Page 66: Insert Effects Algorithm List
Section 3. Using effects Insert Effects Algorithm List The algorithms (the available effects and their to use, first select the effect bank that includes connection order) that can be used as the insert that algorithm, and then refer to “Effect Patch effects are shown below. -
Page 67: Parameter List
The trademarks listed in this document are trademarks of their respective owners, which are separate companies from BOSS. Those companies are not affiliated with BOSS and have not licensed or authorized BOSS’s MICRO BR. Their marks are used solely to identify the equipment whose sound is simulated by BOSS’s MICRO BR. - Page 68 Section 3. Using effects 4BAND EQ (EQ) CHORUS (FX) A 4-band equalizer. A sound with a subtly shifted pitch is added to the direct sound, making the final output sound On/Off OFF, ON thicker and broader. This parameter turns the equalizer effect on/off. * This effect can be used when the FX “Type”...
- Page 69 Section 3. Using effects DELAY (DLY) ENHANCER (ENH) This creates a thicker sound by applying a By adding sounds which are out-of-phase with the direct sound, this effect enhances the delayed sound to the direct sound. definition of the sound, and pushes it to the On/Off OFF, ON forefront.
- Page 70 Section 3. Using effects MIXER (MIX) INPUT (IN) Adjusts the volume of each frequency band. This divides the original sound into three frequency ranges: low, mid, and high. Lo Level -80 – +6 (dB) Sets the volume level of the lower range after the Gain -24 –...
- Page 71 Type Explanation Treble 0 – 100 JC-120 The sound of the Roland “JC-120,” a Adjusts the tone for the high frequency range. favorite of pro musicians around the world. Presence 0 – 100...
- Page 72 This simulates the characteristics of various types microphone is used, and “Off Mic” simulates the of speakers. When the output of the MICRO BR is sound when a condenser microphone is used. connected directly to a mixer, etc., this can be Mic Set CENTER, 1 –...
- Page 73 Section 3. Using effects TREMOLO/PAN (FX) Tremolo is an effect that creates a cyclic change in volume. Pan cyclically moves the stereo position between left and right (when stereo output is used). * This effect can be used when the FX “Type” parameter is set to “TREMOLO/PAN.”...
-
Page 74: Using Reverb Effect
Section 3. Using effects Using Reverb Effect Adjusting the reverb depth for the each track Here we will explain how to edit the reverb You can adjust the amount of reverb for each settings (parameters). track by changing the amount of audio signal For details on the reverb parameters, refer to sent from each track to the reverb processor (the “Reverb Parameters”... -
Page 75: Adjusting The Reverb Depth For The Input Source
Section 3. Using effects Reverb Parameters Adjusting the reverb depth for the input source Reverberation (or reverb) is the effect caused by sound waves decaying in an acoustic space, or a Press [INPUT]. digital simulation thereof. This decay occurs because sound waves bounce off many walls, Press the [TR1]–[TR4] button for the input ceilings, objects, etc. -
Page 76: Mastering
(or stereo) to optimize the level (volume) of your completed song. And you can The MICRO BR is now in Mastering mode. convert mastering data into an audio file (MP3/ fig.Disp-mastering-mode.eps WAV formats). - Page 77 10. Press [TR4] (0!A) Switches the type of character (numeral/ symbol/alphabetical) at the cursor loca- tion. will blink, and the MICRO BR will be in recording standby condition. If you finished naming, press [EXIT]. fig.Disp-mst-standby.eps 15. Use CURSOR [ ] and VALUE [-][+] to set the Type parameter to the desired type of file.
-
Page 78: Editing The Mastering Tool Kit Settings
Section 3. Using effects fig.Disp-PREAMP-OnOff.eps Editing the Mastering Tool Kit settings If you want to create new settings, select the Use CURSOR [ ] to move the existing patch that’s closest to what you have in cursor to the parameter that you want to mind, then modify (edit) those settings. -
Page 79: Saving The Mastering Tool Kit Settings (Write)
Section 3. Using effects Use VALUE [-] [+] to select the write- Saving the mastering tool kit destination patch number. settings (Write) Press [TR4] (YES). The display will ask “Are you sure?” Here’s how you can assign a name (patch name) to the kit settings you’ve edited, and save them as If you are sure you want to write to the a new patch. -
Page 80: Mastering Tool Kit Algorithm List
Section 3. Using effects Mastering Tool Kit Parameter List Algorithm List 3BAND COMP This compresses the overall output signal when MT BANK [MSTR TOOL KIT] the input volume level exceeds a set value. On/Off OFF, ON The Mastering Tool Kit’s algorithms are This parameter turns the compressor effect on/ composed from the following effects. - Page 81 Section 3. Using effects Hi Ratio 1:1.00 – 1:16.0, 1:INF LIMITER This sets the ratio of suppression of the upper- range output when the input level exceeds the Hi This suppresses high-level signals to prevent threshold level. distortion. Hi Attack 0 –...
-
Page 82: Section 4. Using Rhythm
Section 4. Using rhythm The MICRO BR contains various patterns created About rhythm for use in the introduction, verse, fill, and ending. The pattern type is indicated by the letters at the The MICRO BR provides a dedicated rhythm end of the pattern name. -
Page 83: About Pattern Mode And Arrangement Mode
However, The MICRO BR has two modes in which you can using just a single pattern from the beginning of play rhythms; “Pattern mode” and the song to its end would make the rhythm rather “Arrangement mode.”... -
Page 84: Changing The Drum Sounds (Drum Kit)
(drum kit) The rhythm screen appears. fig.Disp-pt-001.eps A drum kit is a collection of rhythm instrument sounds used to play arrangements and patterns. The MICRO BR contains nine different drum kits. fig.04-030 Press [TR3] (KIT). MICRO BR fig.Disp-PtModeKit-STD1.eps Preset Drum Kit 9... -
Page 85: Playing A Pattern
Use VALUE [-] [+] to adjust the tempo. quences of these compositional units, or steps, The playback tempo of the pattern will these songs can be finished with less steps. With the MICRO BR, you can arrange sequences of change. up to 50 steps. -
Page 86: Specifying The Pattern For The First Measure
Section 4. Using rhythm Press [TR4] (EDT). Specifying the pattern for the You’ll be in Song Arrangement Edit mode. first measure fig.Disp-ar-S01-edt.eps Press [RHYTHM]. The rhythm screen appears. Press [TR1] to turn on the rhythm. Press [TR1] (STP). The “RHYTHM” indication appear, and Use CURSOR [ ] and VALUE [-] [+] rhythm will be on. -
Page 87: Placing Patterns In The Desired Order
Section 4. Using rhythm Placing patterns in the desired order Starting measure If you want to specify a different pattern that will This specifies the measure at which the play from Step number 2 or later, continue with the pattern selected for the current step is to following steps after you’ve performed “Specifying begin playing. -
Page 88: Inserting A Step
Section 4. Using rhythm Inserting a step Erasing a step Here’s how to insert a new step at the current Here’s how to erase the contents of the selected step. step. The erased step will take on the contents of the subsequent step. -
Page 89: Naming An Arrangement
Section 4. Using rhythm Naming an arrangement You can freely assign a name of up to eight characters to each song arrangement. Perform steps 1 through 6 of “Specifying the pattern for the first measure” (p. 86). Press [TR2] (NAM). The name editing screen appears. -
Page 90: Playing An Arrangement
Section 4. Using rhythm Playing an arrangement Copying/erasing an arrangement Here’s how to select a desired arrangement and play it. Copying Press [RHYTHM]. The rhythm screen appears. If you want to slightly modify a preset arrangement to Press [TR2] to make the display indicate your liking, or if you want to create a variation of an “AR:”... -
Page 91: Section 5. Using Mp3 Player
If you have audio files on your computer that • linear were imported and converted from a CD, and want to hear them on the MICRO BR, you must Audio formats not supported make sure that the converted files are in the MP3 by the MICRO BR audio format. -
Page 92: Copyright
• Save and play back up to 999 songs. • You can connect the MICRO BR to your computer • Use the Repeat function to play songs repeatedly. via USB, and import audio files (WAV or MP3 •... -
Page 93: Switching To Mp3 Mode
• The file numbers are displayed in order of the file name (alphabetical). • In order to send an MP3/WAV file created Press [MP3/TRAINER]. on your computer to the MICRO BR, you’ll Switches to MP3 mode; the display will need to establish a USB connection (p. 101). indicate (the MP3 screen). -
Page 94: Playing Back Repeatedly (Repeat)
Section 5. Using MP3 player Playing back repeatedly (Repeat) • There must be at least one second between The “repeat” function lets you play back a the repeat start point (A) and end point (B). specified region repeatedly. You can’t specify an end point that’s less fig.01-570 than one second away from the start point. -
Page 95: Practicing Along With An Mp3/Wav File (Phrase Trainer)
Section 5. Using MP3 player fig.Disp-mp3-mode2.eps Practicing along with an MP3/WAV file (Phrase Trainer) Playback speed Range: 25–200% MP3 mode includes a “Phrase Trainer” function A setting of 100% (initial value) will play the that provides an effective way for you to practice song at its original speed, a setting of 50% at a song. -
Page 96: Canceling The Center Sound (Center Cancel)
Section 5. Using MP3 player To emphasize the bass sound, press Canceling the center sound CURSOR [ ] to select “Low Boost,” (Center Cancel) and use VALUE [-][+] to adjust the value so that the bass sound is more easily The Center Cancel function allows you to remove heard. -
Page 97: Recording Mp3 Or Wav Data
• As for both MP3 and WAV format, the sound is recorded with the stereo. • You cannot use reverb in MP3 mode. • If you press the MICRO BR’s buttons while recording via the internal mic, clicking sounds resulting from the operation of the buttons may also be recorded along with the rest of the sound. -
Page 98: Recording Time
Section 5. Using MP3 player Erasing an MP3/WAV Recording time file Memory Card You can erase an MP3/WAV file that was saved 64 kbps 128 kbps 192 kbps Capacity in the MP3 folder. 32 MB 65 min 32 min 21 min 2 min Press [MP3/TRAINER] to MP3 mode. -
Page 99: Naming An Mp3/Wav File
Press [EXIT] to return to the Play screen. If the display indicates <<Unsupported>>, the MP3/WAV file is in a format that is not supported by the MICRO BR. Read “Audio formats supported by the MICRO BR” (p. 91), and check the format of the MP3/WAV file. -
Page 100: Section 6. Using Usb
How USB Can Be Used with a variety of peripheral devices. Using USB allows you to connect different The MICRO BR is equipped with a USB port for peripherals using a single USB cable, and connecting the MICRO BR directly to computers, also provides rapid data transmission. -
Page 101: Connecting To Your Computer
Connecting to your computer Composition of Data on Memory Cards Use the USB cable to connect the MICRO BR to your computer. The folders and files created are as shown below. The end of the USB cable that is connected to the fig.05-010... -
Page 102: Checking The Folders And Files Saved On A Memory Card
• The MICRO BR does not support long filenames. Such filenames will not be When you connect the MICRO BR via USB to displayed correctly. Assign filenames of no your computer (p. 103, p. 106), a MICRO_BR icon more than eight characters, not including the will appear on your computer. -
Page 103: Notes On Using Usb
(Ex.) MICRO_BR Removable Disk (?:) Inside My Computer, double-click the MICRO_BR icon (or the “Removable Disk (?:)” icon). The root folder (p. 101) of the MICRO BR (memory card) will be displayed. Transfer audio files using the following procedure. -
Page 104: Backing Up And Recovering Micro Br Song Data
Double-click the MICRO_BR icon (or the Double-click the MP3 folder in the MICRO “Removable Disk (?:)” icon). The root folder (p. 101) of the MICRO BR The audio files saved in the MP3 folder will (memory card) will be displayed. -
Page 105: Breaking The Connection With Your Computer
Section 6. Using USB Backing up Breaking the connection with MICRO BR song data can be saved on your your computer computer. Drag the “ROLAND” folder to the With Windows XP computer’s folder and drop it in the folder. In My Computer, right-click on the It’s a good idea to create a new folder as... -
Page 106: With Macintosh
MICRO BR and your computer. (Ex.) After a time, the Play screen will reappear. MICRO_BR Double-click the “MICRO_BR” icon in your computer. The root folder (p. 101) of the MICRO BR (memory card) will be displayed. Transfer audio files using the following procedure. -
Page 107: Backing Up And Recovering Micro Br Song Data
Double-click the MP3 folder in the MICRO Double-click the “MICRO_BR” icon in your computer. The audio files saved in the MP3 folder will The root folder (p. 101) of the MICRO BR be displayed. (memory card) will be displayed. From the MP3 folder, drag the desired Transfer MICRO BR’s song data using the... -
Page 108: Breaking The Connection With Your Computer
Section 6. Using USB Backing up Breaking the connection with MICRO BR song data can be saved on your your computer computer. Close the all windows in your computer. Drag the “ROLAND” folder to the computer’s folder and drop it in the Drag the “MICRO_BR”... -
Page 109: Compatibility Of Br-900Cd/600 Song Data
Up the BR-900CD’s Data.” However, since the number of tracks that can be Connect the MICRO BR to your computer handled differs between the MICRO BR and the via USB. BR-900CD/600, the MICRO BR can use only (See MICRO BR Owner’s Manual p. 103, p. -
Page 110: Section 7. Other Convenient Functions
Adjusting the Display Tuning an Instrument Contrast (Tuner) Depending on where the MICRO BR is situated, The MICRO BR has a built-in “chromatic tuner the display contents may be difficult to read. If function” that allows you to tune your this is the case, perform the procedure given instrument quickly. -
Page 111: Tuning
Hold down [EFFECTS] and press displayed note [RHYTHM]. fig.06-020 fig.06-020 When the built-in tuner of the MICRO BR is Your instrument is tuned the displayed used, the reference pitch is shown in the note upper of the display, and the note name in fig.06-020... -
Page 112: Converting Between Track Data And Audio Files
Section 7. Other Convenient Functions Converting between track data and audio If you select TR1-TR4, the data will be files created to a monaural audio file, and if you select TR12 or TR34, the data will You can convert track data into an audio file be created to a stereo audio file. -
Page 113: Converting Audio Files To Track Data (Track Import)
Section 7. Other Convenient Functions Use VALUE [-][+] to set the Type Converting audio files to parameter to the desired type of file. track data (Track Import) You can choose either WAV or MP3 as the file type. Here’s how track data recorded on a track can be fig.06-020 converted to an audio file (MP3/WAV formats). -
Page 114: Using Plug-In Powered Microphone
Section 7. Other Convenient Functions Press [TR4] (NEXT). Using plug-in powered The Import to setting screen appears. fig.06-020 microphone You can connect a plug-in powered condenser mic to the LINE IN/MIC jack. Use CURSOR [ ] and VALUE [-] [+] Perform the procedure given below to use the to specify the import-destination track. -
Page 115: Initializing The Memory Card
Turn the power off as described in • If you initialize the memory card supplied “Turning the power off” (p. 24). with the MICRO BR, the demo songs on the card will be lost. Hold down [UTILITY] and press [POWER]. -
Page 116: Saving Battery Power (Power Save)
(Auto Power Off) If a certain length of time has passed without any buttons being operated, the MICRO BR will dim The Auto Power Off function automatically turns the display brightness to reduce the current off the power if the buttons or VOLUME dial consumption. -
Page 117: Section 8. Appendices
Section 8. Appendices Arrangement / Pattern List Preset Arrangement List Each of the preset Arrangement (except Metro4/4) is set so that a three-measure BREAK, followed by V1 (verse) comes after the E (ending). Arrangement Initial Starting measure Beat BREAK Drum Kit Name Tempo ROCK1... -
Page 118: Preset Pattern List
Section 8. Appendices Preset Pattern List Pattern Name Initial Measure Beat (Abbreviation shown in display) Tempo ROCK1 ROCK2 ROCK3 ROCK4 ROCK5 ROCK6 Hard Rock 1(HdRc1) Hard Rock 1(HdRc2) Hard Rock 1(HdRc3) Hard Rock 1(HdRc4) Hard Rock 1(HdRc5) HEAVY1 (HEVY1) HEAVY2 (HEVY2) HEAVY3 (HEVY3) HEAVY4 (HEVY4) HEAVY5 (HEVY5) -
Page 119: Effect Patch List
Effect Patch List GT (GUITAR/BASS) Bank Patch Name Algorithm Patch Name Algorithm SuperCln COSM GTR AMP Thunnk! COSM GTR AMP MS Drive COSM GTR AMP St Metal COSM GTR AMP MetlCore COSM GTR AMP Lesfilln COSM GTR AMP Twangstr COSM GTR AMP Thirdz COSM GTR AMP Blues Dv... -
Page 120: Mc (Mic) Bank
MC (MIC) Bank EX (EXTERNAL MIC) Bank Patch Name Algorithm Patch Name Algorithm Ag LoCut VOCAL MULTI Flat MSTR TOOL KIT FarDista VOCAL MULTI Mixdown MSTR TOOL KIT Ag3B Cmp MSTR TOOL KIT PreMastr MSTR TOOL KIT Only Lmt MSTR TOOL KIT Live Mix MSTR TOOL KIT ForNylon... -
Page 121: Parameter List
Parameter List • (*1) Stored in the Song. (If you want to save the settings as the currently selected song data, hold down and press • (*2) Stored in the MICRO BR. • (*3) Not Stored. Mixer Parameter Parameter Name (*1) Display... -
Page 122: Song Parameter
Song Parameter Parameter Name (*1) Display Initial Value Valid Settings Song Name SONG0000 8 characters Data Type Type HiFi (MT2) HiFi (MT2), STD (LV1), LONG (LV2) Song Protect OFF, ON Tuner TUNER 435–445 (Hz) Phrase Trainer Parameter Name (*3) Display Initial Value Valid Settings Time Stretch... -
Page 123: Troubleshooting
Cannot be heard For best results, adjust the sensitivity as high as possible without allowing the OVER • Is the power of the MICRO BR and of the indication to appear in the display when the connected equipment turned on? input source is producing its loudest •... - Page 124 • Is a mic with high output impedance • Did you adjust the INPUT LEVEL dial? (p. connected directly to the MICRO BR? The MICRO BR is designed with a wide • Has input source parameter turned off? (The margin of headroom. When the input source...
-
Page 125: Problems With Usb
• Was a strong physical shock applied to the memory card? • Did turn power off while the MICRO BR is connected via USB. • Did disconnect the USB cable while the MICRO BR is connected via USB. -
Page 126: Error Message
If this message appears after you you cannot program it. have been using the memory card Solution: Press [RHYTHM] to select Arrange with the MICRO BR, the data on mode or Pattern mode. the card has become fragmented, causing delays in reading and Card Full! writing data. - Page 127 What is an event? ready in the MP3 folder. The smallest unit of memory used by the No Song! MICRO BR to store recorded results on a memory card is the event. A newly created Cause: There are no songs on the memory card.
-
Page 128: Stop Recorder
Solution 1: Insert a memory card initialized for use with the MICRO BR (p. 115). Cause 2: You have attempted to load an incompatible MP3 or WAV file to the MICRO BR. -
Page 129: Specifications
MP3 (64 kbps, 44.1 kHz) Memory WAV (44.1 kHz, 16-bit) Card 64 kbps 128 kbps 192 kbps * The MICRO BR can play the MP3 in bit rate range of Capacity 64 kbps–320 kbps. 32 MB 65 min 32 min... -
Page 130: Power Supply
1 kΩ or greater (LINE OUT) • Size AA alkaline dry cell batteries (2) • Demo card (128 MB SD Memory Card:Already ● Interface inserted when the MICRO BR is shipped) USB Connector (mini B type) • Owner’s Manual • Leaflets (Information/About Memory Cards, ●... -
Page 131: Track Sheet
Track Sheet... - Page 132 MEMO...
-
Page 133: Index
Index Numerics 0!A ........59, 63, 77, 89, 98, 112 Cannot Edit! This is a Preset ......126 3BAND COMP ........66–67, 80 Cannot Erase! ..........126 4BAND EQ ..........66, 68 Cannot Insert! ..........126 Cannot Program! Rhythm Off..... 126 Cannot Undo! .......... - Page 134 Driver ............... 100 High Gain ............68 drum kit ............. 84 Hi-M F ............... 68 Hi-M Gain ............68 Hi-M Q .............. 68 E.Level ............68–69 HOLD Switch ........... 19 edit region ............54 EDT .............. 43, 96 Effect Patch List ..........119 IMP ..............
- Page 135 LONG ............12, 38 Loop Recording ..........47 NAM ..........59, 89, 97, 112 Low Gain ............68 name ........59, 63, 77, 79, 89, 97 LV1 ............... 12, 38 Naming a song ..........59 LV2 ............... 12, 38 Naming an arrangement ........ 89 new song .............
- Page 136 Track Edit ............53 rhythm ........... 11, 31, 82 Track Erase ............56 Rhythm Parameter ......... 122 Track Exchange ..........57 ROLAND Folder ..........101 Track Export ........... 112 ROOM ..............75 Track Import ........... 113 Track Move ............55 Tracks ..............
- Page 137 Unformatted! ..........128 Unsupported Card! ........128 Unsupported Format! ........128 USB ..............100 USB Connector ..........18 Useful Capacity ..........129 User patches ............62 UTILITY ............. 13 VALUE .............. 14 VO DRV ............. 71 VOCAL MULTI ..........66 Volume ............
- Page 138 For EU Countries...
- Page 139 Cet appareil numérique de la classe B respecte toutes les exigences du Règlement sur le matériel brouilleur du Canada. For the USA DECLARATION OF CONFORMITY Compliance Information Statement Model Name : MICRO BR Type of Equipment : Digital Recorder Responsible Party : Roland Corporation U.S.
- Page 140 * Microsoft and Windows are registered trademarks of Microsoft Corporation. * Apple, Macintosh, iTunes and iTunes Music Store are registered trademarks of Apple Inc. * SonicStage, CONNECT and ATRAC3 are trademarks or registered trademarks of Sony Corporation. * The SD logo ( ) is a trademark of SD Card Association.
Need help?
Do you have a question about the MICRO BR and is the answer not in the manual?
Questions and answers