
Subscribe to Our Youtube Channel
Related Manuals for Grundig GCR001IP


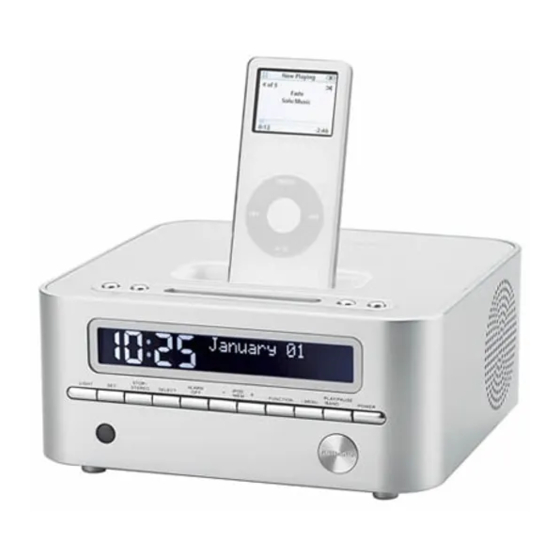
Summary of Contents for Grundig GCR001IP
- Page 1 GCR001IP CLOCK RADIO WITH UNIVERSAL DOCK FOR IPOD The Gold Technical Support Line:1902 215 259 Personal Product Support (Charges will apply at $2.95 per minute) GCR001IP...
-
Page 2: Introduction
GCR001IP Introduction Thank you for buying this Grundig product, which is designed to give you many years of trouble-free service. You may already be familiar with using a similar unit, but please take time to read these instructions. They are designed to familiarize you with the unit’s many features and to ensure you... -
Page 3: Table Of Contents
GCR001IP CONTENTS Introduction Important Notes Main Operation Location of Controls Setting the Time Setting the Sleep Function Alarm Function Mute Function Listening to the Radio Aux in Operation Aux out Operation Ipod Function Dimmer Function Using Earphones/Headphones Specification Warranty What’s in the box The following should be located within the packaging. -
Page 4: Important Notes
GCR001IP IMPORTANT NOTES Your hearing is very important to you and to us so please take care when operating this equipment. It is strongly recommended that you follow the listed guidelines in order to prevent possible damage or loss of hearing: ESTABLISH A SAFE SOUND LEVEL •... - Page 5 Switch off and withdraw the mains plug when making or changing connections. • Contact the Grundig helpline if you are ever in doubt of the installation, operating, or safety of your equipment. • Don't continue to operate the equipment if you are in any doubt about it working normally, or if it is damaged in any way - switch off, withdraw the mains plug and call the helpline.
-
Page 6: Main Operation
GCR001IP Main operation • Insert the mains adaptor into the DC IN socket on the back of the radio. • Insert the mains adaptor into wall socket. Caution: Only connect the mains adaptor to a properly installed wall socket with a voltage matching the “Technical data” of the mains adaptor. Back up batteries for clock Two batteries, type AA/1.5V, are required to provide backup power for the clock. -
Page 7: Location Of Controls
GCR001IP Location of Controls Front view 1. LIGHT button 2. Remote sensor 3. SET button 4. STOP/STEREO button 5. SELECT button 6. ALARM OFF button 3 4 5 6 7 8 9 10 11 12 7. iPOD/MEM - button 8. iPOD/MEM +button Top view 9. -
Page 8: Setting The Time
GCR001IP Setting the Time 1. Press the SET button once, the clock icon and the current time is displayed on the LCD, the hour digit will flash, press PRE -/+ to adjust the hour. 2. Press PLAY/PAUSE/BAND button to confirm the hour setting and the minutes digits flash, press PRE -/+ to adjust the minutes. -
Page 9: Mute Function
GCR001IP more than 5 seconds between ALM 1 mode and ALM2 mode. 5. While the alarm time is flashing press VOL -/+ button to select the desired volume level (00-40) while the alarm is sounding. Note: When no adjustments are made to the alarm volume, the volume will revert to the last set level. -
Page 10: Listening To The Radio
GCR001IP Listening to the Radio 1. Press the POWER button to turn on the radio. 2. Press PLAY/PAUSE/BAND button to select the desired band FM or 3. Press the TUNE -/+ button to tune to the desired station. Hold TUNE -/+ button to auto search for stations. 4. -
Page 11: Aux Out Operation
GCR001IP AUX OUT Operation The sound from the unit can be connected to another audio device via the AUX OUT socket in the back of the radio. 1. Press the POWER button to turn on the radio. 2. Select your desired audio source, FM/AM or iPod. 3. -
Page 12: Using Earphones/Headphones
GCR001IP Using Earphones or Headphones To listen to the radio privately, connect an earphone or headphone (not included) with a 3.5mm plug to the jack on the back of the radio. Plugging in an earphone or headphone disconnects the internal speaker. Remarks In case of malfunction due to electrostatic discharge and/or electrical fast transient (Burst), just reset the product (reconnecting of the power... -
Page 13: Warranty
In the unlikely event that your product fails to work normally, please contact the Grundig Helpline 1800 509 394 (Australia) or 0800 450 259 (New Zealand) and have your receipt of purchase on hand. This guarantee is subject to the following provisions: ●...
Need help?
Do you have a question about the GCR001IP and is the answer not in the manual?
Questions and answers