Table of Contents
Advertisement
Quick Links
Advertisement
Table of Contents

Related Manuals for Grundig SONOCLOCK 935 IP DAB+


Summary of Contents for Grundig SONOCLOCK 935 IP DAB+
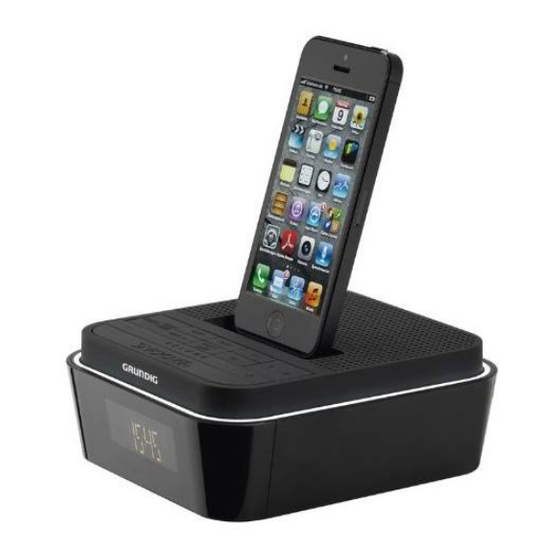
- Page 1 CLOCK RADIO SONOCLOCK 935 IP DAB+...
-
Page 2: Table Of Contents
CONTENT --------------------------------------------------------------------------------------------------------------------------------------- 3 SET-UPANDSAFETY 12 TIMERMODE Alarm mode 4 POWERSUPPLY Sleep timer Insert back-up battery (CR 2032) 13 SPECIALFUNCTIONS Mains operation Call up the software version 5 OVERVIEW Deleting all settings (Reset) R emoving DAB radio stations from the 7 SETTINGS program list T uning and storing DAB radio stations – Beleuchtung der Anzeige einstellen first installation Format der Datumsanzeige einstellen Storing DAB radio stations to presets Software Update T uning and storing DAB radio stations – after a removal 15 INFORMATION P rogramming DAB radio stations – Technical data manually Environmental note S earching for and saving FM radio... -
Page 3: Set-Upandsafety
SET-UPANDSAFETY ----------------------------------------------------------------------------------------------- The device is designed for the playback of audio B atteries, including those which do not contain signals. Any other use is expressly prohibited. heavy metal, should not be disposed of with household waste. Always dispose of used bat- Protect the device from moisture (water drops teries in accordance with local environmental or splashes). regulations. D o not place any vessels such as vases on the Never open the device casing. No warranty device. These may be knocked over and spill claims are accepted for damage caused by in- fluid on the electrical components, thus present-... -
Page 4: Powersupply
POWERSUPPLY --------------------------------------------------------------------------------------------------------------- Insertback-upbattery(CR2032) The back-up battery ensures that the stored settings are not lost in the case of a power failure. Caution: Danger of explosion if battery is incorrect- lyreplaced. Replace only with the same or equivalent type. 1 U nscrew safety bolt of the battery compartment cover panel and remove the cover panel. 2 I nsert the included backup battery with the posi- tive pole facing upwards. 3 C lose the battery compartment cover panel and screw in the safety bolt. Mainsoperation Check that the mains voltage on the type plate cor- responds to your local mains supply. If this is not the case, contact your specialist dealer. 1 I nsert the plug of the supplied power adapter cable into the »DC5V... -
Page 5: Overview
OVERVIEW - --------------------------------------------------------------------------------------------------------------------------------- SELECT INFO/MENU SLEEP ON/OFF AL1 MODE/ PRESET II AL2 iPoddock –VOLUME+ DC5V SNOOZE > BATTERY ANTENNA I5 : 30 § § 5... - Page 6 OVERVIEW - --------------------------------------------------------------------------------------------------------------------------------- iPoddock F or connecting an iPod/iPhone. r e I n DAB mode: Selects the DAB radio station from the station list. SELECT C onfirms the settings in the DAB I n FM mode: Press and hold to menu. start the automatic station search. INFO/MENU P ress briefly to have DAB station P ress briefly to change the fre- information displayed in DAB quency backwards or forwards mode. in steps. P ress and hold to open the DAB I n iPod/iPhone mode: Press menu and close it again. briefly to select the previous or next title; SLEEP A ctivates the sleep time; P ress and hold to search back- selects the switch-off time.
-
Page 7: Settings
SETTINGS - -------------------------------------------------------------------------------------------------------------------------------------- TuningandstoringDABradio TuningandstoringDABradio stations–firstinstallation stations–afteraremoval When the device is switched on for the first time You can activate the Auto Tuning System again. or after factory reset, the Auto Tuning System will That is reasonable, if you will use the device in an- start to scan the whole DAB bandwidth and store other place or search new DAB radio stations. in the program list. 1 Select the DAB input source with »MODE/ «. The time is updated automatically. 2 Open the menu by pressing and holding 1 For the best DAB/FM (UHF) reception it is suf- »INFO/MENU«. fcient to align the wire antenna accordingly. 3 Select the option » « with » « or » « FULL SCAN 2 Press »ON/OFF« to switch on the device. -
Page 8: Setting The Clock Format (12 Or 24 Hours)
SETTINGS - -------------------------------------------------------------------------------------------------------------------------------------- SearchingforandsavingFM Settingtheclockformat(12or radiostations–automatically 24hours) 1 Open the menu by pressing and holding You can store 20 FM radio stations on presets. »INFO/MENU«. 1 Select the FM input source with »MODE/ «. 2 Select the option » « with » « or » « and SYSTEM 2 Start the automatic station search by pressing confirm by pressing »SELECT«. and holding down »PRESET II«. 3 Select the option » – T he automatic station search searches and « with »... -
Page 9: Updating The Time - Automatically
SETTINGS - -------------------------------------------------------------------------------------------------------------------------------------- Updatingthetime–automatically Updatingthetime–manually 1 Select the DAB input source with »MODE/ The device will normally update the time automat- «. ically, when a time signal is received. You can 2 Open the menu by pressing and holding select from which source (DAB or FM or iPod/ »INFO/MENU«. iPhone) the update starts or you can disable this 3 Select the option » « with » « or » « and function. -
Page 10: 10 Ipod/Iphonemode
IPOD/IPHONEMODE ------------------------------------------------------------------------------------------ MadeforiPod/iPhone PlayingthecontentsofaniPod/ iPhone 1 Connect your iPod/iPhone into the »iPoddock« until it latches into its place. 2 Switch on the device from stand-by mode by pressing »ON/OFF«. “Made for iPod/iPhone” means that an electronic accessory has been designed to connect specifi- 3 Select the input source with »MODE/ «. cally to an iPod/iPhone, and has been certified by P«. – Display: »I the developer to meet Apple performance stand- – P layback starts automatically with the last ards. Apple is not responsible for the operation of played passage. -
Page 11: Antenna
RADIOMODE ------------------------------------------------------------------------------------------------------------------------ Antenna SettingDynamicRangeControl (DRC)forDABstations For the best DAB/FM (UHF) reception it is suffcient When you activate Dynamic Range Control, you to align the wire antenna accordingly. can hear lower sounds better in a loud environ- Switchingon/off ment. 1 Switch the device from standby with »ON/ 1 Open the menu by pressing and holding OFF«. »INFO/MENU«. 2 Switch the device to standby with »ON/OFF«. 2 Select the option » « with » « or » « and confirm by pressing »SELECT«. -
Page 12: Alarm Mode Sleep Timer
TIMERMODE -------------------------------------------------------------------------------------------------------------------------- Alarmmode Sleeptimer 1 To set the switch-off time (»120« – »00« min- Settingthealarmtime utes), press »SLEEP« repeatedly. Note: 2 To switch off the sleep timer before the set time The time must be correctly set. press »SLEEP« to set the switch-off time to »00«; 1 Press and hold »AL1« or »AL2« for two sec- or onds. switch the device to standby with »ON/OFF«. – D isplay: » « and the hour flashes 2 Press » « or » « to set the hours and press »AL1« or »AL2« to confirm the setting. -
Page 13: Call Up The Software Version
SPECIALFUNCTIONS -------------------------------------------------------------------------------------------- Callupthesoftwareversion Note: To cancel the function select the option » « 1 Open the menu by pressing and holding (No) by pressing » « or » «. »INFO/MENU«. 5 Press »SELECT« to confirm setting. 2 Select the option » « with » « or » « and SYSTEM confirm by pressing »SELECT«. 6 Press »INFO/MENU« to end the setting. – I n the program list you will find only avail- 3 Select the option » « with » « or » « and SV VER able radio stations. -
Page 14: Software Update
SPECIALFUNCTIONS -------------------------------------------------------------------------------------------- Settingthedatedisplayformat You can choose whether to have the day or the month displayed first. 1 Open the menu by pressing and holding »INFO/MENU«. 2 Select the menu item » « using » « or SYSTEM » « and confirm by pressing »SELECT«. 3 Select the menu item » « using » « or » « TIME and confirm by pressing »SELECT«. 4 Select the menu item »... -
Page 15: Technical Data
INFORMATION - ----------------------------------------------------------------------------------------------------------------- Technicaldata Environmentalnote This device is noise–suppressed This product has been made from according to the applicable EU high-quality parts and materials directives. which can be re-used and recy- cled. This product fulfils the European directives Therefore, do not throw the prod- 2004/108/EC, 2006/95/EC, 2009/125/EC uct away with normal household waste at the end and 2011/65/EU. of its service life. Take it to a collection point for recycling electrical and electronic devices. This is Powersupply: indicated by this symbol on the product, in the op-... - Page 16 Grundig Intermedia GmbH Beuthener Strasse 41 90471 Nürnberg www.grundig.com 72011 412 2200 13/37...
Need help?
Do you have a question about the SONOCLOCK 935 IP DAB+ and is the answer not in the manual?
Questions and answers