Fluke 719 Series User Manual
Pressure calibrator with electric pump
Hide thumbs
Also See for 719 Series:
- Calibration manual (98 pages) ,
- Technical data (2 pages) ,
- Calibration manual (98 pages)
Table of Contents

Subscribe to Our Youtube Channel
Related Manuals for Fluke 719 Series


Summary of Contents for Fluke 719 Series
- Page 1 719 Series Pressure Calibrator with Electric Pump Users Manual August 2008 © 2008 Fluke Corporation. All rights reserved. Specifications are subject to change without notice. All product names are trademarks of their respective companies.
- Page 2 LIMITED WARRANTY AND LIMITATION OF LIABILITY This Fluke product will be free from defects in material and workmanship for three years (one year for pump assembly) from the date of purchase. This warranty does not cover fuses, disposable batteries or damage from accident, neglect, misuse or abnormal conditions of operation or handling.
-
Page 3: Table Of Contents
Set Maximum Pressure Limit ..................10 Calibrating a P/I Transmitter................... 10 Using the Internal Pump....................10 Pump Valve Assembly Cleaning Instructions ..............15 Using an External Pump....................15 External Fluke Pressure Module Compatibility............... 17 Supplying Loop Power ....................18 mA Modes ........................18... - Page 4 Calibration ........................22 Parts and Accessories ....................23 Specifications ........................ 26 Pressure Sensor Input ....................26 Pressure Module Input....................26 DC mA Measure and Source ..................26 Loop Supply ......................26 Pressure Source ....................... 26 General Specifications ....................27 Contacting Fluke......................27...
- Page 5 List of Tables Table Title Page Symbols..........................4 Front Panel Features......................5 Pushbutton Functions......................6 Pump Features........................7 Recommended Pressure Modules ..................14 Fluke Pressure Module Compatibility ..................17 Replacement Parts ........................ 23...
- Page 6 719 Series Users Manual...
- Page 7 List of Figures Figure Title Page Connection Technique ......................4 Front Panel Features......................5 Pump Features........................7 Internal Pressure Sensor with Internal Pump ................ 12 Pressure Module with Internal Pump..................13 Pressure Module with External Pump ................... 16 Sourcing Loop Voltage ......................18 Sourcing mA Connections .....................
- Page 8 719 Series Users Manual...
-
Page 9: Introduction
Identify the set, reset and deadband of of pressure switches Measure pressure via a 1/8-in. NPT pressure fitting The Calibrator ships with: and an internal pressure sensor or via a Fluke 700 holster Series Pressure Module Source pressure via electric pump... -
Page 10: Safety Information
719 Series Users Manual The Calibrator makes 5-digit pressure measurements in Safety Information the units shown below: A Warning identifies conditions and actions that pose hazard(s) to the user; a Caution identifies conditions and actions that may damage the Calibrator or the equipment inH2O at 4 C under test. - Page 11 Pressure Calibrator with Electric Pump Introduction Make sure the battery door is closed and To avoid over pressure damages, do not latched before operating the Calibrator. apply pressure that exceeds the limits listed in the Pressure Specifications Do not operate the Calibrator if it is table in the Specifications section.
-
Page 12: Symbols
Conforms to relevant Canadian Standards Association directives. Conforms to European Union requirements Pressure Do not dispose of this product as unsorted municipal waste. Go to Fluke’s website for recycling information. Conforms to relevant Australian fgx001f.eps standards. Figure 1. Connection Technique... -
Page 13: Getting Acquainted With The Calibrator
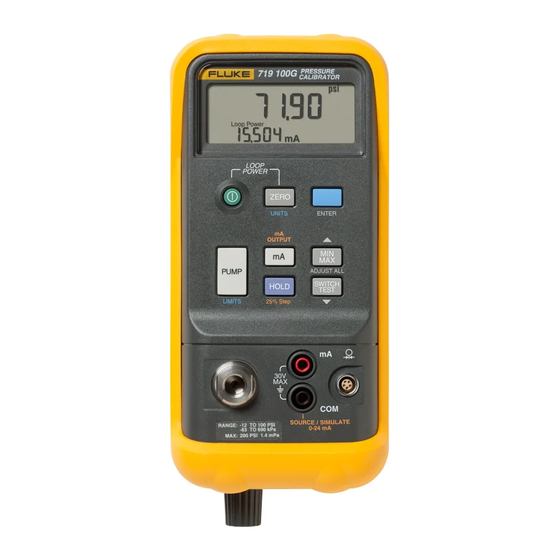
Pressure Calibrator with Electric Pump Getting Acquainted with the Calibrator Getting Acquainted with the Calibrator The Calibrator displays pressure and current measurements simultaneously. See Table 2 and Figure 2 for front panel features. The upper display shows the applied pressure or vacuum (shown as a negative value). -
Page 14: Pushbutton Functions
719 Series Users Manual Table 3. Pushbutton Functions Pushbutton Description Press to zero the pressure display. Vent pressure to atmosphere before pressing. With an Absolute Pressure Module, see special instructions below. Press C then UNITS to change pressure units. Continue to press UNITS for next selection or use U to move back or V to move forward. Press ENTER when finished or await timeout. -
Page 15: Pump Features
Pressure Calibrator with Electric Pump Getting Acquainted with the Calibrator Table 4. Pump Features Item Description Internal Pump- Press to activate internal electric pump and source pressure/vacuum. Pressure Vacuum Switch- Rotate forward (clockwise) for pressure, backward (counter- clockwise) for vacuum. Pressure/Vacuum Release Valve- Rotate fully backward (counter-clockwise) to release all pressure or vacuum. -
Page 16: Hart Resistor
719 Series Users Manual HART Resistor Switch Test The Calibrator has a selectable 250 HART resistor to To perform a switch test: facilitate use with HART communication devices. Use a Note HART communicator when measuring mA with loop power or sourcing mA. The HART resistor defaults to OFF. This example uses a normally closed switch. -
Page 17: Zeroing With Absolute Pressure Modules
Pressure Calibrator with Electric Pump Zeroing with Absolute Pressure Modules Press S to enter pressure switch test mode. The Zeroing with Absolute Pressure Modules Calibrator will display CLOSE instead of a mA For zeroing, adjust the Calibrator to read a known measurement. -
Page 18: Set Maximum Pressure Limit
The internal pump can also be used with certain Fluke 700 Press ENTER when finished. Series Pressure Modules. In this case, pressure measured by the Pressure Module is displayed by the Calibrator. - Page 19 Pressure Calibrator with Electric Pump Using the Internal Pump To use the Calibrator’s internal pump, refer to Figure 3 Press Zto zero the pressure display. and perform the following steps: Turn the fine adjustment knob to mid-range. Depressurize and drain the line before connecting the Turn the pressure/vacuum release control forward Calibrator.
- Page 20 719 Series Users Manual Black S I G N A L – T E S T fgx002f.eps Figure 4. Internal Pressure Sensor with Internal Pump...
- Page 21 Pressure Calibrator with Electric Pump Using the Internal Pump S I G N A L – Pressure Module T E S T Black fgx010f.eps Figure 5. Pressure Module with Internal Pump...
-
Page 22: Recommended Pressure Modules
719 Series Users Manual Table 5. Recommended Pressure Modules External Internal Pressure Pump Pump External Internal Module Pressure Pump Pump 719 30G/100G 719 30G 719 100G Module 719 30G/100G 719 30G 719 100G 700 PA6 700 P00 700 PV3 700 P01 700 PV4 700 P02 700 PD2... -
Page 23: Pump Valve Assembly Cleaning Instructions
To develop higher pressure or vacuum, use an external cuts, nicks, or wear. Replace if needed. pump (such as the Fluke Model 700PTP). Use a Fluke Pressure Module connected to the pressure module input Inspect the springs for wear or loss of tension. They on the Calibrator. - Page 24 719 Series Users Manual S I G N A L Pressure Module – T E S T Black fgx006f.eps Figure 6. Pressure Module with External Pump...
-
Page 25: External Fluke Pressure Module Compatibility
External Fluke Pressure Module Compatibility External Fluke Pressure Module Compatibility If inappropriate units are selected, the output of Fluke 700P Pressure Modules can cause the Calibrator display to overflow (OL), or displays values that are too low to be read. Refer to Table 6 for appropriate unit and range compatibility. -
Page 26: Supplying Loop Power
719 Series Users Manual Supplying Loop Power mA Modes The Calibrator can supply loop power at 24 V dc to a Different mA functions can be accessed by repeatedly current transmitter that is disconnected from the system. pressing A: Use the following procedure: mA- measured current is displayed. -
Page 27: Sourcing 4 To 20 Ma
Pressure Calibrator with Electric Pump Sourcing 4 to 20 mA Sourcing 4 to 20 mA Simulating a 4 to 20mA Transmitter To select current-sourcing mode, use the following Simulate is a mode of operation in which the calibrator is procedure: connected into a loop in place of a transmitter and supplies a known, settable test current. - Page 28 719 Series Users Manual +24 V Loop Black Power Supply Readout or Controller – fgx011.eps Figure 9. Connections for Simulating a 4 to 20 mA Transmitter...
-
Page 29: Percent Error Setup
Safety Information before proceeding. Remove test leads before opening. For maintenance procedures not described in this manual, or if the Calibrator needs repair, contact a Fluke Service Center. See Contacting Fluke. -
Page 30: Replacing The Batteries
( B ) appears. Remove test leads before changing the battery. Calibration Fluke recommends calibrating the Calibrator once a year to ensure that it performs according to its specifications. wh008f.eps Figure 10. Battery Replacement... -
Page 31: Parts And Accessories
Pressure Calibrator with Electric Pump Parts and Accessories Parts and Accessories Refer to Table 7 and Figure 11. Table 7. Replacement Parts Item Description Part/ Mod. No. Alligator clip red 1670641 AC72 Alligator clip black 1670652 BT1, BT2 9 V battery, ANSI/NEDA 1604A or IEC 6LR61 614487 Holster Holster, Yellow... - Page 32 719 Series Users Manual Item Description Part/ Mod. No. Vernier adjust knob 664190 MP11, 12, 13 O-ring 146688 MP14 Spacer 687449 MP85 Case top/connector 3315431 MP86 Case bottom 3315686 MP89, 90 Non-skid foot 885884 MP92 Battery door 664177 Keypad 3315673 TL20 Industrial test lead set 1639457...
- Page 33 Pressure Calibrator with Electric Pump Parts and Accessories MP85 Holster AC72 Alligator Clips TL75 Test Lead Set MP14 MP11,12,13 H7,8 MP3,4 MP86 MP92 CD-ROM H5,6 H2,3,4 MP89,90 fgx004f.eps Figure 11. Replacement Parts...
-
Page 34: Specifications
719 Series Users Manual Specifications Specifications are based on a one year calibration cycle and apply for ambient temperature from +18 C to +28 C unless stated otherwise. Counts are the number of increments or decrements of the least significant digit. Pressure Sensor Input DC mA Measure and Source Accuracy... -
Page 35: General Specifications
Maximum voltage applied between either mA terminal and earth ground or between the mA terminals: 30 V Contacting Fluke To contact Fluke for product information, operating Storage temperature: -30 C to 60 C assistance, service, or to get the location of the nearest... - Page 36 719 Series Users Manual...
Need help?
Do you have a question about the 719 Series and is the answer not in the manual?
Questions and answers