Advertisement
Fantasea EyeGrabber Fujifilm F Series
The EyeGrabber Fujifilm F Series allows for secure storage of Fantasea accessory lenses and
filters when not installed on the housing.
Compatible with the Following Lens Accessories:
BigEye Lens FXF100/200
BigEye Lens FXF80/100/200
EyeDaptor FXF100/200‐F67
adaptor
EyeDaptor FXF80/100/200‐F67
adaptor
RedEye Filter FXF‐80/100/200
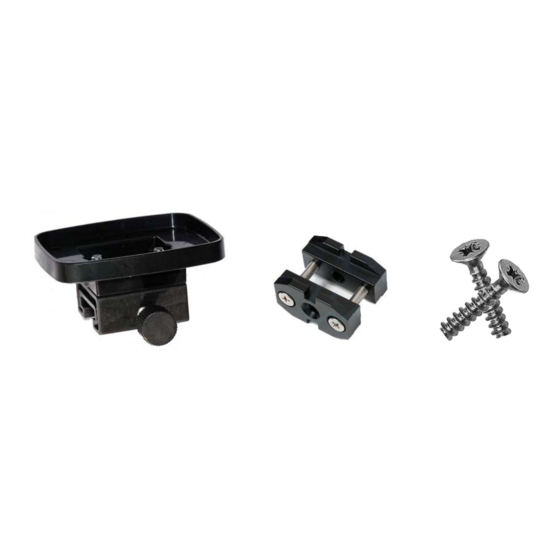
Included in the Kit:
EyeGrabber Fujifilm F Series
Instructions for Use:
1. Assembling the EyeGrabber Lens Holder on a Flex or Ball & Joint Arm
a. Please use the utmost care and do not use excessive force when assembling and
disassembling the different accessories, in order to not cause any damage to the
products.
b. It is advisable to mount the EyeGrabber on the arm prior to installing the arm on the
housing tray or handle.
c. Remove the screws from the T2 Connector so that the two parts of the T2 Connector
are disconnected. Please note that there are two sets of screws included in the kit. The
type of screws compatible with your arm depends on the model of the arm. In general,
(Cat. No. 4055)
Instruction Manual
(Cat. No. 5133)
(Cat. No. 5134)
‐ with any lens accessory mounted on the
(Cat. No. 4705)
‐ with any lens accessory mounted on the
(Cat. No. 4706)
(Cat. No. 5205)
T2 Connector
EyeGrabber Fujifilm F Series Instruction Manual
Set of 2 shorter screws
Advertisement
Table of Contents

Subscribe to Our Youtube Channel
Related Manuals for Fantasea EyeGrabber F Series


Summary of Contents for Fantasea EyeGrabber F Series
- Page 1 Fantasea EyeGrabber Fujifilm F Series (Cat. No. 4055) Instruction Manual The EyeGrabber Fujifilm F Series allows for secure storage of Fantasea accessory lenses and filters when not installed on the housing. Compatible with the Following Lens Accessories: BigEye Lens FXF100/200 (Cat. No. 5133) BigEye Lens FXF80/100/200 (Cat. No. 5134) EyeDaptor FXF100/200‐F67 ‐ with any lens accessory mounted on the (Cat. No. 4705) adaptor EyeDaptor FXF80/100/200‐F67 ‐ with any lens accessory mounted on the (Cat. No. 4706) adaptor RedEye Filter FXF‐80/100/200 (Cat. No. 5205) Included in the Kit: ...
- Page 2 longer screws are compatible with wider arms, such as Fantasea Flex arms, while shorter screws are compatible with narrower arms, such as Ball & Joint arms. Choose the proper set of screws for your system and leave the screws installed only inside the front part of the T2 Connector (image #1). Keep the other set of screws in storage for future use, in case you replace the arms used in your system. d. If assembling the EyeGrabber on a Flex arm, gently rotate the links of the arm so that two sequential holes positioned on the upper half of the arm are aligned in a way that enables inserting screws inside (image #2). If assembling the EyeGrabber on a Ball & Joint arm, simply choose two slots on the upper half of the arm which the EyeGrabber will be assembled through. Image #2 Image #1 e. Hold the front part of the T2 connector with the two screws installed inside in front of the arm, so that the screws are aligned with the two holes or slots in the arm. Insert the screws through the holes or slots of the arm (image #3). Any resistance encountered might be due to improper alignment of the holes on the Flex arm or due to the resistance of the Nylon support line found inside the Flex arm. In such a case, please repeat step 1c and make sure the support line doesn’t get in your way. f. Hold the rear part of the T2 Connector on the other side of the arm, so the narrow side ...
- Page 3 Image #3 Image #4 g. Hold the lens holder against one of the sides of the T2 Connector attached to the arm, so that the lens holder is facing out of the arm and the lens holder’s connector is aligned with the T2 Connector. Make sure that you attach the EyeGrabber on the T2 Connector that faces outward from the housing, so you will have more space to mount the lens on the EyeGrabber. Slide the lens holder on the T2 Connector and tighten the screw on the lens holder in order to fix its position (image #5). It is important to ensure that the lens holder connector and the T2 Connector are perfectly aligned prior to tightening the screw, or else the lens holder cannot be stabilized on the arm. h. Install the snap cord of the accessory lens on the arm. If you had the snap cord attached to the housing before, remove it and install it on the arm instead, so the accessory lens can be secured when mounted both on the housing lens port and the EyeGrabber. i. Mount the arm, with the EyeGrabber installed, on your housing tray or handle. ...
- Page 4 2. Installing and Removing Lens Accessories from the EyeGrabber a. Installing and removing lens accessories from the EyeGrabber during the dive is the same as when installing and removing from the housing lens port (image #6). In order to install the accessory lens on the EyeGrabber, push the lens against the EyeGrabber starting from the bottom right corner (opposite the gap designed for the built‐in flash diffuser) and proceeding towards the top left corner. Make sure that the accessory lens is properly mounted on the EyeGrabber by gently trying to pull it out. If properly installed, the lens should not easily come off the EyeGrabber. b. The EyeGrabber doesn’t feature any bottom or top sides, so the direction in which the lens is installed on the lens holder makes no difference. c. It is recommended not to detach the secure line from the accessory lens during the dive, whether if mounted on the arm or on the housing lens port. d. In order to remove the accessory lens from the EyeGrabber, gently push it off, starting from the secure line loop on the right side of it and using your thumb in an outward direction. e. After the dive, detach the lens accessory from the EyeGrabber and rinse all components in fresh water. Dry with a soft clean cloth and store safely. Image #6 For further information, please contact us at www.fantasea.com/contact or visit our website www.fantasea.com EyeGrabber Fujifilm F Series Instruction Manual...
Need help?
Do you have a question about the EyeGrabber F Series and is the answer not in the manual?
Questions and answers