Table of Contents
Advertisement
Quick Links
Advertisement
Table of Contents

Related Manuals for ESI PHONORAMA


Summary of Contents for ESI PHONORAMA
- Page 1 USB Phono Preamp for professional vinyl & tape transfers User’s Guide...
- Page 2 ESI - Copyright © 2011 Revision 1, October 2011 www.esi-audio.com...
-
Page 3: Table Of Contents
PHONORAMA INDEX 1. Introduction..........................4 2. Description of PHONORAMA ....................4 2.1 Front Panel................................4 2.2 Rear Panel ................................4 2.3 Minimum System Requirements.......................... 5 3. Installation ............................ 5 3.1 Windows XP ................................ 5 3.2 Windows Vista / 7..............................7 3.3 Mac OS X ................................ -
Page 4: Introduction
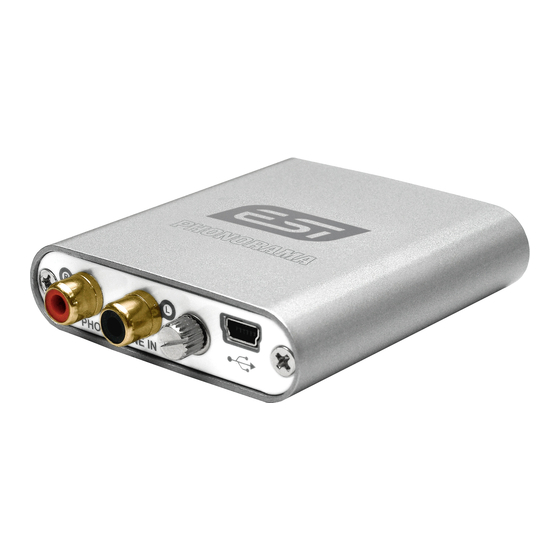
PHONORAMA 1. Introduction Thank you for choosing the ESI PHONORAMA. The stylish USB audio adapter allows you to record, transfer and edit your record and tape collection. Simply connect your turntable to the adjustable phono input and hook it up with a ground connection wire, and then start recording. -
Page 5: Minimum System Requirements
- QuickTime 7 or greater 3. Installation Before installing the drivers of PHONORAMA, we recommend to check on the download section of www.esi-audio.com for updated drivers. 3.1 Windows XP Disconnect PHONORAMA before you install the driver if it has been connected already. Then launch setup.exe from the Windows folder of the included Installation CD or from a download of a... - Page 6 PHONORAMA The installer now informs you that the driver installation will start as shown on the left picture below. Confirm this with Next. During the following process you will see a dialog box once or several times that informs you that the driver software has not passed Windows Logo testing. Please be assured that our drivers have been tested in various different ways and are OK to be used.
-
Page 7: Windows Vista / 7
PHONORAMA You can now finally click OK on the Information dialog. The installation is now finished. To confirm this, please check if the ESI icon is displayed in the taskbar notification area as shown below. If yes, the driver installation has been completed successfully. -
Page 8: Mac Os X
7 informs that the driver is installed via a bubble message box. You can now finally click OK on the Information dialog. The installation is now finished. To confirm this, please check if the ESI icon is displayed in the taskbar notification area as shown below. -
Page 9: Audio Applications
PHONORAMA The panel has the following functions and sections: INPUT section: this section controls the input monitoring volume of the incoming signal from the hardware. A pair of mono faders can be controlled together or individually depending on your mouse position The Mute button at the bottom allows you to mute the signal. A red Mute button indicates that the mute function is enabled. -
Page 10: Windows Multimedia Setup
PHONORAMA 5.1 Windows Multimedia setup The Windows Multimedia setup is required if you want to use your PHONORAMA as the main sound device for Windows multimedia applications. Go to My computer-> Control panel -> Sounds and Audio Device Properties -> Audio. Select the PHONORAMA entry as your playback device to make sure that all standard signals are played via the PHONORAMA hardware. - Page 11 PHONORAMA In the next dialog, choose I do accept the terns of the license agreement and confirm this with Next. After that you can choose if you want to install SoundSaver Express completely or in portions only. We recommend to select Complete and then proceed with clicking Next. The next dialog asks you to proceed with the installation process by clicking Install.
-
Page 12: Installation Under Mac Os X
PHONORAMA The installation is now finished and you can launch SoundSaver Express via its entry in the Windows start menu. 6.2 Installation under Mac OS X For the installation under Mac OS X, open the file BIAS SoundSaver Express.dmg in the SoundSaver Express folder of the included CD. -
Page 13: Authorization
PHONORAMA The following dialog allows you to change the destination folder (Change Install Location). We recommend the installation on the Macintosh HD partition by clicking Install. After the files are copied (which can take some time), the installation will be completed – which can be confirmed with Close. - Page 14 PHONORAMA Enter your email address under Email Address and then under Serial Number, enter the serial number that is included on the postcard of the original retail box of PHONORAMA. Confirm this with Submit. Important: you need an active internet connection when you go through with this! The program will now confirm the authorization with the following message: After clicking OK, you can close the BIAS Authorization Manager with Done and then start using SoundSaver Express together with PHONORAMA on your system.
-
Page 15: Audio Setup
PHONORAMA 6.4 Audio Setup After launching SoundSaver Express for the first time, you need to select PHONORAMA as audio device. This makes sure that the application will not access the integrated audio hardware of your PC or Mac instead. To do that, click on Audio Settings ... under START and then select PHONORAMA (as USB audio device) under Input and Output. -
Page 16: General Information
PHONORAMA 8. General Information Trademarks ESI and PHONORAMA are trademarks of ESI Audiotechnik GmbH. Windows is a trademark of Microsoft Corporation. Other product and brand names are trademarks or registered trademarks of their respective companies. The FCC and CE Regulation Warning This device complies with Part 15 of the FCC Rules.
Need help?
Do you have a question about the PHONORAMA and is the answer not in the manual?
Questions and answers