Table of Contents
Advertisement
Available languages
Available languages
Owner's Manual
Operating and Servicing Instructions
®
www.hoover.com
Quick
& Light
TM
Carpet Cleaner
WARNING:
Cleaner assembly may include small parts.
Small parts can present a choking hazard.
IMPORTANT:READCAREFULLY BEFORE ASSEMBLYAND USE.
Questions
or concerns?
For assistance,
please
call Customer
Service
at
1-800-944-9200
Mon-Fri
8am-7pm
EST before
returning
this product
to the store.
THIS PRODUCTIS INTENDEDFORHOUSEHOLD USEONLY.
IF USED COMMERCIALLY WARRANTYIS VOID.
_2010 Techtronic
Floor Care Technology
Limited. All rights reserved.
#960009652
ID101395-R1
Advertisement
Chapters
Table of Contents

Related Manuals for Hoover Quick & Light FH50010


Summary of Contents for Hoover Quick & Light FH50010
- Page 1 Owner's Manual Operating and Servicing Instructions www.hoover.com ® Quick & Light Carpet Cleaner WARNING: Cleaner assembly may include small parts. Small parts can present a choking hazard. IMPORTANT:READCAREFULLY BEFORE ASSEMBLYAND USE. Questions or concerns? For assistance, please call Customer Service...
-
Page 2: Table Of Contents
Visit our website at hoover.com. Follow the authorized dealer locator link to find the Hoover ® authorized dealer nearest you or call 1-800-944-9200 for an automated referral of Hoover ® authorized dealer locations (U.S. only) or to speak with a customer service representative; Mon- Fri... -
Page 3: Important Safe{Juards
THIS PRODUCT IS INTENDED FORHOUSEHOLD USEONLY. IMPORTANTSAFETYINSTRUCTIONS When you use an appliance, basic precautions should always be followed, including the following: ° READ ALL INSTRUCTIONS BEFORE USING THE APPLIANCE. • ALWAYS FOLLOW THESE SAFETY INSTRUCTIONS. ° DO NOT LEAVE CARPET CLEANER UNATTENDED WHEN PLUGGEDIN. °... - Page 4 • Using i mproper voltage m ay result i ndamage tothemotor andpossible injury t othe user. P roper voltage i slisted onthecleaner plate. • Use only Hoover ®Carpet & Upholstery Detergent. Using o ther c leaning solutions may cause e xcessive foaming.
-
Page 5: Assembling Cleaner
1. Assembling cleaner Carton contents Unpack cleaner from carton and identify parts shown. Remove and dispose of cardboard packing. Stand base in upright position. Push midsection onto base by aligning tabs on the backside of midsection and the pockets on the backside of base. -
Page 6: Cleaner Description
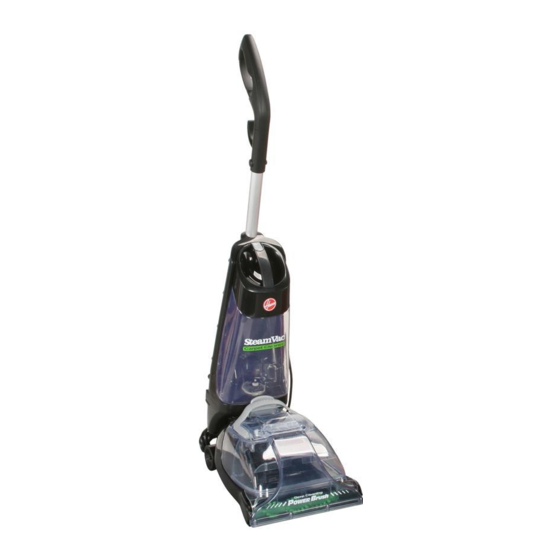
2. How to use Cleaner description Operate cleaner only at voltage specified on data plate on back of cleaner. The assembled cleaner will look like the drawing. 1. Handle 2. Clean Solution Reservoir Latch 3. Carry Handle 4. Clean Solution Reservoir 5. -
Page 7: Preparing The Carpet
IMPORTANT: DO NOT USE THE CARPET CLEANER AS A DRY VACUUM. 1. Vacuum carpet thoroughly. Use a Hoover ® vacuum cleaner with a revolving brushroll for best results. Remove as much furniture from the room as possible. If unable to remove the furniture, place plastic or foil under and around the legs until the carpet has dried completely. -
Page 8: Dirty Water Tank And Filter: Emptying And Cleaning
Other Solutions may generate excessive foam which will cause the float to rise prematurely and shut off the suction. Use five capfuls (5 ounces) of Hoover ® brand detergent per fill up of the clean water reservoir. A higher concentration shampoo may cause excessive foaming. -
Page 9: Storage
WARNING: TO REDUCE THE RISK OF INJURY FROM MOVING PARTS - UNPLUG CLEANER BEFORE CHANGING BELT. For Belt Style 7 replacements, please call 1-800-944-9200 or visit our website at www.hoover. corn to locate a dealer nearest you. To Remove Belt Flip cleaner on its side... -
Page 10: Lfyou Have A Problem
To Replace Belt or Brushroll Removebelt. Dispose Placebelt on motor With belt in place, Replacebelt cover by of old belt. shaft, then slip pull and slide brush inserting end furthest brushroll through roll into nozzle, mak- from brushroll first. belt. Placebelt in area ing sure that the Then place front of brushroll... -
Page 11: Service
For additional assistance OR FITNESS FOR PARTICULAR PURPOSE, ARE DISCLAIMED. inFormation concerning this Warranty availability IN NO EVENT WILL HOOVER BE LIABLE FOR ANY SPECIAL, warranty service outlets, phone Hoover Consumer INDIRECT, INCIDENTAL OR CONSEQUENTIAL DAMAGES OF Response... - Page 12 Manual del Propietario Instrucciones de operaci6n y servicio www.hoover.com Quick & Light '" Carpet Cleaner ADVERTENCIA: iR Elensamblede la aspiradora puede incluirpartes peque_as. Las partes peque_as pueden presentar riesgode ahogamiento. IMPORTANTE:LEA ATENTAMENTEANTES DE ENSAMBLARY USAR. &Tiene alguna pregunta o inquietud?
- Page 13 N0mero de serie Consejo: Adjunte su recibo de compra a este manual del propietario. Para obtener el servicio de garantia de compra de su producto HOOVER, es posible que se requiera la verificaci6n de la fecha de compra. lnscriba su producto en linea en Hoover.corn, o...
- Page 14 ESTA ASPIRADORA ESTA DISENADA P ARA USODOMC:STICO SOLAMENTE. INSTRUCCIONES DESEGURIDAD IMPORTANTES Cuando use un electrodom6sticose deben seguirprecauciones basicas, incluyendolas siguientes: • LEA TODASLAS INSTRUCCIONES A NTESDE USARELAPARATO. • SIEMPRE SIGA ESTASINSTRUCCIONES D E SEGURIDAD. • NODEJELA LAVADORASIN VIGILANCIA CUANDO ESTI_ CONECTADA. •...
- Page 15 • Nolautilice sineltanque d eagua sucia puesto e nsulugar. • Apague todos loscontroles antes dedesconectarla. • Tenga m ucho c uidado cuando a spire e scaleras. • Nola utilice para aspirar l iquidos i nflamables o combustibles como potejemplo gasolina nilauseenareas d onde e stos puedan encontrarse presentes.
- Page 16 1. C6mo ensamblar la aspiradora Contenido de la caja Saque todos los componentes de la caja e identifique cada pieza que se muestra. Antes de deseehar la eaja, asegfirese de que tiene todas las piezas. Coloque la base en posici6n verticale. Empuje la secci6n media en la base al alinear las lengi_etas...
-
Page 17: Descripci6N De La Aspiradora
C6mo usar la aspiradora Descripci6n de la aspiradora Haga funcionar la aspiradora para alfombras solamente en el voltaje espe¢ificado en la placa de datos,quese encuentra en la parte posterior de la aspiradora. La aspiradora ensamb[ada debe tener un as- pecto semejante al del diagrama. 1. -
Page 18: Preparaci6N De La Alfombra
ADVERTENCIA: NO ALMACENE LA LIMP1ADORA DE MOQUETAS EN LE GARAJE N1 EN UN LUGAR EN EL QUE PUD1ERA HELAR. Remocion y reemplazo del deposito de solucion NOTA: Use s6lo detergentes de marca Hoover ®. E1 uso de otras soluciones limpiadoras puede generar demasiada espuma. Demasiada espuma har_ que el flotador apague la aspiradora antes de tiempo. -
Page 19: Limpiezade Alfombras
Use cinco tapones (5 onzas o 150 ml} de del mango de] tanque detergente de marca Hoover g' por cada tanque lleno de agua limpia. Un concen- de agua sucia y traci6n alta de champ0 puede generar excesiva espuma. -
Page 20: Mantenimiento
ADVERTENCIA: PARA REDUC1R EL RIESGO DE LESIONES CAUSADAS POR LAS PARTES MOV1LES, DESCONECTE LA ASP1RADORA ANTES DE CAMB1AR LA BANDA. Para el reemplazo de la banda Estilo 7 por favor llame al 1-800-944-9200 o visite nuestro sitio web www.hoover.com para localizar al distribuidor mils cercano a usted. - Page 21 Para retirar la banda Incline la aspira- Para quitar [a cubi- Tome la tapa de Tome el cepillo la banda cerca del rotatorio con una dora de [ado para erta de [a banda, vet [a base de la utilice un destor- mano, con la otra cepillo rotatorio...
-
Page 22: Si Tiene Un Problema
4. Si tiene un problema Si ocurre un problema menor, generalmente puede resolverse con bastante facilidad cuando sehalla la causa, usando esta lista de verificaci6n. ADVERTENCIA: PARAREDUCIR ELR1ESGO D ELESIONES P ERSONALES, DESCONECTE ANTESDE DARSERV1CIO Problema Causa posible La limpiadora moquetas no fun- eiona. -
Page 23: Garantia
Ohio. El Per[odo de Garant[a no se prorrogar_ en II_velo o envielo a un Centro de ventas y de servicio de Hoover, funci6n de ningtln reemplazo o reparaci6n realizados en virtud de esta Garant[a. o a un Concesionario... - Page 24 Guide d'utilisation Instructions d'utilisation et d'entretien www.hoover.com ® Quick & Light _" Carpet Cleaner AVERTISSEMENT: L'appareil comprendde petites pi_ces qui, au momentde I'assemblage, p resentent un dangerd'etouffement. IMPORTANT: LIRE CESINSTRUCTIONSATTENTIVEMENTAVANT D'UTILISERL'ASPIRATEUR. Vous avez des questions ou des inquietudes? Pour obtenir...
- Page 25 ............... Pour obtenir de I'assistanee Visitez notre site web/_ l'adresse www.hoover.ca. Cliquez sur le lien du localisateur de marchands autoris_s HooverMD pour trouver [e marchand [e plus pros de chez vous, ou composez [e 1 800 944 9200 pour _couter un message indiquant [es adresses des marchands autoris_s HooverMD (_.-U.
- Page 26 CET ASPIRATEUR A €:T¢: C ONI_UPOUR US/_GE DOMESTIQUESEULEMENT CONSIGNES DESECURITE I MPORTANTES Lorsque v ousutilisez unappareil menager, vousdevez prendre certaines p recautions desecurit6, tellesque: ,, LISEZ TOUTES LESINSTRUCTIONS AVANT D'UTILISER CET APPAREIL. • RESPECTEZ TOUJOURS . &. L ALETTRE LESCONSIGNES D ESECURITE. •...
- Page 27 • Nepas debrancher entirant sur lecordon. Pour debrancher, tenir l afiche, non lecordon. • Ne pas manipuler lafiche ouI'appareil avec d es mains m ouillees. • Nepas ramasser quoi q ue cesoit q uibrOle ouqui f ume, telque lescigarettes, lesallu- mettes, oulescendres chaudes.
- Page 28 1. Assemblage de I'aspirateur Contenu de I'emballage Retirer I'aspirateur de la boite et identifier les pi_ees illustr_es. Enlever I'emballage en carton et le mettre au rebut. Placer ['aspirateur en position verticale. Pousser [a partie centra[e de ['appareil sur la bas en a[iynant [es attaches au dos de l'appareil et les poches au dos de la base.
-
Page 29: Description De L'aspirateur
2. Utilisation Description de I'aspirateur N'utiliser l'aspirateur qu'_ la tension sp_cifi_e sur la plaque signal_tique situ_e l'arri_re de l'appareil. Une lois assembl_, l'aspirateur ressemblera celui illustr_. Poign_e Loquet de r_servoir de solution propre Poign_e de transport R_servoir de solution propre 5. -
Page 30: Preparation De La Moquette
Preparation de la Moquette IMPORTANT :NE PASUT1L1SER L A SHAMPOUINEUSE COMMEASPIRATEUR ;_ SEC. 1. Aspirer la moquette _ fond. Pour obtenir de meilleurs resultats,utiliser un aspirateur Dirt DevilM° muni d'un. 2. Enleverle plus de meublespossiblede la pi@e.Si cela n'est pas possible,mettre du plastique ou du papier d'aluminium sousles pieds, et autour, jusqu'_ ce que la moquette soit compl_tement s@he. - Page 31 Mettre sous tension. Tirez sur la gfichette de pulv6risation de la solution REMARQUE : Nejamais tout en poussant lentement l'appareil.Relfichezla laisser l'unit6 sans sur- g_chette et tirez l'appareil vers l'arri_re, en suivant la veillance lorsque celle- m_me trajectoire, pour aspirer l'eau et la solution ci est branchee.
- Page 32 AVERTISSEMENT : POUR RI_DU1RE L ES RISQUES DE BLESSURES DUESA DESPll_CESEN MOUVEMENT, DI_BRANCHER UASP1RATEUR AVANT DE CHANGERLA COURRO1E. Pour remplacer la courroie modele 7, veuillez appeler le 1-800-944-9200 ou visiter notre site fl www.hoover.com pour connaltre le revendeur le plus proche. Pour enlever la courroie...
-
Page 33: Vider Et Nettoyer Le R_Servoir
Pour remplacer la courroie ou le rouleau-brosse Retirer la courroie. Placerla courroie sur Une fog la courroie Remettre le couvercle 3eter la courroie usa- l'arbre moteur, pug en place,tirer et faire de la courroie en place enfiler le rouleau- gee. lslisser d ans le suceur en commengantpar brossedans la cour-... -
Page 34: Service
Cependant, si le produit est postd _ un Votre appareil HOOVERMD garanti pour conditions centre de vente et de service Hoover pour une rdparation sous normales d'utilisation d'entretien domestiques, comme la garantie, son renvoi sera payd, stipule...
Need help?
Do you have a question about the Quick & Light FH50010 and is the answer not in the manual?
Questions and answers