Table of Contents

Related Manuals for Hoover SteamVac F7210-900


Summary of Contents for Hoover SteamVac F7210-900
- Page 1 HOOVER _ L __ EEE IW_ Deep Cleaner ENGLISH ,._ pp. 1-15 ESPAI_OL ,._ pag. 16-25 The Easy to Use Deep Cleaner FRAN(_AIS ,._ p. 27-35 SteamVac Deep Cleaner cleans carpet fibers applying water cleaning solution. www, hoover.com...
- Page 2 This appliance must be grounded. If it product. [eft outdoors, or dropped into water, should malfunction or breakdown, take it to a Hoover Factory Service • Connect to a properBy grounded Center or Authorized Hoover Warranty grounding provides a path of least resis- Service Dealer.
- Page 3 Important safeguards ..If you need any assistance: Parts needed for assembly ..Visit our website at www.hoover.com. Click on the "Service" button to find Assembling deep cleaner ..the service outlet nearest you OR Deep cleaner description ..
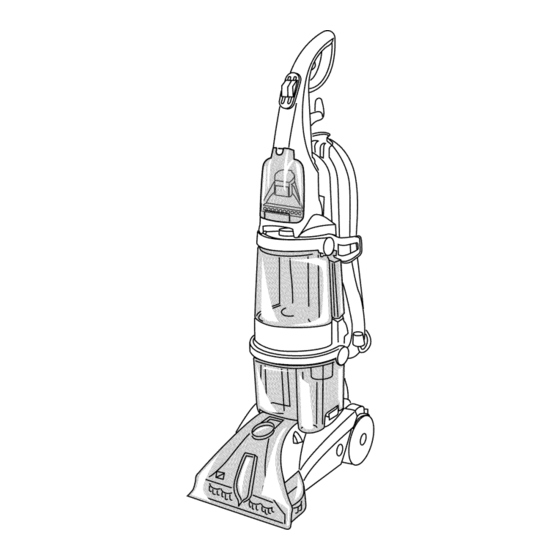
- Page 4 The assembled cleaner will look like this drawing. Attach upper handle NOTE: If the cord protector (A) on back of handle should become dislodged Remove clean water tank (upper tank) during unpacking, make sure it is repo- from deep cleaner. sitioned properly before continuing with assembly of your deep cleaner.
- Page 5 ;_.:] Rotate top of caddy toward cleaner Storing hose Identify the hose parts before storing handle. Slide caddy down so notch (G) hose. tools on caddy rests in hook (H) on cleaner. I. Nozzle connector end Press hose, a few inches from nozzle J.
- Page 6 The assembled deep cleaner will look like the drawing. Deep Cleaner Description P:Sl 1. Hand grip 2. Solution trigger: press to release cleaning solution 3. ON/OFF switch 3, I 4. Wash/Rinse switch 5. Utility tool 6. Carrying handle 7. Clean water tank handle 8.
- Page 7 Check clean water tank also; it may need to be refilled. Do not use without float and float retainer in place. If broken or dis- lodged, take to an Authorized Hoover Service Center or Dealer for repair. Wash/rinse switch The tanks...
- Page 8 Information (U.S.) call 1-800-752-7869. Position bottom of tank onto cleaner and Fill container (16 oz.) with HOOVER Carpet/Upholstery Detergent or pivot tank to snap it into place. HOOVER Bare Floor Cleaner. Do not use Bare Floor Cleaner on carpet or upholstery.
- Page 9 Vacuum thoroughly ° For carpet, wood bare floor surface or place waterproof pet. Pin up furniture skirts and use a HOOVER vacuum cleaner with an material (e.g. plastic) underneath them draperies. before cleaning. agitator for best results. Vacuum uphol- e.
- Page 10 8. Continue to squeeze trigger and Rinsing is not necessary, but will help slowly pull deep cleaner back toward remove detergent residue and help your 2. Fill detergent container with HOOVER you (second wet stroke). Release trigger carpet look fresher. Carpet/Upholstery Detergent according...
- Page 11 1. Fill clean water tank according to instructions for Figs. 2-9 to 2-15. 2. With foam strip (C) (located under the 2. Fill detergent container with HOOVER netting) in position as shown, place Bare Floor Cleaner according to instruc- attachment on front of nozzle (D).
- Page 12 to attach tool The utility nozzle has a built-in brush to Unplug deep cleaner from electrical help provide the scrubbing action some outlet. spots may need for removal. 1. Place handle in upright position and remove hose from rack. 2. Connect tool to hose by sliding it onto connector until the tab (J) locks it securely.
- Page 13 3. Fill clean water tank according instructions for Figs. 2-9 to 2-12. 4. Fill detergent container with HOOVER 9. Pre-spray the carpeted stair by hold- 11. Lift tool, and position it against riser. Carpet/Upholstery...
- Page 14 Removable brushes Your deep cleaner is equipped with removable brushes for easy cleaning. To remove brushes Disconnect cleaner from electrical outlet. To prevent possible leaking, remove clean water tank and recovery tank. Set tanks aside. Grab brush assembly and pull firmly. To replace brushes The brushes can be cleaned under run-...
- Page 15 Canada service outlet locations (U,S, only), or from a U. S. Military Exchange. Do not send your cleaner to The Hoover Appliances purchased elsewhere are Company in North Canton for service, covered by a limited one year warranty this will only result in delay.
- Page 16 HOOVER et _)sont des marques d6posees HOOVER y son marcas registradas HOOVER and _ are registered trademarks R1 11-02 F7210-900 Litho USA 56518-149...
Need help?
Do you have a question about the SteamVac F7210-900 and is the answer not in the manual?
Questions and answers