Table of Contents
Advertisement
MODEL
PDV-709
PORTABLE DVD PLAYER
INSTRUCTION
MANUAL
•
Plays DVDs, Audio CDs, CD-R/RW,
MP3 CDs and Picture CDs
•
Includes
Rechargeable
Battery for Portable
Use Anywhere
•
Includes
AC Adaptor
•
Includes
Car Adaptor
for Travel
•
Connects
to Your Larger Screen
Home TV (cable included)
PLEASE READ CAREFULLY
BEFORE USE
IB-PDV709-WM-E-061006
Advertisement
Table of Contents

Related Manuals for Durabrand PDV-709


Summary of Contents for Durabrand PDV-709
- Page 1 MODEL PDV-709 PORTABLE DVD PLAYER INSTRUCTION MANUAL • Plays DVDs, Audio CDs, CD-R/RW, MP3 CDs and Picture CDs • Includes Rechargeable Battery for Portable Use Anywhere • Includes AC Adaptor • Includes Car Adaptor for Travel • Connects to Your Larger Screen Home TV (cable included) PLEASE READ CAREFULLY BEFORE USE...
-
Page 2: Important Safety Instructions
WARNING PREVENT FIRE OR SHOCK HAZARD, DO NOT USE THE PLUG WITH AN EXTENSION CORD, RECEPTACLE OR OTHER OUTLET UNLESS THE BLADES BE FULLY INSERTED TO PREVENT BLADE EXPOSURE. TO REDUCE RISK OF FIRE OR ELECTRIC SHOCK, DO NOT EXPOSE THIS APPLIANCE TO RAIN... -
Page 3: Fcc Note
Do not apply oil or petroleum products or solvents to any part of this set. FCC NOTE ]-his device complies with Part 15 of the Rules. Operation is subject to the following conditions: (1) This device not cause harmful interference, (2) This device must... - Page 4 • Getting Started: Safety Instructions Controls Overview Power Supply Remote Control Operation Notes on Discs • Basic Operation: 1. Playing a Disc ..................2. Using the Search Functions 3. Selecting Audio Mode ................4. Changing Subtitle Language ..............5. Displaying Disc Information 6.
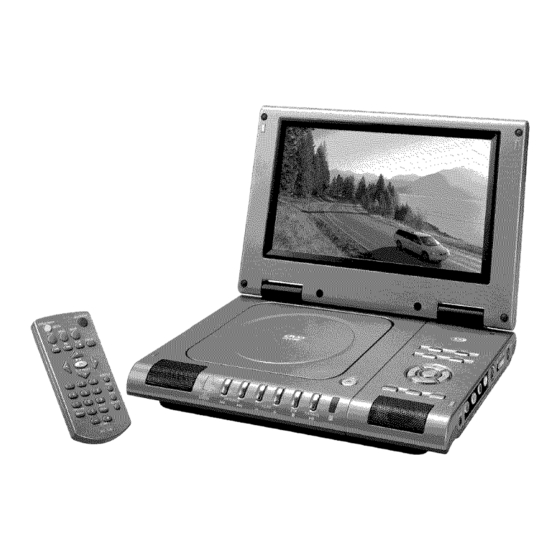
- Page 5 Front View 9 1011 1. TFT LCD SCREEN - Provides a high resolution picture. 2. DISC DOOR - Open the door by pressing the open button and set the disc inside 3. SPEAKERS - Provide stereo sound. 4. ON/STANDBY INDICATOR - The indicator lights up in red when the set is in standby...
-
Page 6: Power Supply
Right Side View 1. PHONES JACK - Insert your headphones (not included) to enjoy the sound without disturbing others. 2, COAXIAL JACK - Connects the DVD player to your home theater system using a coaxial cable (coaxial cable is not included). 3. -
Page 7: Remote Control
1. ON/STANDBY button - Press to turn the set REMOTE CONTROL ON or STANDBY. 2. SCREEN ON/OFF button - To turn the LCD screen ON or OFF (for external TV use only), press and hold this button. To adjust the color or brightness level of the LCD screen, press this... -
Page 8: Using The Ac Adaptor
You can power this portable DVD player by connecting the AC adaptor, the car adaptor or the rechargeabte battery (all included). A. Using the AC adaptor This player is supplied with an AC adaptor for powering unit and charging the battery. Insert the AC adaptor plug to the DC IN jack on the portable DVD player and connect the adaptor to a wall outlet. -
Page 9: Working Conditions
2.Thebattery LED indicator witt f lash when t hebattery i scharging andremain s teadily on when t hebattery isfullycharged. 3.Charging time isabout 5hours. Afully charged battery delivers about 2.5 hours ofviewing time. 4.Tocharge thebattery using t hesupplied car adaptor, follow point B ontheprevious page. NOTE: When i nserting thebattery while t hesetisACpowered orcarpowered, there will b ea delay o fseveral seconds before theLED lights u p. -
Page 10: Discs That Can Be Played
Discs that can be played DVD Video (Region Video+Audio VIDEO DVD-R / DVD-RW Video+Audio VIDEO ".JPG" or "JPEG" JPEG disc Video onty (Photos) or Audio / Video Music CD Audio only I3IGITAL AUDIO [_o_ Audio only CD-R disc or Audio / Video _[_o_ Audio onty CD-RW disc... - Page 11 Lift the LCD screen. Slide the DVD player's POWER switch to the ON position, the DVD logo (start-up picture) will appear on the screen. Press the OPEN button on the DVD player to open the disc door. Place a disc gently on the tray with the label side up, make sure the disc is seated on the spindle by pressing down in the center, then close the door by pushing it down.
- Page 12 During p lay, y oucansearch quickly t hrough a chapter ortrack. Search through a chapter or a track 1 During play, press and hold the SKIP/SEARCH button to search forward at a faster speed, the fast search speed changes as follows: FORWARD X2 _ FORWARD X4 _...
- Page 13 If youwant t oknow discinformation during play, p ress t heDISPLAY button o ntheremote control oronthe set, t hedisc information wiit a ppear onthe topofthe screen asshown below: For DVD Play I DVD TT 1/2 CH 6/12 (_ 00:02:35 The information about the title/chapter number and chapter...
-
Page 14: Repeat Play
The REPEAT button allows you torepeat the current track, chapter, title, achosen section (A-B), or alI o fthe disc. Each time youpress t heREPEAT button o ntheremote control repeatedly, therepeat mode changes asfollows: For DVD REP: [REP ALL] REP: REP: [CHAPTER] REP: [TITLE]... - Page 15 (FOR DVD) The ZOOM/SLOW button allows you to do a minimal zoom into a picture as wel! as shift the zoom point. Press the ZOOM/SLOW button on the remote control repeatedly to enlarge or reduce a picture. The display wilI show as follows: ZOOM 2 _ ZOOM 3 _ ZOOM 4 _...
- Page 16 (DVD ONLY) Some DVD video discs may contain scenes which have been shot simultaneously from a few different angles. This icon _ witI be on the DVD case if it contains these multi-angle shots. Certain scenes can be viewed from many different angles by pressing the PROGRAM/ANGLE button on the remote control.
- Page 17 This allows youtoplay your M P3 audio recorded disc youmade o nthis set. T his setwitt n ot play WMA format songs. When recording your M P3 disc onyour c omputer, please r ecord the songs i nMP3 format. Load your recorded MP3 disc into the player, a menu wil! show on the screen.
- Page 18 For TV Connection This DVD player can also be used to view movies on your large screen TV. When viewing your TV, you may fold the screen down to shut off the TFT LCD display. Always ensure when connecting cables, the DVD player, TV and any other electrical equipment are turned off and not plugged into the AC outlet.
- Page 19 For TV Connection Connecting to a digital home theater system using a coaxial cable Refer to your home theater system's manual before connection. For Video, insert the video plugs into the video out jack on your DVD player and the video in jack on your TV.
- Page 20 After al! the connections have been done, please follow steps below to watch a DVD on your TV. Make sure all of the equipment is plugged back into the AC outlet. Lift the DVD LCD screen. Slide the DVD player's POWER switch to the ON position, the DVD logo (start-up picture) will appear on the screen.
-
Page 21: Setting The Lcd Mode
For TV or Portable Use When using the DVD player for the first time, you may need to set some of the settings adjustments according to your TV and favorite preferences. You can get to the SETUP menu by following the below steps. -
Page 22: Selecting The Tv Type
Selecting the TV TYPE Select the aspect ratio of the movie to match LCD screen and your TV set. There are three types of screen sizes you may select. NOTE: If your DISC is not encoded to allow you to change the aspect ratio,... -
Page 23: Video Setup
LANGUAGE SETUP (On Screen Display, AUDIO, SUBTITLE & MENU) These items allow you to preset the OSD language (OSD = On Screen Display), audio language, subtitle language, and menu language that will always be used for every disc on this player (if the language selected is available). NOTE 1: If the language selected... -
Page 24: Operation
Safety Operation • As the laser beam used in the DVD player • If moving from a cold environment to a warm may be harmful to the eyes, do not attempt environment, let the player's temperature to disassemble the cabinet. Refer servicing stabilize before... - Page 25 Symptom Remedy 1.The battery is depleted, please recharge the battery or use the AC adaptor or car adaptor, make sure the AC outlet has power. No power. 2.The fuse in the car adaptor is blown. To change the fuse, unscrew the tip, replace only with same 3A 250V fuse.
- Page 26 Symptom Remedy 1. Press AUDIO button several times. The disc may have been set to DTS output or a blank audio channel on multiple language, please select AC-3 output or reset to the main language (refer to page 11). 2. Adjust the DVD player's volume. 3.
- Page 27 Symptom Remedy No sound during fast forward or other speed This is normal. Normal sound only happens during normal play. functions. Cannot change a menu item. Try changing this item with the DVD door open (not during play). The LCD picture is not 16:9 widescreen even You need to adjust both the LCD mode and the TV type mode to...
- Page 28 TITLE VIDEO CABLE The longest sections of a picture or a music piece on a DVD, or a movie, etc.. Each title is This is a wire with plugs on each end which is assigned a title number enabling you to locate used to transfer the picture information...
-
Page 29: General Description
General Description TFT LCD screen size: 9" Power source: AC adaptor: 100 - 240V, 50/60Hz, DC 9V, 2A output (included) Car adaptor: 12V input, 12V, 2A output (included), fuse 3A, 250V Power consumption: 17 Watts [normal household current] (approx. 3W when the set is in the standby mode). -
Page 30: Warranty
LIMITED WARRANTY We warrant this product to be free from defects in materiat and workmanship under normat use for a period of 1 year after purchase, and we will repair it free of charge or replace it at no charge, should it become defective under this warranty, providing you submit proof of purchase (sales slip) with the set.
Need help?
Do you have a question about the PDV-709 and is the answer not in the manual?
Questions and answers