Table of Contents

Related Manuals for Palm Handhelds m100


Summary of Contents for Palm Handhelds m100
- Page 1 Handbook Palm m100 Series Handhelds ™...
- Page 2 PalmConnect, and Palm OS are registered trademarks of Palm, Inc. or its subsidiar- ies. The HotSync logo, Palm, and the Palm logo are trademarks of Palm, Inc. or its subsidiaries. Other product and brand names may be trademarks or registered trademarks of their respective owners.
-
Page 3: Table Of Contents
About This Book................... 1 Chapter 1: Introduction to Your Palm™ m100 Series Handheld Getting to know your handheld............2 What is a Palm m100 series handheld? ..........2 System requirements ................3 Palm m100 series components ............4 Using the protective flip cover ............7 Changing the face plate ..............8... - Page 4 Installing and removing applications ..........43 Installing add-on applications ............43 Installing games ................47 Removing applications ..............47 Removing Palm Desktop software ..........48 Security....................49 Assigning a password ..............49 Changing or deleting a password ..........50 Locking your handheld ..............51 Recovering from a forgotten password ........
- Page 5 Sorting lists of records ..............80 Making records private ..............81 Attaching notes ................85 Choosing fonts .................86 Application-specific tasks ..............87 Date Book ..................87 Address Book .................101 To Do List ..................106 Note Pad ..................111 Memo Pad ..................115 Clock ....................118 Calculator ..................120 Chapter 5: Advanced HotSync® Operations Selecting HotSync setup options.............122 Customizing HotSync application settings ........128 IR HotSync operations ..............131...
- Page 6 Password problems ................193 Technical support ................194 Appendix C: Upgrade Information ..........196 Appendix D: Non-ASCII Characters for Login Scripts Use of ^char ..................199 Carriage return and line feed ............199 Literal characters................200 Page vi Handbook for Palm™ m100 Series Handhelds...
- Page 7 Product Regulatory Information FCC Statement ...................201 Canadian ICES-003 Statement ............202 CE Compliance Statement ............202 Battery Warning ................202 Index....................... 204 Contents Page vii...
-
Page 8: About This Book
Welcome to the Handbook for Palm™ m100 Series Handhelds. This handbook is designed to help you get up and running quickly. It describes all you need to know about how to use Palm m100 series handhelds and the applications that come with them. -
Page 9: Chapter 1: Introduction To Your
Series ™ Handheld This chapter explains the physical buttons and controls on your Palm™ m100 series handheld, how to use your handheld for the first time, and how to use HotSync technology to synchronize your ® handheld and Palm™ Desktop organizer software. -
Page 10: System Requirements
System requirements To install and operate Palm Desktop software, your computer system must meet the following requirements: Minimum requirements: Windows IBM-compatible 486 computer or higher Windows 95/98/NT/2000/Me 16 MB RAM (64 MB recommended with Windows 2000) 30 MB available hard disk space VGA monitor or better (the Quick Tour requires a 256-color video display;... -
Page 11: Palm M100 Series Components
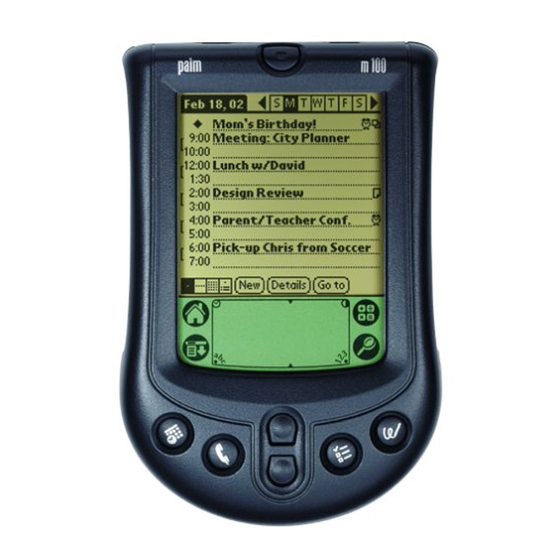
Palm m100 series components Locating front panel controls Power button/ Backlight control Screen Scroll buttons/ Clock control Graffiti writing area Face plate Application buttons Turns your handheld on or off and controls the Power button/ backlight feature. If your handheld is turned off,... - Page 12 Press and hold the power button for about two seconds. The backlight also turns off automatically (after a period of inactivity) with the Auto-off feature. See “General preferences” in Chapter 6 for more information. Page 5 Introduction to Your Palm™ m100 Series Handheld...
- Page 13 (sold separately). Uses infrared technology to transmit data to and IR port receive data from other Palm OS handhelds, and ® to perform HotSync operations. See “Beaming information” in Chapter 4 and “IR HotSync operations”...
-
Page 14: Using The Protective Flip Cover
3. To reattach the cover, align the hinge prongs with the slots on the top edge of your handheld, and then insert one prong at a time until the prongs lock inside the slots. Page 7 Introduction to Your Palm™ m100 Series Handheld... -
Page 15: Changing The Face Plate
You can personalize the appearance of your handheld by changing the face plate. For information about face plate accessories, visit the web site: www.palm.com To change the face plate: 1. Lift the face plate tab slightly to separate it from your handheld and pull the existing face plate away from your handheld. -
Page 16: Installing The Batteries
If you feel resistance when replacing the door, make sure the door is aligned with the slots on the back of your handheld, and that the batteries are firmly seated in the battery compartment. Page 9 Introduction to Your Palm™ m100 Series Handheld... -
Page 17: Palm Desktop Organizer Software
It is a good idea to back up your data in case something happens to the data on your handheld. Changes you make on your handheld or Palm Desktop software appear in both places after you synchronize. - Page 18 If your computer does not have a dedicated serial port available, or the cradle/cable does not fit your computer, you can order the following HotSync cradle/cable adapters from: http://www.palm.com/support/m100/extras Macintosh serial 25-pin serial Page 11 Introduction to Your Palm™ m100 Series Handheld...
-
Page 19: Installing Palm Desktop Software
Installing Palm Desktop software The following instructions guide you through installing Palm Desktop software. After installation, refer to the online Help in Palm Desktop software, the Quick Tour in Palm Desktop software (for Windows users), and the Palm Desktop Software for the Macintosh User’s Guide on the Palm Desktop software CD-ROM. -
Page 20: Using Your Handheld With Another Pim
PIM. The conduit for Microsoft Outlook is included on the Palm Desktop software CD-ROM (Windows only); however, you must install it in addition to Palm Desktop software. For information on the availability of conduit software for the PIM you use, contact the vendor of your PIM or visit the web site www.palm.com... -
Page 21: Tapping And Typing
Tapping and typing Tap with the stylus to get things done Like using a mouse to click elements on a computer screen, using the stylus to tap elements on your handheld screen is the basic action that gets things done on your handheld. The first time you start your handheld, setup instructions appear on the screen. -
Page 22: Elements Of The Handheld Interface
With the cursor in an input field, tap the dot to activate the alphabetic keyboard. With the cursor in an input field, tap the dot to activate the numeric keyboard. Page 15 Introduction to Your Palm™ m100 Series Handheld... - Page 23 Previous/next arrows Check Pick list Command Scroll button Check box When a check mark appears in a check box, the corresponding option is active. If a check box is empty, tapping it inserts a check mark. If a check box is checked, tapping it removes the check mark.
-
Page 24: Opening Applications
The Applications Launcher scrolls to the first application with a name that begins with that letter. You can also assign application icons to different categories. See “Categorizing applications” in Chapter 3. Page 17 Introduction to Your Palm™ m100 Series Handheld... -
Page 25: Using Menus
Using menus Menus on your handheld are easy to use. Once you master them in one application, use them the same way in all the other applications. The menus of each application are illustrated in the section on that application in Chapter 4. The Edit menu is described in “Editing records”... - Page 26 Command stroke, followed by the letter “s.” Note: Command mode is only active for a short time, so you must tap an icon or write the command letter immediately to choose the menu command. Page 19 Introduction to Your Palm™ m100 Series Handheld...
-
Page 27: Entering Data
There are several ways to enter data into your handheld: Using the onscreen keyboard Using Graffiti writing Using Note Pad Entering or importing data in Palm Desktop software and then synchronizing with your handheld Using an external keyboard Onscreen keyboard... - Page 28 Write letters here Write numbers here Division marks The Palm Desktop software CD-ROM includes Giraffe, a game you can install on your handheld to practice Graffiti writing. See “Installing and removing applications” in Chapter 3 for installation instructions. The Memo Pad application is ideal for practicing Graffiti writing.
- Page 29 If you have new records you want to add to your handheld and prefer to use the computer keyboard rather than Graffiti writing or the onscreen keyboard, enter the data in Palm Desktop software or the PIM you have installed to use with your handheld. For details on...
-
Page 30: Customizing Your Handheld
Importing data If you already have data in a database on your computer, you can import it into Palm Desktop software. You can import data stored in computer applications such as spreadsheets and databases, or from another Palm OS handheld. When you import data, you transfer the records to your handheld without having to enter them manually. -
Page 31: Setting The Time And Date
Setting the time and date You make changes to the time and date in the Clock application. To set the current time and date: 1. Tap the Applications icon 2. Tap the Clock icon 3. Tap the Set Time & Date button. Tap here 4. - Page 32 10. Tap a month. 11. Tap the current date. Page 25 Introduction to Your Palm™ m100 Series Handheld...
-
Page 33: Chapter 2: Entering Data In Your Handheld
Chapter 2 Entering Data in Your Handheld This chapter explains how to enter data into your Palm™ m100 series handheld by writing with the stylus in the Graffiti writing ® area, by using the onscreen keyboard, by using the Note Pad application, by using the computer keyboard, by using an external keyboard accessory, or by importing data from another application. - Page 34 Most characters require only a single stroke. When you lift the stylus from the Graffiti writing area, your handheld recognizes and displays the text character immediately. To accomplish single strokes, some Graffiti strokes are portions of the regular alphabet equivalents. The Graffiti writing area is divided into two parts: one for writing the letters of the alphabet and one for writing numbers.
-
Page 35: Graffiti Tips
4. Start your stroke at the heavy dot and draw the stroke shape as it appears in the tables. 5. Lift the stylus from the screen at the end of the stroke shape. That’s all there is to it! When you lift the stylus from the screen, your handheld recognizes your stroke immediately and prints the letter at the insertion point on the screen. -
Page 36: The Graffiti Alphabet
The Graffiti alphabet ® Letter Strokes Letter Strokes Space Back Space tap twice Carriage Period Return Page 29 Entering Data in Your Handheld... -
Page 37: Writing Capital Letters
Writing capital letters You make capital letters with the same stroke shapes as the basic alphabet characters. To make capital letters, you must first “shift” to caps — just as you press the Shift key on a keyboard — and then write the character strokes. -
Page 38: Writing Numbers
Writing numbers Writing numbers with Graffiti writing is similar to writing letters of the alphabet, except that you make the character strokes on the right-hand side (numbers side) of the Graffiti writing area. Graffiti numbers Number Strokes Number Strokes Writing punctuation marks Graffiti writing can create any punctuation symbol that you can enter from a standard keyboard. -
Page 39: Additional Graffiti Punctuation
Symbol Stroke Symbol Stroke Period Dash — Comma Left Paren Apostrophe Right Paren Question Slash Exclamation Dollar Additional Graffiti punctuation & * < > — " Writing symbols and extended characters All symbols and extended characters begin with the stroke in the Graffiti writing area of your handheld: Symbol Shift... -
Page 40: Writing Accented Characters
— Writing accented characters To create accented characters, draw the stroke normally used to create the letter, followed by an accent stroke. Graffiti writing then adds the accent to the letter. For example, the following diagram shows the strokes required to draw an accented “e.”... -
Page 41: Navigation Strokes
Navigation strokes In addition to character symbols, Graffiti writing includes special strokes that you can use to navigate within text or fields in your applications. Command Stroke Move cursor right Move cursor left Previous field (Address Book only) Next Field (Address Book only) Open Address Record (Address Book only) -
Page 42: Using The Onscreen Keyboard
Your handheld includes the following predefined Graffiti ShortCuts: Entry ShortCut Date stamp Time stamp Date / time stamp Meeting Breakfast Lunch Dinner Using the onscreen keyboard You can open the onscreen keyboard anytime you need to enter text or numbers on your handheld. Note that you cannot enter Graffiti characters while using the onscreen keyboard. -
Page 43: Using Note Pad
PIMs, so you don’t need to learn different applications. For more information on entering data on your computer, refer to the online Help in Palm Desktop software, the Quick Tour in Palm Desktop software (for Windows users), and the Palm Desktop Software for the Macintosh User’s Guide on the Palm... -
Page 44: Importing Data
Address Book archive (.aba) To Do List archive (.tda) Memo Pad archive (.mpa) Archive formats can only be used with Palm Desktop software. Use the archive file formats to share information with other people who use a Palm OS handheld or to create a copy of your important ®... -
Page 45: Importing Data From A Macintosh
7. To import data into the correct Palm Desktop fields, drag fields in the left-hand column so that they are opposite the corresponding imported field on the right. 8. If you do not want to import a field, deselect the check box for that field. - Page 46 8. From the Delimiters pop-up menu, choose the appropriate delimiter. 9. Click OK. 10. To add the imported data to your handheld, perform a HotSync operation. See Palm Desktop online Help for more information on importing and exporting data. Page 39 Entering Data in Your Handheld...
-
Page 47: Chapter 3: Managing Your Applications
Applications This chapter explains how to switch between applications on your Palm™ m100 series handheld, how to change application settings so they are personalized to your work methods, and how to categorize applications so you view them in related groups. -
Page 48: Changing The Applications Launcher Display
To categorize an application: 1. Tap the Applications icon 2. Tap the Menu icon 3. Tap App, and then tap Category. 4. Tap the pick list next to each application to select a category. Tip: To create a new category, tap Edit Categories from the pick list. -
Page 49: Choosing Preferences
To change the Applications Launcher display: 1. Tap the Applications icon 2. Tap the Menu icon 3. Tap Options, and then tap Preferences. 4. Tap the View By pick list and select List. 5. Tap OK. To open the Applications Launcher to the last opened catego- 1. -
Page 50: Installing And Removing Applications
® find bonus add-on software that comes with your handheld, look in the Add-on folder inside the Palm folder on your computer. There are also a variety of third-party applications available for your handheld. To learn more about these applications, go to the web site: http://www.palm.com. - Page 51 3. Click Install. Tip: You can also access the Install Tool dialog by selecting Install Tool from the Palm Desktop program group or by double-clicking any file with a PRC, PDB, or PNC file extension. Chapter 3 Page 44...
- Page 52 To install add-on software on your handheld using a Macin- tosh: 1. On your Macintosh, copy or download the application you want to install into the add-on folder in your Palm folder. Note: If the software you download is compressed, you need to decompress it into this folder.
- Page 53 3. From the User pop-up menu, select the name that corresponds to your handheld. 4. Click Add to List. 5. Select the application you want to install. 6. Click Add File to add the selected application to the Install Handheld Files list. Tip: You can install more than one application by repeating steps 4 through 6 and selecting additional applications.
-
Page 54: Installing Games
Installing games The CD-ROM also includes games that you can install with the Install Tool, such as Giraffe. Giraffe is a fun, easy way for you to practice Graffiti writing. ® After you install and start a game, the instructions appear in the Game menu. -
Page 55: Removing Palm Desktop Software
Removing Palm Desktop software If you no longer want to use Palm Desktop software, you can remove it from your computer. To remove Palm Desktop software from a Windows computer: 1. From the Windows Start menu, choose Settings, and then Control Panel. -
Page 56: Security
Security Your handheld comes with a Security application so that unauthorized users cannot view the entries you wish to protect. In Security, you can do the following: Lock and turn off your handheld so that it does not operate until you enter the correct password. -
Page 57: Changing Or Deleting A Password
Changing or deleting a password Once you define a password for your handheld, you can change or delete it at any time. You must enter the current password before you can change or delete it. To change or delete your password: 1. -
Page 58: Locking Your Handheld
Locking your handheld You can also lock your handheld so that you need to enter your password to operate it. Important: If you lock your handheld, you must enter the exact password to re-activate your handheld. If you forget the password, you must perform a hard reset to resume using your handheld. -
Page 59: Recovering From A Forgotten Password
Recovering from a forgotten password If you did not activate the Off & Lock feature and you forget your password, you can delete the password from your handheld. Deleting a forgotten password also deletes all entries and files marked as Private. Important: If you synchronize with your computer before deleting a forgotten password, your handheld restores your private entries the next time you perform a HotSync... -
Page 60: Chapter 4: Using Your Applications
Chapter 4 Using Your Applications Your Palm™ m100 series handheld includes these applications: Date Book Address Book To Do List Note Pad Memo Pad Clock Calculator This chapter is divided into three sections: “Overview of applications” briefly describes each application and explains how to open it. -
Page 61: Overview Of Applications
Overview of applications Date Book Date Book lets you quickly and easily schedule appointments or any kind of activity associated with a time and date. In Date Book, you can do the following: Enter a description of your appointment and assign it to a specific time and date. -
Page 62: Address Book
Note: Press the Address Book application button repeatedly to cycle through the categories in which you have records. Press and hold the Address Book application button to instantly beam your business card to another Palm OS handheld. Page 55 Using Your Applications... -
Page 63: To Do List
To Do List To Do List is a convenient place to create reminders and prioritize the things that you have to do. In To Do List, you can do the following: Make a quick and convenient list of things to do. Assign a priority level to each task. -
Page 64: Note Pad
Set an alarm to use your notes as reminder messages. Assign notes to categories so that you can organize and view them in logical groups. Copy and paste notes into popular computer applications like Microsoft Word using Palm™ Desktop software and HotSync ® technology. To open Note Pad: Press the Note Pad application button on the front panel of your handheld. -
Page 65: Calculator
Calculator Calculator enables you to perform addition, subtraction, multiplication, and division. In Calculator, you can do the following: Perform basic calculations. Store and retrieve values. Display the last series of calculations, which is useful for confirming a series of “chain” calculations. To open Calculator: Tap the Calculator icon next to the Graffiti... -
Page 66: Memo Pad
Use Graffiti characters to store memos, lists, or any other text message on your handheld. Drag and drop memos into popular computer applications like Microsoft Word when you synchronize using Palm™ Desktop software and HotSync technology. Assign memos to categories so that you can organize and view them in logical groups. -
Page 67: Common Tasks
Common tasks The tasks described in this section use the term “records” to refer to individual items in the applications: a Date Book event, Address Book entry, To Do List item, Note Pad note, or Memo Pad memo. Creating records You can use the following procedure to create a new record in Date Book, Address Book, To Do List, Note Pad, and Memo Pad. - Page 68 Entering text For information on entering text using Graffiti writing, the onscreen keyboard, or your computer keyboard, see Chapter 2. For information on entering text in Note Pad, see “Note Pad” later in this chapter. Edit menu The Edit menu is available with any screen where you enter or edit text.
-
Page 69: Deleting Records
Memo Pad: A confirmation dialog box appears. If you want to save a copy of the deleted item to an archive file in Palm Desktop software, be sure that the check box is checked. If you don’t want to save a copy, tap the check box to remove the check. -
Page 70: Purging Records
In Date Book, Address Book, To Do List, and Memo Pad, open the Details dialog box for the record, tap Delete, and then tap In Note Pad, open the note you want to delete, and then tap Delete. Delete the text of the record. Note: In Date Book, you can choose to delete the text of the current repeating event, current and future events, or all... - Page 71 Note: Purging does not happen automatically. You must tap the command to make it happen. Chapter 4 Page 64...
-
Page 72: Exchanging And Updating Data: Hotsync Operations
Important: You must perform your first HotSync operation with a local, direct serial connection. The following steps assume that you have already installed the Palm Desktop software. If you have not installed this software, see “Installing Palm Desktop software” in Chapter 1 for instructions. Page 65... - Page 73 2. If the HotSync Manager is not running, start it: On the Windows desktop, click Start, and then choose Programs. Navigate to the Palm Desktop software program group and choose HotSync Manager. Alternatively, you can start the Palm Desktop software which automatically opens the HotSync Manager.
- Page 74 When you installed Palm Desktop software, you entered a user name. This user name is the connection between your handheld and your Macintosh. The first time you perform a HotSync operation the Palm Desktop software: Adds a user name to your handheld.
- Page 75 Creates a file named User Data in your user name folder. Chapter 4 Page 68...
- Page 76 The following steps assume that you have already installed the Palm Desktop software. If you have not installed this software, see “Installing Palm Desktop software” in Chapter 1 for instructions. To perform a local HotSync operation on a Macintosh: 1.
- Page 77 The HotSync Progress dialog box appears followed by the Select User dialog box. 4. In the Select User dialog box, select the user name you entered when you installed the Palm Desktop software, and click OK. The HotSync Progress dialog box reappears and synchroni- zation begins.
-
Page 78: Beaming Information
Beaming information Your handheld is equipped with an IR (infrared) port that you can use to beam information to another Palm OS handheld that’s close by and also has an IR port. The IR port is located in the upper-right corner on the back of your handheld, behind the small dark shield. - Page 79 is complete before you continue working on your handheld. To beam an application: 1. Open the Applications Launcher. 2. Tap the Menu icon 3. Tap App, and then tap Beam. 4. Tap the application you want to transfer. Note: Some applications are copy-protected and cannot be beamed.
-
Page 80: Categorizing Records
4. Tap Yes. Tips on beaming information You can set the full-screen pen stroke to beam the current entry. See “Pen preferences” in Chapter 6 for more information. You can draw the Graffiti Command stroke to activate the Command toolbar, and then tap the Beam icon. You can use the Graffiti Command stroke /B to beam the current entry. - Page 81 To move a record into a category: 1. Select the record you want to categorize. 2. In Address Book only: Tap Edit. 3. Tap Details. 4. Tap the Category pick list to display the list of available categories. 5. Select the category for the record. 6.
- Page 82 To define a new category: 1. Tap the category pick list in the upper-right corner of the screen or list. Tap here 2. Tap Edit Categories. 3. Tap New. 4. Enter the name of the new category, and then tap OK. 5.
-
Page 83: Finding Records
To rename a category: 1. Tap the category pick list in the upper-right corner of the screen or list. 2. Tap Edit Categories. 3. Select the category that you want to rename, and then tap Rename. 4. Enter the new name for the category, and then tap OK. 5. - Page 84 Looking up Address Book records When working with Address Book, the scroll buttons on the front panel of your handheld make it easy to navigate among your address entries. In the Address list screen, pressing the scroll buttons moves up or down an entire screen of records.
- Page 85 Using Find You can use Find to locate any text that you specify, in any application. To use Find: 1. Tap the Find icon Tip: If you select text in an application before you tap Find, the selected text automatically appears in the Find dialog box.
- Page 86 To use Phone Lookup: 1. Display the record in which you want to insert a phone number. The record can be in Date Book, To Do List, or Memo Pad. 2. Tap the Menu icon 3. Tap Options, and then tap Phone Lookup. 4.
-
Page 87: Sorting Lists Of Records
the selected text and adds the name and its associated information. Sorting lists of records You can sort lists of records in various ways, depending on the application. Sorting is available in applications that have list screens: Address Book, To Do List, Note Pad, and Memo Pad. Note: You can also assign records to categories. -
Page 88: Making Records Private
To sort the Note Pad or Memo list manually, tap and drag a note or memo to a new location in the list. Note: To make the list of your memos appear in Palm Desktop software as you manually sorted it on your handheld, open Memo Pad in Palm Desktop software and click List by. - Page 89 Chapter 4 Page 82...
- Page 90 To hide all private records: 1. Tap the Applications icon 2. Tap Security. 3. Tap the Current Privacy pick list and select Hide Records. Tap Hide Records 4. Tap OK to confirm that you want to hide private records. To mask all private records: 1.
- Page 91 To display private records: 1. Do one of the following: Tap a masked record. Tap the Applications icon , tap Security, then tap the Cur- rent Privacy pick list and select Show Records. If you do not have a password, hidden and masked records become visible.
-
Page 92: Attaching Notes
Attaching notes In all your applications except Note Pad and Memo Pad, you can attach a note to a record. A note can be up to several thousand characters long. For example, for an appointment in Date Book, you can attach a note with directions to the location. To attach a note to a record: 1. -
Page 93: Choosing Fonts
Choosing fonts In most applications you can change the font style to make text easier to read. You can choose a different font style for each application, and in some applications, you can use different font styles in different parts of the application. For example, in Address Book you can use the small font in the Address list screen and the large font in the Address entry screen. -
Page 94: Application-Specific Tasks
Application-specific tasks Date Book When you open Date Book, the screen shows the current date and a list of times for a normal business day. Scheduling an event A record in Date Book is called an “event.” An event can be any kind of activity that you associate with a day. - Page 95 2. Enter a description of the event. You can enter up to 255 characters. 3. If the event is one hour long, skip to step 5. If the event is longer or shorter than an hour, tap the time of the event to open the Set Time dialog box.
- Page 96 To schedule an event for another day: 1. Select the date you want for the event by doing one of the following: Tap the day of the week that you want in the date bar at the top of the screen. If necessary, tap the Previous week or Next week scroll arrows to move to another week.
- Page 97 To schedule an untimed event: 1. Select the date that you want for the event as described in “To schedule an event for another day.” 2. Tap New. 3. Tap No Time, so that no start or end times are defined for the new event.
- Page 98 Rescheduling an event You can easily make changes to your schedule with your handheld. To reschedule an event: 1. Tap the event you want to reschedule. 2. Tap Details. 3. To change the time, tap the Time box and select a new time. 4.
- Page 99 7. When the reminder message appears on screen, do one of the following: Tap OK to permanently dismiss the reminder and return to the current screen. Tap Snooze to dismiss the reminder and return to the current screen. The reminder message appears again five minutes af- ter you tap Snooze.
- Page 100 To schedule a repeating or continuous event: 1. Tap the event. Typically, a continuous event is an untimed event. 2. Tap Details. 3. Tap the Repeat box to open the Change Repeat dialog box. Tap the Repeat 4. Tap Day, Week, Month, or Year to set how often event repeats. For a continuous event, tap Day.
- Page 101 4. Do one of the following: Tap Current to delete only the current event item. Tap Future to delete the current and all future event items and reset the end date of the repeating event to the last shown date. Tap All to delete all occurrences of the repeating event.
- Page 102 Changing the Date Book view In addition to displaying the time list for a specific day, you can also display a whole week, a month, or an agenda. You can also display the current time. To cycle through Day, Week, Month, and Agenda views: Press the Date Book application button repeatedly to display the next view.
- Page 103 Note: The Week View also shows untimed events and events that are before and after the range of times shown. Previous Next week week Tap for that day Bar indicates earlier event Dot indicates untimed event Bar indicates later event 3.
- Page 104 Spotting event conflicts With the ability to define specific start and end times for any event, it’s possible to schedule events that overlap (an event that starts before a previous event finishes). An event conflict (time overlap) appears in the Week View as overlapping bars.
- Page 105 or backward a month. Tap Go to to open the date selector and select a different month. Use the scroll buttons on the front panel of your handheld to move between months. Press the upper button to display the previous month and the lower button to display the next month. Working in Agenda View The Agenda view shows you your untimed events, appointments, and To Do items in one screen.
- Page 106 Date Book menus, preferences, and display options Date Book menus are shown here for your reference, and Date Book features that are not explained elsewhere in this book are described here. See “Using menus” in Chapter 1 for information about choosing menu commands.
- Page 107 Controls how times Compress Day View. appear in the Day View. When Compress Day View is off, all time slots display. When it is on, start and end times display for each event, but blank time slots toward the bottom of the screen disappear to minimize scrolling.
-
Page 108: Address Book
Creating an Address Book entry A record in Address Book is called an “entry.” You can create entries on your handheld, or you can use Palm Desktop software to create entries on your computer and then download the entries to your handheld with your next HotSync operation. - Page 109 4. Use the Next Field Graffiti stroke to move to the First Name field. Next Field Tip: You can also move to any field by tapping it directly. 5. Enter the person's first name in the First Name field. 6. Enter the other information that you want to include in this entry.
- Page 110 Selecting types of phone numbers You can select the types of phone numbers or e-mail addresses that you associate with an Address Book entry. Any changes you make apply only to the current entry. To select other types of phone numbers in an entry: 1.
- Page 111 Select which type of phone or other information Show in List appears in the Address list screen. Your options are Work, Home, Fax, Other, or E-mail. The identifying letters W, H, F, O, or E appear next to the record in the Address list, depending on which option you select.
- Page 112 Options menus Address view Address list Preferences Determines how Remember last category. Address Book appears when you return to it from another application. If you select this check box, Address Book shows the last category you selected. If you clear it, Address Book displays the All category.
-
Page 113: To Do List
To Do List A To Do List item is a reminder of some task that you have to complete. A record in To Do List is called an “item.” To create a To Do List item: 1. Press the To Do List application button on the front of your handheld to display the To Do List. - Page 114 To set the priority of a To Do List item: 1. Tap the Priority number on the left side of the To Do List item. Tap here Tap to select priority 2. Tap the Priority number that you want to set (1 is most important).
- Page 115 To display the To Do Item Details dialog box: 1. Tap the text of the item whose details you want to change. 2. Tap Details. Setting a due date You can associate a due date with any To Do List item. You can also sort the items that appear in the list based on their due date.
- Page 116 To Do Show Options The Show Options dialog box enables you to control the appearance of To Do List, and To Do items in Date Book Agenda view. To change the Show Options settings: 1. In To Do List, tap Show. 2.
- Page 117 Show Due Displays the due dates associated with items Dates in the To Do List and displays an exclamation mark next to items that remain incomplete after the due date passes. Shows the priority setting for each item. Show Priorities Shows the category for each item.
-
Page 118: Note Pad
Note Pad A record in Note Pad is called a “note.” You can assign each note a title and store up to 999 notes on your handheld. To create a new note: 1. Press the Note Pad application button on the front panel of your handheld to open a new note. -
Page 119: Setting An Alarm For A Note
To review a note: 1. In the Note Pad list, tap the note title. Tap arrows to scroll to next and previous notes Tap a note to view its contents 2. Review or edit the contents of the note. 3. Tap Done. Setting an alarm for a note You can set an alarm for a specific time and date to remind you to follow-up on a note. - Page 120 Tap here to select year Tap here to select month Tap here to select date 7. Tap the year, month and date you want the alarm to sound. After you tap the date, the Set Alarm dialog box reappears. 8. Tap OK. 9.
- Page 121 Note Pad menus Note Pad menus are shown here for your reference, and Note Pad features that are not explained elsewhere in this book are described here. See “Using menus” in Chapter 1 for information about choosing menu commands. The Record and Options menus differ depending on whether you’re displaying the Note Pad list or an individual note.
-
Page 122: Memo Pad
Memo Pad A memo can contain up to 4,000 characters. The number of memos you can store is dependent only on the memory available on your handheld. A record in Memo Pad is called a “memo.” To create a new memo: 1. - Page 123 Reviewing memos The first line of a memo appears in the Memo list. This makes it easy to locate and review your memos. To review a memo: 1. In the Memo list, tap the text of the memo. Tap a memo to review its contents...
-
Page 124: Options Menus
Options menus Memo screen Memo list Displays the Memo Preferences dialog box, Preferences where you define the sort order for memos. About Memo Shows version information for Memo Pad. Page 117 Using Your Applications... -
Page 125: Clock
Clock Clock makes it easy for you to check and set the time and date, and provides a convenient travel alarm feature. See “Setting the time and date” in Chapter 1 for details on setting the current date and time for all the applications on your handheld. In addition to setting the date and time, you can set an alarm to sound during the next 24-hour period. - Page 126 Clock menus Clock menus are shown here for your reference, and Clock features that are not explained elsewhere in this book are described here. See “Using menus” in Chapter 1 for information about choosing menu commands. Options menu Allows you to choose which information appears Display Options on the Clock screen.
-
Page 127: Calculator
Calculator The Calculator includes several buttons to help you perform calculations. Clears the last number you entered. Use this button if you make a mistake while entering a number in the middle of a calculation. This button enables you to re- enter the number without starting the calculation over. - Page 128 Recent Calculations The Recent Calculations command enables you to review the last series of calculations and is particularly useful for confirming a series of “chain” calculations. To display recent calculations: 1. Tap the Menu icon 2. Tap Options, and then tap Recent Calculations. 3.
-
Page 129: Chapter 5: Advanced Hotsync® Operations
Palm™ Desktop software or another ® PIM such as Microsoft Outlook. To synchronize data, you must connect your Palm™ m100 series handheld and Palm Desktop software. You can synchronize your data either directly or indirectly. Direct methods include connecting your handheld to the HotSync cradle/cable attached to your computer, or using infrared communications. - Page 130 With this option, the HotSync Manager synchronizes data even when Palm Desktop software is not running. Starts HotSync Manager and monitors Available only when Palm requests automatically when you open Palm Desktop Desktop software.
- Page 131 6. Click OK. To set the HotSync options on a Macintosh: 1. Double-click the HotSync Manager icon in the Palm folder. 2. Click the HotSync Controls tab and select any of the following options:...
- Page 132 Activates the serial port monitor and prepares HotSync Enabled/ your Macintosh to synchronize with your Disabled handheld. When this option is enabled, you cannot use the serial port you selected for other operations such as printing, faxing, or Apple Talk networking. When this option is disabled, the serial port you selected is available for use by other applications.
- Page 133 Determines the speed at which data Speed. is transferred between your handheld and Palm Desktop software. Try the As Fast As Possible rate first, and adjust downward if you experience problems. This setting allows Palm Desktop software and your handheld to find and use the fastest speed.
- Page 134 Hayes setting, or choose Custom to enter a command string. Refer to the manual that came with your modem to find the appropriate command string. Identifies the port that Palm Desktop Port. software uses to communicate with the modem. Select the modem or printer port where you connected the modem cable.
-
Page 135: Customizing Hotsync Application Settings
In general, you should leave the settings to synchronize all files. The only reason you might want to change these settings is to overwrite data on either your handheld or Palm Desktop software, or to avoid synchronizing a particular type of file because you don’t use it. - Page 136 8. Repeat steps 4 through 7 to change conduit settings for other applications. 9. Click Done to activate your settings. To customize HotSync application settings on a Macintosh: 1. Double-click the Palm Desktop icon in the Palm folder. 2. From the HotSync menu, choose Conduit Settings. Page 129 Advanced HotSync® Operations...
- Page 137 3. From the User pop-up menu, select the appropriate user name. 4. Select an application in the Conduit list. 5. Click Conduit Settings. 6. Click the direction in which you want to write data, or click Do Nothing to skip data transfer for an application. Note: Changing the HotSync setting from the default affects only the next HotSync operation.
-
Page 138: Ir Hotsync Operations
IrCOMM implementation of the standards for infrared communication established by the Infrared Data Association (IrDA). This means that not only can you beam data to another Palm OS handheld that’s equipped with an IR port, but you can also beam data to a cell phone and any other device that supports the IrCOMM implementation of the IrDA standards. - Page 139 To check if your Windows 95 computer supports infrared communication: 1. In the Windows taskbar, click Start. 2. Choose Settings, and then choose Control Panel. 3. In the Control Panel, look for the Infrared icon. If the icon is there, your computer is enabled for infrared communication.
- Page 140 After you install the infrared driver, check the ports used by your computer for infrared communication. To check the ports used for infrared communication on a Windows computer: 1. In the Windows taskbar, click Start, choose Settings, and then choose Control Panel. 2.
-
Page 141: Configuring Hotsync Manager For Infrared Communication
To install the extensions for infrared communication on a Macintosh: 1. Insert the Palm Desktop software CD-ROM into the CD-ROM drive on your Macintosh. 2. Open the Palm Extras folder. 3. Open the IrDA Files folder. 4. Open the Install in your System Folder. - Page 142 To configure HotSync Manager for infrared communication on a Macintosh: 1. Double-click the HotSync Manager icon in the Palm folder. 2. In the HotSync Controls tab, select Enabled. 3. Click the Serial Port Settings tab. 4. Under Check for handheld connection using, select Local Setup.
-
Page 143: Performing An Ir Hotsync Operation
Performing an IR HotSync operation After you complete the steps to prepare for performing an IR HotSync operation, it is easy to perform the actual operation. To perform an IR HotSync operation: 1. In the Applications Launcher, tap the HotSync icon. 2. -
Page 144: Conducting A Hotsync Operation Via Modem
To return to cradle/cable HotSync operations on a Macintosh: 1. If needed, connect the cradle/cable to a serial port on your Macintosh. 2. Double-click the HotSync Manager icon in the Palm folder. 3. In the HotSync Controls tab, select Enabled. 4. Click the Serial Port Settings tab. -
Page 145: Preparing Your Computer
Determines the speed at which data is transferred. Try the As Fast As Possible rate first, and adjust downward if you experience problems. This setting allows Palm Desktop software and your handheld to find and use the fastest speed. Chapter 5... - Page 146 CompuServe and America Online (AOL). This helps to avoid conflicts with the serial port. 2. Double-click the HotSync Manager icon in the Palm folder. 3. Click the Serial Port Settings tab. 4. Under Check for handheld connection using, click Modem Setup.
-
Page 147: Preparing Your Handheld
Custom to enter a command string. Refer to the manual that came with your modem to find the appropriate command string. Identifies the port that Palm Desktop software Port uses to communicate with the modem. Select the modem or printer port where you connected the modem cable. -
Page 148: Selecting The Conduits For A Modem Hotsync Operation
Note: If you need to create a new modem configuration, tap the Menu icon and then select Options and Connection Setup. See “Connection preferences” in Chapter 6 for more information. After you create the configuration, a pick list appears below the HotSync icon. Tap the pick list to select your new configuration. -
Page 149: Performing A Hotsync Operation Via A Modem
1. Tap the Applications icon 2. Tap the HotSync icon 3. Tap the Modem icon to dial the Palm Desktop modem and synchronize the applications. 4. Wait for the HotSync operation to complete. If you have any problems conducting a successful HotSync operation, see Appendix B. -
Page 150: Using File Link
Memo Pad archive (*.mpa) Address Book archive (*.aba) Text (*.txt) For information on how to set up a file link, see the Palm Desktop online Help. Note: The File Link feature is not available in Palm Desktop software for the Macintosh. -
Page 151: Creating A User Profile
Creating a user profile If you use the File Link feature to configure several Palm OS handhelds with specific information (such as a company phone list) before distributing them to their actual users, you can create a user profile to load the data into a handheld without associating that data with a user name. - Page 152 To create a user profile on a Macintosh: 1. Open Palm Desktop software. 2. From the User pop-up menu, choose Edit Users. 3. Click New Profile. 4. Enter a unique name for the profile and click OK. 5. Close the Users window.
- Page 153 4. Select the profile you want to load on the handheld, and click OK. 5. Click Yes to transfer all the profile data to the handheld. The next time you perform a HotSync operation, Palm Desktop software prompts you to assign a user name to the handheld.
-
Page 154: Chapter 6: Setting Preferences For Your Handheld
Chapter 6 Setting Preferences for Your Handheld The Preferences screens enable you to customize the configuration options on your Palm™ m100 series handheld. In the Preferences screens, you can do the following: Set the auto shut-off interval, the Beam Receive General feature, and the system, alarm, and game sounds. -
Page 155: Buttons Preferences
Buttons preferences The Buttons Preferences screen enables you to associate different applications with the buttons on the front of your handheld. For example, if you find that you seldom use To Do List and often use Memo Pad, you can assign the To Do List button to start Memo Pad. Any changes you make in the Buttons Preferences screen become effective immediately;... - Page 156 Lock assign a password to lock your handheld. When locked, you need to enter the password to use your handheld. Beam Data Beams the current record to another Palm OS ® handheld. 3. Tap OK. Page 149 Setting Preferences for Your Handheld...
-
Page 157: Hotsync Buttons Preferences
HotSync buttons preferences The Buttons Preferences screen also enables you to associate different applications with the button on the HotSync cradle/cable and the HotSync button on the optional modem. Any changes that you make in the HotSync Buttons dialog box become effective immediately; you do not have to change to a different screen or application. -
Page 158: Country Default
Country default The country default sets date, time, week start day, and number conventions based on geographic regions where you might use your handheld. For example, in the United Kingdom, time often is expressed using a 24-hour clock. In the United States, on the other hand, time is expressed using a 12-hour clock with an AM or PM suffix. -
Page 159: General Preferences
General preferences The General Preferences screen enables you to set the auto shutoff interval, the sounds for your handheld, and the beam receive feature. Auto-off delay Your handheld has an automatic shutoff feature that turns off the power after a period of inactivity. This feature helps conserve battery power in case you forget to turn off your handheld. -
Page 160: Beam Receive
— if required) to complete the configuration. Note: For information about modems that are compatible with your handheld, go to the web site: http://www.palm.com You can also create custom configurations. There are four possible kinds of connections. A local HotSync connection: the direct... -
Page 161: Sample Connection For Remote Ir Hotsync Operations
Sample connection for remote IR HotSync operations The following sample configuration would enable you to perform an IR HotSync operation by sending data through the IR port of a cell phone, which then dials a modem attached to your computer, to synchronize with your Desktop application. -
Page 162: Network Preferences And Tcp/Ip Software
8. Tap OK, and then tap OK again to save the configuration. Your new configuration appears in the list of available configurations After you create the configuration, you need to set up the HotSync Manager of your Desktop application and the HotSync application of your handheld to perform a modem HotSync operation. -
Page 163: Selecting A Service
Note: TCP/IP provides the ability to connect to your ISP or dial-in server with applications that allow you to view the transmitted data. Visit for information on www.palm.com third-party applications that take advantage of TCP/IP. Selecting a service Use the Service setting to select the service template for your Internet Service Provider or dial-in server. -
Page 164: Entering A Password
Entering a password The Password box identifies the password you use to log into your server or ISP. Your entry in this field determines whether your handheld prompts you to enter a password each time you log into your network: If you do not enter a password, your handheld displays the word “Prompt”... -
Page 165: Adding Telephone Settings
To select a connection: 1. Tap the Connection pick list. Tap here to display a list of available connections 2. Tap the connection you want to use. Adding telephone settings When you select the Phone field, your handheld opens a dialog box in which you define the telephone number you use to connect with your ISP or dial-in server. -
Page 166: Entering A Prefix
Entering a prefix A prefix is a number that you dial before the telephone number to access an outside line. For example, many offices require that you dial “9” to dial a number outside the building. To enter a prefix: 1. -
Page 167: Connecting To Your Service
Note: If you are connecting to an ISP, you need a third-party application, such as a web browser or news reader, to take advantage of this connection. For information about third- party applications that support TCP/IP, check the web site www.palm.com Chapter 6 Page 160... -
Page 168: Creating Additional Service Templates
To establish a connection: Tap Connect to dial the current service and display the Service Connection Progress messages. Tip: To see expanded Service Connection Progress messages, press the lower scroll button. To close a connection: Tap Disconnect to terminate the connection between your handheld and your service. - Page 169 Select connection type 3. Tap the Connection type pick list and select one of the following connection types: Point-to-Point protocol SLIP Serial Line Internet Protocol CSLIP Compressed Serial Line Internet Protocol Note: If you are not sure, try PPP; if that doesn’t work, ask your Internet Service Provider or your System Administrator for the correct connection type.
- Page 170 Defining primary and secondary DNS The Domain Naming System (DNS) is a mechanism in the Internet for translating the names of host computers into IP addresses. When you enter a DNS number (or IP address), you are identifying a specific server that handles the translation services.
-
Page 171: Login Scripts
To identify dynamic IP addressing: Tap the IP Address check box to select it. Tap to select automatic IP address To enter a permanent IP address: 1. Tap the IP Address check box to deselect it and display a permanent IP address field below the check box. 2. -
Page 172: Creating A Login Script On Your Handheld
In the Login Script dialog box on your handheld, accessed from the Details dialog box in Network Preferences Tap here to see the list of available commands Note: You can also use non-ASCII and literal characters in your login script. See Appendix D for more information. Creating a login script on your handheld You can create login scripts by selecting commands from the Command pick list in the Login Script dialog box. - Page 173 Tells your handheld to wait for specific characters Wait For from the TCP/IP server before executing the next command. Detects a challenge-response prompt coming from Wait For the server and then displays the dynamically Prompt generated challenge value. You then enter the challenge value into your token card, which in turn generates a response value for you to enter on your handheld.
-
Page 174: Plug-In Applications
Compiled into a device executable Called properly from a login script Able to return control to a login script after it terminates Created using a development environment that supports the Palm OS software, such as Metrowerks CodeWarrior for Palm Computing Platform. -
Page 175: Tcp/Ip Troubleshooting
Options menu TCP/IP troubleshooting If you are having a problem establishing a network connection using TCP/IP, check this section and try the suggestions listed. Displaying expanded Service Connection Progress messages It’s helpful to identify at what point in the login procedure the connection fails. -
Page 176: Owner Preferences
Owner preferences The Owner Preferences screen enables you to record a name, company name, phone number, or any other information that you want to associate with your handheld. If you use the Security application to turn off and lock your handheld with a password, information that you put in the Owner Preferences displays the next time you turn on your handheld. -
Page 177: Shortcuts Preferences
ShortCuts preferences The ShortCuts Preferences screen enables you to define abbreviations for entering text with Graffiti strokes. This section describes how to create, edit, and delete a ShortCut. See Chapter 2 for more information on the use of ShortCuts. Creating a ShortCut You can create a ShortCut for any words, letters, or numbers. -
Page 178: Editing A Shortcut
ShortCut Editing a ShortCut After you create a ShortCut, you can modify it at any time. To edit a ShortCut: 1. Tap the ShortCut you want to edit. 2. Tap Edit. 3. Make the changes you want and tap OK. Deleting a ShortCut If you no longer need a ShortCut, you can delete it from the list of ShortCuts. -
Page 179: Appendix A: Maintaining Your Handheld
Appendix A Maintaining Your Handheld This chapter provides information on the following: Proper care of your handheld Prolonging battery life Resetting your handheld Caring for your handheld Your handheld is designed to be rugged and reliable and to provide years of trouble-free service. Please observe the following general tips when using your handheld: Take care not to scratch the screen of your handheld. -
Page 180: Battery Considerations
Battery considerations Please note the following considerations when replacing the batteries in your handheld: Under normal conditions, your handheld batteries should provide several months of use. You can conserve battery life by minimizing the use of the backlight feature, and changing the Auto-off setting that automatically turns the handheld off after a period of inactivity. -
Page 181: Resetting Your Handheld
Resetting your handheld Under normal circumstances, you will not have to use the reset button. On rare occasions, however, your handheld may no longer respond to buttons or the screen. In this case, you need to perform a reset to get your handheld running again. Performing a soft reset A soft reset tells your handheld to stop what it’s doing and start over again. -
Page 182: Performing A Hard Reset
1. Click the HotSync icon in the Windows system tray (bottom- right corner of the taskbar). Tip: You can also click the HotSync command on the Palm Desktop software menu bar. 2. From the HotSync Manager menu, choose Custom. Page 175... - Page 183 3. Select the appropriate user name from the list. 4. Select an application in the Conduit list. 5. Click Change. 6. Select Desktop overwrites handheld. Note: Changing the HotSync setting from the default affects only the next HotSync operation. Thereafter, the HotSync Actions revert to their default settings.
- Page 184 To restore your data from a Macintosh after a hard reset: 1. Double-click the HotSync Manager in the Palm folder. 2. From the HotSync menu, choose Conduit Settings. 3. From the Users pop-up menu, select the appropriate user name. 4. Select an application from the list.
-
Page 185: Appendix B: Frequently Asked Questions
Appendix B Frequently Asked Questions If you encounter a problem with your Palm™ m100 series handheld, do not call Technical Support until you have reviewed the following list of frequently asked questions, and you have also reviewed the following: The README file located in the folder where you installed the Palm™... -
Page 186: Software Installation Problems
3. Make sure your computer has at least 30 MB of disk space available. 4. Delete all temporary files. 5. Run ScanDisk on your computer. 6. Reinstall Palm Desktop software. Try the following: I cannot install Palm 1. Disable any virus scanning software Desktop software on a on your Macintosh. -
Page 187: Operating Problems
Operating problems Problem Solution I don’t see anything Try each of these in turn: on my handheld’s Press an application button to ensure screen. your handheld is turned on. Tap the Contrast icon in the upper- right corner of the Graffiti writing area. - Page 188 I get a warning Purge records from Date Book and To message telling me Do List. This deletes To Do List items my handheld and past Date Book events from the memory is full. memory of your handheld. See “Purging records” in Chapter 4. You may need to perform a HotSync ®...
-
Page 189: Tapping And Writing Problems
Tapping and writing problems Problem Solution When I tap the Calibrate the screen. See “Digitizer buttons or screen preferences” in Chapter 6. icons, my handheld activates the wrong feature. When I tap the Menu Not all applications or screens have menus. Try changing to a different application. -
Page 190: Application Problems
Memo Preferences setting. In other words, the sort settings you use with Palm Desktop software are not transferred to your handheld. I created an event in In the Week View, you cannot select... -
Page 191: Hotsync Problems
On a Macintosh try these steps: Make sure HotSync Manager is enabled. If it is not, double-click the HotSync Manager icon in the Palm folder and enable HotSync Manager on the HotSync Controls tab. Double-click the HotSync Manager icon in the Palm folder and then click the Serial Port Settings tab. - Page 192 Palm Desktop software matches the user name assigned to your handheld. Make sure the date on your computer matches the date on your handheld. Check the conduit settings in Palm Desktop software. See “Customizing HotSync application settings” in Chapter 5 for details.
- Page 193 Make sure you selected Local from the successfully. HotSync Manager menu or the Palm (continued) Desktop software menu. Make sure you selected the correct serial port on the Local tab in the Setup dialog. It should be set to the port where you connected the HotSync cradle/cable.
- Page 194 Check the following on your computer: I tried to do a modem HotSync Make sure your computer is turned on and operation, but it that it does not shut down automatically as did not complete part of an energy-saving feature. successfully.
- Page 195 On a Macintosh, check the following: I tried to do a modem HotSync Make sure Modem is selected on the Serial Port Settings tab in the HotSync Software operation, but it Setup window. did not complete successfully. You may need to select a different Modem (continued) type or enter a Custom setup string on the Serial Port Settings tab.
- Page 196 Close and restart HotSync Manager on your button on the computer. HotSync cradle/ Make a copy of the folder containing your cable, nothing user data. Uninstall, then reinstall Palm happens on Palm Desktop software. Desktop software Turn on your handheld and tap the and my handheld Applications icon.
- Page 197 If you have performed a HotSync operation HotSync successfully, but you cannot find the data operation, my from your handheld on Palm Desktop information does software, check to see you have the correct not transfer to user name selected for viewing data.
- Page 198 6. Click Apply and OK. If your computer is infrared-enabled, move your handheld away from the computer’s infrared port. I want to If the computer running Palm Desktop synchronize my software synchronizes with more than one computer with handheld, each handheld must have a more than one unique name.
-
Page 199: Beaming Problems
(approximately 4 inches) and 1 meter (approximately 39 inches) apart, and the path between the two handhelds must be clear of obstacles. Beaming distance to other Palm OS handhelds may be different. Move your handheld closer to the receiving handheld. -
Page 200: Password Problems
HotSync process backs up all entries, whether or not they are marked private. Then, you can follow these steps to restore your private entries: 1. Use the Palm Desktop software and the HotSync cradle/cable or infrared communication to synchronize your data. -
Page 201: Technical Support
The name and version of your computer operating system The actual error message or state you are experiencing The steps you take to reproduce the problem The version of Palm OS software you are using and available memory To find version and memory information: 1. - Page 202 Page 195 Frequently Asked Questions...
-
Page 203: Appendix C: Upgrade Information
If you already own a Palm OS handheld, we recommend that you ® install the version of Palm™ Desktop software that comes with your new Palm™ m100 series handheld into the same folder as your current Palm Desktop software. When you install the new version in the same folder as the previous version, all your data is preserved. - Page 204 (for example, Palm Backup), and store the copy outside the Palm Desktop software folder. 4. If your old Palm Desktop software is version 1.0, uninstall your old Palm Desktop software. 5. Follow the installation instructions in “Installing Palm Desktop software”...
- Page 205 Each handheld must have a unique name After you complete the upgrade process described earlier in the “Upgrade Information” section, your new Palm m100 series handheld and your old handheld now have the same user name. This is an undesirable situation. Each handheld must have a unique name in order to prevent unexpected results during HotSync operations, possible data loss, and other complications.
-
Page 206: Appendix D: Non-Ascii Characters For Login Scripts
Appendix D Non-ASCII Characters for Login Scripts The following information enables you to create custom login scripts that require non-ASCII characters. It is provided for advanced users who understand the use and requirements of such characters in a custom login script. Use of ^char You may use the caret ( ^ ) to transmit ASCII command characters. -
Page 207: Literal Characters
Literal characters The backslash ( \ ) character defines that the next character is transmitted as a literal character, and is not subject to any special processing ordinarily associated with that character. Examples: Includes a caret as part of the string \<... -
Page 208: Product Regulatory Information
Regulatory Engineering Department. Changes or modifications made without written approval may void the user’s authority to operate this equipment. Responsible Party: Palm m100 Series Products Palm, Inc. 5470 Great America Parkway Tested to Comply Santa Clara, California 95052... -
Page 209: Canadian Ices-003 Statement
Canada. CE Compliance Statement This product was tested by Palm, Inc. and found to comply with all the requirements of the EMC Directive 89/336/EEC as amended. This is a Class B product based on the standard of the Voluntary Control Council for In- terference from Information Technology Equipment (VCCI). - Page 210 Varoitus Paristo voi räjähtää, jos se on virheellisesti asennettu. Vaihda paristo ainoastaan valm- istajan suosittelemaan tyyppiin. Hävitä käytetty paristo valmistajan ohjeiden mukaises- Advarsel Eksplosjonsfare ved feilaktig skifte av batteri. Benytt samme batteritype eller en tils- varende type anbefait av apparatfabrikanten. Brukte batterier kasseres i henhold til fab- rikantens instruksjoner.
-
Page 211: Index
Index Applications Address Book 55 beaming 71–72 Calculator 58 categories 40–41 Clock 58 Date Book 54 ABA (Address Book archive file) 37 font style 86 Accented characters installing 43–47 Graffiti writing 33 Launcher 17, 40–42 onscreen keyboard 35 Memo Pad 59 Add-on applications 43–47 Note Pad 57 Address Book... - Page 212 Bold font for text 86 Comma delimited files, importing Business card for beaming 72 data from 37 Buttons preferences 148 Command buttons 16 equivalents (Graffiti writing) toolbar 19 Cable Compressing Day view 100 connecting to computer 6 Computer keyboard, entering data for local HotSync operations with 22 66, 69, 136...
- Page 213 records 60 week 151 To Do List items 106 switching views 95 Current date 24, 183 untimed events 87, 90 Current time 17 Week view 95, 151, 183 setting 24 Dates Custom setting current 24, 183 fields in Address Book 105 To Do List record due 108 Customizing.
- Page 214 system sounds 152 Glossary. See Graffiti ShortCuts Editing Graffiti records 60–62 accented characters 33 E-mail addresses alphabet 26, 29 in Address Book 103, 104 basic concepts 26 Entering data 20–23 capital letters 30 importing from other Command stroke 19 applications 37–39 defined 21 problems with 182 Giraffe game for practicing 47...
- Page 215 defined 65 installing Windows 95 driver first-time operation 144–146 first-time operation, Macintosh port 6, 131, 133 67–70 problems with IR HotSync first-time operation, Windows operations 189 65–67 requirements for computer 131 HotSync Manager 65 Initialization string 154–155 IR operation 131–136 Installing linking to external files 143 applications 43–47...
- Page 216 Lotus Windows 95, 98 131 Organizer, importing data Modem from 37 connections 153 HotSync operations via 137–142, 187–188 initialization string 154–155 setup after upgrade 197, 198 Macintosh 3, 131, 164 Monday, to start week 151 Maintenance information 172 Month (Date Book view) 97, 100 Masking records 81 Moving the cursor (Graffiti writing) Memo Pad...
- Page 217 Overlapping events 97 General 152 Owner preferences 169 HotSync buttons 150 Network 155–168 Owner 169 ShortCuts 170 Palm Desktop software. See Primary DNS 163 Desktop software Printing Passwords 49–52 records from applications 10 changing 50 Prioritizing To Do List records 106,...
- Page 218 choosing categories 73 Scroll creating 60 bar 16 Date Book 87 buttons 5 defined 60 Searching. See Finding deleting 62, 93 Secondary DNS 163 displaying a category of 74 Security 49–52 editing 60–62 changing password 50 fonts 86 deleting password 50 hiding private 49, 81 displaying owner’s name 169 lost 183...
- Page 219 tapping with 14 creating records 60, 106 writing with 6, 26 deleting records 62, 93 Sunday, to start week 151 due date 108, 109, 110 Symbols fonts 86 in Graffiti writing 32 menus 110 Synchronizing data. See HotSync notes for records 85 System opening 56 conduit 128...
Need help?
Do you have a question about the Handhelds m100 and is the answer not in the manual?
Questions and answers