Table of Contents
Advertisement
Available languages
Available languages
Owner's
Manual
®
4.0 HORSEPOWER
:2150 PSi
1.9 GPM
Model No. 580.752011
HOURS:
Mort. - Fti. 8 a.m. to 5 p.m. (CT)
ii{ !}J CAUTION
Beforeusingthis product, readthis
manual and follow all Safety Rules and
Operating instructions.
_.: !I P RECAUCI0 N
Antes de utilizar el producto, lea este
manual y siga todas las Reglas de
Seguridad e Instrucciones de Uso.
Sears,
Roebuck
and Co., Hoffman
Estates,
IL 60179
U.S.A.
Visit our Craftsman
website:
wv_w.craftsman.com
o Safety
o Assembly
o Operation
o Maintenance
o Parts
o Espahol
0
5
Part No. 197191GS
Draft 1 (09/20/2005)
Advertisement
Table of Contents

Related Manuals for Craftsman 580.752011


Summary of Contents for Craftsman 580.752011
- Page 1 Safety Rules and manual y siga todas las Reglas de o Espahol Operating instructions. Seguridad e Instrucciones de Uso. Sears, Roebuck and Co., Hoffman Estates, IL 60179 U.S.A. Visit our Craftsman website: wv_w.craftsman.com Part No. 197191GS Draft 1 (09/20/2005)
- Page 2 ON CRAFTSMAN PRESSURE WASHER For one year from the date of purchase, when this Craftsman pressure washer is maintained and operated according to the instructions in the owner's manual, Sears will repair, free of charge, any defect in material and workmanship.
- Page 3 WARNING WARNtNG The engine exhaust from this product contains chemicals known to the State of California to cause cancer, birth defects, or other reproductive harm. WARNING WHEN ADDING OR DRAINBNG FUEL Turn pressure washer OFF and let it cool at least 2 minutes before removing...
- Page 4 WARNING WARNING Always wear eye protection when using equipment or when in vicinity of equipment in use. CAUTION DO NOT touch hot surfaces and avoid hot exhaust gases. Allow equipment to coo[ before touching. The pressure washer must be at least 5 feet from structures having combustible...
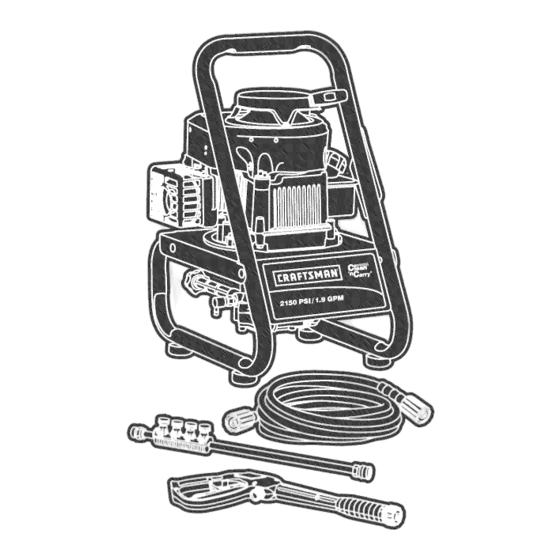
- Page 5 KNOW YOUR PRESSURE WASHER Read the owner's manual and safety rubes before operating your pressure washer, Compare the illustrations with your pressure washer to familiarize yourself with the locations of various controls and adjustments. Save this manual for future reference. Recoil Starter Air Cleaner Throttle Control...
- Page 6 WASHER Clean area around fuel fill cap, remove cap. Your Craftsman pressure washer was mostly assembled Slowly add regular unleaded fuel to fuel tank. Be at the factor},. However, you will need to perform these careful not to overfill. Allow about 1.5" of tank tasks before you can operate your pressure washer: space for fuel expansion, as shown here.
- Page 7 CAUTRON! AIcohoFblended fuels(called gasohol, Run water through garden hose for 30 seconds to ethanol or methanol) canattract m oisture, whichleads flush it of debris. Turn off water. toseparation a ndformation ofacidsduringstorage. llVIPORTANT: DO NOT siphon standing water for the Acidicgascandamage thefuelsystem of anengine water supply.
- Page 8 To Start Your Pressure Washer HOW TO USE YOUR PRESSURE WASHER To start your engine-powered pressure washer for the first time, follow these instructions step-by-step. This if you have any problems operating your pressure starting information also applies whenever you start washer, please call the pressure washer helpline at the engine after you have let the pressure washer sit 1-800-222-3136.
- Page 9 10. Move throttle lever to "Fast" position, shown here 14. Return starter grip handle slowly. DO NOT let rope as a rabbit. "snap back" against starter. WARNING Fast Stop Throttle Lever in STOP When starting engine, pull cord slowly until resistance felt and then pul! rapidly to avoid kickback.
- Page 10 Pull back collar on quick-connect and pull current How to Stop Your Pressure Washer spray tip off. Store spray tips in holder provided on Let engine idle for two minutes. the nozzle extension. Move throttle lever on engine to "Stop" position. Select desired spray tip: Squeeze trigger on spray gun to relieve...
- Page 11 IMPORTANT: Youmustflushthe chemical injection Apply a high pressure spray to a small area and system aftereachusebyplacing thefilterintoa then check the surface for damage, if no damage is bucket o f clean water,thenrunthepressure washer in found, you can assume it is okay to continue rinsing. lowpressure for1-2minutes.
- Page 12 ENGINE TECHNICAL iNFORMATiON PRODUCT SPECiFiCATiONS This is a single cylinder, Uhead, air cooled engine, it Pressure Washer Specifications is a low emissions engine. Pressure ....2150 PSI in the State of California, Model Series Flow Rate ....1.9 GPM 100000 engines are certified by the California Air Chemical Mix ....
- Page 13 OWNER'S RESPONSiBiLiTiES Follow the hourly or calendar intervals, whichever occurs first. More frequent service is required when operating in adverse conditions noted below. MABNTENANCE SCHEDULE FILL tN DATES AS YOU OPERATING iNTERVALS COMPLETE REGULAR SERVICE SERVICE DATES Every 25 I Every 50 Every 100 Before 100-300...
- Page 14 Pressure washer p arts should bekeptclean toreduce t he 2. Place in-line filter screen into threaded end of riskofoverheating andignition o faccumulated debris. nozzle extension. Direction does not matter. Push screen in with eraser end of pencil until it rests flat CAUTION at bottom of opening.
- Page 15 Pump Maintenance Oil Recommendations Changing Pump Oit Change oil every 50 hours or once yearly, whichever NOTE: When adding oil to the engine crankcase, use occurs first. only high quality detergent oil rated with API service classification SF, SG, SH, SJ or higher. DO NOT use NOTE: You must purchase an approved bottle of special additives.
- Page 16 ChangBng Engine Oil Service Air Cleaner Change engine oilafterthefirst5 hoursandevery Your engine will not run properly and may be 50hoursthereafter. If youareusingyourpressure damaged if you run it with a dirty air cleaner. washer u nderextremely d irtyor dustyconditions, or in Service the air cleaner once every 25 hours of extremely h otweather, c hange oil moreoften.
- Page 17 • Remove spark arrester screen for cleaning and Spark Attester Service inspection. Your engine is not factory-equipped with a spark • Replace if screen is damaged. arrester. In some areas, it is illegal to operate an engine without a spark arrester. Check local laws and Air Cooling System regulations.
- Page 18 AFTER EACH USE WINTER STORAGE Water should not remain in the unit for long periods of CAUTION time. Sediments or minerals can deposit on pump parts and "freeze" pump action. Follow these procedures after every use: * Failure to do so will permanently damage your pump Flush detergent siphoning tube by placing the filter...
- Page 19 LONG TERM STORAGE Protect Pump To protect the pump use Sears pump saver to prevent if you do not plan to use the pressure washer for more freeze damage and lubricate pistons and seals. than 30 days, you must prepare the engine and pump for long term storage.
- Page 20 Prob(em Correction Cause Low pressure spray tip installed. Replace spray tip with high pressure spray tip. Water inlet is blocked. Clear inlet. )nadequate water supply. Provide adequate water flow. Inlet hose is kinked or leaking. Straighten inlet hose, patch leak. Pump has followingproblems: Check and clean inlet hose Clogged inlet hose strainer.
- Page 22 CRAFTSMAN 2,150 PS_ Pressure Washer 580.752011 Main Unit m Exploded View and Parts List "\\ items Not Illustrated item Part # Description 196519GS BASE Part # Description 197191GS 192525GS KiT, Pump/Engine Mounting MANUAL, Owners Hardware AB3061BGS OIL BOTTLE 196006GS HOSE...
- Page 23 CRAFTSMAN 2,150 PSI Pressure Washer 580.752011 Pump m Exploded View and Parts List Item Part # 1tern Part # Description Description 19 190571GS 197308GS CAP, Oil KIT, CHECK VALVES 190627GS MANIFOLD 190592GS KIT, INLET CHECK 190575GS 190593GS OoRING, 4 X 2...
- Page 24 ENGINE, 4.0 HP, Briggs and Stratton, 10J902 - Exploded View 524 <_ 51 _._ 524 <_ _4o® 4s¢¢5 1095 VALVE GASKET SET fF_%%. 1211 459@ 689 C) 456@ ..
- Page 25 ENGINE, 4.0 HP, Briggs and Stratton, 10J902 - Exploded View 365 ? 334_ 534 _l 356A 19o% 190_ 332 ® 358 ENGINE GASKET SET...
- Page 26 ENGINE, 4.0 HP, Briggs and Stratton, 10J902 - Parts List Item Part # Description totem Part # Description 699653 Cylinder Assembly 694051 Housing-Blower 399269 Kit-Bushing/Seal (Magneto Side) 692198 Screw (Blower Housing) 299819 SeaPOil (Magneto Side) 690400 Shield-Cylinder 698691 Sump-Engine 690345 Screw (Cylinder Shield)
- Page 28 Sears, Roebuck and Co., U.S.A. (Sears), the California Air Resources Board (CARB) the United States Environmental Protection Agency (U.S.EPA) Emissions Control System Warranty Statement (Owner's Defect Warranty Rights and Obligations) The California Air Resources Board (CARB), U.S. EPA and Fuel Metering System Sears are pleased...
- Page 29 Emissions Durability Period and Air index Emissions Compliance Period On Engine Information On Your Engine Emissions Labe_ Emissions Compliance Labe_ Engines that are certified to meet the California After July 1,2000 certain Sears engines will be certified Resources Board (CARB) Tier 2 Emission Standards must...
- Page 30 ESPECIFICACIONES ......COMO ORDENAR PARTES ..PAGINA POSTERIOR GARANTIA LIM_TADA DE LA MAQUINA LAVADORA DE PRESION CRAFTSMAN Durante un ado a partir de la fecha de compra, Sears reparara, sin cargo alguno, cualquier defecto en material y mano obra, siempre...
- Page 31 , ADVERTENCiA E[ escape dei motor de este producto contiene eiementos qu[micos reconocidos en ei Estado California pot producir c&ncer, defectos de nacimiento u otros dagos de tipo reproduetivo. ADVERTENCJA CUANDO ANADA COMBUSTIBLE O VACiE DEP6SITO Apague et lavadora de presi6n (posici6n OFF) y d6jelo enfriar al menos pot 2 minutos antes de remover la tapa de la /////_ combustible.
- Page 32 ADVERTENCIA Siempre use protecci6n para los ojos cuando utilice este equipo o cuando est_ cerca de donde se est6 usando et equipo. NO toque tas superficies calientes y evite los gases del escape a atta temperatura. NO juegue con partes que puedan aumentar o disminuir la Permita que et equipo se enfde antes de tocarlo.
- Page 33 CONOZCA SU MAQUtNA LAVADORA DE PRE$1ON Lea el manual del propietado y tas regmas de seguridad antes de porter en marcha su m&quina lavadora a presiSn. Compare las ilustraciones con su maquina lavadora a presion para familiarizarse con las ubicaciones de los diferentes controles y ajustes.
- Page 34 Ilenado LAVADORA A PRESiON combustible, retire la tapa, La gran mayoria de su m&quina lavadora a presion Craftsman Agregue lentamente gasolina regular "SIN PLOMO" ha sido ensamblada en la fabrica. Sin embargo, usted debera tanque de combustible.
- Page 35 iPRECAUCJON! Los combustibles con mezcla de alcohol Haga correr el agua a traves de la manguera de su (gasohol, etanol o metanol) pueden atraer la humedad jardin pot 30 segundos para limpiar cualquier escombro que se encuentre en ella. provocar la separaci6n y formacion de &cidos durante...
- Page 36 C6MO USAR SU MAQUINA C6mo Dar[e Arranque a su M&quina Lavadora a Presi6n LAVADORA A PRESION Para darle arranque a su maquina lavadora a presi6n Si tiene problemas operando su maquina lavadora movida a motor por primera vez, siga estas instrucciones presi6n, por favor...
- Page 37 10. Mueva el control de la valvula de admisi6n a la posicion Regrese la cuerda de arranque lentamente. NO permita "Rap!do" ("Fast"), que se distingue con la figura de un que la cuerda regrese bruscamente y golpee e! arrancador. conejo. ADVERTENCIA Rap!do Parade...
- Page 38 C6mo Detener su M_quina Lavadora Desplace hacia atras e! anillo del conector rapido y tire Presi6n de la punta de rociado que este montada. Seleccione la punta de rociado deseada: Espere que e! motor descanse. Mueva valvula de admisi6n a posicion "Stop" ("Parado").
- Page 39 Aplique el detergente sobre la superficie seca, Aplique un rociado de alta presion en un &tea pequeSa, comenzando en la parte inferior der area y dirigiendose despues revise si la superficie presenta daSos. Si no hacia arriba, utilizando movimientos largos, parejos encuentra da5os,...
- Page 40 INFORMAClON TC:CNICA SOBRE EL ESPECIFtCACtONES MOTOR PRODUCTO El motor es de uno cilindros, de Locabeza, refrigerado Es_ec!f!caciones de la M_quina Lavadora aire y de baja emisi6n. a _'res_on En el Estado de California, los motores de la serie Presion ........2150 100000 hart obtenido...
- Page 41 RESPONSABtLIDADES DEL PROPtETARIO Siga el programa de mantenimiento segOn e! nOmero de horas o seg0n e! calendario, Io que suceda primero. Se requiere de servicio con mayor frecuencia cuando opere la unidad en las condiciones adversas descritas a continuaci6n. CALENDARiO DE MANTENIMIENTO ANOTE LAS FECHAS CONFORME...
- Page 42 Mantenga limpios los componentes del lavadora a presion Retire la pistola y la extension para boquillas de la para reducir el riesgo de sobrecalentamiento e ignici6n manguera de alta presion. Retire la extension para los residuos acumulados. boqui!las de la pistola y retire el anillo 'o' y el colador Utilice un trapo hOmedo para limpiar las superficies extefiores.
- Page 43 Mantenimiento de los AnH_os 'O' MANTENJMtENTO DEL MOTOR Compre una ©-Juego de Reparacion de Anillo en sus Sears locales o Ilamando 1-800-366-PART o en linea en www.sears.com. No se incluye con Ja arandela de la presi6n. Este juego incluye los anillos de! reemplazo arandela de caucho...
- Page 44 Comprobaci6n de[ Nive[ de Aceite Limpie el area aJrededor de la abertura para !lenado aceite, retire la varilla de medici6n. Limpie la varilla Compruebe e! nivel de aceite antes de cada uso o cada medici6n. 5 horas de funcionamiento, como minimo.
- Page 45 Si el motor ha estado funcionando, el silenciador estara Proporcione Servicio a la Bujia bastante caJiente. Deje que el silenciador se enfrie para Proporcione servicio a la bujia cada 100 horas de operaci6n poder darle servicio al apagachispas. o una vez al aSo, !o que suceda primero.
- Page 46 DESPUES DE CADA USO ALMACENAMIENTO PARA INVlERNO No deber& haber agua en la unidad pot largos periodos tiempo. Los sedimentos de minerales se pueden depositar PRECAUCION en partes de la bombay "congelar" su funcionamiento. Lleve a cabo estos procedimientos despues de cada uso: Lave el tubo de succi6n de detergente...
- Page 47 ALMACENAMIENTO PROLONGADO Protecci6n de _a Bornba A protege al salvador de bomba de uso de bomba Sears Si usted no planea usar la maquina lavadora a presi6n previene congelar el da_o y lubrica embo!os y sellos. mas de 30 dias, debera preparar el motor para un...
- Page 48 Prob_ema So[uci6n Causa Esta usando la puntas de roc[o Cambie la puntas de rocio a una de las tres baja presi6n (negra). puntas de rocio de alta presi6n, La entrada de agua esta bloqueada, Limpie la entrada, Suministro de agua inadecuado.
- Page 50 Sears, Roebuck and Co., U.S.A. (Sears), California Resources Board (Consejo de Recursos sobre e! Aire California, CARB, por sus sigJas en ingles) y United States Environmental Protection Agency (Agencia de Protecci6n Ambienta[ de EE.UU., EPA, pot sus sig[as en ingles). Declaraci6n de garantia del sistema...
- Page 51 Jnformaci6n Sobre el Periodo Periodo de Cump_imiento de _a Normativa Durabilidad de las Emisiones y e_ indice de Emisiones en ia Etiqueta de Aire en _a Etiqueta de Emisiones CumpHmiento de Emisiones del Motor Motor Desde el 1 de julio de 2000, algunos motores Sears...
- Page 52 Your Home For repair-in your home-of alJ major brand appliances, lawn and garden equipment, or heating and cooling systems, no matter made it, no matter sold For,the replacement parts, accessories owner s manuals that you need to do-it-yourself. For Sears professional installation of home appliances and items like garage...
Need help?
Do you have a question about the 580.752011 and is the answer not in the manual?
Questions and answers