JVC KD-S6060 Instructions Manual
Cd receiver
Hide thumbs
Also See for KD-S6060:
- Instructions manual (82 pages) ,
- Service manual (76 pages) ,
- Installation & connection manual (4 pages)
Table of Contents
Advertisement
Available languages
Available languages
Quick Links
CD RECEIVER
RECEPTOR CON CD
RECEPTEUR CD
CD RECE∑VER
KD-S6060
FM
LOUD
CD
SEL
SSM
AM
DISP
7
8
MO
9
10
11
RPT
12
RND
MODE
SCM
COMPACT
DIGITAL AUDIO
For installation and connections, refer to the separate manual.
Para la instalación y las conexiones, refiérase al manual separado.
Pour l'installation et les raccordements, se référer au manuel séparé.
Montaj ve ba∂lantΩlar için di∂er elkitabΩna bakΩn.
INSTRUCTIONS
MANUAL DE INSTRUCCIONES
MANUEL D'INSTRUCTIONS
TAL∑MATLAR
GET0173-004A
[EU]
Advertisement
Chapters
Table of Contents

Related Manuals for JVC KD-S6060


Summary of Contents for JVC KD-S6060
- Page 1 CD RECEIVER RECEPTOR CON CD RECEPTEUR CD CD RECE∑VER KD-S6060 LOUD DISP MODE COMPACT DIGITAL AUDIO For installation and connections, refer to the separate manual. Para la instalación y las conexiones, refiérase al manual separado. Pour l’installation et les raccordements, se référer au manuel séparé. Montaj ve ba∂lantΩlar için di∂er elkitabΩna bakΩn.
-
Page 2: How To Reset Your Unit
IMPORTANT FOR LASER PRODUCTS 1. CLASS 1 LASER PRODUCT 2. CAUTION: Do not open the top cover. There are no user serviceable parts inside the unit; leave all servicing to qualified service personnel. 3. CAUTION: Visible and invisible laser radiation when open and interlock failed or defeated. Avoid direct exposure to beam. -
Page 3: Table Of Contents
Thank you for purchasing a JVC product. Please read all instructions carefully before operation, to ensure your complete understanding and to obtain the best possible performance from the unit. CONTENTS SOUND ADJUSTMENTS ....14 How to reset your unit ....... -
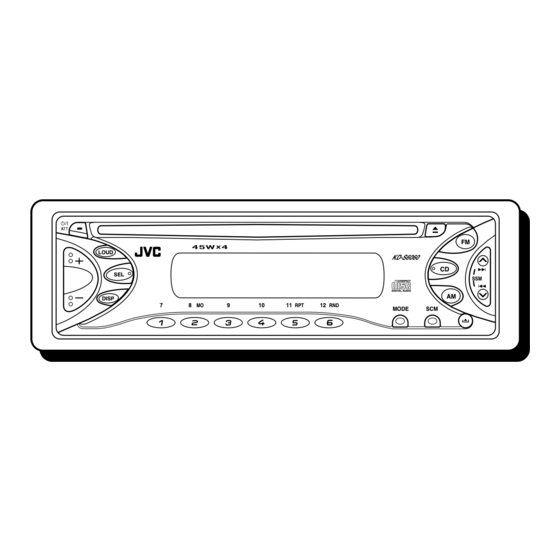
Page 4: Location Of The Buttons
LOCATION OF THE BUTTONS Control panel Display window MO ST RND RPT LOUD DISP MODE (standby/on attenuator) button Display window 2 LOUD (loudness) button ; SCM (sound control memory) indicator 3 SEL (select) button a CD source indicator 4 Display window s FM band indicators (FM1, FM2, FM3) 5 Loading slot d AM band indicator... -
Page 5: Basic Operations
BASIC OPERATIONS LOUD DISP MODE Turning on the power Adjust the sound as you want. (See pages 14 – 16.) Turn on the power. To drop the volume in a moment Press briefly while listening to any source. “ATT” starts flashing on the display, and Note on One-Touch Operation: the volume level will drop in a moment. -
Page 6: Setting The Clock
LOUD DISP MODE Setting the clock 2 Adjust the minute. Press and hold SEL (select) for more than 2 seconds. “CLOCK H,” “CLOCK M,” “SCM LINK,” or “LEVEL” appears on the display. Finish the setting. Set the hour. 1 Select “CLOCK H” (hour) if not shown on the display. -
Page 7: Radio Operations
RADIO OPERATIONS LOUD DISP MODE Listening to the radio Start searching for a station. You can use either automatic searching or To search for stations of higher manual searching to tune in to a particular frequencies station. To search for stations of lower Searching for a station automatically: frequencies Auto search... - Page 8 Searching for a station manually: When an FM stereo broadcast is hard to receive: Manual search MODE Press MODE to enter the functions mode while listening Select the band (FM1 – 3, AM). to an FM stereo broadcast. Press MO (monaural), while still in the functions mode, so that the MO indicator lights up on the display.
-
Page 9: Storing Stations In Memory
Storing stations in memory Manual preset You can preset up to 6 stations in each band You can use one of the following two methods to (FM1, FM2, FM3, and AM) manually. store broadcasting stations in memory. Ex.: Storing FM station of 92.5 MHz into the •... -
Page 10: Tuning In To A Preset Station
Tuning in to a preset station Press and hold the number button (in this example, 1) for more than You can easily tune in to a preset station. 2 seconds. Remember that you must store stations first. If you have not stored them yet, see “Storing stations in memory”... -
Page 11: Cd Operations
CD OPERATIONS LOUD DISP MODE Playing a CD Note: When a CD is inserted upside down, “EJECT” appears on the display and the CD automatically Insert a CD into the loading slot. ejects. The unit turns on, draws the CD and starts playback automatically. -
Page 12: Locating A Track Or A Particular Portion On A Cd
Locating a track or a Selecting CD playback modes particular portion on a CD To play back tracks at random (Random Play) To fast-forward or reverse the track You can play back all tracks on the CD at ¢, while Press and hold random. -
Page 13: Prohibiting Cd Ejection
Prohibiting CD ejection To play back tracks repeatedly (Repeat Play) You can prohibit CD ejection and can lock a CD You can play back the current track repeatedly. in the loading slot. MODE Press MODE to enter the While pressing CD, press and hold 0 for functions mode while playing a more than 2 seconds. -
Page 14: Sound Adjustments
SOUND ADJUSTMENTS Adjusting the sound Adjust the level. You can adjust the sound characteristics to your To increase the level preference. To decrease the level Select the item you want to adjust. Each time you press the button, the adjustable items change as follows: (fader) (bass) -
Page 15: Using The Sound Control Memory (Scm)
Using the sound control Indication For: Preset values LOUD memory (SCM) SCM OFF (Flat sound) BEAT Rock or You can select and store a preset sound disco music adjustment suitable for each playback source SOFT Quiet –03 (Advanced SCM). background music Selecting and storing the sound Light music... -
Page 16: Storing Your Own Sound Adjustments
Storing your own sound Repeat step 2 to adjust the other adjustments items. Press and hold SCM until the sound You can adjust the sound modes (BEAT, SOFT, mode you have selected in step 1 POP) to your preference and store your own flashes on the display. -
Page 17: Other Main Functions
OTHER MAIN FUNCTIONS Selecting the level display Canceling Advanced SCM —LEVEL —SCM LINK You can select the level display according to your You can cancel the Advanced SCM (Sound preference. Control Memory), and unlink the sound modes When shipped from the factory, “VOL 2” is and the playback sources. -
Page 18: Detaching The Control Panel
Detaching the control panel Attaching the control panel Insert the left side of the control You can detach the control panel when leaving panel into the groove on the panel the car. holder. When detaching or attaching the control panel, be careful not to damage the connectors on the back of the control panel and on the panel holder. -
Page 19: Troubleshooting
TROUBLESHOOTING What appears to be trouble is not always serious. Check the following points before calling a service center. Symptoms Causes Remedies • Sound cannot be heard The volume level is set to the Adjust it to the optimum level. from the speakers. -
Page 20: Maintenance
MAINTENANCE Handling discs When playing a CD-R Before playing back CD-Rs, read their instructions This unit has been designed to reproduce CDs or cautions carefully. and CD-Rs (Recordable). • Use only “finalized” CD-Rs. • This unit is not compatible with MP3 discs. •... -
Page 21: Specifications
SPECIFICATIONS AUDIO AMPLIFIER SECTION CD PLAYER SECTION Maximum Power Output: Type: Compact disc player Front: 45 W per channel Signal Detection System: Non-contact optical Rear: 45 W per channel pickup (semiconductor laser) Continuous Power Output (RMS): Number of channels: 2 channels (stereo) 17 W per channel into 4 Ω, 40 Hz Front: Frequency Response: 5 Hz to 20 000 Hz... - Page 22 IMPORTANTE PARA PRODUCTOS LASER 1. PRODUCTO LASER CLASE 1 2. PRECAUCIÓN: No abra la tapa superior. En el interior de la unidad no hay piezas que pueda reparar el usuario; encargue el servicio a personal técnico cualificado. 3. PRECAUCIÓN: Radiación láser visible e invisible en caso de apertura o con interbloqueo averiado o defectuoso.
-
Page 23: Operaciones Basicas
Muchas gracias por la compra de un producto JVC. Como primer paso, por favor lea detenidamente este manual para comprender a fondo todas las instrucciones y obtener un máximo disfrute de esta unidad. CONTENIDO AJUSTES DEL SONIDO ....14 Cómo reposicionar su unidad .... -
Page 24: Ubicacion De Los Botones
UBICACION DE LOS BOTONES Panel de control Ventanilla de visualización MO ST RND RPT LOUD DISP MODE 1 Botón Ventanilla de visualización (en espera/encendido atenuador) ; Indicador SCM (memoria de control de 2 Botón LOUD (sonoridad) sonido) 3 Botón SEL (selección) a Indicador de la fuente de CD 4 Ventanilla de visualización s Indicadores de banda FM (FM1, FM2, FM3) -
Page 25: Operaciones Basicas
OPERACIONES BASICAS LOUD DISP MODE Conexión de la alimentación Ajuste el sonido según se desee. (Consulte las páginas 14 – 16.) Encienda la unidad. Para disminuir el volumen en un instante Pulse por un tiempo breve mientras está escuchando cualquier fuente. “ATT” Nota sobre la operación con pulsación única: comienza a destellar en la pantalla, y el nivel de La unidad se enciende automáticamente cuando... -
Page 26: Ajuste Del Reloj
LOUD DISP MODE Ajuste del reloj 2 Ajuste los minutos. Pulse y mantenga pulsado SEL (selección) durante más de 2 segundos. Aparece “CLOCK H”, “CLOCK M”, “SCM LINK” o “LEVEL” en la pantalla. Finalice el ajuste. Ajuste la hora. 1 Seleccione “CLOCK H” (hora) si no está visualizado en la pantalla. -
Page 27: Operaciones De La Radio
OPERACIONES DE LA RADIO LOUD DISP MODE Para escuchar la radio Comience la búsqueda de la emisora. Podrá sintonizar una determinada emisora Para buscar emisoras de mediante búsqueda automática o búsqueda frecuencias más altas manual. Para buscar una emisora Para buscar emisoras de automáticamente: frecuencias más bajas Búsqueda automática... - Page 28 Para buscar una emisora Cuando una radiodifusión en FM estéreo sea difícil de recibir: manualmente: Búsqueda manual MODE Pulse MODE para acceder al modo de funciones mientras Seleccione la banda (FM1 – 3, AM). se está escuchando una radiodifusión en FM. Pulse MO (monofónico), mientras permanece en el modo de funciones, de...
-
Page 29: Cómo Almacenar Emisoras En La Memoria
Cómo almacenar emisoras en Preajuste manual la memoria Podrá preajustar manualmente hasta 6 emisoras en cada banda (FM1, FM2, FM3 y AM). Las emisoras podrán almacenarse en la Ej.: Almacenamiento de una emisora FM de memoria mediante uno de los dos métodos 92,5 MHz en el número de preajuste 1 de la siguientes. -
Page 30: Cómo Sintonizar Una Emisora Preajustada
Cómo sintonizar una emisora Pulse y mantenga pulsado el botón preajustada numérico (en este ejemplo, 1), durante más de 2 segundos. Las emisoras preajustadas pueden sintonizarse fácilmente. Tenga presente que primero deberá almacenar las emisoras. Si todavía no lo ha hecho, consulte “Cómo almacenar emisoras en la memoria”... -
Page 31: Operacion Del Reproductor De Cd
OPERACION DEL REPRODUCTOR DE CD LOUD DISP MODE Para reproducir un CD Nota: Si inserta el CD boca abajo, aparecerá “EJECT” en la pantalla y el CD será expulsado automáticamente. Inserte un CD en la ranura de carga. Se conecta la alimentación de la unidad, entra el CD y Para interrumpir la reproducción y comienza la reproducción... -
Page 32: Cómo Encontrar Una Pista O Un Punto Determinado De Un Cd
Cómo encontrar una pista o Selección de los modos de un punto determinado de un reproducción de CD Para reproducir las pistas de forma aleatoria (Reproducción aleatoria) Para efectuar la búsqueda progresiva o regresiva de la pista Podrá reproducir todas las pistas del CD de forma aleatoria. -
Page 33: Prohibición De La Expulsión Del Cd
Prohibición de la expulsión Para reproducir las pistas repetidamente (Reproducción repetida) del CD Podrá escuchar la pista actual repetidamente. Es posible inhibir la expulsión del CD y bloquear MODE Pulse MODE para acceder al el CD dentro de la ranura de carga. modo de funciones mientras se está... -
Page 34: Ajustes Del Sonido
AJUSTES DEL SONIDO Ajuste del sonido Ajuste el nivel. Usted puede ajustar las características de Para aumentar el nivel sonido a su preferencia. Para reducir el nivel Seleccione el ítem que desea ajustar. Cada vez que pulsa el botón, los ítems ajustables cambian de la siguiente manera: Ej.: Cuando usted ajusta a “TRE”... -
Page 35: Utilización De La Memoria De Control De Sonido (Scm)
Utilización de la memoria de Indicación Para: Valores preajustados control de sonido (SCM) TRE LOUD SCM OFF (Sonido plano) BEAT Música de Usted puede seleccionar y almacenar un ajuste rock o de de sonido preestablecido para cada fuente de discoteca reproducción (SCM avanzado). -
Page 36: Cómo Almacenar Sus Propios Ajustes De Sonido
Cómo almacenar sus propios Repita el paso 2 para ajustar los ajustes de sonido otros ítems. Pulse y mantenga pulsado SCM Usted podrá ajustar los modos de sonido (BEAT, hasta que el modo de sonido SOFT, POP) a su gusto y almacenar sus propios seleccionado por usted en el paso 1 ajustes en la memoria. -
Page 37: Otras Funciones Principales
OTRAS FUNCIONES PRINCIPALES Selección de la pantalla de Cancelación del SCM nivel—LEVEL avanzado—SCM LINK Usted puede seleccionar la indicación de nivel a Usted puede cancelar el SCM avanzado su gusto. (memoria de control de sonido) y desenlazar los La unidad se entrega de fábrica con “VOL 2” modos de sonido y las fuentes de reproducción. -
Page 38: Desmontaje Del Panel De Control
Desmontaje del panel de Cómo instalar el panel de control control Inserte el lado izquierdo del panel de control en la ranura del Podrá desmontar el panel de control cuando portapanel. salga de su automóvil. Al desmontar o instalar el panel de control, preste atención para no dañar los conectores provistos al dorso del panel de control y en el portapanel. -
Page 39: Localización De Averias
LOCALIZACIÓN DE AVERIAS Lo que aparenta ser una avería podría resolverse fácilmente. Verifique los siguientes puntos antes de acudir al centro de servicio. Síntomas Causas Remedios • El sonido no sale por los El nivel de volumen está Ajustarlo al nivel óptimo. altavoces. -
Page 40: Mantenimiento
MANTENIMIENTO Manipulación de los discos Cuando se reproduce un CD-R Antes de reproducir los CD-Rs, lea atentamente sus instrucciones o precauciones. Esta unidad ha sido diseñada para reproducir • Utilice únicamente CD-Rs “finalizados”. CDs y CD-Rs (grabables). • Es posible que algunos CD-Rs no se puedan •... -
Page 41: Especificaciones
ESPECIFICACIONES SECCION DEL AMPLIFICADOR DE SECCION DEL REPRODUCTOR DE CD AUDIO Tipo: Reproductor de discos compactos Sistema de detección de la señal: Captor óptico Máxima potencia de salida: sin contacto (láser de semiconductor) Delantera: 45 W por canal Número de canales: 2 canales (estéreo) Trasera: 45 W por canal... -
Page 42: Comment Réinitialiser Votre Appareil
IMPORTANT POUR PRODUITS LASER 1. PRODUIT LASER CLASSE 1 2. ATTENTION: N’ouvrez pas le couvercle supérieur. Il n’y a aucune pièce réparable par l’utilisateur à l’intérieur de l’appareil; confiez toute réparation à un personnel qualifié. 3. ATTENTION: Risque de radiations laser visible et invisible quand l’appareil est ouvert et que le système de verrouillage ne fonctionne pas ou a été... -
Page 43: Comment Utiliser La Touche Mode
Merci pour avoir acheté un produit JVC. Veuillez lire attentivement toutes les instructions avant d’utiliser l’appareil afin de bien comprendre son fonctionnement et d’obtenir les meilleures performances possibles. TABLE DES MATIERES AJUSTEMENT DU SON ....14 Comment réinitialiser votre appareil .. -
Page 44: Emplacement Des Touches
EMPLACEMENT DES TOUCHES Panneau de command Fenêtre d’affichage MO ST RND RPT LOUD DISP MODE 1 Touche Fenêtre d’affichage (attente/en service sourdine) 2 Touche LOUD (contour) ; Indicateur SCM (mémoire de commande 3 Touche SEL (sélection) sonore) 4 Fenêtre d’affichage a Indicateur de source CD 5 La fente d’insertion s Indicateurs de bande FM (FM1, FM2, FM3) -
Page 45: Fonctionnement De Base
FONCTIONNEMENT DE BASE LOUD DISP MODE Mise sous tension Ajustez le son comme vous le souhaitez. (Voir les pages 14 – 16). Mettez l’appareil sous tension. Pour baisser le son instantanément Appuyez brièvement sur pendant l’écoute de n’importe quelle source. “ATT” Remarque sur le fonctionnement monotouche: commence à... -
Page 46: Réglage De L'horloge
LOUD DISP MODE Réglage de l’horloge 2 Ajustez les minutes. Maintenez pressée SEL (sélection) pendant plus de 2 secondes. “CLOCK H”, “CLOCK M”, “SCM LINK” ou “LEVEL” apparaît sur l’affichage. Terminez le réglage. Réglez les heures. 1 Choisissez “CLOCK H” (heures) s’il n’apparaît pas sur l’affichage. -
Page 47: Fonctionnement De La Radio
FONCTIONNEMENT DE LA RADIO LOUD DISP MODE Ecoute de la radio Commencez la recherche d’une station. Vous pouvez utiliser la recherche automatique ou l’accord manuel pour accorder une station Pour rechercher des stations particulière. de fréquences supérieures Recherche d’une station Pour rechercher des stations automatiquement: Recherche de fréquences inférieures... - Page 48 Recherche manuelle d’une station: Quand une émission FM stéréo est difficile à recevoir: Recherche manuelle MODE Appuyez sur MODE pour entrer en mode de fonction Choisissez la bande (FM1 – 3, AM). pendant l’écoute d’une station Appuyez sur MO (monaural), pendant le mode de fonction, de façon que l’indicateur MO s’allume sur l’affichage.
-
Page 49: Mémorisation Des Stations
Mémorisation des stations Présélection manuelle Vous pouvez présélectionner manuellement un Vous pouvez utiliser l’une des deux méthodes maximum de 6 stations pour chaque bande suivantes pour mémoriser les stations reçues. (FM1, FM2, FM3 et AM). • Présélection automatique des stations FM: Ex.: Mémorisation de la station FM située à... -
Page 50: Accord D'une Station Présélectionnée
Accord d’une station Maintenez pressée la touche présélectionnée numérique (dans cet exemple, 1) pendant plus de 2 secondes. Vous pouvez accorder facilement une station présélectionnée. Rappelez-vous que vous devez d’abord mémoriser les stations. Si vous ne les avez pas encore mémorisées, référez-vous à “Mémorisation des stations”... -
Page 51: Fonctionnement Du Lecteur Cd
FONCTIONNEMENT DU LECTEUR CD LOUD DISP MODE Lecture d’un CD Remarque: Quand un CD est inséré à l’envers, “EJECT” apparaît sur l’affichage et le CD est éjecté Insérez un disque dans la fente de automatiquement. d’insertion. L’appareil se met en marche, tire le CD et Pour arrêter la lecture et éjecter le CD commence la lecture... -
Page 52: Localisation D'une Plage Ou D'un Point Particulier Sur Un Cd
Localisation d’une plage ou Sélection des modes de d’un point particulier sur un CD lecture de CD Pour avancer rapidement ou inverser une Pour reproduire les plages dans un ordre plage aléatoire (Lecture aléatoire) Vous pouvez reproduire toutes les plages du ¢, Maintenez pressée disque dans un ordre aléatoire. -
Page 53: Interdiction De L'éjection De Cd
Interdiction de l’éjection de Pour reproduire les plages répétitivement (Lecture répétée) Vous pouvez reproduire la plage actuelle répétitivement. Vous pouvez interdire l’éjection d’un CD et le verrouiller dans la fente d’insertion. MODE Appuyez sur MODE pour entrer en mode de fonction Tout en maintenant pressée CD, pendant l’écoute d’un CD. -
Page 54: Ajustement Du Son
AJUSTEMENT DU SON Ajustement du son Ajustez le niveau. Vous pouvez ajuster les caractéristiques du son Pour augmenter le niveau à votre préférence. Pour diminuer le niveau Choisissez l’élément que vous souhaitez ajuster. Chaque fois que vous appuyez sur la touche, l’élément ajustable change comme suit: Ex.: Quand vous ajustez “TRE”... -
Page 55: Utilisation De La Mémoire De Commande Du Son (Scm)
Utilisation de la mémoire de Indication Pour: Valeurs préréglées LOUD commande du son (SCM) SCM OFF (Son plat) BEAT Musique Vous pouvez choisir et mémoriser un ajustement rock ou du son spécifique pour chaque source de lecture disco (SCM avancé). SOFT Musique –03... -
Page 56: Mémorisation De Votre Propre Ajustement Sonore
Mémorisation de votre propre Pour mettre la fonction loudness en ajustement sonore ou hors service. • Référez-vous à la page LOUD 14 pour les détails. Vous pouvez ajuster les modes sonore (BEAT, SOFT, POP) comme vous le souhaitez et mémoriser votre propre ajustement. Répétez l’étape 2 pour ajuster d’autres éléments. -
Page 57: Autres Fonctions Principales
AUTRES FONCTIONS PRINCIPALES Sélection de l’affichage du Annulation de SCM avancé niveau—LEVEL —SCM LINK Vous pouvez choisir l’affichage du niveau en Vous pouvez annuler les réglages SCM fonction de vos préférences. (mémoire de commande sonore) avancés est À l’expédition de l’usine, “VOL 2” est choisi. annuler les liaisons des modes sonores avec les •... -
Page 58: Détachement Du Panneau De Commande
Détachement du panneau de Comment attacher le panneau de commande commande Insérez le côté gauche du panneau Vous pouvez détacher le panneau de commande de commande dans la rainure située quand vous quittez la voiture. du côté droit du porte-panneau. Lors du détachement ou de la remise en place du panneau de commande, faites attention de ne pas endommager les connecteurs situés à... -
Page 59: Depannage
DEPANNAGE Ce qui apparaît comme un problème n’est pas toujours très sérieux. Vérifier les points suivants avant d’appeler un centre de réparation. Symptoms Causes Remèdes • Le son ne peut pas être Le niveau de volume est réglé Ajustez-la sur le niveau optimum. entendu des enceintes. -
Page 60: Entretien
ENTRETIEN Manipulation des disques Lors de la reproduction d’un CD-R Avant de reproduire un CD-R, lisez attentivement leurs instructions et précautions. Cet appareil a été conçu uniquement pour • Utilisez uniquement des CD-R finalisés. reproduire les CD et CD-R (enregistrables). •... -
Page 61: Specifications
SPECIFICATIONS SECTION AMPLIFICATEUR AUDIO SECTION LECTEUR CD Puissance de sortie maximum: Type: Lecteur de disque compact Avant: 45 W par canal Système de détection de signal: Capteur sans Arrière: 45 W par canal contact optique (semiconducteur laser) Puissance de sortie en mode continu (RMS): Nombre de canaux: 2 canaux (stéréo) 17 W par canal pour 4 Ω, 40 Hz à... - Page 62 LOUD DISP MODE Notlar: • Kanal ya da ses ayarlarΩ gibi önceden kurmuπ oldu∂unuz ayarlar da silinecektir. • Ünitenin içinde CD varsa, ünite sΩfΩrlandΩ∂Ωnda CD dΩπarΩ çΩkartΩlacaktΩr. CD’yi düπürmemek için dikkat edin.
- Page 63 MODE • Not: Güvenlik nedenleriyle, bu üniteyle birlikte bir kimlik kartΩ verilmiπ olup, aynΩ kimlik numarasΩ ünitenin πasisine de basΩlmΩπtΩr. Üniteniz çalΩndΩ∂Ω takdirde kimli∂inin yetkili makamlarca tespit edilmesine yardΩm edecek olan bu kartΩ emin bir yerde saklayΩn. KULLANMADAN ÖNCE *TaπΩt içinin sΩcaklΩ∂Ω..*Güvenlik için..
- Page 64 TU∏LARIN YERLER∑ Kumanda panosu Ekran penceresi MO ST RND RPT LOUD DISP MODE Ekran penceresi ¢ 4 • AyrΩca, birlikte basΩldΩklarΩnda SSM tuπlarΩ olarak görev yaparlar.
- Page 65 LOUD DISP MODE Tek Temasla ÇalΩπtΩrma (One-Touch Operation) hakkΩnda not: Aπa∂Ωdaki 2 . adΩmda bir kaynak seçti∂inizde ünite otomatik olarak açΩlΩr. Üniteyi açmak için bu tuπa basmanΩz πart de∂ildir. • Ses AyarΩna iliπkin D∑KKAT edilecek hususlar: CD, di∂er kaynaklara kΩyasla çok az gürültü yapar.
- Page 66 LOUD DISP MODE CLOCK H CLOCK M DISP LEVEL SCM LINK • • • CLOCK H CLOCK M LEVEL SCM LINK...
- Page 67 LOUD DISP MODE Not: Bu “receiver”Ωn üç FM bandΩ vardΩr (FM1, FM2, FM3). Bir FM yayΩnΩ dinlemek için bunlardan herhangi birini kullanabilirsiniz.
- Page 68 MODE Not: Bu “receiver”Ωn üç FM bandΩ vardΩr (FM1, FM2, FM3). Bir FM yayΩnΩ dinlemek için bunlardan herhangi birini kullanabilirsiniz. ¢ • •...
- Page 69 • •...
- Page 70 Notlar: • AynΩ numaralΩ belle∂e yeni bir istasyon kaydedilirse, eski istasyon ayarΩ silinir. • Bellek devresinin elektrik kayna∂Ωnda kesinti olursa 8 MO 11 RPT (örne∂in, akü de∂iπtirildi∂i zaman) önceden ayarlanmΩπ istasyonlar silinir. Böyle bir durumda, istasyonlarΩ yeniden ayarlamanΩz gerekecektir.
- Page 71 LOUD DISP MODE Not: CD ters yerleπtirilirse, ekranda “EJECT” sözcü∂ü görüntülenir ve CD otomatik olarak dΩπarΩ çΩkartΩlΩr. Tek Temasla ÇalΩπtΩrma (One-Touch Operation) hakkΩnda not: Yükleme yuvasΩnda zaten CD varsa, CD tuπuna basΩldΩ∂Ωnda ünite otomatik olarak açΩlΩr ve çalmaya • baπlar. Notlar: •...
- Page 72 MODE ¢ ¢ • •...
- Page 73 MODE...
- Page 74 Not: LOUD...
- Page 75 Ses kumanda belle∂inin Gösterge Uygulama: Ön ayarlar (SCM) kullanΩlmasΩ (∑leri SCM). Ses modlarΩnΩn seçilmesi ve kaydedilmesi Ses modlarΩnΩn bellekten ça∂rΩlmasΩ “SCM LINK” modu “LINK ON” • seçene∂ine ayarlandΩ∂Ωnda kayna∂Ω seçin. ∑stedi∂iniz ses modunu seçin. SCM OFF BEAT SOFT Notlar: • Her ses modunu kendi tercihinize göre ayarlayabilir ve belle∂e kaydedebilirsiniz.
- Page 76 • • • LOUD...
- Page 77 • • • • • CLOCK H CLOCK M LEVEL SCM LINK CLOCK H CLOCK M LEVEL SCM LINK VOL 1 VOL 2...
- Page 78 Konektörlerin temizlenmesi hakkΩnda not: Kumanda panosunu sΩk sΩk sökerseniz, konektörlerin performansΩ düπecektir. Bu olasΩlΩ∂Ω minimuma indirmek için, konektörlere hasar vermemeye dikkat ederek, alkole batΩrΩlmΩπ pamuklu çubuk veya bezle konektörleri silin.
- Page 79 • • • • • • • • • • • •...
- Page 80 • • • • • • • • D∑KKAT: • Yükleme yuvasΩna 8 cm’lik disk (single CD) yerleπtirmeyin. (Bu tür diskler dΩπarΩ çΩkartΩlamaz). • • Kalp, çiçek veya baπka anormal πekilli hiçbir diski • kullanmayΩn; bu tür diskler ünitenin arΩzalanmasΩna yol açar. •...
- Page 81 TEKN∑K ÖZELL∑KLER SES AMPL∑F∑KATÖR KISMI CD-ÇALAR KISMI Ω Ω GENEL Ω Ω Ω ± ± ° ° × × × × Ω Ω × × TÜNER (RADYO) KISMI TasarΩm ve teknik özellikler bildiri verilmeden de∂iπtirilebilir. [FM Tüner] µ Ω µ Ω...
- Page 82 Having TROUBLE with operation? Please reset your unit Refer to page of How to reset your unit ¿Tiene PROBLEMAS con la operación? Por favor reinicialice su unidad Consulte la páfina de Cómo reposicionar su unidad Vous avez des PROBLÈMES de fonctionnement? Réinitialisez votre appareil Référez-vous à...
Need help?
Do you have a question about the KD-S6060 and is the answer not in the manual?
Questions and answers