Table of Contents
Advertisement
CD RECEIVER
!"#$
CD
∂"¥„ Ë ´ ' ¥ '
For installation and connections, refer to the separate manual.
!"#$%&'()*+,-./0
°√ÿ ≥ "¥Ÿ § Ÿ Ë ¡ ◊ Õ ∑' Ë · ¬°µË " ßÀ"° „π°"√µ' ¥ µ— È ß ·≈–°"√‡™◊ Ë Õ ¡µË Õ
INSTRUCTIONS
!"
§"·π–π"
KD-S685
DIRECT TRACK ACCESS
LOUD
SEL
KD-S585
DIRECT TRACK ACCESS
LOUD
SEL
KD-S685/S585
KD-S685/S585
KD-S685/S585
COMPACT
DIGITAL AUDIO
GET0067-001A
[U]
Advertisement
Table of Contents

Related Manuals for JVC GET0067-001A


Summary of Contents for JVC GET0067-001A
- Page 1 °√ÿ ≥ “¥Ÿ § Ÿ Ë ¡ ◊ Õ ∑’ Ë · ¬°µË “ ßÀ“° „π°“√µ‘ ¥ µ— È ß ·≈–°“√‡™◊ Ë Õ ¡µË Õ INSTRUCTIONS §”·π–π” KD-S685 DIRECT TRACK ACCESS LOUD KD-S585 DIRECT TRACK ACCESS LOUD !" KD-S685/S585 KD-S685/S585 KD-S685/S585 COMPACT DIGITAL AUDIO GET0067-001A...
-
Page 2: How To Reset Your Unit
How to reset your unit Press and hold both the SEL (Select) and (Standby/On/Attenuator) buttons at the same time for several seconds. This will reset the built-in microcomputer. NOTES: Your preset adjustments — such as preset channels or sound adjustments — will also be erased. If a CD is in the unit, it will eject when you reset the unit. -
Page 3: Table Of Contents
Thank you for purchasing a JVC product. Please read all instructions carefully before operation, to ensure your complete understanding and to obtain the best possible performance from the unit. CONTENTS How to reset your unit ... 2 How to use the number buttons ... 2 LOCATION OF THE BUTTONS ...4... -
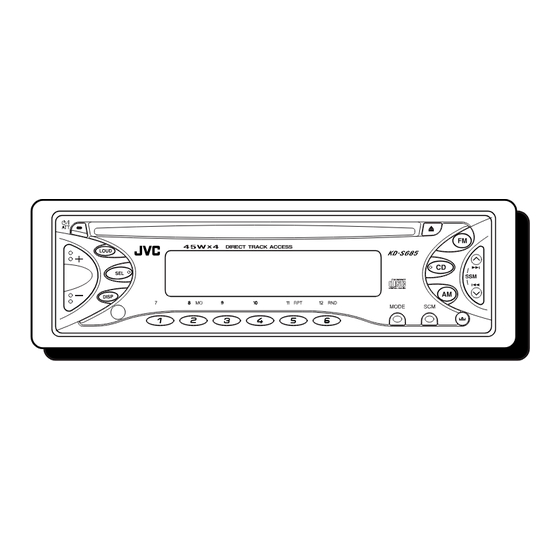
Page 4: Location Of The Buttons
LOCATION OF THE BUTTONS Control panel Display window 12 34 (Standby/On/Attenuator) button 2 +/– button 3 LOUD (Loudness) button 4 SEL (Select) button 5 Loading slot 6 AM button 7 0 (Eject) button 8 CD button 9 FM button p Remote sensor (only for KD-S685) q DISP (Display) button w MO (Monaural) button e RPT (Repeat) button... -
Page 5: Remote Controller (Only For Kd-S685)
Remote controller (only for KD-S685) This section is only for KD-S685. RM-RK31 1 • Turns on the unit if pressed when the unit is turned off. • Turns off the unit if pressed and held until “SEE YOU” appears on the display. •... -
Page 6: Installing The Battery
Preparing the remote controller This section is ONLY FOR KD-S685. Before using the remote controller: • Aim the remote controller directly at the remote sensor on the main unit. Make sure there is no obstacle in between. Remote sensor • Do not expose the remote sensor to strong light (direct sunlight or artificial lighting). -
Page 7: Basic Operations
Turning on the power Turn on the power. Note on One-Touch Operation: When you select a source in step 2 below, the power automatically comes on. You do not have to press this button to turn on the power. Select the source. To operate the tuner (FM or AM), see pages 8 –... -
Page 8: Radio Basic Operations
RADIO BASIC OPERATIONS Listening to the radio You can use either automatic searching or manual searching to tune into a particular station. Searching a station automatically: Auto search Select the band (FM 1 – 3, AM). Selected band appears Note: This receiver has three FM bands (FM1, FM2, FM3). -
Page 9: When An Fm Stereo Broadcast Is Hard To Receive
Tune into a station you want while “M” is flashing. Press stations of higher frequencies. Press 4 stations of lower frequencies. • If you release your finger from the button, the manual mode will automatically turn off after 5 seconds. •... -
Page 10: Manual Preset
Manual preset You can preset up to 6 stations in each band (FM1, FM2, FM3 and AM) manually. Ex: Storing an FM station of 88.3 MHz into the preset number 1 of the FM1 band. Select the band (FM1 – 3, AM) you want to store FM stations into (in this example, FM1). -
Page 11: Cd Operations
Playing a CD Insert a disc into the loading slot. The unit turns on, draws a CD and starts playback automatically. Note: When a CD is inserted upside down, the CD automatically ejects. The CD-in indicator lights up Total playing time of Total track number of the inserted disc the inserted disc... -
Page 12: Locating A Track Or A Particular Portion On A Cd
Locating a track or a particular portion on a CD To fast-forward or reverse the track Press and hold while playing a CD, to fast forward the track. Press and hold 4 while playing a CD, to reverse the track. To go to the next tracks or the previous tracks Press... -
Page 13: Prohibiting Cd Ejection
Prohibiting CD ejection You can prohibit the CD ejection and can lock a CD in the loading slot. Press and hold CD and 0 for more than 2 seconds. “EJECT” flashes on the display for about 5 seconds, and the CD is locked and cannot be ejected. -
Page 14: Sound Adjustments
SOUND ADJUSTMENTS Adjusting the sound You can adjust the sound characteristics to your preference. Select the item you want to adjust. Each time you press the button, the adjustable items change as follows: Indication To do: Adjust the bass. (Bass) Adjust the treble. -
Page 15: Using The Sound Control Memory (Scm)
Using the Sound Control Memory (SCM) You can select and store a preset sound adjustment suitable to each playback source. (Advanced SCM) Selecting and storing the sound modes Once you select a sound mode, it is stored in memory. It will be recalled every time you select the same source and will be shown on the display. -
Page 16: Storing Your Own Sound Adjustments
Storing your own sound adjustment You can adjust the sound modes (BEAT, SOFT, POP: see page 15) to your preference and store your own adjustments in memory. • There is a time limit in doing the following procedure. If the setting is cancelled before you finish, start from step 1 again. -
Page 17: Other Main Functions
Setting the clock Press and hold SEL (Select) for more than 2 seconds. “CLOCK H”, “CLOCK M”, “SCM LINK” or “LEVEL” appears on the display. Set the hour. 1 Select “CLOCK H” if not shown on the display. 2 Adjust the hour. Set the minute. -
Page 18: Selecting The Level Display
Selecting the level display You can select the level display according to your preference. When shipped from the factory, “VOL 2” is selected. VOL 1 : Shows the volume level indicator. VOL 2 : Alternates “VOL 1” setting and illumination display. : Erase the volume level indicator. -
Page 19: Detaching The Control Panel
Detaching the control panel You can detach the control panel when leaving the car. When detaching or attaching the control panel, be careful not to damage the connectors on the back of the control panel and on the panel holder. How to detach the control panel Before detaching the control panel, be sure to turn off the power. -
Page 20: Maintenance
MAINTENANCE Handling CDs This unit has been designed only to reproduce the COMPACT CDs bearing the mark. DIGITAL AUDIO • Other discs cannot be played back. How to handle CDs When removing a CD from its case, press down the center holder of the case and lift the CD out, holding it by the edges. -
Page 21: Troubleshooting
What appears to be trouble is not always serious. Check the following points before calling a service center. Symptoms • CD cannot be played back. • CD sound is sometimes interrupted. • “NO DISC” appears on the display. • Sound cannot be heard from the speakers. -
Page 22: Specifications
SPECIFICATIONS AUDIO AMPLIFIER SECTION Maximum Power Output: Front: 45 watts per channel Rear: 45 watts per channel Continuous Power Output (RMS): Front: 17 watts per channel into 4 Ω, 40 Hz to 20 000 Hz at no more than 0.8% total harmonic distortion. 17 watts per channel into 4 Ω, Rear: 40 Hz to 20 000 Hz at no more than... - Page 23 If you have any questions or require information regarding installation J V C kits, consult your JVC car audio dealer or a company supplying kits. Before mounting: Press (Control Panel Release button) to detach the control panel if already attached.
- Page 24 • When using the optional stay !"# • • Fire wall Washer Dashboard Sleeve Removing the unit • • Before removing the unit, release the rear section. Remove the control panel. Remove the trim plate. Insert the 2 handles into the slots, as shown. Then, while gently pulling the handles away from each other, slide out the unit.
-
Page 25: Electrical Connections
(See connection diagram below.) to the car’s chassis using shorter and thicker cords, such as copper braiding or gauge wire. If noise still persists, consult your JVC car audio dealer. • Maximum input of the speakers should be more than 45W at the rear and 45W at the front, with an •... - Page 26 (Cover the terminals of the these unused leads with – insulating tape, as illustrated above.) !" Amplifier / Rear speakers !" JVC amplifier INPUT Signal cord (not supplied with this unit) !"#$% LINE OUT REAR Front speakers !"...
Need help?
Do you have a question about the GET0067-001A and is the answer not in the manual?
Questions and answers