Table of Contents
Advertisement
Advertisement
Table of Contents

Related Manuals for Stanton RM.416


Summary of Contents for Stanton RM.416
- Page 1 RM.416 4 channel Rack Mount MixeR user Manual...
-
Page 2: Important Safety Instructions
important Safety instructions 1. Read these instructions. 2. Keep these instructions. 3. Heed all warnings. 4. Follow all instructions. 5. Do not use the apparatus near water. 6. Clean only with dry cloth. 7. Do not block any ventilation openings. Install in accordance with the manufacturer’s instructions. 8. -
Page 3: Table Of Contents
1.2. Overview ..................................1 2. connecting the RM.416 ............................... 2 3. RM.416 Description ..............................3 3.1. Front Panel ..................................3 3.2. Rear Panel ..................................5 4. troubleshooting ................................6 Specifications ..................................7 Registration card ................................10 Stanton Warranty ................................11... -
Page 4: Introduction
The RM.416 is Stanton’s latest addition to the RM (Rack Mount) series of mixers. With four traditional channels coupled with three microphone inputs the RM.416 is a perfect mixer for the most demanding mobile or club DJ. In addition to a vast array of traditional connectivity, the RM features a USB connection for either playing music from your favorite DJ application or recording your mix in real time. -
Page 5: Connecting The Rm.416
connecting the RM.416 connecting the RM.416 Before starting to connect the RM.416, please read the Important Safety Instructions page and study this setup diagram (Figure 2.1). Make sure all faders are at "zero,” the Master Volume is turned all the way counterclockwise, and all devices are Off. Figure 2.1 Now, please follow these simple instructions: 1. -
Page 6: Rm.416 Description
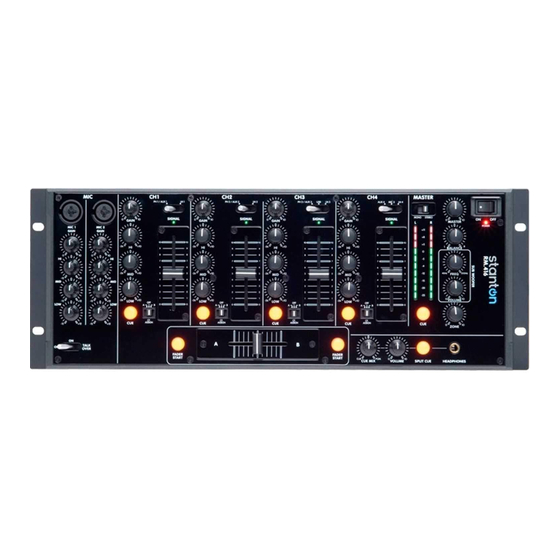
RM.416 Description (Front Panel) RM.416 Description Front Panel (Figure 3.1) Figure 3.1 1. Mic gain (gain): These rotary knobs control the output volume of the Mic channels. 2. Mic eQ: These knobs control the frequency response of MIC 1/2 separately. Range -12 dB to +12 dB. HI: Adjusts the High frequencies (centered at 10 kHz). - Page 7 RM.416 Description (Front Panel) - continuation 12. Zone (Zone): This knob controls the level of the ZONE output located on the Rear Panel (5). The ZONE level is not affected by the MASTER VOLUME and MASTER BALANCE. The ZONE output is essentially a second Master output and can be used to drive a booth monitor, feed a recorder, or provide audio to a secondary set of PA speakers.
-
Page 8: Rear Panel
13. gnD (gRounD teRMinal): To eliminate electrical hum, connect the ground cable from your standard turntable ground post to the RM.416 ground terminal. Some turntables (like the Stanton STR8.150) do not require grounding wire. 14. channel line level Selector Switches (Ph/aux): These switches are used to change the voltage line levels of their related Phono/Aux RCA inputs jacks. -
Page 9: Troubleshooting
troubleshooting troubleshooting Problem / Symptom Possible cause / Solution no Sound. Is the power ON? Based on your connections, check that you have properly set the INPUT SELECTOR SWITCH. Make sure that the GAIN, CHANNEL FADER, and MASTER VOLUME are turned up. -
Page 10: Specifications
Specifications Specifications 1. geneRal Section: PRODUCT Professional Mixer POWER SOURCE AC 100 - 240V, 50/60 Hz POWER CONSUMPTION 21 W DIMENSIONS (H x W x D) 136.8 mm x 482 mm x 177 mm WEIGHT 4.5 kg 2. inPut/outPut iMPeDance & SenSitiVitY: (EQ FLAT, MAXIMUM GAIN, CUE MIXING CENTER, LOAD=100 k ohm) 2.1 input impedance and Reference level: Line 20k ohm /-14 dBV +/-0.1 dB (200 mV) - Page 11 Specifications - continuation 9. eQ MIC 1/2 12 +/- 3 dB, -12 +/- 3 dB, at 100 Hz 12 +/- 3 dB, -12 +/- 3 dB, at 1 kHz 12 +/- 3 dB, -12 +/- 3 dB, at 10 kHz MIC 3/CHANNEL 10 +/- 2 dB, below -25 dB at 70 Hz 10 +/-2 dB, below -25 dB at 1 kHz...
- Page 12 notes...
-
Page 13: Registration Card
Return Authorization Number (RA#) PRIOR to shipping your product to us. Warranty Service outside the united States: To initiate a warranty repair, please contact the authorized Stanton dealer from whom you purchased your product, and follow the dealer’s return policy. -
Page 14: Stanton Warranty
Stanton dealer's return policy. Stanton assumes no risk and shall be subject to no liability for damages or loss resulting from the specific use or application made of the merchandise. Stanton's liability for any claim, whether based on breach of contract, negligence, infringement of any rights of any party, or product liability, and relating to the merchandise shall not exceed the price received by Stanton from your purchase of such merchandise. - Page 16 RM.416 and STR8.150, are trademarks or registered trademarks of the Stanton Group. All other trademarks are property of their respective owners, who are in no way affiliated with Stanton DJ or SC System products. All information included in the User Manual is subject to change without notice.
Need help?
Do you have a question about the RM.416 and is the answer not in the manual?
Questions and answers