Sony UP-DR80MD Instructions For Use Manual
Digital color printer
Hide thumbs
Also See for UP-DR80MD:
- Instructions for use manual (31 pages) ,
- Quick manual (17 pages) ,
- Quick reference manual (4 pages)

Related Manuals for Sony UP-DR80MD


Summary of Contents for Sony UP-DR80MD
- Page 1 4-118-614-11(1) Digital Color Printer Instructions for Use UP-DR80MD © 2008 Sony Corporation...
- Page 2 The model and serial numbers are located at the rear. authority to operate this equipment. Record these numbers in the space provided below. Refer to these numbers whenever you call upon your Sony All interface cables used to connect peripherals must be dealer regarding this product.
- Page 3 EMC information provided in this specified, with the exception of replacement parts sold by instructions for use. Sony Corporation, may result in increased emissions or • The portable and mobile RF communications equipment decreased immunity of the UP-DR80MD.
- Page 4 Guidance and manufacturer’s declaration - electromagnetic immunity The UP-DR80MD is intended for use in the electromagnetic environment specified below. The customer or the user of the UP-DR80MD should assure that it is used in such as environment. IEC 60601 test Immunity test Compliance level Electromagnetic environment-guidance...
- Page 5 Guidance and manufacturer’s declaration - electromagnetic immunity The UP-DR80MD is intended for use in the electromagnetic environment specified below. The customer or the user of the UP-DR80MD should assure that it is used in such as environment. IEC 60601 test Immunity test Compliance level Electromagnetic environment-guidance...
- Page 6 For the customers in Europe If you have questions on the use of the above Power Cord / Appliance Connector / Plug, please consult a qualified The manufacturer of this product is Sony Corporation, 1- service personnel. 7-1 Konan, Minato-ku, Tokyo, Japan.
-
Page 7: Table Of Contents
Table of Contents Introduction Features ..............8 System Configuration .........8 Location and Function of Parts and Controls ..8 Front ..............8 Rear ..............9 Preparation Supplied Accessories ..........10 Connections ............10 USB Port Connection ........10 Installing the Printer Driver ......11 Operation Before Printing .............12 Notes on the Handling of the Ink Ribbon and Paper ...............12 Loading the Ink Ribbon and Paper ....13... -
Page 8: Introduction
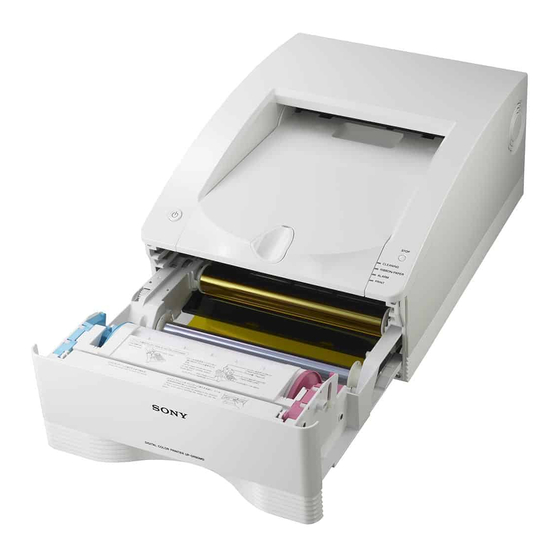
Introduction Location and Function of Parts and Controls Features Front The UP-DR80MD Digital Color Printer is a dye sublimation thermal transfer printer providing high quality and high resolution printing of computer image data on A4 or letter size paper in full color (256 gradations process and 16.7 million colors). -
Page 9: Rear
G Indicators Rear The indicators are as shown below: A CLEANING indicator Lights while cleaning is in progress. B RIBBON/PAPER indicator Lights when an error involving the ink ribbon or paper occurs. C ALARM indicator USB connector Lights when an error such as a paper jam occurs. Connects to a computer equipped with the USB interface (which conforms to USB 2.0), using a USB D PRINT indicator... -
Page 10: Preparation
Check that nothing is missing from your USB Port Connection package. Paper holder Paper holder UP-DR80MD (pink) (1) (blue) (1) USB cable 1-824-211-41 (SONY) (1) Before Using this Printer (1) CD-ROM (1) Cleaning ribbon (1) Software License Agreement (1) Note to (USB) to ~AC IN connector... -
Page 11: Installing The Printer Driver
Notes • Follow the connection procedures described in the computer manual. • Make sure that the USB cable is connected securely at both ends. • The printer driver software provided with the printer is not suitable for using the printer connected to a network. •... -
Page 12: Operation
Handling paper rolls Operation • Place the paper roll vertically on the stable place, when opening the wrapping. If you open the wrapping holding it with hands or placing it horizontally, you may drop it. Dropping may result in an injury. •... -
Page 13: Loading The Ink Ribbon And Paper
Load the ink ribbon in the media tray. Loading the Ink Ribbon and Paper Place the ink ribbon in the media tray so that the IC When using the printer for the first time, it is necessary to board of the ink ribbon is positioned as shown in the first load the paper and ink ribbon. - Page 14 Insert the paper holders into the paper roll. The hook on the selector snaps into the notch on A pink paper holder and a blue paper holder are the bobbin marked by the arrow. provided with the printer. Insert these paper holders into the ends of the paper roll as shown in the figure below, with the pink paper holder in the end closer to the pink adhesive label and the blue paper holder in...
- Page 15 2 Place the paper roll in the media tray so that the Note arrow on the label points toward the ink ribbon side. You can load the paper roll in the correct Be certain to remove the labels completely. If the direction by matching the colors of the paper labels are not peeled off carefully, they can leave holders inserted into the paper roll with the colors...
-
Page 16: Replacing The Ink Ribbon And Paper
the thermal head could result in a burn. Also, be careful not to scratch the thermal head. Open the cover of the media tray and remove the paper roll. Remove the paper holders from the paper roll. • Removing the adhesive labels before closing the cover can cause a malfunction. -
Page 17: Printing
• Do not open the media tray while printing is in Printing progress. If the media tray is opened, printing stops and the PRINT, ALARM, RIBBON/PAPER, and Before printing CLEANING indicators all light simultaneously. In • Is the printer connected to a computer? (page 10) such an event, press the 1 ON/STANDBY switch •... - Page 18 When removing and then reloading a partially used paper roll If the paper roll is not tightly rolled, roll it up more tightly before reloading it. Note When removing a partially used paper roll, be sure to place the media tray on a stable surface before beginning. If you drop the media tray while it contains a paper roll, it could cause personal injury.
-
Page 19: Miscellaneous
When the cabinet becomes dirty your Sony service facility or your Sony dealer. Clean the cabinet, panel and controls with a soft dry cloth, or a soft cloth lightly moistened with a mild detergent Installation solution. -
Page 20: Ink Ribbon And Paper
Load the cleaning ribbon. Ink Ribbon and Paper For details on how to load the cleaning ribbon, see steps 2 and 3 of “Loading the Ink Ribbon and Paper” on page 13. Laminate Color Printing Pack UPC-R80MD Contains two color ink ribbons and two rolls of paper (A4- size width). -
Page 21: Specifications
700 hPa to 1,060 hPa EXTERNAL DEVICE. Dimensions Approx. 317 × 425 × 207 mm (w × d × h) • SONY WILL NOT BE LIABLE FOR DAMAGES OF ANY Weight Approx. 11.5 kg KIND INCLUDING, BUT NOT LIMITED TO,... -
Page 22: Troubleshooting
If the problem persists, turn off the • The printer may not have been able to printer and consult with your Sony dealer. recover from an error. tPress the 1 ON/STANDBY switch to enter the standby state and then... -
Page 23: Explanation Of Indicators
Indicator Status Possible causes and remedies Explanation of Indicators All of • The printer is initializing. tAfter pressing the 1 ON/ CLEANING, The meanings of the indicators on the printer when they RIBBON/ STANDBY switch to turn on the PAPER, printer, this indicator remains lit are on or flashing are described below. -
Page 24: If A Paper Jam Occurs
If there is no printing on the paper If a paper jam occurs Make sure that the leading edge of the paper is not creased or wrinkled. If the leading edge is creased or the paper is wrinkled, While the printer is printing, if the ALARM indicator cut off the leading edge or wrinkled portion with a lights and any of the following messages appears on the pair of scissors or the like. - Page 25 Sony Corporation...
Need help?
Do you have a question about the UP-DR80MD and is the answer not in the manual?
Questions and answers