Table of Contents
Advertisement
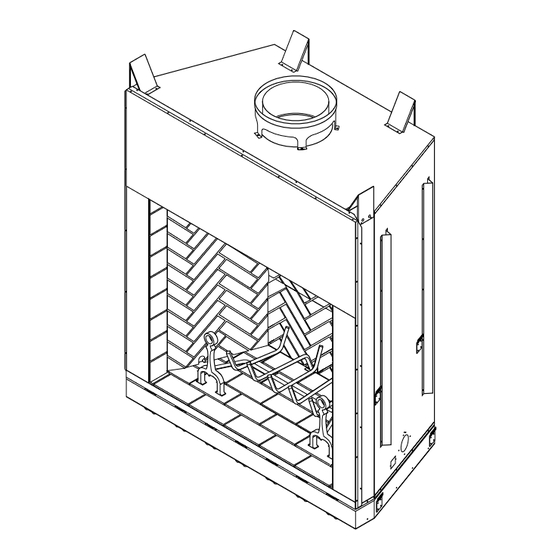
Residential Wood BuRning FiReplace
oWneR's opeRation and installation Manual
PFS
F48H(i)(R), VF48H(i)(R)
and WcM-48F
®
plantation
C
US
48" Wood BuRning
FiReplace
WitH HeRRingBone
MasonRy BRick
IF FIREPLACE IS TO BE INSTALLED DIRECTLY ON
ANY COMBUSTIBLE MATERIAL, A HEARTH SPACER
IS REQUIRED.
SAVE THIS BOOK
This book is valuable. In addition to instructing you
on how to install and maintain your appliance, it also
contains information that will enable you to obtain re-
placement parts or accessory items when needed. Keep
it with your other important papers.
This fireplace is approved for use as a wood burning fire-
place or for use with a vented gas log approved to ANS
Z21.60 or Z21.84 standards or for use with a vent-free gas
log heater approved to ANS Z21.11.2 standard.
This wood burning fireplace complies with UL127-CAN/ULC-
S610-M87 standard as a FACTORY BUILT APPLIANCE.
FOR CANADA: The authority having jurisdiction (such
as the municipal building department, fire department,
etc.) should be contacted before installation to deter-
mine the need to obtain a permit.
INSTALLER: Leave this manual with the appliance.
CONSUMER: Retain this manual for future reference.
For more information, visit www.fmiproducts.com
Advertisement
Table of Contents

Related Manuals for FMI VF48H(I)(R


Summary of Contents for FMI VF48H(I)(R
- Page 1 Residential Wood BuRning FiReplace oWneR’s opeRation and installation Manual F48H(i)(R), VF48H(i)(R) and WcM-48F ® plantation 48" Wood BuRning FiReplace WitH HeRRingBone MasonRy BRick IF FIREPLACE IS TO BE INSTALLED DIRECTLY ON ANY COMBUSTIBLE MATERIAL, A HEARTH SPACER IS REQUIRED. SAVE THIS BOOK This book is valuable.
-
Page 2: Table Of Contents
FOR YOUR SAFETY • This FMI PRODUCTS, LLC fireplace and • Do not store or use gasoline its components are safe when installed or any other flammable vapors according to this installation manual. -
Page 3: Specifications
saFety Continued WARNING: Always leave glass WARNING: If fireplace is doors fully opened or fully closed to be installed on combustible material, a Hearth Spacer must when operating fireplace. be used. See Replacement and Accessory Parts on page 18. speciFications MODELS F48H(I)(R) AND VF48H(I)(R) SQUARE ROUND TOP... -
Page 4: Installation
installation SELECTING FIREPLACE LOCATION on a hearth spacer designed for use with this fireplace (see Replacement and Ac- To determine the safest and most efficient cessory Parts, page 18). location for the fireplace, you must take into 3. Set the fireplace directly in front of this consideration the following guidelines: opening and slide the unit back until the 1. - Page 5 installation Continued HEARTH ExTENSION MANTELS A hearth extension projecting a minimum of A mantel may be installed if desired (see 20" in front of and a minimum of 12" beyond Figure 4). Woodwork such as wood trims, each side of the fireplace opening is required mantels or any other combustible material to protect combustible floor construction projecting from the front face must not be...
- Page 6 CHIMNEY PIPE Each double wall chimney section consists of a galvanized outer pipe, a stainless steel in- FMI PRODUCTS, LLC chimney system ner flue pipe and a wire spacer. Pipe sections consists of 12", 18", 24", 36"' and 48" snap-...
- Page 7 installation Continued USING ELBOW OFFSETS (30E-12DM) 2. Chimney weight above offset rests on re- turn elbow. Straps must be securely nailed 1. To achieve desired offset, you may install to rafters or joists (see Figure 8, details A combinations of 12", 18", 24", 36" and 48" and B).
- Page 8 installation Continued PENETRATING ROOF To maintain a 2" clearance to pipe on roof with a pitch, a rectangular opening must be cut. 1. Determine center point through which pipe Screws will penetrate roof. 2. Determine center point of roof. Pitch is the distance the roof drops over a given span, usually 12".
- Page 9 installation Continued FLASHING INSTALLATION (V6F-10DM Terminations/Spark Arrestor Fireplace system must be terminated with OR V12F-10DM) listed round top or chase terminations. In any Determine flashing to be used with roof open- case, refer to installation instructions supplied ing chart. Slide flashing over pipe until base is with termination.
-
Page 10: Optional Gas Line
installation Continued OPTIONAL GAS LINE INSTALLATION Gas line hook up should be done by your sup- plier or a qualified service person. Note: Before you proceed, make sure your gas supply is turned off. Use only a 1/2" black iron 18"... - Page 11 installation Continued BRICK INSTALLATION CAUTION: All gas piping IMPORTANT: Installation of brick and connections must be tested should be done after the fire- for leaks after the installation place is placed in a permanent is completed. After ensuring location. that the gas valve is on, apply soap and water solution to all Each brick housing is stamped with a number connections and joints.
- Page 12 installation Continued HERRINGBONE BRICK INSTALLATION F054 S011 F054 F054 Rear Upper Refractory S018 S018 S018 S007 S007 S007 S003 S003 S001 S001 S022 Rear Lower Refractory F055 F055 F055 F050 F054 F054 S042 F051 F050 S030 F049 F049 S029 F049 S041 F049 S028...
- Page 13 installation Continued REAR UPPER REFRACTORY REAR LOWER REFRACTORY IVORY IVORY FULL FULL FULL FULL (112140-02) (112140-06) (112140-02) (112140-06) F054R F054W F055R F055W S002R S002W S001R S001W S005R S005W S002R S002W S006R S006W S003R S003W S007R S007W S004R S004W S008R S008W S005R S005W S011R...
- Page 14 installation Continued GROUTING INSTRUCTIONS grout may fall out after burning. 8. Using a joint striker, force grout mixture Material provided: into joint and sweep back and forth 1 or 2 - 10 lb. bags of cement (depending until grout is smooth and round. If grout on model) becomes too shallow, add more grout 1 or 2 - 10 lb.
- Page 15 installation Continued Screen Top Rail Fireplace Front Remove Screws Bracket then Replace to Smoke Shelf Secure Top Rail Push On Nut Screen Ring Screen Bottom Rail (Use as a Template before Drilling) Figure 21 - Installing Fireplace Screen Drill Holes Concrete into Bricks Screws...
-
Page 16: Door Adjustment
installation Continued Installing Glass Doors 2. Repeat step 1 for remaining door. After spring clips have been installed some If you find the doors do not close properly or adjustments may be needed. Install the doors do not appear level or straight, proceed with using the following steps: section on door adjustment. - Page 17 WARNING: Risk of fire! Re- WARNING: Fireplaces place grate with FMI PRODUCTS, equipped with glass doors LLC model 109496-01 grate only. should be operated only with...
-
Page 18: Technical Service
You may have further questions about in- You can also visit our web site at stallation, operation, or troubleshooting. www.fmiproducts.com. If so, contact FMI PRODUCTS, LLC at 1-866-328-4537. When calling please have your model and serial numbers of your heater ready. - Page 19 ReplaceMent and accessoRy paRts Continued SQUARE CHASE-TOP TERMINATION - STL-12D OPTIONAL HEARTH SPACER HS48 ROUND TOP TERMINATIONS RLT-12D AND RLT-12HT 24" ROUND WOODNOOK - DHR-24 OPTIONAL ASH LIP KIT (BRICKS) AL48 - Red Brick AL48I - Ivory Brick SCREEN - 118115-01 ROD - 110146-02 PUSH-ON NUT - 11418 www.fmiproducts.com...
- Page 20 2701 S. Harbor Blvd. Santa Ana, CA 92704 122272-01 1-866-328-4537 Rev. D www.fmiproducts.com 01/10...
Need help?
Do you have a question about the VF48H(I)(R and is the answer not in the manual?
Questions and answers