Table of Contents
Advertisement
Operator's Manual
3800 PSI*
4.0 GPIVi
PRESSURE WASHER
Model No. 580.752382
HOURS: IVlon.- Fri. 8 a.m. to 5 p.m. (CT)
WARNING
Before using this product, read this
manual and follow all Safety Rules
and Operating Instructions.
ADVERTENCIA
Antes de utilizar el producto, lea este
manual y siga todas las Reglas de
Seguridad
e Instrucciones
de Uso.
• Safety
• Assembly
• Operation
• Maintenance
• Parts
• Espafiol,p. 36
* This pressure washer is rated in accordance to the Pressure Washer Manufacturers Association (PWMA) standard PWI01 (Testing and
Rating Performance of Pressure Washers).
* Esta limpiadora a presi6n est_ clasificada conforme a la norma PW101 (comprobacidn y clasificaci6n de rendimiento de limpiadoras a
presi6n) de la Asociaci6n de fabricantes de bombas a presi6n (Pressure Washer Manufacturers Association, PWMA).
Sears Brands Management Corporation, Hoffman Estates, IL 60179 U.S.A.
Visit our Craftsman website: www.craftsman.com
Part No. 313955GS Draft - (11/01/2010)
0
7
Advertisement
Table of Contents

Related Manuals for Craftsman 580.752382


Summary of Contents for Craftsman 580.752382
- Page 1 * Esta limpiadora a presi6n est_ clasificada conforme a la norma PW101 (comprobacidn y clasificaci6n de rendimiento de limpiadoras a presi6n) de la Asociaci6n de fabricantes de bombas a presi6n (Pressure Washer Manufacturers Association, PWMA). Sears Brands Management Corporation, Hoffman Estates, IL 60179 U.S.A. Visit our Craftsman website: www.craftsman.com Part No. 313955GS Draft - (11/01/2010)
- Page 2 Defective product will receive free repair or replacement if repair is unavailable, For warranty coverage details to obtain free repair or replacement, visit the web site: www.craftsman.com This warranty does not cover the spray guns, hoses, nozzle extensions, nozzles,filters and spark plugs, which are expendable parts that can wear out from normal use within the warranty period.
- Page 3 Read this manual carefully and becomefamiliar _i, WARNING The engine exhaust from this product with your pressurewasher. Knowits applications, contains chemicals known to the State of California to its limitations, and any hazards involved. cause cancer, birth defects, or other reproductive harm. Important Safety Information _i, WARNING This product contains lead and lead...
- Page 4 ,& WARNING Fuel and its vapors are extremely flammable ,& WARNING Starter cord kickback (rapid retraction) will and explosive which could cause burns, pull hand and arm toward engine faster than you fire or explosion resulting in death, ,_can let go which could cause broken bones, fractures, bruises, or sprains resulting in serious serious injury and/or property damage.
- Page 5 _. WARNING Use ofpressure washer could create _i_ CAUTION Excessively high operating speeds could puddles and slippery surfaces causing result in minor injury and/or pressure washer damage. youtofallresulting indeath orserious Excessively low speeds impose a heavy load. injury. • DO NOTtamper with governor spring, links or other parts to Kickback fromspray guncould cause y outofallresulting increase engine speed.
-
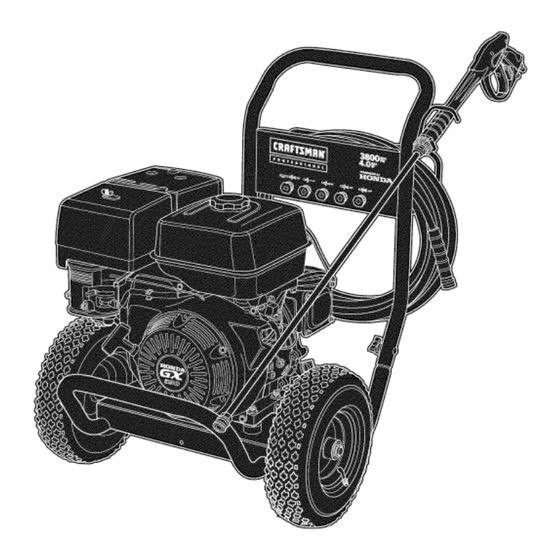
Page 6: Know Your Pressure Washer
KNOWYOURPRESSURE WASHER Read the Operator'sManual and safety rules before operatingyour pressure washer. Comparethe illustrations with your pressure washer to familiarize yourself with the locationsof various controls and adjustments. Savethis manual for future reference. ® A - High PressureHose-- Connect one end to water pump M - EngineSwitch-- Set switch to "On"... -
Page 7: Unpackthe Pressurewasher
1-800-222-3136. unit and attach a plastic knob (F) from inside of unit. Tighten by hand. Assembling Your Pressure Washer Your Craftsman pressure washer will need assembly before operation: Fill out and send in registration card. Attach handle. -
Page 8: Add Engine Oil
Use clean, fresh, regular UNLEADED fuel with a Add Engine Oil minimum of 86 octane with equipment. DO NOT mix oil Place pressure washer on a flat, level surface. with fuel. Cleanarea around oil fill and remove oil fill cap/dipstick. Place pressure washer on a level surface. -
Page 9: Lubricate O-Rings
Lubricateall connectionsshownbelow, followingthese Lubricate O-Rings instructions: Lubrication of o-rings is extremely important for installation Inspect and clean connecting surfaces prior to and operation. The use of a lubricant (petroleum or synthetic lubrication and assembly. grease) during assembly helps seat o-rings properly and provides an improved seal. -
Page 10: Connect Hose And Water Supply To Pump
ConnectHose and Water Supplyto Pump Run water through garden hose for 30 seconds to clean out any debris. Turn off water. NOTICE DO NOT siphon standing water for the water NOTICE DO NOT run the pump without the water supply supply. -
Page 11: Pressure Washer Location
HOWTO USEYOURPRESSURE WASHER To Start Your Pressure Washer To start your engine-powered pressure washer for the first If you have any problems operating your pressure washer, time, follow these instructions step-by-step. This starting please call the pressure washer helpline at 1-888-222-3136. information also applies whenever you start the engine after Pressure Washer Location you have let the pressure washer sit idle for at least a day. - Page 12 9. Move throttle lever ( A)to"Fast" p osition, shown a sa 12. When starting engine, position yourself as rabbit. recommended and grasp starter grip handle and pull slowly until you feel some resistance.Then pull rapidly to start engine. 10. Move choke lever ( B)to"Closed" position. "...
-
Page 13: How To Stop Your Pressure Washer
How to Stop Your Pressure Washer ,& WARNING The high pressure stream of water that Release spray gun trigger and let engine idle for two minutes. and its underlying tissues, resulting in serious this equipment produces could cut through skin injury and possible amputation. -
Page 14: How To Use Spray Tips
Cleaningand ApplyingDetergent How to Use Spray Tips The quick-connect on the nozzle extension allows you to ,A WARNING Chemical Burn Hazard. switch between four different quick connect spray tips. Spray _::;;;_,, Chemicals could cause burns resulting in death, tips can be changed while pressure washer is running once and/or serious injury, property damage. -
Page 15: Pressure Washer Rinsing
7. Apply d etergent toa drysurface, starting a tlower Cleaning DetergentSiphoningTube portion o farea tobewashed and workupward, using If you used the detergent siphoning tube, you must flush it long, e ven, overlapping strokes. with clean water before stopping the engine. 8. -
Page 16: Product Specifications
OWNER'SRESPONSIBILITIES PRODUCT SPECIFICATIONS Follow the hourly or calendar intervals, whichever occurs Pressure Washer Specifications first. More frequent service is required when operating in Pressure ..... 3,800 PSI* adverse conditions noted below. Flow Rate ..... 4.0 GPM MaintenanceSchedule Detergent Mix ....Use as directed Water Supply Temperature .. -
Page 17: Pressure Washer Maintenance
GeneralRecommendations Checkand CleanInlet Screen Examine garden hose inlet screen. Clean if it is clogged or Regular maintenancewill improve the performance and extend the life of the pressure washer. See any Sears or replace if it is torn. other qualified service dealer for service. CheckHigh Pressure Hose The pressure washer warranty does not cover items that High pressure hoses can develop leaks from wear, kinking,... -
Page 18: Nozzle Maintenance
Remove detergent siphoning hose from barbed fitting on Reinstall spray tip into nozzleextension. pump. Reconnect nozzle extension to spray gun. Using a firm, blunt object 7/64" in diameter or smaller, Make sure garden hose is connected to water inlet. by at least 1" long, such as an Allen wrench, slowly Checkthat high pressure hose is connected to spray gun insert the object into the barbed fitting until you meet and pump. -
Page 19: Engine Maintenance
ENGINEMAINTENANCE ChangingEngineOil Changeengine oil after the first 20 hours and every _. WARNING Unintentional sparking could cause fire or 100 hours or 6 months, whichever comes first, thereafter. If "_,ah electric shock resulting in death or you are using your pressure washer under extremely dirty or serious injury. -
Page 20: Service Air Cleaner
ServiceAir Cleaner Using a moist rag, wipe dirt from inside of air cleaner base and cover. Be careful to prevent dirt from entering Your engine will not run properly and may be damaged if you air duct that leadsto the carburetor. run it with a dirty air cleaner. -
Page 21: Inspectmuffler And Sparkarrester
InspectMuffler and SparkArrester Remove the three 4 mm screws (C) from exhaust deflector (D), and remove deflector. Inspect the muffler for cracks, corrosion, or other damage. Removethe spark arrester, if equipped,and inspect for Remove the four 5 mm screws (E) from muffler damageor carbon blockage. - Page 22 AFTER EACH USE Disconnect hose from spray gun and high pressure outlet on pump. Drain water from hose, gun, and spray Water should not remain in the unit for long periods of time. tip extension. Use a rag to wipe off the hose. Sediments or minerals can deposit on pump parts and "freeze"...
-
Page 23: Winter Storage
WINTERSTORAGE Protect Fuel System Fuel Additive: NOTICE You must protect your unit from freezing If adding a fuel additive, fill the fuel tank with fresh fuel. If temperatures. only partially filled, air in the tank will promote fuel • Failureto do so will permanently damage your pumpand render deterioration during storage. -
Page 24: Change Engine Oil
Change EngineOil NOTICE PumpSaver is available as an optional accessory. It is not included with the pressure washer. Contact your local While engine is still warm, drain oil from crankcase. Refill Searsservice center to purchase PumpSaver. with recommended grade. See Changing Engine Oil. To use PumpSaver, make sure the pressure washer is turned Oil Cylinder Bore off and disconnected from supply water. - Page 25 Problem Cause Correction Low pressurespray tip installed. Replacespray tip with high pressure spray tip. Water inlet is blocked. Clear inlet. Inadequatewater supply. Provide adequatewater flow. Inlet hose is kinked or leaking. Straighten inlet hose, patch leak. Pump has following problems: failure Checkand clean inlet hose strainer.
- Page 26 CRAFTSMAN 3800 PSI Pressure Washer 580.752382 Main Unit -- Exploded View and Parts List 8® 88r- 8 @_fg@ / \'\\\ -- 9 ¢_P c>9 : Item Part # Description Item Part # Description 313328GS BASE 199310GS ADAPTER-GARDEN HOSE 313192BTGS HANDLE...
- Page 27 CRAFTSMAN 3800 PSI Pressure Washer 580.752382 Pump -- Exploded View and Parts List ÷ 50--1 © Item Part# Description Item Part# Description 198851GS INJECTOR-DETERGENT 198847GS KIT-O-RING 204860GS 202902GS KIT-UNLOADER SEAT 198850GS PLUG 202800GS KIT-UNLOADER 198849GS DIPSTICK NOTE:Item letters A - L are service kits and include all parts...
- Page 28 ENGINE, 13 HP, Honda, GX390T2 - Exploded View 27 28 ._./...
- Page 29 ENGINE, 13 HP, Honda, GX390T2 - Exploded View...
- Page 30 ENGINE, 13 HP, Honda, GX390T2 - Exploded View © 1 O2 112_ _108 123 _1 Ii__) __1_...
- Page 31 ENGINE, 13 HP, Honda, GX390T2 - Exploded View _-141 148 -- 130 --...
- Page 32 ENGINE, 13 HP, Honda, GX390T2 - Parts List Item Part # Item Part# Description Description 16010-ZE2-812 GASKETSET 91001-ZF6-013 BEARING,RADIAL BALL 90013-883-000 13010-Z5R-O04 BOLT, FLANGE RINGSET, PISTON 91201-ZLC-003 OIL SEAL 90601-ZE3-000 CLIP, PISTONPIN 91353-671-003 O-RING 13101-Z5T-800 PISTON 94050-06000 13111-Z5T-O00 NUT, FLANGE PIN, PISTON 94050-08000 90001-ZE8-000...
- Page 33 ENGINE, 13 HP, Honda, GX390T2 - Parts List Item Part # Description Item Part # Description 107 18205-Z5T-000 PROTECTOR, EX. PIPE 145 16166-Z5T-901 NOZZLE,MAIN 108 18381-ZE2-800 GASKET,MUFFLER 146 16011-ZA0-931 VALVESET, FLOAT 109 18331-Z5T-000 PIPE, EX. 147 99101-ZH8-1050 JET, MAIN 110 18333-ZF6-W01 148 16013-Z10-003 FLOATSET GASKET,EX.PIPE...
- Page 34 California, U.S. EPA, and Sears Emissions Sears EmissionsControlWarranty Provisions Control Warranty Statement The following are specific provisions relative to your Emissions Control Warranty Coverage. It is in addition to the YourWarranty RightsAnd Obligations Searsengine warranty for non-regulated engines found in The California Air Resources Board, U.S.
- Page 35 The warranty onemissions-related parts isasfollows: LookFor Relevant EmissionsDurability Period and Air Index InformationOnYour Engine EmissionsLabel • Any warranted part t hatis notscheduled forreplacement asrequired maintenance intheowner's m anual supplied, Enginesthat are certified to meet the California Air Resources iswarranted forthewarranty period stated a bove. If any Board (CARB) Emissions Standard must display information such part f ailsduring theperiod ofwarranty coverage, regarding the Emissions Durability Period and the Air Index.
- Page 36 Una vez que adquiera el contrato de protecci6n para reparaciones, s61otiene que hacer una sencilla Ilamada telef6nica para programar Su nuevo producto Craftsman® est_ diseSado y fabricado para un servicio. Puede Ilamar a cualquier hora del dia o la noche, o funcionar de manera fiable durante muchos aSos.
-
Page 37: Informaci6Nimportantede Seguridad
_i, ADVERTENCIA El escape del motor de este producto estemanualminuciosamente y conozca a fondo las partes y el funcionamiento desum_quina limpiadora a contiene elementos quimicos reconocidos en el Estado de presi6n.Conozca susaplicaciones, suslimitaciones y los California por producir c_.ncer,defectos de nacimiento u peligros involucrados. - Page 38 _i_ ADVERTENCIA El combustible y sus vapores son A ADVERTENCIA El retroceso (repliegue r_.pido) del extremadamenteinflamablesy explosivos, cable del arrancador impedir_, que el usuario _,_,_ suelte el cable a tiempo y tirar_, de su mano y Io que podria provocar quemaduras, incendioso explosiones;asi como da_os brazo hacia el motor, Io que podria provocar materiales,lesiones graveso incluso la muerte.
- Page 39 ,&. PRECAUCION Las velocidades de funcionamiento _i, ADVERTENCIA El chorro de agua a alta presi6n que excesivamentealtas podrian provocar lesiones leves y/o este equipo produce podria atravesar la piel y da_os al limpiadora a presi6n. provocar los tejidos subcut_.neos, podrian Lasvelocidades excesivamente bajas incrementan la lesiones graves y la posible amputaci6n de un miembro.
- Page 40 CONOZCA SU IVIAQUINA LIMPIADORAA PRESION Lea el Manual del Operario y las reglas de seguridadantes de poner en marcha su limpiadora a presi6n. ___. Compare las ilustraciones con su limpiadora a presi6n para familiarizarse con las ubicaciones de los diferentes controles y ajustes. Guarde este manual para referencias futuras.
- Page 41 PRESION Coloque la limpiadora a presi6n en una superficie plana y nivelada. La gran mayoriade su m_quinalimpiadora a presi6n Craftsman ha sido ensambladaen laf_brica. Sin embargo, usted deber_.Ilevara Limpie la zona de alrededor del orificio de Ilenado de aceite y cabo los siguientes procedimientosantes de poner en funcionamiento quite el tap6n.
-
Page 42: Lubrique Las Juntas T6Ricas
Instale la tapa del tanque de combustible y la espera para Agreguegasolina algOn combustible rociado para evaporar. _i_ADVERTENCIA El combustible y sus vapores son iPRECAUCION! Los combustibles con mezcla de alcohol (gasohol, extremadamenteinflamablesy explosivos, etanol o metanol) pueden atraer la humedad y provocar la Io que podria provocar quemaduras, separaci6n y formaci6n de _cidos durante el almacenamiento. -
Page 43: Conectela Mangueray El Suministrode Agua A La Bomba
Haga correr el agua a trav_s de la manguera de su jardin por Conectela mangueray el suministrode agua a la bomba 30 segundos para limpiar cualquier escombro que se encuentre en ella. Desconecteel agua. AVI$O Hace NO agua de parar de siphon para el abastecimiento de AVI$O NO haga funcionar la bomba si no tiene el agua. - Page 44 COIVIO USARSU IVIAQUINA LIIVIPIADORA A C6mo darle arranque a su mdquina limpiadora a presi6n PRESION Para darle arranque a su m_.quinalimpiadora a presi6n movida a Si tiene problemas con el funcionamiento de su m_quina limpiadora motor por primera vez, siga estas instrucciones paso a paso. Esta a presi6n, por favor Ilame a la linea de ayuda de la m_quina informaci6n acerca del arranque inicial tambi_n se aplica cuando limpiadora a presi6n al 1-800-222-3136.
- Page 45 Sitt_ela palanca del acelerador (A) en la posici6n "R_pido" Cuando arranque el motor, col6quese en la posici6n que se ("Fast"), que se distingue con la figura de un conejo. recomienda a continuaci6n. Sujete la manija y hale ligeramente la manija del arranque hasta que sienta cierta resistencia. Despu_s h_lela r_pidamente.
-
Page 46: C6Mo Detenersu M Quina Limpiadoraa Presi6N
C6mo detenersu m quina limpiadoraa presi6n _i_ADVERTENCIA El chorro de agua a alta presiCn que Espere que el motor descanse. este equipo produce podrfa atravesar la piel y provocar SitOe la palanca del acelerador en la posici6n "Slow" (Lento), los tejidos subcut_.neos, podrfan lesiones graves y la posible amputaciCn de un indicada con una tortuga. -
Page 47: C6Mousar Las Puntas De Rocio
C6mousar las puntas de rocio Limpiezay aplicaci6ndel detergente La extensi6n para boquillas de conexi6n r_pida le permite usar cinco ,& ADVERTENCIA Peligro de quemadura quimica. puntas de rocio diferentes. Siempre que est_ activado el seguro del gatillo de la pistola rociadora, se pueden cambiar las puntas de rocio quemaduras,asi como daSosmateriales,lesiones as sustanciasquimicaspodrian provocar con la limpiadora a presi6n en funcionamiento. -
Page 48: Enjuagede La M Quina Limpiadora A Presi6N
Marcha el motor siguiendo las instrucciones de la secci6n Limpieza del tube de inyecci6nde detergente C6mo poner en funcionamiento la limpiadora a presi6n. Si us6 el tube, debe lavarlo con agua limpia antes de parar el motor. Aplique el detergente sobre la superficie seca, comenzando en Coloque el filtro y la inyecci6n de detergente en un balde Ileno la parte inferior del Areay dirigi_ndose hacia arriba, utilizando de agua limpia. -
Page 49: Especificaciones Del Producto
RESPONSABILIDADES DELPROPIETARIO ESPECIFICACIONESDEL PRODUCTO Siga el programa de mantenimiento seg_n el nt_merode horas o Especificaciones de la mdquina limpiadora a seg_n el calendario, Io que suceda primero. Se requiere de servicio preslon con mayor frecuencia cuando opere la unidad en las condiciones Presi6n ........ - Page 50 Recomendaciones generales Revisey limpie el coladorde entrada Examine el colador de entrada de la manguera de jardin. Limpielo si El mantenimiento peri6dico mejorar_ el rendimiento y prolongar_ la est_ tapado o remplacelo si est_ roto. vida 0til del limpiadora a presi6n. Si necesita asistencia, consulte con un distribuidor de Sears o con otro distribuidor cualificado.
-
Page 51: Mantenimientode La Bombade Aceite
Retire la manguera de inyecci6n de detergente del Usando una manguera de jardin, remueva cualquier desecho acoplamiento dentado de la bomba. adicional, poniendo agua en la extensi6n de la boquilla. Haga esto en un intervalo de 30 a 60 segundos. Inserte suavemente un objeto s61idosin punta de 2,7 mm (7/64 pulg.) de diAmetro o mAs peque_o, pero de por Io menos 2,54 cm (1 pulg.) de largo, como una Ilave Allen, en el... -
Page 52: Mantenimiento Del Motor
Cambio deaceitedel motor MANTENIMIENTO DEL MOTOR Cambieel aceite del motor despu_s de las primeras 20 horas y cada _i_ ADVERTENCIA Las chispas involuntarias podrian 100 horas o 6 meses a partir de ese momento. Si est_ utilizando su _,,h, provocar incendios o electrocuci6n m_quina limpiadora a presi6n bajo condiciones de extrema suciedad pueden provocar lesiones graves o la o polvo, o en un clima demasiado caliente, haga el cambio de aceite... - Page 53 Retire y revise la bujia. Para dar servicio al filtro de aire, siga los pasos que se detallan a continuaci6n: Cambie la bujia si los electrodos est_n desgastados, o si el Quite la tuerca de mariposa (A) de la tapa del filtro de aire (B) aislador est_ roto o partido.
Need help?
Do you have a question about the 580.752382 and is the answer not in the manual?
Questions and answers