Table of Contents
Advertisement
Available languages
Available languages
Operator's Manual
®
PRESSU
7.0 HORSEPOWER
2800 PSI
2.5 GPM
Model No. 580.752370
WASHE
HOURS:
Mort. - Fri. 8 a.m. to 5 p.m. (CT)
!_!Ji WARNING
Before using this product, read this
manual and follow all Safety Rules
and Operating Instructions.
[[i! ' ADVERTENCIA
Antes de utilizar el producto, lea este
manual y siga todas las Reglas de
Seguridad e Instrucciones de Uso.
Sears, Roebuck
and Co., Hoffman
Estates,
IL 60179
U.S.A.
Visit our Craftsman
website:
www.craftsman.com
Pall No. 200031G S Draft 0 (03,0?,2006)
•
Safety
,
Assembly
•
Operation
•
Maintenance
•
Parts
•
Espafiol,
p, 30
0 J!JJ!
Advertisement
Table of Contents

Subscribe to Our Youtube Channel
Related Manuals for Craftsman 580.752370


Summary of Contents for Craftsman 580.752370
- Page 1 Reglas de • Espafiol, p, 30 and Operating Instructions. Seguridad e Instrucciones de Uso. 0 J!JJ! Sears, Roebuck and Co., Hoffman Estates, IL 60179 U.S.A. Visit our Craftsman website: www.craftsman.com Pall No. 200031G S Draft 0 (03,0?,2006)
- Page 2 Washer fails due to a defect in material or workmanship within one year from the date of purchase, return it to any Sears store or Parts & Repair Center or other Craftsman outlet in the United States for free repair (or replacement if repair proves impossible).
- Page 3 WARNING WARNING The engine exhaust from this product contains chemicals known to the State of California to cause cancer, birth defects, or other reproductive harm. WARNING WHEN ADDING OR DRAINING FUEL Turn pressure washer OFF and let it cool at least 2 minutes before removing...
- Page 4 WARNING WARNING Always wear safety goggles when using this equipment or in vicinity of where equipment is in use. Before starting the pressure washer, be sure you are DO NOT touch hot surfaces and avoid hot exhaust gases. wearing adequate safety goggles.
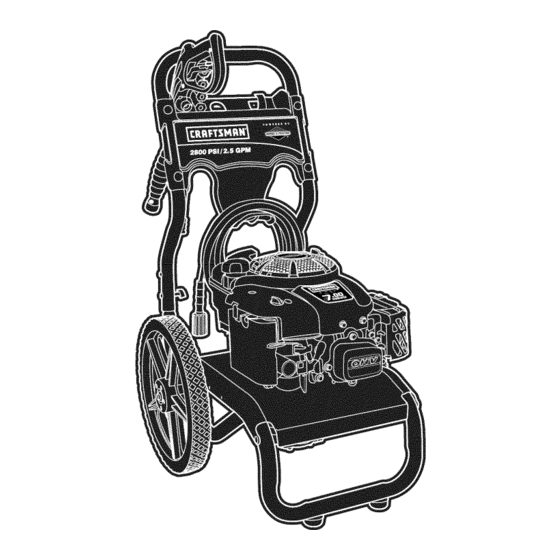
- Page 5 KNOW YOUR PRESSURE WASHER Read the Operator's Manual and s afety rules before operating your pressure washer, ......Compare the illustrations with your pressure washer to familiarize yourself with the locations of various controls and adjustments, Save this manual for future reference, Spray Gun Nozzle Extension with Quick Connect...
- Page 6 ASSEMBLING YOUR PRESSURE readyforuseonlyafterit hasbeenproperly serviced WASHER withtherecommended oil andfuel. Your Craftsman high pressure washer was mostly if you have any problems with the assembly assembled at the factory. However, you will need to your pressure washer, please call the pressure perform these tasks before you can operate your washer helpline at 1-800-222-3136.
- Page 7 3. Placeaccessory t rayoverholesonhandle Add Fuel (viewing fromfrontof unit).Pushtreeclipsinto NOTE: This gasoline engine is certified to operate on holesuntiltheysitflatagainst a ccessory t ray. gasoline. Exhaust Emission Control System: EM (Engine Modifications). WARNING WHEN ADDING FUEL Turn pressure washer OFF and let it cool at least 2 minutes before fuel cap.
- Page 8 Connect garden hose (not to exceed 50 feet in Connect Hose and Water Supply to Pump length) to water inlet. Tighten by hand. iMPORTANT: To avoid pump damage, you must assemble the nozzle extension to the spray gun and CAUTION attach all hoses before you start the engine.
- Page 9 HOW TO USE YOUR PRESSURE To Start Your Pressure Washer WASHER To start your engine-powered pressure washer for the first time, follow these instructions step-by-step. This If you have any problems operating your pressure starting information also applies whenever you start washer, please call the pressure washer helpline at the engine after you have let the pressure washer sit 1-800-222-3136.
- Page 10 10.Movethrottle leverto"Fast"position, shown here 14. When engine starts, slowly move choke knob to asa rabbit. "Run" position as engine warms. If engine falters, move choke knob to "Choke" position, then to "Run" position. 15. After each starting attempt, where engine fails to Throttle Lever in run, always point gun in safe direction and "Fast"...
- Page 11 Pull back collar on quick-connect and pull current to Use Accessory Tray spray tip off. The unit is equipped with an accessory tray with places to store your spray gun and nozzle extension. Select desired spray tip: There is also a hook at the front of the accessory tray •...
- Page 12 4. Makesureblackdetergent spraytip is installed. Apply a high pressure spray to a small area and then check the surface for damage. If no damage is NOTE: D etergent cannot b eapplied withthe high found, you can assume it is okay to continue rinsing. pressure nozzles (White, G reen, Y ellowor Red).
- Page 13 ENGINE TECHNICAL INFORMATION PRODUCT SPECIFICATIONS This is a single cylinder, overhead valve (OHV), air Pressure Washer Specifications cooled engine. It is a low emissions engine. Max Outlet Pressure ..2,800 PSI In the State of California, Model Series 120000 Max Flow Rate ..... 2.5 GPM engines are certified by the California Air Resources Chemical Mix ....
- Page 14 OWNER'S RESPONSIBILITIES Follow the hourly or calendar intervals, whichever occurs first. More frequent service is required when operating in adverse conditions noted below. MAINTENANCE SCHEDULE FILL IN DATES AS YOU SERVICE DATES COMPLETE REGULAR SERVICE SERVICE DATES Before Every I00 MAINTENANCE TASK Hours or...
- Page 15 Check In-Line Filter CAUTION Refer to the illustration and service the in-line filter if it becomes clogged, as follows: DO NOT insert any slots. • objects through cooling In-line Filter • Use a damp cloth to wipe exterior surfaces clean. •...
- Page 16 Reinstall spray tip and in-line filter into nozzle extension. Oil Recommendations Reconnect nozzle extension to spray gun. NOTE: When adding oil to the engine crankcase, use Reconnect water supply, turn on water, and start only high quality detergent oil rated with API service engine.
- Page 17 Changing Engine Oil Service Air Cleaner Change engine oil after the first 5 hours and every Your engine will not run properly and may be 50 hours thereafter. If you are using your pressure damaged if you run it with a dirty air cleaner. washer under extremely dirty or dusty conditions, or in Service the air cleaner once every 25 hours of extremely hot weather, change oil more often.
- Page 18 Service Spark Plug WARNING Service the spark plug every 100 hours of operation or yearly, whichever occurs first. Clean area around spark plug. Remove and inspect spark plug. Replace spark plug if electrodes are worn, or if insulator is cracked or chipped. For replacement use either the standard resistor DO NOT touch hot surfaces and avoid hot exhaust gases.
- Page 19 AFTER EACH USE Store unit in a clean, dry area. If storing for more than 30 days see "Long Term Water should not remain in the unit for long periods of time. Sediments or minerals can deposit on pump Storage" on next page. parts and "freeze"...
- Page 20 LONG TERM STORAGE Protect Pump To protect the pump use Sears pump saver to prevent If you do not plan to use the pressure washer for more freeze damage and lubricate pistons and seals. than 30 days, you must prepare the engine and pump for long term storage.
- Page 21 Problem Cause Correction Low pressure spray tip installed. Replace spray tip with high pressure spray tip. Water inlet is blocked. Clear inlet, Inadequate water supply, Provide adequate water flow, Inlet hose is kinked or leaking, Straighten inlet hose, patch leak, Pump has following problems: Check and clean inlet hose...
- Page 22 CRAFTSMAN 2800 PSi Pressure Washer 580.752370 Main Unit m Exploded View and Parts List Part # item Part # Description item Description 192050GS E-RING 200159GS ASSY, Base M199108GS HANDLE B2203GS KIT, Handle Connector 192310GS 200160GS ASSY, Billboard/Decals KIT, Vibration Mount...
- Page 23 CRAFTSMAN 2800 PSi Pressure Washer 580.752370 Pump m Exploded View and Parts List ½ item Part # item Part # Description Description 190571GS 189971GS CAP, Oil KIT, CHEMICAL HOSE 190574GS MANIFOLD 193971GS KIT, PIPE FITTING 190578GS 193972GS KIT, UNLOADER SEAT...
- Page 24 ENGINE, 7 HP, Briggs and Stratton, 12G612 = E×ploded View _1034 1029 1026 6150 GASKET 1022_ 993__ ls8 2o_...
- Page 25 ENGINE, 7 HP, Briggs and Stratton, 12G612 - E×ploded View 633 G 692 _ 968_ 8321_ _36A 287_ 883 _ CARBURETOR GASKET 334 _' 524_ 163_ 633AG...
- Page 26 ENGINE, 7 HP, Briggs and Stratton, 12G612 = E×ploded View 121 CARBURETOR OVERHAUL 592 ® ..689 o 305_ 592 ® ENGINE GASKET 32,, 1005_...
- Page 27 ENGINE, 7 HP, Briggs and Stratton, 12G612 = Parts List Item Part# Description Item Part # Description 697893 Cylinder Assembly 695161 Cup-Flywheel 399269 Bushing/Seal Kit (Magneto Side) 690662 Nut (Flywheel) 299819 Oil Seal 802574 Armature-Magneto 498983 Engine Sump 691061 Screw (Magneto Armature) 895276...
- Page 28 Sears, Roebuck and Co., U.S.A.(Sears), the California Air Resources Board (CARE3) and the United States Environmental Protection Agency (U.S.EPA) Emissions Control System Warranty Statement (Owner's Defect Warranty Rights and Obligations) The California Air Resources Board (CARB), U.S. EPA and Fuel Metering System Sears are pleased...
- Page 29 Emissions Durability Period and Air Index Emissions Compliance Period On Engine Information On Your Engine Emissions Label Emissions Compliance Label Engines that are certified to meet the California After July 1,2000 certain Sears engines will be certified Resources Board (CARB) Tier 2 Emission Standards must...
- Page 30 Sears, punto de venta de Craftsman o centro de reparacion y repuestos de Sears de los Estados Unidos...
- Page 31 ADVERTENCIA ADVERTENCIA El escape del motor de este producto contiene elementos quimicos reconocidos en el Estado California per producir c_ncer, defectos de nacimiento u otros daSos de ripe reproductive. ADVERTENCIA Opere el lavadora de presi6n SOLAMENTE al mire tibre. Aseg0rese de que los gases de escape no puedan entrar per ventanas, puertas, tomas de mire de ventilaci6n u otras CUANDO...
- Page 32 ADVERTENCIA ADVERTENCIA Utitice siempre gafas de proteccidn cuando utilice este equipo o si se encuentra cerca de donde se esta utilizando. Antes de poner en marcha la timpiadora a presi6n, asegt_rese de Ilevar gafas de proteccidn adecuadas. PRECAUCION NO toque tas superficies calientes y evite los gases det escape a atta temperatura.
- Page 33 CONOZCA SU MAQUINA LAVADORA DE ALTA PRESiON Lea el manual del operario y las reglas de seguridad antes de poner en marcha su sistema de limpieza..Compare las ilustraciones con su sistema de limpieza para familiarizarse con las ubicaciones de los diferentes centreles y ajustes.
- Page 34 La gran mayoria de su maquina lavadora a presion Si tiene problemas el ensamble de su m_quina Craftsman ha sido ensamblada en la fabrica. Sin embargo, lavadora a presi6n, Ilarne a la linea de ayuda de la usted deber&...
- Page 35 Coloque la bandeja de accesorios sobre los orificios Agregue Gasolina ass (vista desde la parte delantera de la unidad). NOTA: Este motor est& certificado pars funcionar Presione las pinzas de &rbol pars introducirlas en los gasolina, Sistema de control de emisiones de gases de orificios hasta...
- Page 36 Conecte la manguera de jardin (no exceder 50 pies en Conecte la Manguera y el Suministro Agua a la Bomba la Iongitud) a la entrada del agua. Apriete con la mano. PRECAUCION IMPORTANTE: Usted debera conectar todas las mangueras antes de darle arranque al motor.
- Page 37 COMO USAR SU MAQUINA Arranque a C6mo Darle su M_quina LAVADORA A PRESION a Presi6n Lavadora Para darle arranque a su m&quina lavadora a presi6n Si tiene problemas operando su maquina lavadora movida a motor por primera vez, siga estas instrucciones presion, por favor...
- Page 38 10. Mueva el control de la v&lvula de regulacion a la Cuando arranque el motor, mueva lentamente la perilla posicion "Rapido" ("Fast"), que se distingue con la del cebador a la posicion "En marcha" ("Run"). Si el figura de un conejo. motor falla, mueva la perilla del cebador a la posicion...
- Page 39 Coloque la pistola rociadora en el orificio situado a la ADVERTENCIA derecha de la bandeja de accesorios. Cuelgue la manguera de alta presion del gancho situado en la parte delantera de la bandeja accesorios, como se muestra. C6mo Usar las Puntas de Rocio La conexi6n rapida...
- Page 40 Limpieza y Aplicaci6n del Detergente Seleccione e instale la boquilla de alta presi6n desee siguiendo las instrucciones de "Como Usar las IMPORTANTE: Utilice detergentes diseSados Puntas de Rocio". especificarnente para m_quinas lavadoras a presi6n. Mantenga la pistola de rociado a una distancia segura detergentes caseros...
- Page 41 INFORMACION TECNICA SOBRE EL ESPECIFICACIONES MOTOR PRODUCTO El motor es de uno cilindros, de v&lvulas en cabeza (OHV), Espec!f!caciones de la M_quina Lavadora refrigerado por aire y de baja emisi6n. a P'res|on En el Estado de California, los motores de la serie 120000 Presion de salida...
- Page 42 RESPONSABILIDADES DEL PROPIETARIO Siga el programa de mantenimiento seg0n el nOmero de horas o segQn el calendario, Io que suceda primero. Se requiere de servicio con mayor frecuencia cuando opere la unidad en las condiciones adversas descritas a continuacion. CALENDARIO DE MANTENIMIENTO ANOTE LAS FECHAS CONFORME...
- Page 43 Revise el Filtro en Linea MANTENIMIENTO DE LA MAQUINA LAVADORA A PRESION Consulte la ilustracion y suministre servicio al filtro en linea si se tapa siguiendo estos pasos: Limpie Residuos Filtro en Linea Limpie a diario, o antes de cada uso, los residues acumulados en el lavadora...
- Page 44 Aceite Instale de nuevo la puntas de rocio yen el filtro en-linea en la extension. Recomendaciones sobre el aceite Conecte de nuevo la extension de la boquilla a la pistola rociadora. NOTA: Cuando agregue aceite al compartimiento del motor, utilice Onicamente aceite detergente de alta calidad, designado...
- Page 45 Adici6n de Aceite del Motor Servicio del Depurador de Aire Coloque el lavadora a presion sobre una superficie Su motor no funcionara adecuadamente y puede daSarse nivelada. usted Io hace funcionar con un depurador de aire sucio. Compruebe el nivel de aceite tal como se indica en la Suministre...
- Page 46 Remplace la Bujia ADVERTENClA Remplace la bujia anualmente o cada 100 horas de operacion. Limpie el &rea alrededor de la bujia y retirela. Retire y revise la bujia. Para el uso del reemplazo o el bujia uniforme de la chispa de reostato, el Champion RCI2YC...
- Page 47 DESPUES DE CADA USO Almacene la unidad en una area iimpia y seca. Si pianea almacenar la unidad por mas de 30 dias, vea No debera haber agua en la unidad por largos periodos la seccion "Almacenamiento Prolongado" en proxima tiempo.
- Page 48 ALMACENAMIENTO PROLONGADO Protecci6n de la Bomba A protege al salvador de bomba de uso de bomba Sears Si usted no planea usar la m&quina lavadora a presion previene congelar el daSo y lubrica embolos y sellos. m&s de 30 dias, debera preparar el motor para un...
- Page 49 Problema Causa SoluciSn Esta usando la boquilla de baja presi6n Cambie la boquilla a una de las cuatro (negra). boquilla de alta presion. La entrada de agua est& bloqueada. Limpie la entrada. Suministro de agua inadecuado. Proporcione flujo de agua adecuado.
- Page 50 Sears, Roebuck and Co., U.S.A. (Sears), California Resources Board (Consejo de Recursos sobre el Aire de California, BARB, por sus siglas en ingles) y United States Environmental Protection Agency (Agencia de Protecci6n Ambiental de EE.UU., EPA, por sus siglas en ingles). Declaraci6n de garantia del sistema...
- Page 51 Informaci6n Sobre el Periodo Periodo de Cumplimiento de la Normativa Durabilidad de las Emisiones y el indice de Emisiones en la Etiqueta Curnplimiento de Emisiones del Motor de Aire en la Etiqueta de Emisiones Motor Desde el 1 de julio de 2000, algunos motores Sears...
- Page 52 _::__________#IIIII_IIIIIIHI_:_I_ _iiiiiH_:_ _HiiiiiHiiH_H#iiiiH_'_ [i_i[[[[ii[[[!![[[ii[[[ii[[[ii[[[ii[[i _:_Uiiiiii[[!!ii!!iiiiiiiiii[[iiii [i_i[[[%[ii[[[ii[[[[i[[! %[[iiiiii_ii[[!!iiii[[ Your Home Forrepair-inyourhome -of all majorbrandappliances, lawn and garden equipment, or heating and cooling systems, nomatterwhomadeit, nomatterwhosoldit! ...... Forthereplacementparts, accessoriesand ..... owner'smanualsthatyou needtodo-it-yourself......For Sears professional installation of home appliances anditemslikegaragedooropenersandwaterheaters. 1-800-4-MY-HOME ®...
Need help?
Do you have a question about the 580.752370 and is the answer not in the manual?
Questions and answers
Where do I connect the tube for detergent?
Place the filter end of the detergent siphoning tube into the detergent solution.
This answer is automatically generated